B0657 : Pixter 2.0 - US - Mattel
B0657 : Pixter 2.0 - US - Mattel
B0657 : Pixter 2.0 - US - Mattel

Create successful ePaper yourself
Turn your PDF publications into a flip-book with our unique Google optimized e-Paper software.
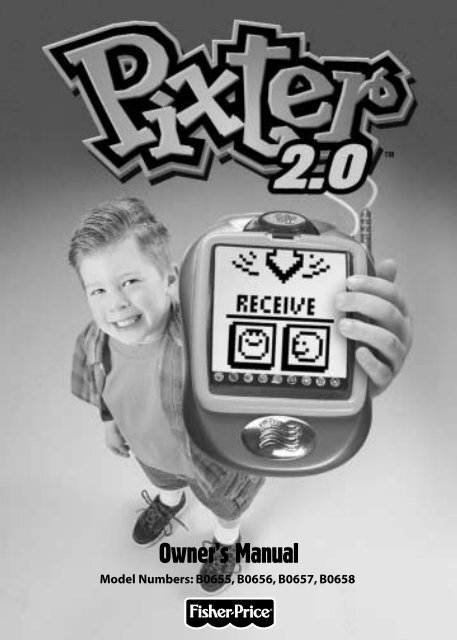
Owner’s Manual<br />
Model Numbers: B0655, B0656, <strong>B0657</strong>, B0658
TM<br />
<strong>Pixter</strong> Creativity Computer<br />
Software Cartridge<br />
Software cartridge not<br />
included (sold separately).<br />
Software Port<br />
Insert a software cartridge<br />
(sold separately) into this slot.<br />
Signal Dome<br />
Send and receive messages<br />
from another <strong>Pixter</strong> <strong>2.0</strong> unit<br />
(sold separately)<br />
Light Port<br />
(Flexible screen light<br />
sold separately)<br />
Contrast Dial<br />
Rotate to make<br />
the image on<br />
the screen<br />
darker or lighter.<br />
Power Switch<br />
Slide the power<br />
switch to turn the<br />
toy on or off. When<br />
not in use, this toy<br />
automatically turns<br />
off after about<br />
three minutes.<br />
Drawing Stylus<br />
Touch Sensitive Screen<br />
Calibration Hole<br />
(on back of toy)<br />
You must calibrate the<br />
stylus and screeen<br />
before first-time use.<br />
2<br />
Stylus Storage<br />
Tool<br />
Menu<br />
Speaker
Before you begin, take note!<br />
• Please keep this manual for future reference, as it contains important<br />
information.<br />
• Adult assembly is required to install batteries.<br />
• Tool needed for battery installation: Phillips screwdriver (not included).<br />
• Requires four “AA” (LR6) alkaline batteries for operation (not included).<br />
• Replace batteries when:<br />
- Display on the screen becomes difficult to see.<br />
- Toy functions erratically.<br />
- Sounds become faint or there are no sounds at all.<br />
• Use only the drawing stylus on the screen. Never use any other object,<br />
such as a regular pen or pencil, on the screen. Markings from regular pens<br />
or pencils cannot be removed and will damage the screen.<br />
• Be sure to turn <strong>Pixter</strong> TM power off before inserting a software cartridge<br />
(sold separately) into the software port. Turn <strong>Pixter</strong> power back on to play!<br />
IMPORTANT! You must calibrate the stylus to the screen before<br />
first-time use.<br />
<br />
• Install four “AA” alkaline batteries. Turn <strong>Pixter</strong> power on. Wait until you<br />
see the Home Screen.<br />
• Turn <strong>Pixter</strong> over and locate the calibration hole.<br />
• Insert, push and hold the stylus in the calibration hole. Turn <strong>Pixter</strong> over so that<br />
you can see the screen. When you see two plus signs remove the stylus<br />
from the calibration hole.<br />
• First touch the upper right corner with the tip of the stylus.<br />
• Then, touch the lower left corner with the tip of the stylus.<br />
3
Touch an activity on the<br />
screen with the stylus.<br />
Awesome Activities<br />
Choose a fun activity from the Home Screen.<br />
4<br />
Touch the tool menu Home<br />
Screen with the stylus.
Awesome Activities<br />
Freestyle Drawing Scene Starters<br />
• Use any of the cool tools to<br />
make your own creation:<br />
“Pencil” Tool<br />
Straight Line<br />
Shape Maker<br />
Stamp It<br />
Special Effects Selector<br />
• Touch the arrows on the bottom<br />
of the screen with the stylus to<br />
scroll through choices.<br />
• When you find a scene that you like,<br />
touch the screen with the stylus.<br />
• Use any of the tools to make<br />
the scene!<br />
Face Templates Connect-the-Dots<br />
• Touch the arrows on the bottom<br />
of the screen with the stylus to<br />
scroll through each funny face.<br />
• When you find a face that<br />
you like, touch the screen<br />
with the stylus.<br />
• Finish the face using any of<br />
the tools.<br />
• Touch the arrows on the bottom<br />
of the screen with the stylus<br />
to scroll through each pattern.<br />
Can you guess what it will be?<br />
• When you find a pattern that you<br />
like, touch the screen with the stylus.<br />
• Connect the dots to see if you<br />
were right!<br />
Hint: When you finish a drawing, you can Erase It (touch ), Full Screen<br />
Erase (touch ), Save It or Send It! (touch ) or go back to the Home Screen<br />
(touch ). Please refer to the instructions in the Tool Menu section for more<br />
details about using each of these tools.<br />
5
Tool Menu<br />
After you choose an activity from the Home Screen, choose a tool!<br />
Touch the tool with the stylus.<br />
“Pencil” Tool<br />
Straight Line<br />
Touch for freestyle drawing or writing.<br />
Create your own drawing or write a message with<br />
the stylus.<br />
Touch to make straight lines.<br />
Now, choose the thickness for your “pencil” tool.<br />
Touch the screen with the stylus, drag it and stop.<br />
Look – a straight line!<br />
Hint: Make your own shapes or create your own<br />
connect-the-dots.<br />
6
Shape Maker<br />
Stamp It<br />
Touch to make shapes.<br />
Tool Menu<br />
Now, choose the shape – triangle, circle, square/<br />
rectangle or make your own shape!<br />
Touch the screen and drag the stylus to make small or<br />
large shapes.<br />
Hint: To make a triangle, touch the screen and drag the<br />
stylus to make the base of the triangle. Then, touch the base<br />
line with the stylus and drag it to complete the triangle.<br />
Touch for stamper art.<br />
Touch the arrows on the bottom of the screen<br />
with the stylus to scroll through stamper designs.<br />
Touch the screen with the stylus to choose a stamper.<br />
Touch the screen as many times as you like with the<br />
stylus for lots of stamper fun!<br />
Hint: Choose more than one stamper to make a picture!<br />
Simply touch the Stamp It tool ; touch the arrows to<br />
scroll through the different stampers; and touch the<br />
screen with the stylus to choose a stamper. Look – you’re<br />
back to your picture. Use the new stamper in your picture.<br />
7
Erase It<br />
Full Screen Erase<br />
Tool Menu<br />
Touch to make your stylus an eraser.<br />
Now, choose a thickness for the eraser.<br />
Use your stylus to erase any part of what’s<br />
on the screen.<br />
Touch to choose an animated full screen erase with<br />
cool sound effects.<br />
Choose from four differents screens. Touch the<br />
screen with the stylus and watch and listen as<br />
your picture disappears.<br />
Hint: After using the full screen erase, you’re still in<br />
the same activity using the tool you used before you<br />
erased the screen.<br />
8
Special Effects Selector<br />
Tool Menu<br />
Touch to choose a special effect.<br />
Switch from white to black or black to white;<br />
rotate it, mirror it, fill in a selected drawing area<br />
or write a caption.<br />
White to Black/Black to White/Rotate/Mirror Tool<br />
Touch the screen with the stylus and watch<br />
the special effect.<br />
Quick-Paint Tool<br />
To fill in a selected drawing area, select the area.<br />
Watch the selected area fill in.<br />
Typing Tool<br />
To create your own caption, touch each letter of<br />
each word with the stylus. Touch the bottom of<br />
the screen with the stylus. You’re back to your<br />
creation. Touch the screen with the stylus to<br />
“stamp” your caption on the screen.<br />
9
Save It or Send It<br />
(Add a Subject Line to your<br />
message and Adjust the Volume too)<br />
Touch this tool to save or retrieve your drawing,<br />
send a message, add a subject line to your message<br />
or adjust the volume.<br />
Save It<br />
Touch the IN file to save; touch the<br />
OUT of file to retrieve; touch the<br />
volume control to increase or decrease<br />
sound to a comfortable level.<br />
Hints:<br />
- You can save one picture at a time! Each time you save a picture,<br />
it replaces the one already there.<br />
- After you save a picture, it will appear on your screen again.<br />
To make a new picture, choose another activity.<br />
Add a Subject Line to Your Message<br />
To create a subject line for messages, touch each<br />
letter of each word with the stylus. When you<br />
are finished, touch the screen. Your subject line<br />
is automatically stored.<br />
Send It<br />
To send a picture or message, make sure the receiver<br />
(the other <strong>Pixter</strong> <strong>2.0</strong> unit) is no more than five feet<br />
away and signal domes are aligned! Touch the on<br />
the screen to send your message.<br />
To receive a message touch the nodding yes face<br />
on the screen.<br />
Message Tips<br />
• Make sure the signal dome on each <strong>Pixter</strong> <strong>2.0</strong> unit is in a direct<br />
line and no more than five feet away.<br />
• Make sure the path between the signal domes is free of obstacles.<br />
• For best performance, avoid using in areas of bright light.<br />
10
Home<br />
Tool Menu<br />
Touch to go back to the Home Screen.<br />
Choose an activity: Freestyle Drawing,<br />
Scene Starters, Face Templates or Connect-the-Dots!<br />
11
• Locate the battery compartment<br />
on the back of the toy.<br />
• Loosen the screws in the<br />
battery compartment door<br />
with a Phillips screwdriver.<br />
• Lift to remove the battery<br />
compartment door.<br />
Battery Installation<br />
Battery Compartment<br />
1.5V x 4<br />
“AA” (LR6)<br />
Shown Actual Size<br />
• Insert four “AA” (LR6) alkaline batteries as indicated inside the battery<br />
compartment.<br />
Hint: We recommend using alkaline batteries for longer battery life.<br />
• Replace the battery compartment door and tighten the screws with<br />
a Phillips screwdriver. Do not over-tighten.<br />
12
Battery Tips<br />
• Do not mix old and new batteries.<br />
• Do not mix different types of batteries: alkaline, standard (carbon-zinc)<br />
or rechargeable (nickel-cadmium).<br />
• Remove the batteries during long periods of non-use. Always remove<br />
exhausted batteries from the toy. Battery leakage and corrosion can<br />
damage this toy. Dispose of batteries safely.<br />
• Do not dispose of batteries in a fire. The batteries may explode or leak.<br />
• Never short circuit the battery terminals.<br />
• Non-rechargeable batteries are not to be recharged.<br />
• Only batteries of the same or equivalent type as recommended in the<br />
“Battery Installation” instructions are to be used.<br />
• If removable rechargeable batteries are used, they are only to be<br />
charged under adult supervision.<br />
• Rechargeable batteries are to be removed from the toy before they<br />
are charged.<br />
• If you use a battery charger, it should be examined regularly for<br />
damage to the cord, plug, enclosure and other parts. Do not use a<br />
damaged battery charger until it has been properly repaired.<br />
Care<br />
• Keep water, sand and dirt off of this toy.<br />
• Keep this toy away from direct sunlight and excessive heat.<br />
• Wipe this toy with a clean cloth dampened with a mild soap and<br />
water solution. Do not immerse this toy.<br />
• This toy has no consumer serviceable parts. Please do not take this<br />
toy apart.<br />
• Do not drop this toy on a hard surface.<br />
13
Mark on Screen<br />
Calibrating the Stylus<br />
<br />
Tip of<br />
Stylus<br />
IMPORTANT!<br />
From time to time, the mark made<br />
on your screen from the stylus and<br />
the location of the tip of the stylus<br />
may not align. When this happens,<br />
you must calibrate the stylus.<br />
• Turn <strong>Pixter</strong> TM over and locate the calibration hole.<br />
• Insert, push and hold the stylus in the calibration hole. Turn <strong>Pixter</strong> over<br />
so that you can see the screen. When you see two ,you can remove the<br />
stylus from the calibration hole.<br />
• First touch the upper right corner with the tip of the stylus.<br />
• Then, touch the lower left corner with the tip of the stylus.<br />
14
One (1) Year Limited Warranty<br />
Fisher-Price, Inc., 636 Girard Avenue, East Aurora, New York 14052 warrants<br />
<strong>Pixter</strong> <strong>2.0</strong> is free from all defects in material and workmanship when used<br />
under normal conditions for a period of one (1) year from the date of purchase.<br />
Should the product fail to perform properly, we will repair or replace it at our<br />
option, free of charge. Purchaser is responsible for shipping the product to<br />
Consumer Relations at the address indicated above and for all associated freight<br />
and insurance cost. Fisher-Price, Inc. will bear the cost of shipping the repaired or<br />
replaced item to you. This warranty is void if the owner repairs or modifies<br />
the product. This warranty excludes any liability other than that expressly<br />
stated above including but not limited to any incidental or consequential<br />
damages.<br />
SOME STATES DO NOT ALLOW THE EXCL<strong>US</strong>ION OR LIMITATION OF<br />
INCIDENTAL OR CONSEQUENTIAL DAMAGES, SO THE ABOVE LIMITATION<br />
OR EXCL<strong>US</strong>ION MAY NOT APPLY TO YOU.<br />
THIS WARRANTY GIVES YOU SPECIFIC LEGAL RIGHTS, AND YOU MAY ALSO<br />
HAVE OTHER RIGHTS WHICH MAY VARY FROM STATE TO STATE.<br />
FCC Statement (United States Only)<br />
This equipment has been tested and found to comply with the limits for a Class B<br />
digital device, pursuant to part 15 of the FCC rules. These limits are designed<br />
to provide reasonable protection against harmful interference in a residential<br />
installation. This equipment generates, uses and can radiate radio frequency<br />
energy and, if not installed and used in accordance with the instructions, may<br />
cause harmful interference to radio communications. However, there is no<br />
guarantee that interference will not occur in a particular installation. If this<br />
equipment does cause harmful interference to radio or television reception,<br />
which can be determined by turning the equipment off and on, the user<br />
is encouraged to try to correct the interference by one or more of the<br />
following measures:<br />
- Reorient or relocate the receiving antenna.<br />
- Increase the separation between the equipment and receiver.<br />
- Connect the equipment into an outlet on a circuit different from that to which<br />
the receiver is connected.<br />
- Consult the dealer or an experienced radio/TV technician for help.<br />
Note: Changes or modifications not expressly approved by the manufacturer<br />
responsible for compliance could void the user’s authority to operate<br />
the equipment.<br />
15
Consumer Information<br />
Questions? We’d like to hear from you!<br />
Call Fisher-Price® Consumer Relations, toll-free at 1-800-432-KIDS,<br />
8 AM- 6 PM EST Monday through Friday. Hearing-impaired consumers<br />
using TTY/TDD equipment, please call 1-800-382-7470. Or, write to:<br />
Fisher-Price®<br />
Consumer Relations<br />
636 Girard Avenue<br />
East Aurora, New York 14052<br />
For other countries, outside the United States:<br />
Canada: call 1-800-567-7724, or write to: <strong>Mattel</strong> Canada Inc., 6155 Freemont Blvd.,<br />
Mississauga, Ontario L5R 3W2.<br />
Great Britain: telephone 01628 500303.<br />
Australia: <strong>Mattel</strong> Australia Pty. Ltd., 658 Church Street, Locked Bag #870, Richmond,<br />
Victoria 3121 Australia. Consumer Advisory Service 1300 135 312.<br />
New Zealand: 16-18 William Pickering Drive, Albany 1331, Auckland.<br />
Fisher-Price, Inc., a subsidiary of <strong>Mattel</strong>, Inc., East Aurora, NY 14052 U.S.A.<br />
©2002 <strong>Mattel</strong>, Inc. All Right Reserved. ® and designate<br />
U.S. trademarks of <strong>Mattel</strong>, Inc.<br />
Printed in China B0655-0920