Windmill-Powered Pump House - myLargescale.com
Windmill-Powered Pump House - myLargescale.com
Windmill-Powered Pump House - myLargescale.com

Create successful ePaper yourself
Turn your PDF publications into a flip-book with our unique Google optimized e-Paper software.
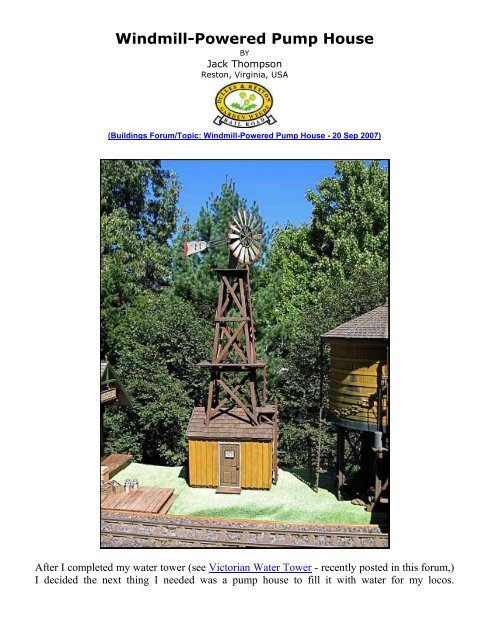
<strong>Windmill</strong>-<strong>Powered</strong> <strong>Pump</strong> <strong>House</strong><br />
BY<br />
Jack Thompson<br />
Reston, Virginia, USA<br />
(Buildings Forum/Topic: <strong>Windmill</strong>-<strong>Powered</strong> <strong>Pump</strong> <strong>House</strong> - 20 Sep 2007)<br />
After I <strong>com</strong>pleted my water tower (see Victorian Water Tower - recently posted in this forum,)<br />
I decided the next thing I needed was a pump house to fill it with water for my locos.
In the days before electricity was readily available, stationary steam engines were sometimes<br />
used to power the pumps that brought water up from below ground. If you were lucky enough<br />
to have a water source above your tower, then you could just let gravity do the job - but that<br />
wasn't often the case, particularly out on the pancake-flat Great Plains. There, the railroads<br />
often resorted to an abundant and (usually) reliable alternate power source - the wind. (They<br />
were "going green" long before it became PC.) BTW, if anybody's got any period photos of<br />
R.R. water-tank windmills, I'd love to see 'em posted here.<br />
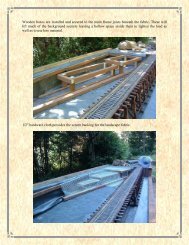
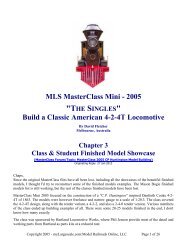
I had a bunch of cedar lying around, so I cut it into strip wood on my table saw and used that<br />
almost exclusively, except for castings from Schomberg Scale Models (door and frame),
Muella Scale Models (wind mill, motor and stand) and Grandt Line Products (windows) and<br />
some styrene tubing from Evergreen for the stove pipe. Here you see it all framed out.<br />
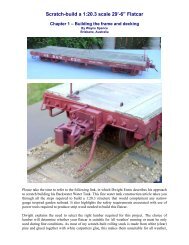
Here you see the finished product hooked up to the water tower in a "mock-up" I made of the<br />
depot area that will eventually be on my (yet-to-be-built) layout.
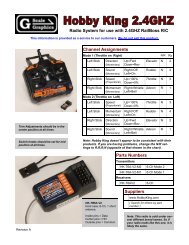
Another shot from "ground level."
A close-up of the front.
Here's the back and side with the coal-box for the stove - can't let that pump freeze up, <strong>com</strong>e<br />
winter.
This is the best windmill casting I've found so far - but I did add some extra detail (like wood<br />
grain, outer rim, etc.) I also installed sealed ball bearings on the blade wheel axle and the motor<br />
mount pivot.<br />
When I took it outside today (for the first time) to take these pictures, I was delighted with the<br />
windmill's performance. It turned into the wind and started spinning when it didn't even seem<br />
as if there was a breath of wind blowing. Boy, those ball bearings are great! (Hmmm, I wonder<br />
if I should put 'em on my truck wheels, too.)
Here are some additional close-ups of the roof, tower and platform details. BTW, I didn't use<br />
any plans or prototype photos - I just sorta made it up as I went along using, what I hope are,<br />
<strong>com</strong>mon sense and good engineering principles.
I was inspired by the tools in my photo-editing software to make this "old timey-looking"<br />
vignette.<br />
I will soon be posting some updated pix of the only other structure (so far, anyway) on my<br />
layout - Ft. Mallison Depot. Meanwhile, your questions and <strong>com</strong>ments on the above would be<br />
wel<strong>com</strong>e.<br />
Greg - Thanks for your postings of windmill-powered pumps for RR water tanks. They're<br />
great!
Here are a few more related images from my "collection":<br />
Not exactly a "prototype" but it does show that the manufacturers knew where their market<br />
was.
Anybody got any more?<br />
Thanks, everyone, for all the nice <strong>com</strong>ments.<br />
Now, to answer your questions:<br />
Robert - The doorknob is part of the casting, but I did enhance it a little with a blob of "J-B<br />
Weld", a two-part epoxy, to make it just a bit bigger.<br />
Bob M. - (and André) The sealed ball bearings look something like this to begin with:<br />
They can be found online from various sources (just Google "miniature ball bearings" or<br />
something like that) and in several sizes. I mounted one horizontally at the top of the mounting<br />
stand by drilling out the existing hole to the outside diameter of the bearing. The air motor has<br />
a vertical post (brass) that fits the bearing's inside diameter.<br />
For the blade wheel, I replaced the cast hub with the ball bearing assembly itself, gluing the<br />
spokes directly to the outer race of the bearing. It turns on a post made of brass tubing sticking<br />
horizontally from the motor.<br />
This shows you where to look in the bigger pictures on the previous page.
André - The board & batten siding is done just like the "real deal." I cut to size and glued (with<br />
"Titebond III") the vertical boards to the frame, then covered the interstices with the battens,<br />
also glued with Titebond. When they dried good 'n' tight, I sanded them even with an electric<br />
orbital pad sander.<br />
The wind motor doesn't actually work - no gears or anything like that. It just turns into the wind<br />
on its vertical axis and spins on its horizontal axis. Purely for show.<br />
I hope I answered your question about the ball bearings for you above.<br />
Jim - The overall height of the windmill - ground to tip - is 25.5 inches, which scales out to just<br />
over 43 feet.<br />
Hope that does it. Thank you again for your interest. If anyone else has other questions, don't<br />
hesitate to "fire away."<br />
Richard - Good question. I actually thought about installing some tin or copper flashing there,<br />
but eventually decided that would take more effort than it was worth. Besides, I really don't<br />
care if the roof leaks or not - there's nothing inside, not even a floor.<br />
As for leaving it outside, I'll probably bring it in during the winter, but it's built almost entirely<br />
from cedar and held together with brass nails and Titebond III glue (the water-proof kind,) so I<br />
think it'll be just fine outside for the most part. In fact, I hope it will get weathered to some<br />
extent.<br />
TJ, Greg, Joe (et al.) - I'm glad to hear your <strong>com</strong>ments and I'm very glad that what I've posted<br />
here has been of some value to you.<br />
I guess that's the main reason I do it. Sure, I like to show off my stuff and it's nice to get my ego<br />
stroked by the response (however, I'm certainly willing to take the hits as they <strong>com</strong>e, too,) but I<br />
remember how lost I felt not too long ago when I saw others' beautiful work and wondered how<br />
could I ever do things like that myself. In fact, I still feel like that, to some extent.<br />
If I can serve to inspire and/or instruct in any way by posting all this stuff here on MLS, then<br />
I'm entirely satisfied (and feel somewhat justified) in doing that. We're all here to help, and to<br />
learn from, each other, so "keep those cards and letters <strong>com</strong>ing in, folks." And don't hesitate to<br />
criticize as well as praise as you feel warranted. As I've said here before: if it's true you learn<br />
from your mistakes, then I've learned a lot, and I look forward to learning more.<br />
Nevertheless, thanks again for all your nice remarks.
Originally posted by, Vance Bass:<br />
OK, I know everyone is going to throw rocks at me, but I really do have one tiny criticism.<br />
The wood grain on the tail is wrong. They used sheet metal for those (although the casting is<br />
way too thick for sheet metal). But hey, who's going to be looking at that? I am a windmill<br />
fanatic and this is one of the best windmill models I've ever seen. And the first I've seen that<br />
models the pump house, too, which is a terrific addition.<br />
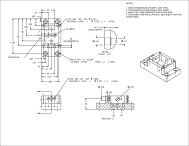
I have a CAD drawing of the stencil Aermotor used on the tail sail, if anyone's interested.<br />
You could easily make a decal of it, or just use it as a guide to painting the logo by hand.<br />
Vance:<br />
Thanks for pointing that out. If I had thought about it, I'd have realized that a thin sheet metal<br />
vane (or tail) would have been better. However, I had to work with what I had. If you take a<br />
look at the wheel arms (spokes) between the hub and the inner rim - to which the sails are<br />
attached - they're pretty crude, too.<br />
Nevertheless, the overall effect is good. It's still much better than the ubiquitous circle of tin<br />
with slits cut in it.<br />
Since you're never going to fool anybody into thinking it's real (the size, if nothing else, kinda<br />
gives it away,) any model only needs to create the right impression of the thing it represents<br />
and not necessarily be an exact miniature recreation of it.<br />
At least, that's the best rationalization I can <strong>com</strong>e up with for not detailing a model to the n-th<br />
degree. I can live with that.<br />
In case anybody is interested, this is the kind of thing Vance is talking about - what a typical<br />
"real" windmill should look like - the wheel, at any rate. It is very delicate and would take a<br />
master of the soldering iron (which I'm not) to create.
You can see that, in <strong>com</strong>parison, mine is really only a crude approximation. But, as I said<br />
above, it works for me.<br />
Steve,<br />
There are two definitions for the word "criticize" in the dictionary:<br />
1. To indicate the faults of someone or something in a disapproving way.<br />
2. To form and express a sophisticated judgment of a literary or artistic work.<br />
I definitely took Vance's <strong>com</strong>ments as an expression of the second kind. And I certainly respect<br />
his opinion.<br />
Since I was planning to go to Roger Cutter's open-house at his RGS East on Sunday, I had<br />
brought my recently renovated pump house/water tower "diorama" to reinstall on his layout.<br />
There was no room for it on Clem O'Jevich's Warrior Run Loco Works modular layout, so I put<br />
it over on the model contest table and filled out an entry form just so I'd have a place to keep it<br />
safe while at the show. To my astonishment, it not only took first place in the kit-bashed<br />
structures category (the water tower is from a Piko kit) but also took Best-in-Show! Go figure.
You may remember seeing this water tower and pump house in separate postings in these pages<br />
before. As mentioned above, the "Victorian" water tower is bashed from a Piko kit and I had<br />
built the pump house <strong>com</strong>pletely from scratch except for a Muella Scale Models<br />
windmill resin casting. Unfortunately, when I set in up on Roger's layout, the windmill caught<br />
the wind so well that it got blown over and when the spinning windmill wheel hit the deck, the<br />
blades went flying everywhere.<br />
The solution to this problem was to securely mount the water tower and pump house on a<br />
heavy concrete backer-board base and to recreate the windmill wheel and vane from brass. The<br />
"air motor" and its mount were used as a basis for the rebuild and the sealed ball bearing races<br />
for the swivel and the wheel hub were also reused.
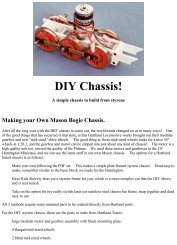
I found plans for a typical farm windmill online, scaled them out for my model, and used them<br />
as a "template" for the new wheel. Luckily, a slice from a copper plumbing elbow proved to be<br />
just the right diameter and thickness for the inner band. I cut the "sails" from thin sheet brass,<br />
clamped them all together and cut a slot through them all at once, about a third of the way from<br />
the ends, for the outer band. It was then a simple matter of bending a piece of brass bar stock<br />
into a circle of the proper diameter and using it to set the proper angle for each of the sails.
I then soldered the whole thing together. In this shot, the inner end of each blade, bent at a right<br />
angle, has not yet been trimmed off and the ball bearing hub has not yet been installed. The<br />
vane was constructed in a similar manner using the same sheet brass and L-shaped brass "angle<br />
iron."<br />
I guess while I'm at it, I should also congratulate all the other winners of the various categories<br />
in the contest. I must confess, it's gratifying to receive recognition for your work from your<br />
peers.