2011 Spicer Steer Axles Service Manual
2011 Spicer Steer Axles Service Manual
2011 Spicer Steer Axles Service Manual

You also want an ePaper? Increase the reach of your titles
YUMPU automatically turns print PDFs into web optimized ePapers that Google loves.
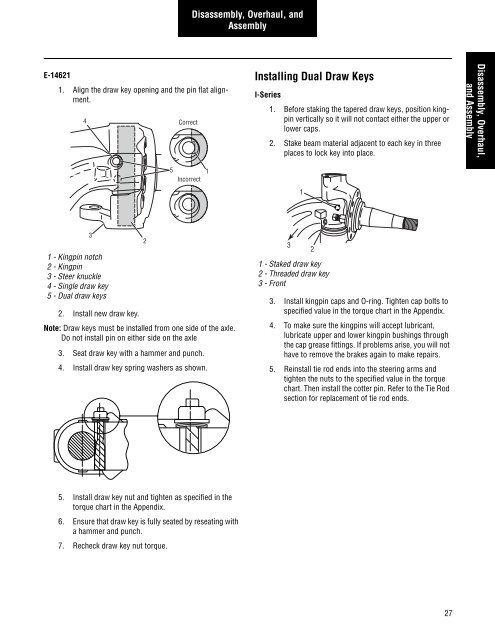
E-14621<br />
1. Align the draw key opening and the pin flat alignment.<br />
4<br />
3<br />
1 - Kingpin notch<br />
2 - Kingpin<br />
3 - <strong>Steer</strong> knuckle<br />
4 - Single draw key<br />
5 - Dual draw keys<br />
2. Install new draw key.<br />
Note: Draw keys must be installed from one side of the axle.<br />
Do not install pin on either side on the axle<br />
3. Seat draw key with a hammer and punch.<br />
4. Install draw key spring washers as shown.<br />
5. Install draw key nut and tighten as specified in the<br />
torque chart in the Appendix.<br />
6. Ensure that draw key is fully seated by reseating with<br />
a hammer and punch.<br />
7. Recheck draw key nut torque.<br />
2<br />
5<br />
Correct<br />
Incorrect<br />
Disassembly, Overhaul, and<br />
Assembly<br />
1<br />
Installing Dual Draw Keys<br />
I-Series<br />
1. Before staking the tapered draw keys, position kingpin<br />
vertically so it will not contact either the upper or<br />
lower caps.<br />
2. Stake beam material adjacent to each key in three<br />
places to lock key into place.<br />
3<br />
1 - Staked draw key<br />
2 - Threaded draw key<br />
3 - Front<br />
1<br />
2<br />
3. Install kingpin caps and O-ring. Tighten cap bolts to<br />
specified value in the torque chart in the Appendix.<br />
4. To make sure the kingpins will accept lubricant,<br />
lubricate upper and lower kingpin bushings through<br />
the cap grease fittings. If problems arise, you will not<br />
have to remove the brakes again to make repairs.<br />
5. Reinstall tie rod ends into the steering arms and<br />
tighten the nuts to the specified value in the torque<br />
chart. Then install the cotter pin. Refer to the Tie Rod<br />
section for replacement of tie rod ends.<br />
27<br />
Disassembly, Overhaul,<br />
and Assembly