work instructions – dana kit part number - Spicer
work instructions – dana kit part number - Spicer
work instructions – dana kit part number - Spicer

Create successful ePaper yourself
Turn your PDF publications into a flip-book with our unique Google optimized e-Paper software.
Removal/Disassembly<br />
Drum Removal<br />
1. Perform “Brake Maintenance Preliminary Steps”.<br />
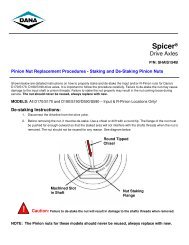
2. While depressing locking sleeve, back off brake adjuster<br />
adjustment nut on manual brake adjusters. Refer to<br />
Figure 4. Continue turning until shoes are fully returned to<br />
released position and clear of drum. On self adjusting<br />
brake adjusters, follow manufacturer’s <strong>instructions</strong>.<br />
NOTE: With outboard mounted drums go to step 6.<br />
! WARNING: Do not strike the axle shaft flange with a<br />
!<br />
Turn Adjuster Nut to<br />
Back-Off Adjustment<br />
Figure 4<br />
3. On drive axles, remove stud nuts and axle shafts. If used,<br />
remove Iockwashers and taper dowels. If necessary,<br />
loosen dowels by holding a brass drift in the center of the<br />
shaft head and striking it a sharp blow with a hammer. On<br />
trailer and steer axles, remove hub cap.<br />
hammer. Do not use chisels or wedges to loosen shaft or<br />
dowels.<br />
4. Remove axle spindle nut(s) and washer.<br />
5. While rocking drum, pull outboard enough to allow<br />
removal of outer wheel bearing.<br />
6. Remove drum by pulling outboard while rocking from side<br />
to side. If shoes are not clear of drum, return to Step 2<br />
above.<br />
CAUTION: If difficulty is found on removal, do not force<br />
drum. Excessive pulling force may damage brake<br />
components.<br />
06SE01TBC6298<br />
3