ECtemp 550 - Danfoss.com
ECtemp 550 - Danfoss.com
ECtemp 550 - Danfoss.com

You also want an ePaper? Increase the reach of your titles
YUMPU automatically turns print PDFs into web optimized ePapers that Google loves.
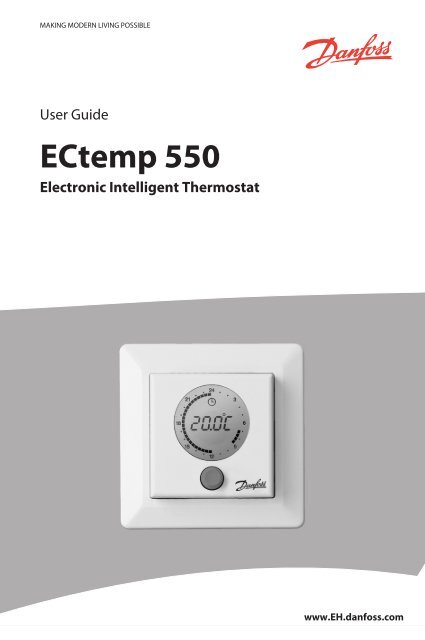
MAKING MODERN LIVING POSSIBLE<br />
User Guide<br />
<strong>ECtemp</strong> <strong>550</strong><br />
Electronic Intelligent Thermostat<br />
www.EH.danfoss.<strong>com</strong>
<strong>ECtemp</strong> <strong>550</strong><br />
Table of Contents<br />
1 Introduction . . . . . . . . . . . . . . . 4<br />
1.1 Safety Instructions . . . . . . . . 5<br />
2 Settings . . . . . . . . . . . . . . . . . 6<br />
2.1 Frost Protection . . . . . . . . . 8<br />
2.2 Time and Day of Week . . . . . . 9<br />
2.3 Periods with Lowering of Temperature<br />
. . . . . . . . . . . . . . . . 10<br />
2.4 Minimum Floor Temperature . . 14<br />
2.5 Safety Lock . . . . . . . . . . . . 15<br />
2.6 Turning the Thermostat On and<br />
Off . . . . . . . . . . . . . . . . . 16<br />
3 Saving Clock Settings (Backup Battery)<br />
. . . . . . . . . . . . . . . . . . . . 17<br />
4 Error Messages . . . . . . . . . . . . . 17<br />
5 Warranty . . . . . . . . . . . . . . . . . 18<br />
6 Disposal Instruction . . . . . . . . . . 19<br />
User Guide 3
1 Introduction<br />
<strong>ECtemp</strong> <strong>550</strong><br />
<strong>ECtemp</strong> <strong>550</strong> is an adaptive temperature controller specially<br />
designed for floor heating systems by using the built-in<br />
room sensor and an external floor sensor . It can, however,<br />
also be used for other heating systems (e.g. power heating<br />
units).<br />
The thermostat will measure the radiant temperature from<br />
the floor <strong>com</strong>bined with the air temperature in the room to<br />
<strong>com</strong>pensate for the outside weather condition. This means<br />
that <strong>ECtemp</strong> <strong>550</strong> will automatically adjust the heating to<br />
meet your <strong>com</strong>fort levels regardless of changing weather<br />
conditions shortly after the settings are set and the desired<br />
<strong>com</strong>fort temperature has been selected. A sudden temperature<br />
drop in the room will also be detected. Instead of immediately<br />
switching on the heating to <strong>com</strong>pensate, information<br />
is stored and a check will be made to detect whether<br />
this sudden drop of temperature may be caused by, for<br />
instance, a window that has been opened for 10 minutes.<br />
4 User Guide
<strong>ECtemp</strong> <strong>550</strong><br />
Even the programming of economy temperatures (i.e. lowering<br />
of temperature at night and when you are at work) is<br />
very simple. A calculation of the heating start is not needed<br />
to reach a specific temperature at a specific time. Just tell<br />
the <strong>ECtemp</strong> <strong>550</strong> when you want the <strong>com</strong>fort temperature,<br />
and the rest will happen automatically; by identifying the<br />
rate of heat loss from the room, <strong>ECtemp</strong> <strong>550</strong> knows when<br />
to start heating in order to achieve the selected temperature<br />
at the right time.<br />
1.1 Safety Instructions<br />
Please observe the following guidelines:<br />
▪ Do not cover the thermostat, e.g. by hanging towels or<br />
similar items in front of it! This will impair the ability of<br />
the thermostat to sense and adjust the room temperature<br />
correctly.<br />
▪ Do not spill liquids of any kind into the thermostat.<br />
▪ Do not open, disassemble, or tamper with the thermostat<br />
in any way.<br />
▪ If the thermostat is installed in a place frequented by<br />
small children, use the safety lock.<br />
▪ Do not interrupt the power supply to the thermostat.<br />
▪ The installation of the thermostat must be done by an<br />
authorized and qualified installer according to local<br />
regulations.<br />
User Guide 5
2 Settings<br />
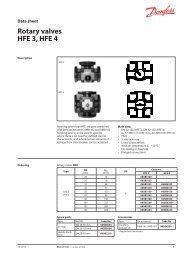
Using clear visual symbols, the display of the thermostat<br />
shows active and selected functions, the actual temperature<br />
and the time:<br />
<br />
<br />
<br />
<br />
<br />
<strong>ECtemp</strong> <strong>550</strong><br />
1. Symbol for frost protection.<br />
2. Numeric display of time, temperature, text, etc.<br />
3. Day of week.<br />
4. Flashing indication of actual time.<br />
5. Symbol for setting of time and day.<br />
6. Symbol for timer mode.<br />
7. Symbol indicating that the floor is being heated.<br />
8. Symbol for degrees.<br />
<br />
<br />
<br />
<br />
<br />
6 User Guide
<strong>ECtemp</strong> <strong>550</strong><br />
9. Safety lock.<br />
10. Economy periods (i.e. periods with lowering of temperature).<br />
Basic rules for changing thermostat settings<br />
Accessing different<br />
settings<br />
When you press and hold the button<br />
for a certain number of seconds,<br />
different layers of settings will<br />
appear.<br />
To increase a value Turn the button to the right (clockwise).<br />
To decrease a value Turn the button to the left (counterclockwise).<br />
To confirm a value<br />
or go to the next<br />
setting<br />
The unit of measurement<br />
for temperature<br />
Press the button once.<br />
The temperature is either shown in<br />
celsius degrees (5°C to 35°C) if a<br />
room sensor is used, or as a scale<br />
from 1 to 10 (where each step corresponds<br />
to approximately 5°C) if<br />
only a floor sensor is used .<br />
User Guide 7
Network installation<br />
If more <strong>ECtemp</strong> <strong>550</strong> thermostats have been installed, they<br />
may be connected in a network. If so, one of the thermostats<br />
is defined as the master unit controlling the time, day<br />
of week and lowering of temperature during economy periods<br />
for the other so-called slave units. This means that<br />
changes to these settings must be made on the master<br />
thermostat and will then automatically take effect on all<br />
"slave" thermostats.<br />
Please contact the electrician to find out if the thermostats<br />
in your house are linked in a network and, if so, ask which<br />
thermostat is configured as master unit.<br />
2.1 Frost Protection<br />
How to set the thermostat in frost protection mode<br />
1. Turn the button counter-clockwise until<br />
the temperature reaches +5°C (or 1<br />
if a scale from 1 to 10 is used).<br />
A frost symbol will now appear on<br />
the display.<br />
<strong>ECtemp</strong> <strong>550</strong><br />
8 User Guide
<strong>ECtemp</strong> <strong>550</strong><br />
2.2 Time and Day of Week<br />
The time and day of week is not set by default.<br />
How to set the time and day of week<br />
1. Press and hold the button for 3 seconds.<br />
The symbol for setting of time, the<br />
time and the number of the day in the<br />
week will be shown on the display<br />
2. Turn the button to the right or left.<br />
Every time the time passes 00:00, the day of week<br />
number will go 1 day up/down depending on which<br />
way you turn the button.<br />
The number you choose will be the day of the current<br />
day of the week, i.e. the numbers 1-7 do not correspond<br />
to any specific day. For example, if today is<br />
Tuesday and you select 2 on the display, Tuesday will<br />
correspond to number 2.<br />
3. Set the time correctly by turning the button.<br />
User Guide 9
4. When the right time is found, press the button once to<br />
save the settings.<br />
2.3 Periods with Lowering of Temperature<br />
With <strong>ECtemp</strong> <strong>550</strong> you have the possibility of either setting<br />
the thermostat to keep a constant temperature, or let the<br />
thermostat automatically switch between periods with a<br />
lower temperature (also called economy temperature) and<br />
periods with <strong>com</strong>fort temperature.<br />
By default, the thermostat is set to the following <strong>com</strong>fort<br />
periods:<br />
▪ Monday - Friday: 6:00 - 8:00 and 16:00 - 22:30.<br />
▪ Saturday - Sunday: 6:00 - 22:30.<br />
<strong>ECtemp</strong> <strong>550</strong><br />
In order to automatically switch between <strong>com</strong>fort temperature<br />
and economy temperature (e.g. when going to bed or<br />
to work), the timer function is used.<br />
The temperature will be lowered by a certain number of<br />
degrees <strong>com</strong>pared to the <strong>com</strong>fort temperature. By default<br />
this number is preset to -5°C.<br />
If the adaptive function is active (this is normally the case),<br />
you only need to select the time at which you require <strong>com</strong>fort<br />
and economy temperatures. The thermostat will then<br />
calculate when the heating should start in order to reach<br />
the desired temperature at the specified time.<br />
10 User Guide
<strong>ECtemp</strong> <strong>550</strong><br />
How to define <strong>com</strong>fort periods and economy periods<br />
Note: The markings on the clock ring indicate periods with<br />
<strong>com</strong>fort temperature and periods with economy temperature.<br />
The flashing point indicates the actual time of day. If<br />
at any point you make a mistake, rotate the dial counterclockwise<br />
to the first segment and press the button to clear<br />
the marking.<br />
1. Press and hold the button for 6 seconds.<br />
The symbol for timer setting and day<br />
of week numbers are shown.<br />
2. Turn the button clockwise until you<br />
reach the day of week and start time<br />
of the first <strong>com</strong>fort temperature period,<br />
e.g. day 1 at 06:00. Then press the<br />
button once to confirm the start time.<br />
User Guide 11
3. Turn the button clockwise until you<br />
reach the time at which the temperature<br />
should be lowered again, e.g.<br />
07:30. Then press the button once to<br />
confirm.<br />
4. Turn the button clockwise until you<br />
reach the time at which the <strong>com</strong>fort<br />
temperature is required again, e.g.<br />
15:30. Then press the button once to<br />
confirm.<br />
5. Turn the button clockwise until you<br />
reach time at which the temperature<br />
should be lowered again, e.g. 22:30.<br />
Then press the button once to confirm.<br />
<strong>ECtemp</strong> <strong>550</strong><br />
6. Turn the button clockwise. When you pass the midnight<br />
hour (00:00), the settings for the following day<br />
of the week can be made using the same procedure.<br />
7. Repeat Steps 3-6 until period settings for all seven<br />
days of the week are made.<br />
12 User Guide
<strong>ECtemp</strong> <strong>550</strong><br />
8. Hold the button for 3 seconds to save your settings<br />
and finish.<br />
The display will automatically return to normal display.<br />
How to turn the timer function on and off<br />
1. Press the button once to turn the timer function on or<br />
off.<br />
You may for instance want to turn the timer function<br />
off if a short extension of the <strong>com</strong>fort period is needed.<br />
You may also want to turn off the timer when a<br />
lowering of the temperature is required for a longer<br />
period, e.g. because of vacation.<br />
When switched on, a timer symbol is<br />
shown in the upper part of the display.<br />
An unbroken clock ring indicates that<br />
constant <strong>com</strong>fort temperature is<br />
maintained, i.e. the timer function is<br />
deactivated.<br />
User Guide 13
2.4 Minimum Floor Temperature<br />
Note: Minimum floor temperature only applies if the thermostat<br />
is configured to use a room and floor sensor (rFS<br />
mode) and only during <strong>com</strong>fort periods.<br />
1. Press and hold the button for 9 seconds.<br />
"MFt" (Minimum Floor Temperature)<br />
appears on the display.<br />
<strong>ECtemp</strong> <strong>550</strong><br />
2. Turn the button until you reach the desired minimum<br />
floor temperature. Then press the button shortly to<br />
confirm.<br />
The display returns to normal.<br />
The floor temperature is now kept above the specified<br />
lower limit.<br />
14 User Guide
<strong>ECtemp</strong> <strong>550</strong><br />
2.5 Safety Lock<br />
The safety lock is used for preventing undesirable changes<br />
of the thermostat settings.<br />
How to turn the safety lock on<br />
1. Press and hold the button while turning<br />
it counter-clockwise until "COdE"<br />
appears on the display. Then turn the<br />
button clockwise to select "0033".<br />
2. Press once to confirm and the safety<br />
lock symbol appears on the display.<br />
The safety lock is now on and the thermostat<br />
settings cannot be operated<br />
before the safety lock is switched off<br />
again.<br />
How to turn the safety lock off<br />
1. Press and hold the button while turning it counterclockwise<br />
until "COdE" appears on the display.<br />
2. Turn the button clockwise to select "0033".<br />
User Guide 15
3. Press once to confirm and the safety lock symbol disappears<br />
from the display.<br />
The safety lock is off and it is now possible to change<br />
the thermostat settings again.<br />
2.6 Turning the Thermostat On and Off<br />
Note: The thermostat is on by default. Before you can<br />
switch the thermostat off, the timer function must be deactivated.<br />
How to turn the thermostat off<br />
1. Make sure the timer function is turned off (solid black<br />
outer ring).<br />
2. Turn the button counter-clockwise until<br />
the temperature is below +5°C (or 1<br />
if the temperature is shown as a scale<br />
from 1 to 10) and keep turning until<br />
OFF appears on the display.<br />
How to turn the thermostat on<br />
<strong>ECtemp</strong> <strong>550</strong><br />
1. Turn the button clockwise until the temperature is<br />
above +5°C (or 1 if the temperature is shown as a<br />
scale from 1 to 10).<br />
16 User Guide
<strong>ECtemp</strong> <strong>550</strong><br />
3 Saving Clock Settings (Backup Battery)<br />
The backup battery saves time settings in case of power<br />
failure and recharges automatically when the mains supply<br />
is on again.<br />
The thermostat must be connected to continuous power<br />
supply. Do not interrupt the power supply to the thermostat.<br />
4 Error Messages<br />
<strong>ECtemp</strong> <strong>550</strong> has a built-in system that constantly checks<br />
the heating system, the thermostat itself and a possible<br />
network for any malfunctions.<br />
When an error occurs, the outer ring on the thermostat display<br />
flashes and one of the numbers normally indicating<br />
the day of week shows the error code.<br />
No Error What to do?<br />
2 Configured as Master,<br />
but another Master<br />
unit detected.<br />
3 Configured as a<br />
Slave, but cannot<br />
find any Master unit.<br />
Call an electrician (Only one<br />
unit may be configured as a<br />
Master).<br />
Call an electrician (One unit<br />
must be configured as Master).<br />
User Guide 17
4 The thermostat is<br />
switched off because<br />
of overheating.<br />
5 Sensor fault. Floor<br />
sensor is short circuit.<br />
6 Sensor fault. Floor<br />
sensor open circuit.<br />
7 Clock is not set. Set the clock.<br />
5 Warranty<br />
Call an electrician (Let the<br />
thermostat cool for a period.<br />
Then enter basic set-up to<br />
leave error mode).<br />
Call an electrician (Floor sensor<br />
must be checked and replaced<br />
if necessary).<br />
Call an electrician (Floor sensor<br />
must be checked and replaced<br />
if necessary).<br />
2<br />
Y E A R<br />
<strong>ECtemp</strong> <strong>550</strong><br />
18 User Guide
<strong>ECtemp</strong> <strong>550</strong><br />
6 Disposal Instruction<br />
User Guide 19
<strong>Danfoss</strong> A/S<br />
Electric Heating Systems<br />
Ulvehavevej 61<br />
7100 Vejle<br />
Denmark<br />
Phone:+45 7488 8500<br />
Fax: +45 7488 8501<br />
Email: EH@danfoss.<strong>com</strong><br />
www.EH.danfoss.<strong>com</strong><br />
<strong>ECtemp</strong> <strong>550</strong><br />
<strong>Danfoss</strong> can accept no responsibility for possible errors in catalogues, brochures and other printed material. <strong>Danfoss</strong> reserves the right to alter its<br />
products without notice. This also applies to products already on order provided that such alterations can be made without subsequential changes<br />
being necessary in specifications already agreed. All trademarks in this material are property of the respective <strong>com</strong>panies. <strong>Danfoss</strong> Heating Solutions<br />
and the <strong>Danfoss</strong> Heating Solutions logotype are trademarks of <strong>Danfoss</strong> A/S. All rights reserved.<br />
VUFZC102 Produced by <strong>Danfoss</strong> Heating Solutions © 07/2012