Pleur-Evac Operation Manual - Clinical Engineering
Pleur-Evac Operation Manual - Clinical Engineering
Pleur-Evac Operation Manual - Clinical Engineering

You also want an ePaper? Increase the reach of your titles
YUMPU automatically turns print PDFs into web optimized ePapers that Google loves.
IV. TO CHANGE AUTOTRANSFUSION<br />
BAG<br />
1. Use the high negativity relief valve on the <strong>Pleur</strong>evac<br />
Sahara System to reduce excessive<br />
negativity.<br />
2. Obtain and unwrap the new <strong>Pleur</strong>-evac Sahara<br />
Autotransfusion Bag.<br />
3. Close the two clamps on the top of the new<br />
Autotransfusion Bag.<br />
4. Close the clamp on the patient tube and both<br />
clamps on the existing Autotransfusion Bag.<br />
5. Separate the red connectors on the patient tube<br />
and the blue connectors on the connector tube.<br />
6. Remove the red protective cap from the<br />
collection tube on the Autotransfusion Bag.<br />
Connect this tube, using the red connectors, to<br />
the patient tube.<br />
7. Remove the blue protective cap from the<br />
connection tube on the Autotransfusion Bag.<br />
Connect this tube, using the blue connectors, to<br />
the short <strong>Pleur</strong>-evac Sahara Tube.<br />
8. Remove the existing Autotransfusion Bag from<br />
the <strong>Pleur</strong>-evac Sahara System by pressing the<br />
lever and lifl the Autotransfusion Bag up until it is<br />
free of the <strong>Pleur</strong>-evac Sahara System.<br />
9. Attach the new Autotransfusion Bag to the <strong>Pleur</strong>evac<br />
Sahara System. Align the bottom leg and<br />
the lever of the adaptorwith their mating<br />
receptacles on the <strong>Pleur</strong>-evac Sahara System.<br />
Insert with a downward motion until the lever<br />
“clicks” into position. The Autotransfusion Bag<br />
should be firmly attached to the <strong>Pleur</strong>-evac<br />
Sahara System.<br />
10. OPEN ALL CLAMPS.<br />
Deknatel Product Group<br />
600 Airport Road<br />
Fall River, MA 02720 U.S.A.<br />
I-800-367-7874<br />
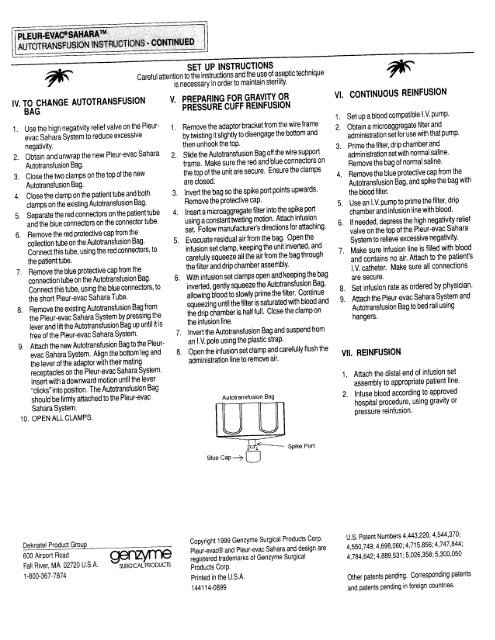
SET UP INSTRUCTIONS<br />
Careful attention to the instructions and the use of aseptic technique<br />
is necessary in order to maintain sterility.<br />
V.<br />
PREPARING FOR GRAVITY OR<br />
PRESSURE CUFF REINFUSION<br />
1. Remove the adaptor bracket from the wire frame<br />
by twisting it slightly to disengage the bottom and<br />
then unhook the top.<br />
2. Slide the Autotransfusion Bag off the wire support<br />
frame. Make sure the red and blue connectors on<br />
the top of the unit are secure. Ensure the clamps<br />
are closed.<br />
3. Invert the bag so the spike port points upwards.<br />
Remove the protective cap.<br />
4. Insert a microaggregate filter into the spike port<br />
using a constant twisting motion. Attach infusion<br />
set. Follow manufacturer’s directions for attaching.<br />
5. <strong>Evac</strong>uate residual air from the bag. Open the<br />
infusion set clamp, keeping the unit inverted, and<br />
carefully squeeze all the air from the bag through<br />
the filter and drip chamber assembly.<br />
6. With infusion set clamps open and keeping the bag<br />
inverted, gently squeeze the Autotransfusion Bag,<br />
allowing blood to slowly prime the filter. Continue<br />
squeezing until the filter is saturated with blood and<br />
the drip chamber is half full. Close the clamp on<br />
the infusion line.<br />
7. Invert the Autotransfusion Bag and suspend from<br />
an I.V. pole using the plastic strap.<br />
8. Open the infusion set clamp and carefully flush the<br />
administration line to remove air.<br />
Autotransfusion Bag<br />
m<br />
,bF--- Spike Port<br />
Blue Cap -+<br />
Copyright 1999 Genzyme Surgical Products Corp.<br />
<strong>Pleur</strong>-eva@ and <strong>Pleur</strong>-evac Sahara and design are<br />
registered trademarks of Genzyme Surgical<br />
Products Corp.<br />
Printed in the U.S.A.<br />
144114-0899<br />
VI.<br />
1. Set up a blood compatible I.V. pump.<br />
2. Obtain a microaggregate filter and<br />
administration set for use with that pump.<br />
3. Prime the filter, drip chamber and<br />
administration set with normal saline.<br />
Remove the bag of normal saline.<br />
4. Remove the blue protective cap from the<br />
Autotransfusion Bag, and spike the bag with<br />
the blood filter.<br />
5. Use an I.V. pump to prime the filter, drip<br />
chamber and infusion line with blood.<br />
6. If needed, depress the high negativity relief<br />
valve on the top of the <strong>Pleur</strong>-evac Sahara<br />
System to relieve excessive negativity.<br />
7. Make sure infusion line is filled with blood<br />
and contains no air. Attach to the patient’s<br />
I.V. catheter. Make sure all connections<br />
are secure.<br />
8. Set infusion rate as ordered by physician.<br />
9. Attach the <strong>Pleur</strong>-evac Sahara System and<br />
Autotransfusion Bag to bed rail using<br />
hangers.<br />
VII. REINFUSION<br />
1.<br />
2.<br />
CONTlNirOUS REINFUSION<br />
Attach the distal end of infusion set<br />
assembly to appropriate patient line.<br />
Infuse blood according to approved<br />
hospital procedure, using gravity or<br />
pressure reinfusion.<br />
US. Patent Numbers 4,443,220,4,544,370;<br />
4550,749; 4,698,060; 4,715,856; 4,747,844;<br />
4,784,642; 4,889,531; 5,026,358; 5,300,050<br />
Other patents pending. Corresponding patents<br />
and patents pending in foreign countries.