SureTemp 678 - Users Guide - Clinical Engineering
SureTemp 678 - Users Guide - Clinical Engineering
SureTemp 678 - Users Guide - Clinical Engineering

Create successful ePaper yourself
Turn your PDF publications into a flip-book with our unique Google optimized e-Paper software.
WALL MOUNTING INSTRUCTIONS<br />
The optional wall mount bracket should be mounted approximately 48 inches<br />
from the floor. This allows the end user of average height relatively easy access<br />
to the probe and probe covers. It should have at least 12 inches of clearance on<br />
the top of the unit so that the end user can easily remove the thermometer probe<br />
and load a probe cover without hindrance. Clearance of at least 4 inches from<br />
the bottom of the unit and from either side is also advisable to prevent tangling<br />
of the probe cord with other equipment at the bedside.<br />
The wall mount bracket should be mounted in a location so that when a<br />
thermometer is installed, the display can be read from the patient's bedside.<br />
Placement should also ensure that the probe can be readily removed from<br />
the thermometer, a probe cover can be easily installed and the probe can<br />
be returned to its position without stress being placed on either the<br />
instrument, the wall mount or most importantly, the patient.<br />
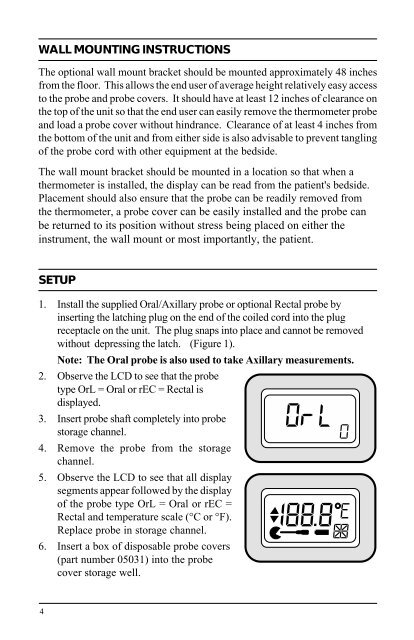
SETUP<br />
1. Install the supplied Oral/Axillary probe or optional Rectal probe by<br />
inserting the latching plug on the end of the coiled cord into the plug<br />
receptacle on the unit. The plug snaps into place and cannot be removed<br />
without depressing the latch. (Figure 1).<br />
Note: The Oral probe is also used to take Axillary measurements.<br />
2. Observe the LCD to see that the probe<br />
type OrL = Oral or rEC = Rectal is<br />
displayed.<br />
3. Insert probe shaft completely into probe<br />
storage channel.<br />
4. Remove the probe from the storage<br />
channel.<br />
5. Observe the LCD to see that all display<br />
segments appear followed by the display<br />
of the probe type OrL = Oral or rEC =<br />
Rectal and temperature scale (°C or °F).<br />
Replace probe in storage channel.<br />
6. Insert a box of disposable probe covers<br />
(part number 05031) into the probe<br />
cover storage well.<br />
4