warning - This is a secure site - Whirlpool
warning - This is a secure site - Whirlpool
warning - This is a secure site - Whirlpool

You also want an ePaper? Increase the reach of your titles
YUMPU automatically turns print PDFs into web optimized ePapers that Google loves.
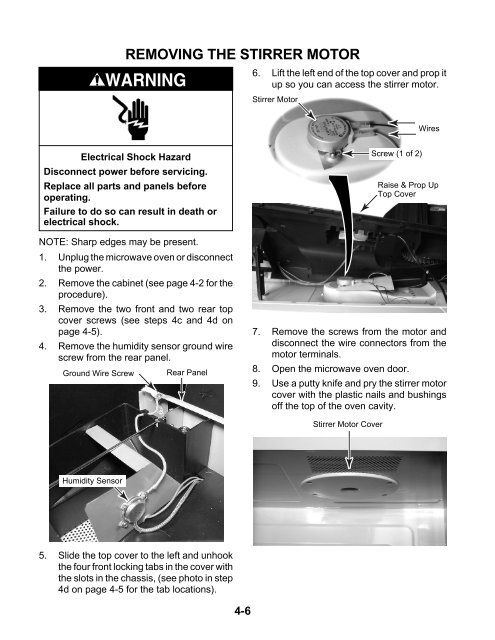
NOTE: Sharp edges may be present.<br />
REMOVING THE STIRRER MOTOR<br />
WARNING<br />
Electrical Shock Hazard<br />
D<strong>is</strong>connect power before servicing.<br />
Replace all parts and panels before<br />
operating.<br />
Failure to do so can result in death or<br />
electrical shock.<br />
1. Unplug the microwave oven or d<strong>is</strong>connect<br />
the power.<br />
2. Remove the cabinet (see page 4-2 for the<br />
procedure).<br />
3. Remove the two front and two rear top<br />
cover screws (see steps 4c and 4d on<br />
page 4-5).<br />
4. Remove the humidity sensor ground wire<br />
screw from the rear panel.<br />
Ground Wire Screw Rear Panel<br />
Humidity Sensor<br />
5. Slide the top cover to the left and unhook<br />
the four front locking tabs in the cover with<br />
the slots in the chass<strong>is</strong>, (see photo in step<br />
4d on page 4-5 for the tab locations).<br />
4-6<br />
6. Lift the left end of the top cover and prop it<br />
up so you can access the stirrer motor.<br />
Stirrer Motor<br />
Screw (1 of 2)<br />
Wires<br />
Ra<strong>is</strong>e & Prop Up<br />
Top Cover<br />
7. Remove the screws from the motor and<br />
d<strong>is</strong>connect the wire connectors from the<br />
motor terminals.<br />
8. Open the microwave oven door.<br />
9. Use a putty knife and pry the stirrer motor<br />
cover with the plastic nails and bushings<br />
off the top of the oven cavity.<br />
Stirrer Motor Cover