1756-IN080C-EN-P, ControlLogix Chassis-Series B Installation ...
1756-IN080C-EN-P, ControlLogix Chassis-Series B Installation ...
1756-IN080C-EN-P, ControlLogix Chassis-Series B Installation ...
You also want an ePaper? Increase the reach of your titles
YUMPU automatically turns print PDFs into web optimized ePapers that Google loves.
10 <strong>ControlLogix</strong> <strong>Chassis</strong>-<strong>Series</strong> B<br />
ATT<strong>EN</strong>TION<br />
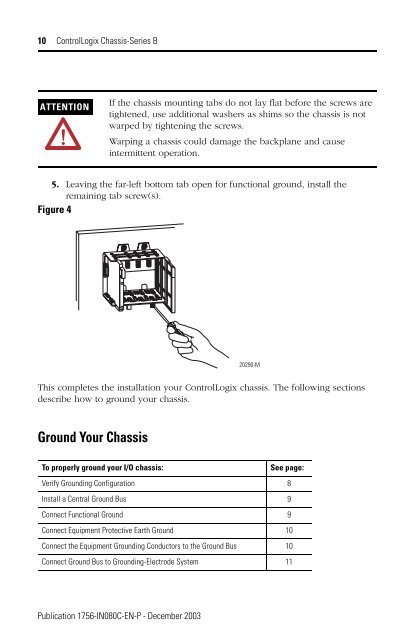
5. Leaving the far-left bottom tab open for functional ground, install the<br />
remaining tab screw(s).<br />
Figure 4<br />
This completes the installation your <strong>ControlLogix</strong> chassis. The following sections<br />
describe how to ground your chassis.<br />
Ground Your <strong>Chassis</strong><br />
If the chassis mounting tabs do not lay flat before the screws are<br />
tightened, use additional washers as shims so the chassis is not<br />
warped by tightening the screws.<br />
Warping a chassis could damage the backplane and cause<br />
intermittent operation.<br />
To properly ground your I/O chassis: See page:<br />
Verify Grounding Configuration 8<br />
Install a Central Ground Bus 9<br />
Connect Functional Ground 9<br />
Connect Equipment Protective Earth Ground 10<br />
Connect the Equipment Grounding Conductors to the Ground Bus 10<br />
Connect Ground Bus to Grounding-Electrode System 11<br />
Publication <strong>1756</strong>-<strong>IN080C</strong>-<strong>EN</strong>-P - December 2003<br />
20290-M


