You also want an ePaper? Increase the reach of your titles
YUMPU automatically turns print PDFs into web optimized ePapers that Google loves.
»<br />
<strong>CD</strong>-<strong>RW700</strong><br />
<strong>CD</strong> Rewritable Recorder<br />
Ü<br />
ÿ<br />
Ÿ<br />
This appliance has a serial number<br />
located on the rear panel. Please record<br />
the model number and serial number<br />
and retain them for your records.<br />
Model number<br />
Serial number<br />
OWNER’S MANUAL<br />
3D0031900A<br />
CAUTION: TO REDUCE THE RISK OF ELECTRIC SHOCK, DO NOT<br />
REMOVE COVER (OR BACK). NO USER-SERVICEABLE PARTS<br />
INSIDE. REFER SERVICING TO QUALIFIED SERVICE PERSONNEL.<br />
The lightning flash with arrowhead symbol, within an equilateral triangle, is intended to alert<br />
the user to the presence of uninsulated “dangerous voltage” within the product’s enclosure<br />
that may be of sufficient magnitude to constitute a risk of electric shock to persons..<br />
The exclamation point within an equilateral triangle is intended to alert the user to the presence<br />
of important operating and maintenance (servicing) instructions in the literature<br />
ac<strong>com</strong>panying the appliance.<br />
WARNING: TO PREVENT FIRE OR SHOCK<br />
HAZARD, DO NOT EXPOSE THIS<br />
APPLIANCE TO RAIN OR MOISTURE.
Important Safety Precautions<br />
Note for U.K. Customers<br />
DO NOT cut off the mains plug from this<br />
equipment.<br />
If the plug fitted is not suitable for the power points in<br />
your home or the cable is too short to reach a power<br />
point, then obtain an appropriate safety approved<br />
extension lead or consult your dealer.<br />
If nonetheless the mains plug is cut off, remove the fuse<br />
and dispose of the plug immediately, to avoid a possible<br />
shock hazard by inadvertent connection to the mains<br />
supply.<br />
If this product is not provided with a mains plug, or one<br />
has to be fitted, then follow the instructions given<br />
below:<br />
IMPORTANT: DO NOT make any connection to the<br />
larger terminal which is marked with the letter E or by<br />
the safety earth symbol ç or coloured GREEN or<br />
GREEN-and-YELLOW.<br />
The wires in the mains lead on this product are coloured<br />
in accordance with the following code:<br />
BLUE : NEUTRAL<br />
BROWN : LIVE<br />
As these colours may not correspond with the coloured<br />
markings identifying the terminals in your plug proceed<br />
as follows:<br />
The wire which is coloured BLUE must be connected<br />
to the terminal which is marked with the letter N or<br />
coloured BLACK.<br />
The wire which is coloured BROWN must be<br />
connected to the terminal which is marked with the<br />
letter L or coloured RED.<br />
When replacing the fuse only a correctly rated<br />
approved type should be used and be sure to re-fit the<br />
fuse cover.<br />
IF IN DOUBT — CONSULT A COMPETENT<br />
ELECTRICIAN.<br />
2 TASCAM <strong>CD</strong>-<strong>RW700</strong><br />
TO THE USER<br />
This equipment has been tested and found to <strong>com</strong>ply<br />
with the limits for a Class B digital device, pursuant to<br />
Part 15 of the FCC Rules. These limits are designed<br />
to provide reasonable protection against interference<br />
in a residential area. This device generates and uses<br />
radio frequency energy and if not installed and used in<br />
accordance with the instructions, it may cause<br />
interference to radio or TV reception. If this unit does<br />
cause interference with TV or radio reception you can<br />
try to correct the interference by one or more of the<br />
following measures:<br />
a) Reorient or relocate the receiving antenna.<br />
b) Increase the separation between the equipment<br />
b) and the receiver.<br />
c) Plug the equipment into a different outlet so that it<br />
b) is not on the same circuit as the receiver.<br />
b) If necessary, consult the dealer or an experienced<br />
b) radio/TV technician for additional suggestions.<br />
CAUTION<br />
Changes or modifications to this equipment not<br />
expressly approved by TEAC CORPORATION for<br />
<strong>com</strong>pliance could void the user’s authority to operate<br />
For the consumers in Europe<br />
WARNING<br />
This is a Class A product. In a domestic environment, this<br />
product may cause radio interference in which case the user<br />
may be required to take adequate measures.<br />
Pour les utilisateurs en Europe<br />
AVERTISSEMENT<br />
Il s’agit d’un produit de Classe A. Dans un environnement<br />
domestique, cet appareil peut provoquer des interférences<br />
radio, dans ce cas l’utilisateur peut être amené à prendre<br />
des mesures appropriées.<br />
Für Kunden in Europa<br />
Warnung<br />
Dies is eine Einrichtung, welche die Funk-Entstörung nach<br />
Klasse A besitzt. Diese Einrichtung kann im Wohnbereich<br />
Funkstörungen versursachen ; in diesem Fall kann vom<br />
Betrieber verlang werden, angemessene Maßnahmen<br />
durchzuführen und dafür aufzukommen.
IMPORTANT SAFETY INSTRUCTIONS<br />
CAUTION:<br />
… Read all of these Instructions.<br />
…Save<br />
these Instructions for later use.<br />
…Follow<br />
all Warnings and Instructions marked on the audio<br />
equipment.<br />
1) Read Instructions — All the safety and operating instructions should<br />
be read before the product is operated.<br />
2) Retain Instructions — The safety and operating instructions should<br />
be retained for future reference.<br />
3) Heed Warnings — All warnings on the product and in the operating<br />
instructions should be adhered to.<br />
4) Follow Instructions — All operating and use instructions should be<br />
followed.<br />
5) Cleaning — Unplug this product from the wall outlet before cleaning.<br />
Do not use liquid cleaners or aerosol cleaners. Use a damp cloth for cleaning.<br />
6) Attachments — Do not use attachments not re<strong>com</strong>mended by the<br />
product manufacturer as they may cause hazards.<br />
7) Water and Moisture — Do not use this product near water — for<br />
example, near a bath tub, wash bowl, kitchen sink, or laundry tub; in a wet<br />
basement; or near a swimming pool; and the like.<br />
8) Accessories — Do not place this product on an unstable cart, stand,<br />
tripod, bracket, or table. The product may fall, causing serious injury to a<br />
child or adult, and serious damage to the product. Use only with a cart,<br />
stand, tripod, bracket, or table re<strong>com</strong>mended by the manufacturer, or sold<br />
with the product. Any mounting of the product should follow the manufacturer’s<br />
instructions, and should use a mounting accessory re<strong>com</strong>mended by<br />
the manufacturer.<br />
9) A product and cart <strong>com</strong>bination should be moved with care. Quick stops,<br />
excessive force, and uneven surfaces may cause the product and cart <strong>com</strong>bination<br />
to overturn.<br />
10) Ventilation — Slots and openings in the cabinet are provided for ventilation<br />
and to ensure reliable operation of the product and to protect it<br />
from overheating, and these openings must not be blocked or covered. The<br />
openings should never be blocked by placing the product on a bed, sofa,<br />
rug, or other similar surface. This product should not be placed in a built-in<br />
installation such as a bookcase or rack unless proper ventilation is provided<br />
or the manufacturer’s instructions have been adhered to.<br />
11) Power Sources — This product should be operated only from the<br />
type of power source indicated on the marking label. If you are not sure of<br />
the type of power supply to your home, consult your product dealer or local<br />
power <strong>com</strong>pany. For products intended to operate from battery power, or<br />
other sources, refer to the operating instructions.<br />
12) Grounding or Polarization — This product may be equipped with a<br />
polarized alternating-current line plug (a plug having one blade wider than<br />
the other). This plug will fit into the power outlet only one way. This is a<br />
safety feature. If you are unable to insert the plug fully into the outlet, try<br />
reversing the plug. If the plug should still fail to fit, contact your electrician<br />
to replace your obsolete outlet. Do not defeat the safety purpose of the<br />
polarized plug.<br />
13) Power-Cord Protection — Power-supply cords should be routed so<br />
that they are not likely to be walked on or pinched by items placed upon or<br />
against them, paying particular attention to cords at plugs, convenience<br />
receptacles, and the point where they exit from the product.<br />
14) Outdoor Antenna Grounding — If an outside antenna or cable<br />
system is connected to the product, be sure the antenna or cable system is<br />
grounded so as to provide some protection against voltage surges and builtup<br />
static charges. Article 810 of the National Electrical Code, ANSI/NFPA<br />
70, provides information with regard to proper grounding of the mast and<br />
supporting structure, grounding of the lead-in wire to an antenna discharge<br />
unit, size of grounding conductors, location of antenna-discharge unit, connection<br />
to grounding electrodes, and requirements for the grounding electrode.<br />
"Note to CATV system installer:<br />
This reminder is provided to call the CATV system installer’s attention to<br />
Section 820-40 of the NEC which provides guidelines for proper grounding<br />
and, in particular, specifies that the cable ground shall be connected to the<br />
grounding system of the building, as close to the point of cable entry as<br />
practical.<br />
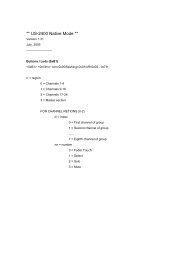
Example of Antenna Grounding as per<br />
National Electrical Code, ANSI/NFPA 70<br />
ELECTRIC<br />
SERVICE<br />
EQUIPMENT<br />
NEC - NATIONAL ELECTRICAL CODE<br />
GROUND<br />
CLAMP<br />
ANTENNA<br />
LEAD IN<br />
WIRE<br />
ANTENNA<br />
DISCHARGE UNIT<br />
(NEC SECTION 810-20)<br />
GROUNDING CONDUCTORS<br />
(NEC SECTION 810-21)<br />
GROUND CLAMPS<br />
POWER SERVICE GROUNDING<br />
ELECTRODE SYSTEM<br />
(NEC ART 250. PART H)<br />
15) Lightning — For added protection for this product during a lightning<br />
storm, or when it is left unattended and unused for long periods of time,<br />
unplug it from the wall outlet and disconnect the antenna or cable system.<br />
This will prevent damage to the product due to lightning and power-line<br />
surges.<br />
16) Power Lines — An outside antenna system should not be located in<br />
the vicinity of overhead power lines or other electric light or power circuits,<br />
or where it can fall into such power lines or circuits. When installing an<br />
outside antenna system, extreme care should be taken to keep from touching<br />
such power lines or circuits as contact with them might be fatal.<br />
17) Overloading — Do not overload wall outlets, extension cords, or<br />
integral convenience receptacles as this can result in risk of fire or electric<br />
shock.<br />
18) Object and Liquid Entry — Never push objects of any kind into<br />
this product through openings as they may touch dangerous voltage points<br />
or short-out parts that could result in a fire or electric shock. Never spill<br />
liquid of any kind on the product.<br />
19) Servicing — Do not attempt to service this product yourself as opening<br />
or removing covers may expose you to dangerous voltage or other<br />
hazards. Refer all servicing to qualified service personnel.<br />
20) Damage Requiring Service — Unplug this product from the wall<br />
outlet and refer servicing to qualified service personnel under the following<br />
conditions:<br />
a) when the power-supply cord or plug is damaged.<br />
b) if liquid has been spilled, or objects have fallen into the product.<br />
c) if the product has been exposed to rain or water.<br />
d) if the product does not operate normally by following the operating<br />
instructions. Adjust only those controls that are covered by the operating<br />
instructions as an improper adjustment of other controls may result in<br />
damage and will often require extensive work by a qualified technician to<br />
restore the product to its normal operation.<br />
e) if the product has been dropped or damaged in any way.<br />
f ) when the product exhibits a distinct change in performance – this<br />
indicates a need for service.<br />
21) Replacement Parts — When replacement parts are required, be<br />
sure the service technician has used replacement parts specified by the<br />
manufacturer or have the same characteristics as the original part.<br />
Unauthorized substitutions may result in fire, electric shock, or other<br />
hazards.<br />
22) Safety Check — Upon <strong>com</strong>pletion of any service or repairs to this<br />
product, ask the service technician to perform safety checks to determine<br />
that the product is in proper operating condition.<br />
23) Wall or Ceiling Mounting — The product should be mounted to a<br />
wall or ceiling only as re<strong>com</strong>mended by the manufacturer.<br />
24) Heat — The product should be situated away from heat sources such<br />
as radiators, heat registers, stoves, or other products (including amplifiers)<br />
that produce heat.<br />
TASCAM <strong>CD</strong>-<strong>RW700</strong> 3
SAFETY INFORMATION<br />
This product has been designed and manufactured according to FDA regulations "title 21, CFR, chapter 1, subchapter J, based on<br />
the Radiation Control for Health and Safety Act of 1968", and is classified as a class 1 laser product. There is no hazardous invisible<br />
laser radiation during operation because invisible laser radiation emitted inside of this product is <strong>com</strong>pletely confined in the<br />
protective housings.<br />
The label required in this regulation is shown 1.<br />
CAUTION<br />
- DO NOT REMOVE THE PROTECTIVE HOUSING USING A SCREWDRIVER.<br />
- USE OF CONTROLS OR ADJUSTMENTS OR PERFORMANCE OF PROCEDURES OTHER THAN THOSE SPECIFIED HEREIN MAY<br />
RESULT IN HAZARDOUS RADIATION EXPOSURE.<br />
- IF THIS PRODUCT DEVELOPS TROUBLE, CONTACT YOUR NEAREST QUALIFIED SERVICE PERSONNEL, AND DO NOT USE THE<br />
PRODUCT IN ITS DAMAGED STATE.<br />
For CANADA<br />
AC POWER CORD CONNECTION<br />
CAUTION:<br />
TO PREVENT ELECTRIC SHOCK, MATCH WIDE BLADE OF<br />
PLUG TO WIDE SLOT, FULLY INSERT.<br />
4 TASCAM <strong>CD</strong>-<strong>RW700</strong><br />
Voltage Conversion<br />
(General export models only)<br />
Be sure to remove the power cord from the AC outlet before repositioning<br />
the voltage converter switch.<br />
1.Locate the voltage selector on the rear panel.<br />
2.Using a flat-bladed screwdriver, set to the appropriate 230V or 120V<br />
position according to your area.<br />
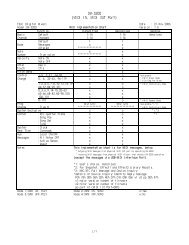
Optical pickup:<br />
Type : KRS-202A or KRS-220B<br />
Manufacturer : SONY Corporation<br />
Laser output : Less than 0.1 mW (Play) and 32 mW<br />
Laser output : (Record) on the objective lens<br />
Wavelength : 777 - 787 nm<br />
Pour le CANADA<br />
CORDE DE CONNEXION CA<br />
ATTENTION:<br />
POUR ÉVITER LES CHOCS ÉLECTRIQUES, INTRODUIRE LA<br />
LAME LA PLUS LARGE DE LA FICHE DANS LA BORNE<br />
CORRESPONDANTE DE LA PRISE ET POUSSER JUSQU’AU<br />
FOND.
1 - Introduction<br />
1.1 About <strong>CD</strong>-R and <strong>CD</strong>-RW discs .........6<br />
1.2 Finalizing ............................................7<br />
1.2.1 “Recordable” discs ....................................7<br />
1.2.2 About this manual ......................................7<br />
1.3 Unpacking the <strong>CD</strong>-<strong>RW700</strong> .................7<br />
1.3.1 Rack-mounting the unit .............................7<br />
1.4 Environmental considerations .........7<br />
1.4.1 Beware of condensation ............................8<br />
1.4.2 Never use a stabilizer or printable discs .8<br />
1.4.3 Handling of <strong>com</strong>pact discs .......................8<br />
1.4.4 Additional notes with regard to<br />
<strong>CD</strong>-R and <strong>CD</strong>-RW discs .............................8<br />
1.4.5 Re<strong>com</strong>mended media ................................9<br />
1.4.6 Default settings ..........................................9<br />
1.4.7 Dimensional drawing .................................9<br />
2 - Features of the <strong>CD</strong>-<strong>RW700</strong><br />
2.1 Front panel .......................................11<br />
1 POWER switch (STANDBY/ON) ..............11<br />
2 Disc tray ....................................................11<br />
3 OPEN/CLOSE key .....................................11<br />
4 RHSL key ..................................................11<br />
5 DIGITAL DIRECT ......................................11<br />
6 INPUT SELECT .........................................11<br />
7 REMOTE SENSOR ....................................11<br />
8 Display ......................................................11<br />
9 MENU key ..................................................11<br />
A DISPLAY key ......................................11<br />
B MULTI JOG control ...........................11<br />
C TIMER switch (PLAY, OFF, REC) .....11<br />
D PHONES jack and LEVEL control ....11<br />
E REC LEVEL controls .........................11<br />
F FINALIZE key .....................................11<br />
G ERASE key .........................................11<br />
H STOP key ...........................................12<br />
I PLAY key ............................................12<br />
J PAUSE key .........................................12<br />
K RECORD key ......................................12<br />
L SYNC REC key ...................................12<br />
M FADER key .........................................12<br />
2.2 Rear panel ........................................12<br />
N ANALOG IN (L, R) (UNBALANCED) .12<br />
O ANALOG OUT (L, R)<br />
(UNBALANCED) ................................12<br />
P DIGITAL COAXIAL (IN, OUT) ............12<br />
Q DIGITAL OPTICAL (IN, OUT) ............12<br />
2.3 Remote control unit .........................12<br />
1 POWER key ........................................12<br />
2 OPEN/CLOSE key ..............................12<br />
3 Number keys (0 through 10<br />
and +10) .............................................12<br />
4 CLEAR key .........................................12<br />
5 REPEAT key .......................................12<br />
6 DISPLAY key ......................................12<br />
7 MENU key ...........................................12<br />
8 ENTER key .........................................12<br />
9 FADER key .........................................12<br />
A MONITOR key ....................................12<br />
B PLAY MODE key ................................12<br />
FINALIZE key .....................................12<br />
C<br />
Table of Contents<br />
D ERASE key ........................................ 12<br />
E RECORD key ..................................... 12<br />
F SYNC REC key .................................. 13<br />
G REC MUTE key ................................. 13<br />
H SEARCH keys ................................... 13<br />
I SKIP keys .......................................... 13<br />
J STOP key .......................................... 13<br />
K PAUSE key ........................................ 13<br />
L PLAY key ........................................... 13<br />
2.3.1 Use of the remote control unit ................ 13<br />
2.4 Connections .................................... 13<br />
2.5 Timer operations ............................. 13<br />
2.5.1 Setting the clock ...................................... 13<br />
2.5.2 Setting the timer ...................................... 14<br />
2.5.3 Using the timer ......................................... 14<br />
3 - Playback operations<br />
3.1 Simple playback operations ........... 15<br />
3.1.1 Time display modes ................................ 15<br />
3.1.2 Track search ............................................. 15<br />
3.1.3 Playback modes ....................................... 15<br />
3.2 Programmed order playback ......... 16<br />
3.3 Repeat play ...................................... 16<br />
4 - Recording<br />
4.1 Input selection ................................. 17<br />
4.1.1 Signal volume .......................................... 17<br />
4.1.2 Input monitoring ...................................... 17<br />
4.1.3 Frequency conversion ............................ 17<br />
4.2 Basic recording ............................... 18<br />
4.2.1 Playing back tracks ................................. 18<br />
4.2.2 Time display while recording ................. 18<br />
4.2.3 Manual track division .............................. 19<br />
4.2.4 Restricting the number of tracks ........... 19<br />
4.2.5 Full disc .................................................... 19<br />
4.3 Advanced recording ....................... 19<br />
4.3.1 Synchronized recording .......................... 19<br />
4.3.2 Automatic track division ......................... 21<br />
4.3.3 SCMS and the <strong>CD</strong>-<strong>RW700</strong> ....................... 22<br />
4.3.4 Digital direct ............................................. 22<br />
4.3.5 Rec mute function ................................... 23<br />
4.3.6 Fade-in and fade-out ............................... 23<br />
4.4 Rehearsal ......................................... 23<br />
4.4.1 Rehearsal for synchronized recording .. 24<br />
4.4.2 Rehearsal for track division .................... 25<br />
5 - After recording<br />
5.1 Finalizing .......................................... 26<br />
5.1.1 Unfinalizing <strong>CD</strong>-RW discs ....................... 26<br />
5.2 Erasing ............................................. 26<br />
5.2.1 Erasing tracks .......................................... 26<br />
5.2.2 Erasing a whole disc ............................... 27<br />
5.2.3 Refreshing a disc ..................................... 27<br />
6 - Reference and specifications<br />
6.1 Troubleshooting .............................. 28<br />
6.2 Specifications .................................. 28<br />
TASCAM <strong>CD</strong>-<strong>RW700</strong> 5
1 - Introduction<br />
The <strong>CD</strong>-<strong>RW700</strong> <strong>CD</strong> rewritable recorder allows you<br />
to make your own <strong>CD</strong>s from a variety of sources—<br />
other <strong>CD</strong>s, MD recordings, analog cassette tapes,<br />
and records.<br />
Tracks can be recorded all at one time, or added,<br />
until the disc is “finalized”, allowing it to be played<br />
on <strong>CD</strong> players.<br />
NOTE<br />
Some models of <strong>CD</strong> player may be unable to play<br />
certain discs produced using the <strong>CD</strong>-<strong>RW700</strong>.<br />
A variety of sophisticated features are incorporated<br />
in the <strong>CD</strong>-<strong>RW700</strong>, allowing a wide degree of flexibility.<br />
The <strong>CD</strong>-<strong>RW700</strong> provides analog unbalanced audio<br />
inputs and outputs for connection to –10 dBV equipment.<br />
In addition, coaxial and optical inputs and outputs<br />
are provided for recording from and playing back to<br />
suitably-equipped digital audio equipment.<br />
The analog and digital signals may be mixed, allowing<br />
unprecedented versatility while recording.<br />
24-bit digital-to-analog and analog-to-digital converters<br />
provide excellent recording and playback<br />
quality.<br />
A sampling frequency convertor is incorporated,<br />
allowing the recording of <strong>CD</strong>s from digital audio<br />
sources which are at frequencies other than the <strong>CD</strong><br />
standard sampling frequency of 44.1 kHz.<br />
Track divisions can be entered manually, or can produced<br />
automatically as a response to the input signal<br />
level.<br />
A recording buffer ensures that even the first milliseconds<br />
of a track are recorded, and a rehearsal mode<br />
allows the precise positioning of track divisions,<br />
allowing the elimination of false starts or late entries.<br />
“One-touch” fade-ins and fade-outs over a specified<br />
time allow you to edit program material to your specific<br />
requirements.<br />
A multi-function “multi jog” dial is used to set and<br />
confirm parameter settings.<br />
A wireless remote control unit allows control of the<br />
<strong>CD</strong>-<strong>RW700</strong> from remote locations.<br />
NOTE<br />
This product is designed to help you record and<br />
reproduce sound works to which you own the copyright,<br />
or where you have obtained permission from<br />
the copyright holder or the rightful licensor. Unless<br />
you own the copyright, or have obtained the appropri-<br />
6 TASCAM <strong>CD</strong>-<strong>RW700</strong><br />
ate permission from the copyright holder or the rightful<br />
licensor, your unauthorized recording,<br />
reproduction or distribution thereof may result in<br />
severe criminal penalties under copyright laws and<br />
international copyright treaties. If you are uncertain<br />
about your rights, contact your legal advisor. Under<br />
no circumstances will TEAC Corporation be responsible<br />
for the consequences of any illegal copying performed<br />
using the <strong>CD</strong>-<strong>RW700</strong>.<br />
1.1 About <strong>CD</strong>-R and <strong>CD</strong>-RW discs<br />
The <strong>CD</strong>-<strong>RW700</strong> uses <strong>CD</strong>-R and <strong>CD</strong>-RW Digital<br />
media.<br />
<strong>CD</strong>-R discs can be recorded once only. Once they<br />
have been used for recording, they cannot be erased<br />
or re-recorded. However, if space is available on the<br />
disc, additional material can be recorded. The packaging<br />
of <strong>CD</strong>-R discs will include the following logo:<br />
By contrast, a <strong>CD</strong>-RW disc can be used in much the<br />
same way as a <strong>CD</strong>-R disc, but the last track or tracks<br />
recorded can be erased before the disc has been<br />
“finalized”, and the space on the disc can be re- used<br />
for other recordings. The packaging of <strong>CD</strong>-RW discs<br />
will include the a logo similar to the following:<br />
However, you should note that an audio <strong>CD</strong> created<br />
using a <strong>CD</strong>-RW disc may not play back satisfactorily<br />
on every audio <strong>CD</strong> player. It will, naturally, be playable<br />
on the <strong>CD</strong>-<strong>RW700</strong>. This is in no way a limitation<br />
of the <strong>CD</strong>-<strong>RW700</strong> itself, but of the difference<br />
between the different types of media and the methods<br />
used to read them.<br />
<strong>CD</strong>-R discs created on the <strong>CD</strong>-<strong>RW700</strong>, by contrast,<br />
may be played satisfactorily on the majority of audio<br />
<strong>CD</strong> players.
For details of disc brands that are known to work<br />
well with the <strong>CD</strong>-<strong>RW700</strong>, see 1.4.5, “Re<strong>com</strong>mended<br />
media”.<br />
1.2 Finalizing<br />
Although audio data may be written on a <strong>CD</strong>-R or<br />
<strong>CD</strong>-RW disc, a standard <strong>CD</strong> player will not be able<br />
to read the data (i.e. play back the audio) until a final<br />
table of contents (TOC) has been written at the start<br />
of the disc.<br />
The process of writing this table of contents is known<br />
as “finalizing”. Once this has been done, no further<br />
data can be written to the disk. See 5.1, “Finalizing”<br />
for details.<br />
In the case of a <strong>CD</strong>-RW disc which has been finalized,<br />
the whole of the disc may be erased, or the disc<br />
may be “refreshed”, and the disc re-used.<br />
In addition, a <strong>CD</strong>-RW disc that has been finalized<br />
may be “unfinalized”, i.e. the TOC is removed. This<br />
allows further tracks to be recorded to the disc, provided<br />
that there is space on the disc.<br />
1.2.1 “Recordable” discs<br />
In this manual, we use the term “recordable” disc to<br />
describe a <strong>CD</strong>-R or <strong>CD</strong>-RW disc that has not been<br />
finalized, i.e. further recording is possible on the<br />
disc.<br />
1.2.2 About this manual<br />
In this manual, we use the following conventions:<br />
• The names of keys and controls are given in the<br />
following typeface: ERASE.<br />
• When the alphanumeric portion of the display<br />
shows a message, this is shown in the following<br />
typeface: Wel<strong>com</strong>e.<br />
• If a preset indicator in the display (i.e. one which<br />
cannot change, but is either on or off) is shown, this<br />
is shown as follows: SHUFFLE.<br />
• When referring to a front or rear panel control or<br />
feature, the following typeface is used to show the<br />
number of the feature (as given in the diagram in<br />
this manual, and the corresponding explanation):<br />
5.<br />
• When referring to a remote control key, the following<br />
typeface is used to show the number of the key<br />
(as given in the diagram in this manual, and the<br />
corresponding explanation): 5 .<br />
1 • Introduction—Finalizing<br />
1.3 Unpacking the <strong>CD</strong>-<strong>RW700</strong><br />
When unpacking the unit, you should find the following<br />
items, in addition to this manual:<br />
• The main unit itself<br />
• The remote control unit<br />
• Two AA batteries for the remote control unit<br />
• A rack-mounting screw kit<br />
1.3.1 Rack-mounting the unit<br />
Use the rack-mounting kit to mount the unit in a<br />
standard 19-inch equipment rack, as shown below.<br />
Remove the feet of the unit before mounting it.<br />
See 1.4, “Environmental considerations” below for<br />
details of ventilation, etc.<br />
1.4 Environmental considerations<br />
The <strong>CD</strong>-<strong>RW700</strong> may be used in most areas, but to<br />
maintain top performance, and prolong operating<br />
life, observe the following environmental conditions:<br />
The nominal temperature should be between 5˚C and<br />
35˚C (41˚F and 95˚F). The <strong>CD</strong>-<strong>RW700</strong> is more sensitive<br />
to extremes of temperature than ordinary <strong>CD</strong><br />
players.<br />
Relative humidity should be 30 to 90 degrees noncondensing.<br />
As the unit may be<strong>com</strong>e hot during operation, always<br />
leave sufficient space above the unit for ventilation.<br />
If you are mounting the unit in a rack, leave 1U of<br />
space above it.<br />
You should not place the unit on a piece of equipment<br />
generating heat, e.g. an amplifier, to avoid possible<br />
problems with overheating.<br />
Make sure that the unit is mounted in a level position<br />
for correct operation. Do not mount the unit in a rack<br />
tilted 5˚ or more from the vertical position.<br />
TASCAM <strong>CD</strong>-<strong>RW700</strong><br />
7
1 • Introduction—Environmental considerations<br />
NOTE<br />
If the mounting surface is more than 5 degrees away<br />
from the horizontal, it will not open or close.<br />
The voltage supplied to the unit should match the<br />
voltage as printed on the rear panel. If you are in any<br />
doubt regarding this matter, consult an electrician.<br />
NOTE<br />
When transporting the unit, always use the original<br />
packing materials. For this reason, we strongly re<strong>com</strong>mend<br />
that you save all the packing materials that<br />
came with the <strong>CD</strong>-<strong>RW700</strong>, in case you need to transport<br />
it in the future.<br />
In addition, when transporting the unit, you should tape the<br />
disc tray closed, using an adhesive tape that will not spoil<br />
the finish of the unit.<br />
1.4.1 Beware of condensation<br />
If the unit (or a <strong>com</strong>pact disc) is moved from a cold<br />
to a warm place, or used after a sudden temperature<br />
change, there is a danger of condensation; vapor in<br />
the air could condense on the internal mechanism,<br />
making correct operation impossible. To prevent this,<br />
or if this occurs, leave the player for one or two hours<br />
with the power turned on, then turn the power off and<br />
on again.<br />
1.4.2 Never use a stabilizer or printable<br />
discs<br />
Using <strong>com</strong>mercially available <strong>CD</strong> stabilizers or<br />
printable recordable discs with this player will damage<br />
the mechanism and cause it to malfunction.<br />
NOTE<br />
Never use a disc that has had a stabilizer mounted to<br />
it. The residual adhesive may cause the disc to stick<br />
to the mechanism of the <strong>CD</strong>-<strong>RW700</strong>. If it sticks to the<br />
mechanism, you will need a technician to get it out.<br />
1.4.3 Handling of <strong>com</strong>pact discs<br />
Observe the following:<br />
• Always place the <strong>com</strong>pact discs in the trays with<br />
their label facing upward (<strong>com</strong>pact discs can only<br />
be played on one side).<br />
• To remove a disc from its storage case, press down<br />
on the center of the case, and lift the disc out, holding<br />
it carefully by the edges.<br />
8<br />
TASCAM <strong>CD</strong>-<strong>RW700</strong><br />
• Finger marks and dust should be carefully wiped<br />
off the disc’s recorded surface with a soft cloth.<br />
Unlike conventional records, the <strong>com</strong>pact disc has<br />
no grooves to collect dust and microscopic debris,<br />
so gently wiping with a soft cloth should remove<br />
most particles.<br />
• Wipe in a straight motion from the inside to the<br />
outside of the disc. Small dust particles and light<br />
stains will have absolutely no effect on reproduction<br />
quality.<br />
• Never use such chemicals as record sprays, antistatic<br />
sprays or fluid, benzine or thinner to clean<br />
<strong>com</strong>pact discs. Such chemicals will do irreparable<br />
damage to the disc’s plastic surface.<br />
• Discs should be returned to their cases after use to<br />
avoid serious scratches that could cause the laser<br />
pickup to “skip”.<br />
• Don’t expose discs to direct sunlight or high<br />
humidity and temperature for extended periods.<br />
Long exposure to high temperature can warp the<br />
disc.<br />
• Only use circular <strong>com</strong>pact discs. Avoid using noncircular<br />
promotional, etc. discs.<br />
• To keep the laser pickups clean, don’t touch them.<br />
For the same reason, don’t leave the disc trays<br />
opened unnecessarily.<br />
1.4.4 Additional notes with regard to<br />
<strong>CD</strong>-R and <strong>CD</strong>-RW discs<br />
There are additional precautions that you should take<br />
when handling <strong>CD</strong>-R and <strong>CD</strong>-RW discs, that are different<br />
to those that you should take when handling<br />
ordinary <strong>CD</strong>s.<br />
• Avoid touching the recording (non-label) side of a<br />
disc on which you will be recording. Recording on<br />
a disc requires a cleaner surface than playing back,<br />
and fingerprints, grease, etc. can cause errors in the<br />
recording process.<br />
• <strong>CD</strong>-R discs are more sensitive to the effects of heat<br />
and ultraviolet rays than ordinary <strong>CD</strong>s. It is important<br />
that they are not stored in a location where
direct sunlight will fall on them, and which is away<br />
from sources of heat such as radiators or heat-generating<br />
electrical devices.<br />
• Always store <strong>CD</strong>-R discs in their “jewel cases” to<br />
avoid dirt and dust accumulating on their surfaces.<br />
• Do not put labels or protective sheets on the discs<br />
and do not use any protective coating spray.<br />
• When labeling <strong>CD</strong>-R discs, always use a soft oilbased<br />
felt-tipped pen to write the information.<br />
Never use a ball-point or hard-tipped pen, as this<br />
may cause damage to the recorded side.<br />
• Dirty discs may be cleaned using a soft dry cloth<br />
and/or a <strong>com</strong>mercial <strong>CD</strong> cleaning fluid or ethyl<br />
alcohol. Do not use thinner, gasoline, benzene or<br />
LP cleaning fluid, as these will damage the disc.<br />
• If you are in any doubt as to the care and handling<br />
of a <strong>CD</strong>-R disc, read the precautions supplied with<br />
the disc, or contact the disc manufacturer directly.<br />
1.4.5 Re<strong>com</strong>mended media<br />
An up-to-date list of manufacturers who produce<br />
media suitable for use in the <strong>CD</strong>-<strong>RW700</strong> can be<br />
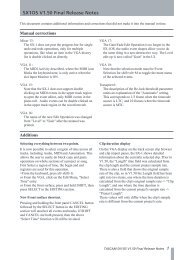
1.4.7 Dimensional drawing<br />
483mm (19.0")<br />
465mm (18.3")<br />
435mm (17.1")<br />
1 • Introduction—Environmental considerations<br />
76mm (3.0")<br />
88mm (3.5")<br />
obtained from your TASCAM dealer, or found on the<br />
TASCAM Web site at http://www.tascam.<strong>com</strong>.<br />
1.4.6 Default settings<br />
The default settings when the <strong>CD</strong>-<strong>RW700</strong> is shipped<br />
from the factory are given below.<br />
Setting Description Default value<br />
Digital direct<br />
(D_DIRECT)<br />
4.3.4, “Digital direct” Off<br />
Input selection 4.1, “Input selection” Analog<br />
Auto track<br />
4.3.2, “Automatic track On<br />
(A_TRACK) division”<br />
Trigger level 4.3.1, “Synchronized –54 dB<br />
(S_LEVEL) recording”<br />
FADE IN time 4.3.6, “Fade-in and fade- 3 seconds<br />
out”<br />
FADE OUT time 4.3.6, “Fade-in and fade- 3 seconds<br />
out”<br />
Volume (DIGITAL IN) 4.1.1, “Signal volume” 0 dB<br />
Volume (ANALOG IN) 4.1.1, “Signal volume” 0 dB<br />
Timer on/off times 2.5.2, “Setting the timer” Unset<br />
Play mode 3.1.3, “Playback modes” Continue<br />
Trim 4.4, “Rehearsal” ±0 frames<br />
98mm (3.9")<br />
21mm<br />
(0.8")<br />
284.5m<br />
m<br />
6.5mm<br />
(0.3")<br />
TASCAM <strong>CD</strong>-<strong>RW700</strong> 9
2 - Features of the <strong>CD</strong>-<strong>RW700</strong><br />
10 TASCAM <strong>CD</strong>-<strong>RW700</strong>
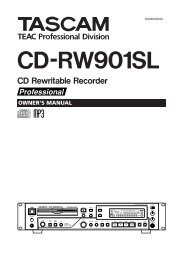
2.1 Front panel<br />
1 POWER switch (STANDBY/ON)<br />
The power switch is used to switch the unit between<br />
standby mode (the time from the internal clock is<br />
displayed) and on (full operational mode).<br />
When the unit is turned on, the display shows<br />
Wel<strong>com</strong>e!.<br />
2 Disc tray<br />
Discs should be placed label side upwards in the disc<br />
tray.<br />
When a disc is loaded into the unit, the display<br />
briefly shows TOC Reading., with a flashing<br />
period following the word “Reading” as the unit<br />
determines the contents of the disc.<br />
3 OPEN/CLOSE key<br />
Use this key to open and close the disc tray. The display<br />
shows OPEN when the tray is opening and<br />
CLOSE when the tray is closing.<br />
4 RHSL key<br />
Use this key when recording to set and adjust the<br />
start point of a recording session or the start of a<br />
track on the recorded disc. See 4.4, “Rehearsal” for<br />
details.<br />
5 DIGITAL DIRECT<br />
When this is active, any digital audio signals input to<br />
the unit bypass the frequency convertor and the digital<br />
volume control. See 4.3.4, “Digital direct” for<br />
details<br />
6 INPUT SELECT<br />
Repeated presses of this key cycle through the different<br />
audio inputs and the input <strong>com</strong>binations. See 4.1,<br />
“Input selection” for full details.<br />
7 REMOTE SENSOR<br />
This is not a control, but the sensor for the remote<br />
control unit. When using the remote control unit,<br />
make sure that there is a clear path from the remote<br />
control unit to the sensor.<br />
8 Display<br />
The display is used to show the current status of the<br />
unit, as well as the current menu settings. See 2.2,<br />
“Rear panel” for details.<br />
9 MENU key<br />
Repeated presses of this key cycle through the different<br />
menu items used to set parameters.<br />
2 • Features of the <strong>CD</strong>-<strong>RW700</strong>—Front panel<br />
A DISPLAY key<br />
Repeated presses of this key cycle through the different<br />
time display modes. These modes differ, according<br />
to whether the unit is playing back or recording a<br />
disc.<br />
B MULTI JOG control<br />
Use this control to select tracks for playback, to set<br />
parameter values, etc.<br />
Typically, turning the control clockwise will increase<br />
a value, and turning it counterclockwise will<br />
decrease the value. There is no “end-stop” to the control—it<br />
may be turned continuously in either<br />
direction.<br />
In addition, pushing the control acts like an “enter”<br />
key, i.e. the currently-displayed value or setting is<br />
confirmed.<br />
C TIMER switch (PLAY, OFF, REC)<br />
Use this switch with the timer functions to control<br />
the behavior of the unit when the timer “on” time is<br />
reached. See 2.5, “Timer operations” for details.<br />
D PHONES jack and LEVEL control<br />
Use a standard pair of stereo headphones, equipped<br />
with a 1/4-inch plug, with this jack.<br />
Adjust the volume from the jack with the control<br />
(turn clockwise for higher volume).<br />
E REC LEVEL controls<br />
Use these concentric controls to adjust the level of<br />
the analog audio signals received at the ANALOG IN<br />
jacks N. Typically, turning one of these controls will<br />
cause the other to turn, but they can be turned independently<br />
of each other.<br />
Use the lower (outer) control to adjust the left signal,<br />
and the upper (inner) control to adjust the right<br />
signal.<br />
Turning the controls clockwise past the “5” position<br />
will boost the signals relative to their input level, and<br />
turning them counterclockwise to a position below<br />
“5” will cut the signals relative to their original input<br />
level.<br />
F FINALIZE key<br />
Use this key to finalize recordable discs. See 1.2,<br />
“Finalizing” and 5.1, “Finalizing” for details.<br />
G ERASE key<br />
Use this key (with <strong>CD</strong>-RW discs only) to erase<br />
tracks, or a whole disc, or to refresh a “bad” disc, or<br />
TASCAM <strong>CD</strong>-<strong>RW700</strong> 11
2 • Features of the <strong>CD</strong>-<strong>RW700</strong>—Rear panel<br />
to unfinalize a finalized disc. See 5.2, “Erasing” for<br />
details.<br />
H STOP key<br />
Use this key to stop playback or recording.<br />
I PLAY key<br />
Use this key to start or resume playback or recording.<br />
J PAUSE key<br />
Use this key to pause playback or recording.<br />
K RECORD key<br />
Use this key to enter record ready mode (see 4,<br />
“Recording” for details) and also to enter manual<br />
track divisions (see 4.2.3, “Manual track division”).<br />
L SYNC REC key<br />
Use this key to turn synchronized recording on and<br />
off (see 4.3.1, “Synchronized recording” for details).<br />
M FADER key<br />
Use this key to start fade-in recordings or to start a<br />
fade-out when recording (see 4.3.6, “Fade-in and<br />
fade-out” for details).<br />
2.2 Rear panel<br />
N ANALOG IN (L, R) (UNBALANCED)<br />
These RCA jacks accept analog audio signals from<br />
suitably-equipped units (–10 dBV, unbalanced).<br />
O ANALOG OUT (L, R) (UNBALANCED)<br />
These RCA jacks output analog audio signals (at<br />
–10 dBV levels, unbalanced) to suitably-equipped<br />
units.<br />
P DIGITAL COAXIAL (IN, OUT)<br />
These two RCA jacks accept and output digital audio<br />
in standard consumer format (SPDIF).<br />
Q DIGITAL OPTICAL (IN, OUT)<br />
These two TOSLINK optical connectors accept and<br />
output digital audio using optical fiber connectors.<br />
2.3 Remote control unit<br />
1 POWER key<br />
Use this to turn the unit between off and standby<br />
modes (equivalent to 1).<br />
2 OPEN/CLOSE key<br />
Opens and closes the disc tray (equivalent to 3).<br />
12 TASCAM <strong>CD</strong>-<strong>RW700</strong><br />
3 Number keys (0 through 10 and +10)<br />
Use these keys for direct entry of track numbers<br />
when playing back, or making a programmed play<br />
list.<br />
4 CLEAR key<br />
Use this key to clear a mistaken entry made with the<br />
number keys.<br />
5 REPEAT key<br />
Use this key to change between the various repeat<br />
modes when playing back (see 3.3, “Repeat play”).<br />
6 DISPLAY key<br />
Use this key to switch between the different display<br />
modes available (equivalent to A).<br />
7 MENU key<br />
Repeated presses of this key cycle through the different<br />
menu items used to set parameters (equivalent to<br />
9).<br />
8 ENTER key<br />
Pressing this key is equivalent to pressing the MULTI<br />
JOG control B to confirm an entry.<br />
9 FADER key<br />
Use this key to start fade-in recordings or to start a<br />
fade-out when recording (equivalent to M).<br />
A MONITOR key<br />
Use this key to output the signals received at the currently<br />
selected input(s) through the outputs when not<br />
recording or in record ready mode.<br />
B PLAY MODE key<br />
Use this key to choose between the different playback<br />
modes (single play, continue play, etc.).<br />
C FINALIZE key<br />
Use this key to finalize recordable discs. See 1.2,<br />
“Finalizing” and 5.1, “Finalizing” for details (equivalent<br />
to F).<br />
D ERASE key<br />
Use this key (with <strong>CD</strong>-RW discs only) to erase<br />
tracks, or a whole disc, or to refresh a “bad” disc, or<br />
to unfinalize a finalized disc. See 5.2, “Erasing” for<br />
details (equivalent to G).<br />
E RECORD key<br />
Use this key to enter record ready mode (equivalent<br />
to K).
F SYNC REC key<br />
Use this key to turn synchronized recording on and<br />
off (equivalent to L). See 4.3.1, “Synchronized<br />
recording” for details).<br />
G REC MUTE key<br />
Use this key when recording, to mute the input signal<br />
for about four seconds and then to enter record ready<br />
mode (see 4.3.5, “Rec mute function”).<br />
H SEARCH keys<br />
Use these keys to move the playback position inside<br />
a track.<br />
I SKIP keys<br />
Use these keys to move between tracks when playing<br />
back (equivalent to turning B). They are also used to<br />
set the parameter values, etc.<br />
J STOP key<br />
Use this key to stop playback or recording (equivalent<br />
to H).<br />
K PAUSE key<br />
Use this key to pause playback or recording (equivalent<br />
to J).<br />
L PLAY key<br />
Use this key to start playback, or enter record mode<br />
from record ready mode (equivalent to I).<br />
2.3.1 Use of the remote control unit<br />
When using the remote control unit, make sure:<br />
• There is a clear unobstructed path between the<br />
remote control unit and the remote sensor 7 on<br />
the main unit.<br />
• The remote control unit is located within 5 m<br />
(15 ft.) of the main unit, and is pointing at approximately<br />
right angles (±30°) to the front panel.<br />
When fitting or replacing the batteries:<br />
• Always make sure that both batteries are replaced<br />
together. Do not mix old and new batteries.<br />
• Do not mix batteries of different types.<br />
• Always make sure that the batteries are located<br />
with the correct polarity (the positive terminals of<br />
2 • Features of the <strong>CD</strong>-<strong>RW700</strong>—Connections<br />
the batteries should match the + markings inside<br />
the battery <strong>com</strong>partment, and the negative terminals<br />
should match the – markings).<br />
• If you are not going to use the remote control unit<br />
for an extended period of time, remove the batteries.<br />
Old batteries can leak, casing damage to the<br />
remote control unit.<br />
• Always dispose of old batteries in the way re<strong>com</strong>mended<br />
by your local garbage disposal authorities.<br />
2.4 Connections<br />
The following should be noted when you connect the<br />
unit to other equipment.<br />
It is possible to connect the unit’s DIGITAL<br />
COAXIAL IN P and DIGITAL OPTICAL IN Q to<br />
other equipment at the same time. However, the unit<br />
can receive signals from only one digital input at a<br />
time.<br />
Audio signals output from the unit are output from<br />
the ANALOG OUT O jacks, as well as from the<br />
DIGITAL COAXIAL OUT jack P and DIGITAL<br />
OPTICAL OUT connector Q simultaneously.<br />
If the ANALOG IN jacks N are connected, it is possible<br />
to select a “mix mode”, where the ANALOG IN<br />
signals are mixed with the digital audio signals at<br />
either the COAXIAL or OPTICAL input. The digital<br />
audio signal is attenuated (cut) by 12 dB when this<br />
mix takes place.<br />
2.5 Timer operations<br />
The unit can use its internal clock to start and stop<br />
playback or recording at pre-determined times.<br />
2.5.1 Setting the clock<br />
1 When the unit must be in standby mode<br />
(power connected but not turned on), and if<br />
the time has not been set, the display shows<br />
Clock Adjust in dimmed characters.<br />
2 Press the MENU key (9 or 7). The display<br />
lights, and shows CLOCK ADJ ?.<br />
3 Press the MULTI JOG control B or the ENTER<br />
key on the remote control unit 8. The “hours”<br />
value will start flashing.<br />
4 Turn the MULTI JOG control or use the remote<br />
control unit SKIP keys I to set the current<br />
hour.<br />
TASCAM <strong>CD</strong>-<strong>RW700</strong> 13
2 • Features of the <strong>CD</strong>-<strong>RW700</strong>—Timer operations<br />
5 Press the MULTI JOG control or the ENTER key<br />
to confirm the hour setting. The “minutes”<br />
value starts flashing.<br />
NOTE<br />
The unit uses the 24 hour “military” clock, where<br />
1 p.m. is represented by 13, etc.<br />
6 Turn the MULTI JOG control or use the remote<br />
control unit SKIP keys to set the current minutes.<br />
7 Press the MULTI JOG control or the ENTER key<br />
to confirm the minute setting and return to the<br />
standby mode. The unit now shows the current<br />
time in standby mode and the colon : between<br />
the hours and the minutes flash once per<br />
second.<br />
NOTE<br />
If the unit is disconnected from the power supply for<br />
an extended period of time, the clock must be reset<br />
(the Clock Adjust message appears<br />
when power is reapplied). For this reason, if connecting<br />
the unit through a power distributor, we suggest<br />
that you use an unswitched outlet on the distributor.<br />
2.5.2 Setting the timer<br />
Once the clock has been set following the procedure<br />
above, the timer can be set.<br />
The procedure below sets the time at which the unit<br />
will turn on and off.<br />
1 Make sure the unit is turned on and a disc is<br />
inserted.<br />
2 Press the MENU key (9 or 7) until the display<br />
shows TIMER ?.<br />
3 Press the MULTI JOG control B or the ENTER<br />
key on the remote control unit 8.<br />
4 Turn the MULTI JOG control or use the remote<br />
control unit SKIP keys I to set the timer<br />
hour.<br />
NOTE<br />
The unit uses the 24 hour “military” clock, where<br />
1 p.m. is represented by 13, etc.<br />
5 Press the MULTI JOG control or the ENTER key<br />
to confirm the hour setting. The “minutes”<br />
value starts flashing.<br />
6 Turn the MULTI JOG control or use the remote<br />
control unit SKIP keys to set the timer<br />
minutes.<br />
7 Press the MULTI JOG control or the ENTER key<br />
to confirm the minutes setting.<br />
14 TASCAM <strong>CD</strong>-<strong>RW700</strong><br />
8 After step 7 above, the display shows OFF<br />
0:00.<br />
9 Repeat steps 4 through 7 above to set the<br />
hours and minutes value.<br />
If the TIMER switch C is set to REC or PLAY,<br />
the display shows a small “clock” icon, to show<br />
that the unit is in timer mode.<br />
2.5.3 Using the timer<br />
When the start time has been set, slide the TIMER<br />
switch C to either the PLAY or REC position,<br />
depending on whether playback or recording is to<br />
start at the specified time.<br />
The display shows a small clock icon to show the<br />
unit is in timer mode, in standby mode as well as in<br />
power-on mode. When the switch is set to REC, and<br />
a recordable disc is loaded, the REC indicator shows<br />
beside the clock icon.<br />
When the unit is in standby mode and timer playback<br />
is selected, the unit will turn on and start playing at<br />
the specified time.<br />
If recording is selected, the unit will turn itself on<br />
one minute before recording is due to start. Recording<br />
will start at the specified time at the first free<br />
location on the disc.<br />
If the off time is set to a time greater than the length<br />
of the disc, and playback is selected, the unit will<br />
start playing at the start of the disc, and continue to<br />
the end.<br />
If timer recording is selected, and the off time is set<br />
to a time which is greater than the remaining time on<br />
the disc, the unit will continue recording until there is<br />
no space left on the disc.<br />
If the timer is set, and the unit is switched on at the<br />
timer start time, the timer operation will have no<br />
effect.<br />
If the unit has been disconnected from the power<br />
supply so that the clock time has been lost, and the<br />
timer switch is set, the clock icon will flash rapidly in<br />
standby mode as an indication that the current timer<br />
setting is invalid.<br />
NOTE<br />
If the unit has recognized the current disc as nonrecordable,<br />
Timer Error! appears when<br />
the timer switch is set to REC. If the timer is set with<br />
the switch at OFF or PLAY and a non-recordable disc<br />
loaded, the unit is then placed in standby, and the<br />
switch then set to the REC position, this error message<br />
will not appear (of course, recording will not<br />
take place under these conditions).
The <strong>CD</strong>-<strong>RW700</strong> can be used to play back <strong>CD</strong>s<br />
(including <strong>CD</strong>-R and <strong>CD</strong>-RW discs that have been<br />
recorded and finalized on other types of recorder), as<br />
well as <strong>CD</strong>-R discs and <strong>CD</strong>-RW discs that have been<br />
recorded on the unit.<br />
3.1 Simple playback operations<br />
1 Press the OPEN/CLOSE key (3 or 2) to open<br />
the disc tray.<br />
2 Discs should be inserted in the tray with the<br />
label uppermost.<br />
3 Press the OPEN/CLOSE key (3 or 2) to close<br />
the tray again.<br />
When a disc is loaded into the unit, the display<br />
briefly shows TOC Reading., with a flashing<br />
period following the word “Reading” as the unit<br />
determines the contents of the disc. When the TOC<br />
has been read, the display shows (at the top left of the<br />
display) one of the following:<br />
<strong>CD</strong> A <strong>com</strong>mercial pre-recorded <strong>CD</strong> or a<br />
finalized <strong>CD</strong>-R<br />
<strong>CD</strong>-R, NO TOC A <strong>CD</strong>-R which has yet to be finalized<br />
<strong>CD</strong>-RW, NO TOC A <strong>CD</strong>-RW which has yet to be finalized<br />
<strong>CD</strong>-RW A finalized <strong>CD</strong>-RW (this differs from a <strong>CD</strong>,<br />
as it may be unfinalized and erased)<br />
[blank] Unusable or unreadable disc or no disc<br />
1 Press the PLAY key (I or L) to start playback<br />
2 Press the STOP key (H or J) to stop playback<br />
3 Press the PAUSE key (J or K) to pause playback<br />
temporarily.<br />
The track number indicators at the bottom of the display<br />
light, to show the available unplayed tracks. If<br />
there are thirteen tracks on the disc, for example,<br />
indicators 1 through 13 will light. If there are more<br />
than 20 tracks on a disc, the track number OVER indicator<br />
(at the bottom of the display) will light.<br />
3.1.1 Time display modes<br />
When playing back a <strong>CD</strong> (or in pause mode), there<br />
are four different time display modes.<br />
In each mode, the current track number is given, followed<br />
by the time, as given below, e.g.<br />
10Tr 0:48<br />
3 - Playback operations<br />
Press the DISPLAY key (A or 6) to cycle through<br />
these time display modes, as described below:<br />
Display shows Meaning<br />
TOTAL Total elapsed time of the disc<br />
[blank] Elapsed time of the current track<br />
TOTAL REMAIN Time remaining of the current disc<br />
REMAIN Time remaining of the current track<br />
NOTE<br />
If programmed playback has been selected (3.2,<br />
“Programmed order playback”), the elapsed time and<br />
total remaining time refer to the programmed material,<br />
not the whole disc.<br />
3.1.2 Track search<br />
Use the MULTI JOG control B or the SKIP keys on<br />
the remote control unit I to jump forward or backward<br />
by one track at a time, as shown on the display.<br />
Note that going forward from the last track of the<br />
disc will “wrap round” to track 1, and going backward<br />
from the first track of the disc will “wrap<br />
round” to the last track of the disc.<br />
The track number indicators at the bottom of the display<br />
shows the selected track (the lit indicator at the<br />
left of the row of indicators).<br />
It is also possible to use the number keys on the<br />
remote control unit 3 to jump directly to a particular<br />
track:<br />
1 To play tracks 1 through 9, simply press the<br />
appropriate key (1 through 9).<br />
2 To play a track whose number is higher than 9,<br />
press the +10 key an appropriate number of<br />
times to set the “tens” digit of the track number,<br />
followed by a single key to set the “units”<br />
digit. For example:<br />
Track 13 = +10, 3<br />
Track 30 = +10, +10, +10, 0<br />
On the remote control unit only, the SEARCH keys<br />
Hcan be used to “fast-forward” and “fast-rewind”<br />
through the disc.<br />
3.1.3 Playback modes<br />
The unit can be set to play back a single track, the<br />
whole disc in the order in which it was created, the<br />
tracks of the disc in a random (shuffled) order, or a<br />
programmed order (see 3.2, “Programmed order<br />
playback”).<br />
TASCAM <strong>CD</strong>-<strong>RW700</strong> 15
3 • Playback operations—Programmed order playback<br />
NOTE<br />
Selecting the playback mode is only possible using<br />
the remote control unit. It is not possible to select the<br />
playback mode using the main unit alone.<br />
1 Press the PLAY MODE key B repeatedly to<br />
cycle the display through the following:<br />
• Program (see 3.2, “Programmed order playback”<br />
below). The red PROGRAM display indicator<br />
lights in this mode.<br />
• Shuffle (random track order). In this mode,<br />
each track is played once before the disc repeats.<br />
Using the track search functions will move backwards<br />
or forwards through the random order, e.g. if<br />
track 7 is followed by track 10, it is possible to use<br />
the track search keys to go back to track 7, which is<br />
remembered as being before immediately before<br />
track 10. The red SHUFFLE display indicator lights<br />
in this mode.<br />
• Continue. Normal playback mode. Programming<br />
is cancelled, and playback continues in<br />
the normal order.<br />
The selected mode is shown in large characters disappears<br />
from the display a few seconds after selecting<br />
the mode, and the display returns to its previous<br />
mode.<br />
3.2 Programmed order playback<br />
The steps to set up to 25 program steps (tracks) to be<br />
played back in a specified order are as follows:<br />
1 Press the PLAY MODE key B until the display<br />
shows Program.<br />
2 The display changes to show<br />
0Tr 0:00 00,<br />
meaning that no program steps have yet had<br />
tracks assigned to them.<br />
3 Use the number keys to enter a track number<br />
(including the +10 key to enter values greater<br />
than 9, as described in 3.1.2, “Track search”).<br />
There is no need to press ENTER.<br />
The track entered is assigned to the program<br />
step, and the display changes, showing the<br />
track number, the total time of the program so<br />
far, and the step number, e.g.<br />
2Tr14:56 03.<br />
4 The next program step can then be entered.<br />
NOTE<br />
Steps 3 and 4 above can be carried out from the<br />
main unit by turning and pushing the MULTI JOG<br />
control B.<br />
16 TASCAM <strong>CD</strong>-<strong>RW700</strong><br />
5 Repeat steps 3 and 4 above until the program<br />
is <strong>com</strong>plete.<br />
6 Press the PLAY key (I or L) to start playback<br />
at the first program step.<br />
The display shows the track, the current time<br />
display, and the program step number.<br />
While in programmed playback mode, using<br />
the SKIP keys I or the MULTI JOG control B<br />
moves backwards and forwards in the order<br />
set in the program.<br />
Use the PAUSE key (J or K) to halt playback temporarily<br />
or the STOP key (H or J) to stop playback<br />
of the program.<br />
If the STOP key is used, when playback is restarted,<br />
it starts from the first program step.<br />
Clear the program by pressing PLAY MODE B until<br />
the display shows Continue. The program is<br />
also cleared when the disc tray is opened, and if the<br />
STOP key is pressed when playback is stopped in<br />
programmed order mode.<br />
The programmed play order is not memorized when<br />
power is turned off.<br />
If an attempt is made to enter more than 25 program<br />
steps, the message PGM Full ! appears on<br />
the display.<br />
3.3 Repeat play<br />
The unit can repeat the whole of the disc (or program)<br />
or the current track only.<br />
NOTE<br />
Selecting the repeat mode is only possible using the<br />
remote control unit. It is not possible to select the<br />
repeat mode using the main unit alone.<br />
1 The unit should be in playback, pause or stop<br />
mode.<br />
2 Continue to press the REPEAT key 5 so that<br />
the display shows Repeat 1 (the REPEAT 1<br />
indicator lights) to repeat one track, or<br />
Repeat ALL (the REPEAT ALL indicator<br />
lights) to repeat the whole disc or program.<br />
3 If playback has not started, restart it.<br />
To cancel repeat mode, press the REPEAT key so that<br />
the display shows Repeat OFF and the<br />
REPEAT indicator goes out.
Before you start recording using the <strong>CD</strong>-<strong>RW700</strong>,<br />
make sure that you understand the following key<br />
points:<br />
• Once you have recorded on a <strong>CD</strong>-R disc, the data<br />
cannot be erased from it.<br />
• You can add tracks to an unfinalized recordable<br />
disc. Once finalized, a <strong>CD</strong>-R disc is “fixed” and<br />
behaves in the same way as a pre-recorded disc.<br />
Finalized <strong>CD</strong>-RW discs, however, can be erased,<br />
refreshed and re-recorded.<br />
4.1 Input selection<br />
To select the input to be recorded, press the INPUT<br />
SELECT key on the main unit 6.<br />
Repeated presses of the key cycle through the following<br />
options:<br />
Analog In Analog in<br />
Optical In Optical digital in<br />
Coaxial In Coaxial digital in<br />
Opt +Analog Optical digital and analog,<br />
mixed<br />
Coax +Analog Coaxial digital and analog,<br />
mixed<br />
In the case of either the coaxial or optical inputs<br />
being selected, either alone, or together with the analog<br />
inputs, the boxed DIGITAL indicator shows on the<br />
display, and the appropriate indicator: COAXIAL or<br />
OPTICAL, lights on the display.<br />
If the analog signal is selected, either alone, or<br />
together with either of the digital inputs, the boxed<br />
ANALOG indicator lights on the display.<br />
4.1.1 Signal volume<br />
The signals from either of the digital inputs (coaxial<br />
or optical) can be mixed with the signals from the<br />
analog inputs. The signal path is as follows (this<br />
description applies, no matter how many inputs are<br />
being mixed):<br />
• The analog signals received at the ANALOG IN<br />
jacks are controlled with the REC LEVEL controls<br />
E.<br />
• Any input analog signals are then mixed with the<br />
digital signals received at either the COAXIAL or<br />
OPTICAL IN (P or Q). If analog and digital sig-<br />
4 - Recording<br />
nals are being mixed, the digital signals are attenuated<br />
by 12 dB. The level of the analog/digital mix<br />
is then controlled using the digital volume menu,<br />
as described below.<br />
1 Press the RECORD key (K or E) to place the<br />
unit in record ready mode.<br />
2 Repeatedly press the MENU key (9 or 7)<br />
until the display shows VOLUME XXXdB<br />
where XXX is the current setting.<br />
3 Use the MULTI JOG control B or the SKIP<br />
keys I to adjust the input volume between -<br />
60dB and +18db (relative to the original<br />
input level). There is also a ---- setting<br />
which represents a <strong>com</strong>plete signal cut.<br />
NOTE<br />
If digital direct is selected, as described below (4.3.4,<br />
“Digital direct”), the digital volume is bypassed and<br />
the menu item does not appear.<br />
4.1.2 Input monitoring<br />
When the unit is in record ready, or record mode, the<br />
input signal is output from the OUT jacks (digital and<br />
analog), allowing you to hear the input signal.<br />
The meters also show the current signal level.<br />
However, it is only possible to record, or to enter<br />
record ready mode, when a recordable disc is<br />
inserted. To allow monitoring of the input signal at<br />
other times, or when the unit is stopped, use the<br />
MONITOR key on the remote control unit A.<br />
The RECORD key K on the main unit will also enter<br />
monitor mode from stop mode when there is no<br />
recordable disc in the unit (when there is a recordable<br />
disc in the unit, pressing the RECORD key<br />
enters record ready mode).<br />
The word MONITOR appears on the display to<br />
show that the output signal is an echo of the input<br />
signal(s). The meters show the current input level.<br />
Exit the monitor mode by using the STOP key.<br />
4.1.3 Frequency conversion<br />
The sampling frequency for <strong>CD</strong>s is 44.1 kHz. The<br />
<strong>CD</strong>-<strong>RW700</strong> will always record (and play back) <strong>CD</strong>s<br />
at this frequency.<br />
However, if recording through a digital connection<br />
(either coaxial or optical) and the source has been<br />
recorded at a frequency other than 44.1 kHz, or is<br />
being played back at a non-standard speed using a<br />
varispeed unit (more than 1% away from the standard),<br />
the <strong>CD</strong>-<strong>RW700</strong>’s internal frequency converter<br />
TASCAM <strong>CD</strong>-<strong>RW700</strong> 17
4 • Recording—Basic recording<br />
will automatically convert the in<strong>com</strong>ing frequency to<br />
44.1 kHz.<br />
NOTE<br />
If digital direct is selected, as described below (4.3.4,<br />
“Digital direct”), the frequency convertor is bypassed.<br />
In this case, recording from digitally-connected<br />
devices is only possible when the source frequency<br />
is 44.1 kHz. If an attempt is made to record from a<br />
digitally-connected source at a different frequency,<br />
the error message Not Fs44.1k!is displayed.<br />
4.2 Basic recording<br />
NOTE<br />
According to the “Red Book” (the specification for<br />
audio <strong>CD</strong>s), a track cannot be less than four seconds<br />
in length, and there can be a maximum of 99 tracks<br />
on an audio <strong>CD</strong>. Bear these limitations in mind when<br />
recording.<br />
If you press either the STOP or the PAUSE key within four<br />
seconds of starting recording, the unit will continue recording<br />
until four seconds have elapsed (since the start of<br />
recording) and then stop or pause as appropriate.<br />
After selecting the input source(s) (4.1, “Input selection”),<br />
it is possible to start recording.<br />
The basic record procedure is as follows:<br />
1 Load a recordable disc is into the unit. As the<br />
disc is loaded, the display shows TOC<br />
Reading.<br />
When the disc has been loaded, the display<br />
indicators show <strong>CD</strong>-R, NO TOC, or <strong>CD</strong>-RW, NO TOC,<br />
as appropriate.<br />
2 Press the RECORD key (K or E). The unit<br />
enters record ready mode, as shown by the REC<br />
and pause indicators on the display. As the unit<br />
enters record ready mode, the display shows<br />
Now OPC (Optimum Power Control), as<br />
the unit prepares to record on the disc.<br />
3 Adjust the level of the source(s), following the<br />
guidelines in 4.1.1, “Signal volume”.<br />
NOTE<br />
The red OVER indicators on the meters should never<br />
light. Unlike analog equipment, digital audio units<br />
produce extremely unpleasant sounds when distorted,<br />
and there is no “headroom” after the 0 mark. If<br />
recording digitally from a <strong>com</strong>mercially-produced <strong>CD</strong>,<br />
the volume set in the menu should be 0dB. This will<br />
maintain all the dynamic range of the source <strong>CD</strong><br />
without clipping. Only boost the signal if the source is<br />
exceptionally quiet.<br />
18 TASCAM <strong>CD</strong>-<strong>RW700</strong><br />
An analog signal input at nominal level, with no cut<br />
or boost from the volume controls, is equivalent to a<br />
reading of –16 dB on the meters (on other words, 0 is<br />
equivalent to 16 dBFS).<br />
4 Press the PLAY key (I or L) or the PAUSE<br />
key (J or J) to start recording.<br />
Note that there is no need to “cue up” the<br />
recording position—the unit always finds the<br />
next available location on the disc and start<br />
recording to it.<br />
5 Press the PAUSE key (J or J) to pause<br />
recording temporarily. The pause indicator on<br />
the display shows this.<br />
Pressing PAUSE or PLAY again restarts recording<br />
with a new track number.<br />
6 Press STOP (H or J) to stop recording. When<br />
recording stops, the display shows PMA<br />
Writing (Program Memory Area) and<br />
the REC indicator flashes for a few seconds as<br />
the unit writes to the disc.<br />
NOTE<br />
While the “PMA Writing” message is displayed, all<br />
keys are disabled, and the unit is actually writing to<br />
disc. Do not disconnect the power or subject the unit<br />
to severe vibration or shocks at this time, as this will<br />
prevent proper recording of the information.<br />
When this message disappears, you must press<br />
the RECORD key (step 2) before restarting the<br />
recording. Recording restarts with a new track<br />
number.<br />
NOTE<br />
Remember that every time recording is paused or<br />
stopped, when recording is restarted, a new track will<br />
always be started. It is not possible to record in two<br />
“stages” within one track.<br />
4.2.1 Playing back tracks<br />
Although an unfinalized disc cannot be played back<br />
on an ordinary <strong>CD</strong> player, the <strong>CD</strong>-<strong>RW700</strong> can play<br />
back tracks that have been recorded.<br />
Use the MULTI JOG control B or the SKIP keys I<br />
to select a track for playback.<br />
4.2.2 Time display while recording<br />
While a recordable disc is being played back, the<br />
four time display modes available in normal playback<br />
as described in 3.1.1, “Time display modes”:<br />
TOTAL, TOTAL REMAIN, track REMAIN and elapsed track<br />
time.
However, during recording there are fewer options<br />
available (obviously, the unit cannot see into the<br />
future and know how much time remains of the track<br />
which is being currently recorded!).<br />
When in record or record ready mode, repeated<br />
presses of the DISPLAY key (A or 6) cycle<br />
between displaying the remaining time left for<br />
recording on the disc (TOTAL REMAIN) and the elapsed<br />
time of the track currently being recorded (no indicator<br />
lit).<br />
When playback is stopped at the start of a recordable<br />
disc, there are only two options available: TOTAL (the<br />
total time recorded so far on the disc) and TOTAL<br />
REMAIN (the total time available on the disc for further<br />
recording).<br />
4.2.3 Manual track division<br />
It is possible to divide the recording into tracks “on<br />
the fly” while recording.<br />
While recording is taking place, press the RECORD<br />
key (K or E) . The current track number is incremented<br />
by one.<br />
For details of automatic track division while recording,<br />
see 4.3.2, “Automatic track division”.<br />
NOTE<br />
According to the “Red Book” (the specification for<br />
audio <strong>CD</strong>s), a track cannot be less than four seconds<br />
in length, and there can be a maximum of 99 tracks<br />
on an audio <strong>CD</strong>. Bear these limitations in mind when<br />
adding track divisions.<br />
4.2.4 Restricting the number of tracks<br />
When making a recording using the <strong>CD</strong>-<strong>RW700</strong>, it is<br />
possible to restrict the number of tracks that may be<br />
recorded at one time. This applies whether the tracks<br />
are being divided manually, as described above<br />
(4.2.3, “Manual track division”) or being divided<br />
automatically (4.3.2, “Automatic track division”).<br />
At any time within record or record ready mode, turn<br />
the MULTI JOG control B or use the SKIP keys I.<br />
This sets the number of remaining tracks, as shown<br />
to the right of the time display. The maximum number<br />
here is limited by the standard limit of 99 tracks,<br />
and the number of tracks currently recorded. In other<br />
words, if 8 tracks have already been recorded on the<br />
disc, the maximum value that can be set here is 91<br />
(91+8=99). If 49 tracks have already been recorded<br />
on the disc, the maximum value that can be set here<br />
is 50 (49+50=99).<br />
4 • Recording—Advanced recording<br />
Every time a track division is made, the number<br />
shown at the right of the display goes down by one.<br />
When the number shown is 1, and a track division is<br />
made, the display shows PMA Writing and<br />
the unit enters stop mode.<br />
The number of remaining tracks can be changed during<br />
recording using the MULTI JOG control.<br />
4.2.5 Full disc<br />
If recording a long program, and the number of<br />
tracks has not been restricted, when there is no space<br />
remaining on the disc for recording, as shown by the<br />
time display (see 4.2.2, “Time display while recording”),<br />
just before the end of the disc is reached, the<br />
unit starts a fade-out over a few seconds (the display<br />
shows FADE OUT).<br />
When the fade-out has finished, the display shows<br />
Disc Full!! for a few seconds, and the unit<br />
then goes into stop mode (the display shows PMA<br />
Writing).<br />
If the disc is a <strong>CD</strong>-RW, the final track can be erased,<br />
if required (see 5.2.1, “Erasing tracks”) and the disc<br />
then finalized. If the disc is a <strong>CD</strong>-R, it must be finalized<br />
prior to use (see 5.1, “Finalizing”).<br />
4.3 Advanced recording<br />
These sections cover more advanced recording<br />
techniques.<br />
4.3.1 Synchronized recording<br />
Synchronized recording means that recording will<br />
begin automatically when a signal is received, and<br />
will stop when the signal ends.<br />
To enable or disable synchronized recording:<br />
1 A recordable disc must be loaded.<br />
2 With the unit in record ready or record mode,<br />
press the SYNC REC key (Lor F).<br />
The display shows SYNC ON briefly, and<br />
then changes to the track and time display.<br />
When synchronized recording is enabled, the<br />
SYNC indicator lights in the display.<br />
The SYNC REC key is also used to turn off synchronized<br />
recording (the display briefly shows<br />
SYNC OFF and then returns to the track<br />
and time display).<br />
The signal level which may be used with synchronized<br />
recording operations (here called the “trigger<br />
level” or “threshold”) is set as below:<br />
TASCAM <strong>CD</strong>-<strong>RW700</strong> 19
4 • Recording—Advanced recording<br />
1 With a recordable disc loaded, press the MENU<br />
key (9 or 7) until the display shows:<br />
S_LVL>> xxdB, where xx is the current<br />
value.<br />
2 Turn the MULTI JOG control B or use the<br />
SKIP keys Ito change the value between -<br />
24, -30, -36, -42, -48, -54, -60,<br />
-66, and -72 dB.<br />
Low numerical values of this setting (towards –24)<br />
mean that it takes a louder signal to trigger the start<br />
of the synchronized recording. A high numerical<br />
value (towards –72) means that a relatively quiet signal<br />
will trigger the start of recording.<br />
The conditions under which an input signal is used as<br />
the trigger to start recording are:<br />
• when recording digitally, a digital start signal is<br />
detected, and audio is subsequently detected<br />
level<br />
S_LVL<br />
or<br />
• the sound level rises above the threshold (see<br />
below) after having been below the threshold for<br />
one second or more. Note that the diagram below<br />
represents a special case (the source is stopped or<br />
paused) of the more general condition, as<br />
explained later:<br />
level<br />
S_LVL<br />
Track start signal<br />
received<br />
Start of recording<br />
noise<br />
level<br />
Start of recording<br />
To start synchronized recording when the source is<br />
stopped or in pause mode:<br />
1 The unit must be in record ready mode, and<br />
the SYNC indicator in the display must be lit, as<br />
explained above.<br />
2 Start playing the source. The pause indicator<br />
disappears from the display, and the unit starts<br />
recording.<br />
20 TASCAM <strong>CD</strong>-<strong>RW700</strong><br />
time<br />
time<br />
The conditions under which synchronized recording<br />
stops are:<br />
• when recording digitally, an appropriate digital signal<br />
is detected. If the signal is detected from a <strong>CD</strong>,<br />
the unit enters record ready mode after 2 seconds.<br />
If the signal is detected from an MD, the unit enters<br />
record ready mode immediately:<br />
level<br />
level<br />
time<br />
Note that the trigger level is not used here.<br />
or<br />
• the sound level drops below the threshold level for<br />
five seconds<br />
level<br />
S_LVL<br />
<strong>CD</strong> stop<br />
2<br />
seconds<br />
MD stop<br />
REC pause<br />
REC pause<br />
time<br />
time<br />
If you set the threshold value so that only high-level<br />
signals trigger recording, remember that this will not<br />
record the start of a piece with a slow fade-in:<br />
level<br />
S_LVL This part of the<br />
track is not<br />
recorded<br />
5 seconds<br />
Recording<br />
starts<br />
REC pause<br />
time<br />
Also remember that when recording from an analog<br />
source, the threshold should be set so that it is higher<br />
than the “noise floor” (the base level of hiss, pops
and crackles which may <strong>com</strong>e from an older vinyl<br />
recording, for example). If the “noise floor” is higher<br />
than the threshold, synchronized recording will not<br />
take place (the rehearsal facility can be used here<br />
(4.4, “Rehearsal”) to help):<br />
level<br />
S_LVL<br />
Because synchronized recording can be turned on<br />
and off while recording is taking place, it is therefore<br />
possible to record with a synchronized automatic<br />
start, and a manual end, or vice versa.<br />
When the source material is being played back<br />
before synchronized recording is enabled, the conditions<br />
under which synchronized recording will start<br />
(after synchronized recording has been enabled) are:<br />
When the signal drops below the threshold for one<br />
second or more and then rises above the threshold<br />
again (this is the general condition, of which starting<br />
synchronized recording from a stopped or paused<br />
source is a special case):<br />
level<br />
S_LVL<br />
Alternatively, when recording digitally from sources<br />
(MD, <strong>CD</strong> and DAT) which output track divisions,<br />
synchronized recording starts when a track division<br />
is received, regardless of the level:<br />
level<br />
S_LVL<br />
Noise is higher<br />
than threshold<br />
Start of track is not registered<br />
At least 1<br />
second<br />
time<br />
Recording<br />
starts<br />
time<br />
Track signal from source<br />
starts recording<br />
time<br />
4 • Recording—Advanced recording<br />
To stop synchronized recording:<br />
1 The unit must be in record mode, and the SYNC<br />
indicator in the display must be lit.<br />
2 Stop the source. After a few seconds, the unit<br />
enters record ready mode. The time between<br />
the stopping of the source and entering record<br />
ready mode is used to record a gap at the end<br />
of the track.<br />
3 If no changes are made to the unit’s controls,<br />
restarting the source restarts recording, as the<br />
unit is still in sync mode and will start recording<br />
again when the source is detected.<br />
NOTE<br />
When recording in sync mode, you may notice a<br />
slight delay between starting the source, and the <strong>CD</strong>-<br />
<strong>RW700</strong> responding. This is due to the way in which<br />
the unit works, storing the data in a memory buffer<br />
before writing it to the disc. The resulting delay is<br />
therefore not a cause for concern—all audio data<br />
received between the start and end points will be<br />
recorded.<br />
4.3.2 Automatic track division<br />
The trigger level, as set above (4.3.1, “Synchronized<br />
recording” can also be used to divide tracks if the A-<br />
TRACK (auto track) function is enabled.<br />
When this function is enabled, the unit automatically<br />
inserts a track division in the recorded material<br />
when:<br />
• recording digitally from MD, <strong>CD</strong> or DAT, an increment<br />
signal is detected and the sound level rises<br />
above the threshold:<br />
level<br />
S_LVL<br />
Track increment<br />
from source<br />
<strong>CD</strong>-RW<br />
increments<br />
track<br />
time<br />
or<br />
• increment signals are unavailable (e.g. analog<br />
recording or digital sources other than MD. <strong>CD</strong> or<br />
DAT) and the sound level has dropped below the<br />
TASCAM <strong>CD</strong>-<strong>RW700</strong> 21
4 • Recording—Advanced recording<br />
threshold for more than two seconds, and sound<br />
has re-started<br />
level<br />
S_LVL<br />
time<br />
To enable or disable automatic track division:<br />
1 With a recordable disc inserted, and with the<br />
unit in record ready mode, press the MENU key<br />
(9 or 7) repeatedly until A_TRACK>XX<br />
is shown, where XX may be ON or OFF.<br />
2 Turn the MULTI JOG control B or use the<br />
SKIP keys Ito change the value to ON or<br />
OFF.<br />
The A-TRACK indicator at the top right of the<br />
display lights when the auto track function is<br />
enabled.<br />
Automatic track division can be turned on or off<br />
while recording is taking place.<br />
NOTE<br />
When recording certain types of material (e.g. certain<br />
types of classical music or spoken word) through the<br />
analog connections, since the track divisions are<br />
determined by relative silence, it is possible that spurious<br />
track divisions will be inserted. Under these<br />
conditions, it may be better to use manual track division<br />
(4.2.3, “Manual track division”).<br />
However, if recording through a digital connection, the track<br />
number will be incremented only when a track division signal<br />
is received, followed by a rise in volume.<br />
level<br />
S_LVL<br />
A fall and subsequent rise in volume alone when recording<br />
digitally from <strong>CD</strong>, MD or DAT is not sufficient to trigger an<br />
22 TASCAM <strong>CD</strong>-<strong>RW700</strong><br />
At least 2<br />
seconds<br />
Track start signal<br />
received<br />
Track incremented<br />
Track<br />
increment<br />
time<br />
automatic track increment.<br />
level<br />
S_LVL<br />
Digital recording from <strong>CD</strong>, MD and<br />
Long "pause"<br />
in signal, but<br />
track is not<br />
incremented<br />
time<br />
You may find it helpful to use the track restriction<br />
facility (see 4.2.4, “Restricting the number of<br />
tracks”) together with the automatic track division.<br />
For instance, if you have recorded two albums on one<br />
DAT tape, and you wish to make two separate <strong>CD</strong>s<br />
from this tape, you can use the MULTI JOG control to<br />
set the number of tracks to the number of tracks <strong>com</strong>prising<br />
the first album.<br />
When the final track of the first album has been<br />
recorded, the unit automatically performs the PMA<br />
writing procedure and enters stop mode.<br />
4.3.4 Digital direct<br />
As mentioned earlier, the digital direct mode<br />
bypasses some of the input circuitry of the <strong>CD</strong>-<br />
<strong>RW700</strong> (the frequency convertor and the digital level<br />
control) to write directly to the disc.<br />
To enable or disable digital direct recording:<br />
1 Ensure that the input source is set to DIGITAL<br />
(either COAXIAL or OPTICAL).<br />
2 Press the DIGITAL DIRECT key 5 (main unit<br />
only). The display shows D_Direct XX<br />
where XX is ON or OFF.
3 Press the DIGITAL DIRECT key to toggle<br />
between ON and OFF.<br />
When digital direct recording is enabled, the<br />
DIGITAL indicator in the display flashes slowly.<br />
NOTE<br />
As mentioned earlier, the digital direct feature<br />
bypasses the frequency convertor. Recording is<br />
therefore only possible from sources recorded with<br />
44.1 kHz sampling frequency.<br />
4.3.5 Rec mute function<br />
The rec mute function allows instant cut-off of the<br />
input signal, and records four seconds of silence on<br />
the disc.<br />
1 While recording is in progress, press the REC<br />
MUTE key G.<br />
The display shows REC MUTE, the meters<br />
stop displaying the current level and the monitored<br />
sound is cut.<br />
2 After about four seconds, the unit enters<br />
record ready mode.<br />
NOTE<br />
This function is only available from the remote control<br />
unit. It is not possible to use this function with the<br />
main unit only.<br />
4.3.6 Fade-in and fade-out<br />
To provide smooth beginnings and endings to<br />
recorded tracks, the unit provides fade facilities.<br />
Fade-ins are from –∞ (silence) to the set input level<br />
(4.1.1, “Signal volume”) and fade-outs go from the<br />
current input volume to silence.<br />
The fade-in and fade-out times can be set independently<br />
in increments of one second, from 1 second to<br />
24 seconds.<br />
To set the fade times:<br />
1 Press the MENU key (9 or 7) repeatedly until<br />
the display shows FADE IN > XXS,<br />
where XX is the current fade-in time, in<br />
seconds.<br />
2 Turn the MULTI JOG control B or use the<br />
SKIP keys Ito change the value of the fade-in<br />
time.<br />
3 Press the MENU key again so that the display<br />
shows FADE OUT> XXS, where XX is<br />
the current fade-out time, in seconds.<br />
4 Turn the MULTI JOG control or use the SKIP<br />
keys to change the value of the fade-out time.<br />
4 • Recording—Rehearsal<br />
It is possible to set the fade-in time only (perform<br />
step 5 after step 2) or the fade-out time<br />
only (in step 1, press the MENU key until the<br />
fade-out time menu item is shown).<br />
To perform the fade-in:<br />
1 With a recordable disc loaded, press the<br />
RECORD key (K or E) so that the unit enters<br />
record ready mode.<br />
2 Start the source material, and press the FADER<br />
key (M or 9).<br />
The display shows FADE IN for the time<br />
specified in the menu item above.<br />
As the fade progresses, the monitored signal<br />
gradually be<strong>com</strong>es louder, reflecting the level<br />
recorded on disc.<br />
To perform a fade-out:<br />
1 While recording, press the FADER key (M or<br />
9).<br />
The display shows FADE OUT for the time<br />
specified in the menu above.<br />
As the fade progresses, the monitored signal<br />
gradually be<strong>com</strong>es quieter, reflecting the level<br />
recorded on disc.<br />
2 When the end of the fade-out time is reached,<br />
the unit goes into record ready mode. Recording<br />
can be restarted with the FADER key or the<br />
PLAY or PAUSE keys.<br />
The fade-in and fade-out times can be reset to new<br />
values while recording is in progress.<br />
Fades are also possible in digital direct mode (4.3.4,<br />
“Digital direct”).<br />
4.4 Rehearsal<br />
There are two areas in which the unit’s rehearsal<br />
facilities can be used: synchronized recording (4.3.1,<br />
“Synchronized recording”) and automatic track division<br />
(4.3.2, “Automatic track division”).<br />
The purpose of the rehearsal facilities is to allow you<br />
to override the automatic synchronized recording and<br />
track division facilities where necessary.<br />
Here is an example where this facility may be of<br />
value:<br />
A piece has been recorded on DAT, with a verbal<br />
count-in immediately prior to the first drum beat.<br />
This count-in is not to be recorded as a part of the<br />
<strong>CD</strong> track, but the threshold level has been set to a<br />
TASCAM <strong>CD</strong>-<strong>RW700</strong> 23
4 • Recording—Rehearsal<br />
level where the fourth count will trigger recording (–<br />
24 dB — this is the limit of the threshold sensitivity<br />
and cannot be adjusted further).<br />
When the rehearsal facility is used, the source is cued<br />
up and played, and the first few seconds of the track<br />
are sampled and looped. The position of the loop can<br />
be adjusted.<br />
S_LVL<br />
S_LVL<br />
When this offset has been set, synchronized recording<br />
takes place with the start occurring at the new<br />
location:<br />
S_LVL<br />
"1" "2" "3"<br />
"1" "2" "3"<br />
"1" "2" "3"<br />
This example shows how the start time can be moved<br />
forward, in order to eliminate unwanted “false<br />
starts”. It is also possible to “slip” the start time<br />
backwards, in order to record a quiet passage that<br />
would otherwise not trigger the sync recording facility<br />
(this is done by the use of a memory buffer).<br />
As well as being used for changing the start time of<br />
synchronized recording, the start of an automatic<br />
track division can also be trimmed backwards and<br />
forwards in a similar way.<br />
24 TASCAM <strong>CD</strong>-<strong>RW700</strong><br />
"4"<br />
Drum beat<br />
Sync recording starts here<br />
This section is looped. The<br />
MULTI JOG control adjusts<br />
the position of the loop<br />
"4"<br />
Drum beat<br />
"4"<br />
Drum beat<br />
Sync recording starts at new<br />
point<br />
Both the sync start trim and the track start trim can<br />
take the same value and can be used in the same<br />
recording.<br />
The maximum trim value is 125 frames on either side<br />
of the original point (represented by 0), where there<br />
are 75 frames in a second (i.e. 1.67 seconds).<br />
4.4.1 Rehearsal for synchronized<br />
recording<br />
To perform a synchronized recording, using the<br />
rehearsal mode to slip the start of the track forwards<br />
or backwards:<br />
1 Load a recordable disc into the unit and make<br />
sure the unit is in stop mode.<br />
2 Cue the source material to the start of the<br />
source track to be recorded (i.e. in the example<br />
above, this would be just before the count-in).<br />
3 Press the RHSL key 4 so that the display<br />
shows Waiting Sync.<br />
4 Start playing the source. When the start of the<br />
track is detected (as explained in 4.3.1, “Synchronized<br />
recording”), the display changes to<br />
Sync RHSL.<br />
5 If the rehearsal does not start at the region of<br />
the true start point, press the RHSL key once<br />
again to “re-arm” the trigger.<br />
6 After nine seconds, the message changes from<br />
Sync RHSL, and the sampled data loops<br />
in a four-second loop. The display shows<br />
Sync 0:0X, where X is the current second<br />
of the loop.<br />
7 Stop the source.<br />
8 Turn the MULTI JOG control B to adjust the<br />
point of the loop. The display shows:<br />
TRIM = +XXXf or<br />
TRIM = -XXXf, where XXX can be a<br />
number between 0 and 125 and changes<br />
back to the Sync 0:0x display when the<br />
loop restarts.<br />
Every time the trim value is changed, the loop<br />
starts replaying from the new start point.<br />
9 When the new start point has been set, press<br />
the STOP key (H or J).<br />
10 Cue up the source material to the original<br />
point set in step 2.<br />
11 Press the RECORD key (K or E) to enter<br />
record ready mode, and then press the SYNC<br />
REC key (L or F).
12 Start playing the source material. The unit<br />
starts recording, with the start point being<br />
determined by the trim value.<br />
NOTE<br />
If a trim setting is made for the sync start, this will<br />
apply to all sync starts and track divisions made in<br />
the future until the value is reset using the procedure<br />
above.<br />
4.4.2 Rehearsal for track division<br />
In the same way that the automatic threshold may<br />
produce a false trigger, starting recording at the<br />
wrong point, the automatic threshold may produce<br />
false track divisions.<br />
By rehearsing the point at which the track division is<br />
to be made, it is possible to trim the division point so<br />
that it corresponds to a the track division which is<br />
actually required.<br />
1 Load a recordable disc into the unit and make<br />
sure the unit is in stop mode.<br />
2 If the unit is not already in auto track mode,<br />
set it so that the A-TRACK indicator is lit on the<br />
display (4.3.2, “Automatic track division”).<br />
3 Cue the source material to a little before the<br />
point of the planned track division.<br />
4 Press the RHSL key 4 twice so that the display<br />
shows Waiting Inc.<br />
If the auto track mode has not previously been<br />
selected, the display shows No Inc<br />
Mode when the key is pressed.<br />
5 Start playing the source. When the start of the<br />
track is detected (as explained in 4.3.1, “Synchronized<br />
recording”), the display changes to<br />
Inc RHSL.<br />
6 If the rehearsal does not start at the region of<br />
the true track division point, press the RHSL<br />
key once again to “re-arm” the trigger.<br />
7 After nine seconds, the message changes from<br />
Inc RHSL, and the sampled data loops in<br />
4 • Recording—Rehearsal<br />
a four-second loop. The display shows Inc<br />
0:0X, where X is the current second of the<br />
loop.<br />
8 Stop the source.<br />
9 Turn the MULTI JOG control B to adjust the<br />
point of the loop. The display shows:<br />
TRIM = +XXXf or<br />
TRIM = -XXXf, where XXX can be a<br />
number between 0 and 125 and changes<br />
back to the Inc 0:0x display when the<br />
loop restarts.<br />
10 When the track division point has been fixed,<br />
press the STOP key (H or J).<br />
11 Press the RECORD key (K or E) to enter<br />
record ready mode. The synchronized recording<br />
mode can be used here, and so the SYNC<br />
REC key (L or F) may be pressed to prepare<br />
for synchronized recording.<br />
12 Cue up the source material to the point where<br />
recording is to start.<br />
13 Start playing the source material. If sync<br />
recording is not being used, start recording on<br />
the <strong>CD</strong>-<strong>RW700</strong> (otherwise recording starts<br />
automatically).<br />
When the track division point (plus or minus the trim<br />
value set earlier) is reached, the recording will divide<br />
into tracks.<br />
Note that if a positive trim value is set (i.e. the start<br />
point of the track is “slipped” to a position past the<br />
“normal” start), the counter shows a minus value<br />
(e.g. -0.02) for the period between the “normal”<br />
and the actual adjusted start position. This minus<br />
value is also displayed when recording starts, if sync<br />
recording has been enabled.<br />
NOTE<br />
If a trim setting is made for the track division, this will<br />
apply to all track divisions and sync starts made in<br />
the future until the value is reset using the procedure<br />
above.<br />
TASCAM <strong>CD</strong>-<strong>RW700</strong> 25
5 - After recording<br />
This section deals with the actions taken after recording:<br />
finalizing for <strong>CD</strong>-R and <strong>CD</strong>-RW discs, and erase<br />
operations for <strong>CD</strong>-RW discs.<br />
Once finalized, <strong>CD</strong>-R discs are truly final—no more<br />
can be recorded on them. By contrast, <strong>CD</strong>-RW discs<br />
can be “unfinalized” using the <strong>CD</strong>-<strong>RW700</strong>, i.e. their<br />
TOC can be deleted, and if there is space, further<br />
material can be recorded on them. Even if the disc is<br />
full, tracks can be erased following the unfinalize<br />
process, and new material can be recorded.<br />
5.1 Finalizing<br />
As has been explained earlier (1.2, “Finalizing”), in<br />
order for a disc to be<strong>com</strong>e a standard <strong>CD</strong>, it must<br />
have a Table of Contents (TOC) written to it. This<br />
process is known as finalizing.<br />
An unfinalized disc can always be distinguished on<br />
the <strong>CD</strong>-<strong>RW700</strong> by the NO TOC indicator under the<br />
disc type on the display being lit when the disc is<br />
inserted.<br />
To finalize a disc:<br />
1 With the unfinalized (recordable) disc loaded,<br />
and the unit in stop mode, press the FINALIZE<br />
key (F or C).<br />
The display shows Finalize OK?.<br />
2 If you do not want to proceed with the finalizing<br />
process, press any other key (such as the<br />
STOP key).<br />
3 To start the finalizing process, press the MULTI<br />
JOG control B or press the ENTER key 8.<br />
4 If finalization has been chosen, the display<br />
changes. The NO TOC indicator goes out, and the<br />
word TOC and the REC indicator flashes in the<br />
display. The unit starts counting down from a<br />
time shown on the display (about 1 minute 10<br />
seconds).<br />
5 After finalization, a <strong>CD</strong>-RW NO TOC changes to<br />
<strong>CD</strong>-RW and a <strong>CD</strong>-R NO TOC changes to a <strong>CD</strong>.<br />
NOTE<br />
Although <strong>CD</strong>-R discs finalized on the <strong>CD</strong>-<strong>RW700</strong><br />
may be replayed on ordinary <strong>CD</strong> players, remember<br />
that finalized <strong>CD</strong>-RW discs may not play on <strong>CD</strong> players.<br />
5.1.1 Unfinalizing <strong>CD</strong>-RW discs<br />
If a <strong>CD</strong>-RW disc has been finalized, it is possible to<br />
erase the Table of Contents in the following way:<br />
26 TASCAM <strong>CD</strong>-<strong>RW700</strong><br />
1 With the finalized disc loaded and the unit in<br />
stop mode, press the ERASE key (G or D).<br />
2 If the display does not show the word<br />
Unfinalize?, turn the MULTI JOG<br />
control B or use the SKIP keys I until it is<br />
displayed.<br />
3 If you do not want to proceed with the unfinalizing<br />
process, press any other key (such as the<br />
STOP key).<br />
4 To start the unfinalizing process, press the<br />
MULTI JOG control B or press the ENTER key<br />
8.<br />
5 If unfinalization has been chosen, the NO TOC<br />
indicator starts flashing in the display, and the<br />
word ERASE also starts flashing. The unit<br />
starts counting down from a time shown on the<br />
display (depending on the disc and material,<br />
this value will be between 50 seconds and 1<br />
minute 30 seconds).<br />
6 After unfinalization, a <strong>CD</strong>-RW indicator changes<br />
to a <strong>CD</strong>-RW NO TOC indicator.<br />
5.2 Erasing<br />
Unfinalizing (described above) is a special case of<br />
erasing a disc. It is also possible to erase a track or<br />
tracks, starting with the last-recorded track, a whole<br />
disc, or to “refresh” a disc.<br />
NOTE<br />
Erase procedures are possible only on a <strong>CD</strong>-RW disc.<br />
Even if a <strong>CD</strong>-RW disc has been finalized, selecting an<br />
erase procedure will automatically unfinalize it prior to erasure.<br />
The disc may then have to be re-finalized. Remember<br />
that it is not possible to perform any erase procedures on a<br />
<strong>CD</strong>-R disc.<br />
5.2.1 Erasing tracks<br />
It is possible to erase the last recorded track, the last<br />
two recorded tracks, the last three recorded tracks,<br />
etc. It is not, however, possible to erase tracks in the<br />
“middle” of the disc.<br />
1 With the disc loaded, and the unit in stop<br />
mode, press the ERASE key (G or D).<br />
2 If the display does not show ERASE XX-<br />
XX?, where XX is the number of the last<br />
track recorded on the disc, turn the MULTI<br />
JOG control B or use the SKIP keys I until it<br />
is displayed.
3 Turn the MULTI JOG control or use the SKIP<br />
keys to change the number of the first track to<br />
be erased. The highest value that this number<br />
can take is the last track recorded (e.g. if 17<br />
tracks have been recorded on the disc, 17-<br />
17 means that the last track only, 17, will be<br />
erased). The lowest value that this number can<br />
take is 2 (if this number was 1, the whole disc<br />
would be erased, as described below).<br />
4 If you do not want to proceed with the erase<br />
operation, press any other key (such as the<br />
STOP key).<br />
NOTE<br />
If only one track has been recorded on the disc, only<br />
the “erase disc” option (5.2.2, “Erasing a whole disc”)<br />
is available.<br />
5 When the range of tracks to be erased has been<br />
selected, press the MULTI JOG control or press<br />
the ENTER key 8.<br />
NOTE<br />
This operation cannot be undone. If you are going to<br />
erase a track or tracks, make sure that they are<br />
recordings that you really want to erase!<br />
6 If the erase operation has been selected, the<br />
word ERASE flashes on the display, and the<br />
timer starts counting down from 0:20 (20<br />
seconds).<br />
7 At the end of the countdown period, the word<br />
Complete appears briefly on the display,<br />
and the display returns to the track/time<br />
display.<br />
5.2.2 Erasing a whole disc<br />
When you want to erase a whole disc (all the tracks<br />
on a disc), follow the procedure below:<br />
1 With the disc loaded, and the unit in stop<br />
mode, press the ERASE key (G or D).<br />
2 Turn the MULTI JOG control B or use the<br />
SKIP keys I until the display shows ERASE<br />
DISC?.<br />
3 If you do not want to proceed with the erase<br />
operation, press any other key (such as the<br />
STOP key).<br />
4 To erase the contents of the disc, press the<br />
MULTI JOG control or press the ENTER key 8.<br />
5 • After recording—Erasing<br />
NOTE<br />
This operation cannot be undone. If you are going to<br />
erase a disc, make sure that it contains only recordings<br />
that you really want to erase!<br />
5 If the erase operation has been selected, the<br />
word ERASE flashes on the display, and the<br />
timer starts counting down a time value shown<br />
on the display.<br />
6 At the end of the countdown period, the word<br />
Complete appears briefly on the display,<br />
and the display returns to the track/time<br />
display.<br />
5.2.3 Refreshing a disc<br />
If a <strong>CD</strong>-RW disc has been corrupted at any point<br />
(e.g. power has been cut off in the middle of a finalize<br />
operation, etc.), or has been used in a <strong>com</strong>puter or<br />
another piece of equipment that makes it unreadable,<br />
it is possible to “refresh” the disc to make it usable<br />
again. This is equivalent to formatting a disk on a<br />
<strong>com</strong>puter to prepare it for use. This operation<br />
destroys all data on the disc.<br />
1 With the disc loaded, and the unit in stop<br />
mode, press the ERASE key (G or D).<br />
2 Turn the MULTI JOG control B or use the<br />
SKIP keys I until the display shows DISC<br />
REFRESH.<br />
3 If you do not want to proceed with the refresh<br />
operation, press any other key (such as the<br />
STOP key).<br />
4 To refresh the disc, press the MULTI JOG control<br />
or press the ENTER key 8.<br />
NOTE<br />
This operation cannot be undone. If you are going to<br />
refresh a disc, make sure that it contains only recordings<br />
that you really want to erase!<br />
5 If the erase operation has been selected, the<br />
word ERASE flashes on the display, and the<br />
timer starts counting down. The refresh operation<br />
typically takes around 20 minutes or so.<br />
6 At the end of the countdown period, the word<br />
Complete appears briefly on the display,<br />
and the display returns to the track/time<br />
display (of course, there are no tracks, and the<br />
disc is as the start, with the total time of the<br />
disc available for recording).<br />
TASCAM <strong>CD</strong>-<strong>RW700</strong> 27
6 - Reference and specifications<br />
6.1 Troubleshooting<br />
Symptom Possible cause and remedy<br />
No sound on playback<br />
(the disc is playing and<br />
the time display is<br />
incrementing)<br />
No meter indication<br />
when a source is input<br />
D-IN UNLOCK!<br />
Cannot record on a<br />
disc (pressing<br />
RECORD shows<br />
MONITOR)<br />
PGM Full !<br />
Disc Full! or<br />
Cannot Rec!<br />
SCMS !!<br />
Not FS 44.1k!<br />
No Inc Mode<br />
Timer Error!<br />
Disc Error<br />
Erase Error!<br />
The display suddenly<br />
shows PMA<br />
Writing<br />
Rec Error<br />
No OPC Area!<br />
The connections from the <strong>CD</strong>-<strong>RW700</strong> to<br />
the amplifier system have not been made<br />
properly, or the input source selector is<br />
not at the correct position.<br />
Analog and/or digital volume (4.1.1, “Signal<br />
volume”) is set too low. The signal is<br />
being input through an unselected input<br />
source (4.1, “Input selection”)<br />
A digital input source has been selected,<br />
but the source is not connected or is not<br />
switched on.<br />
A finalized disc has been inserted. Use<br />
an unfinalized recordable disc.<br />
An attempt has been made to create<br />
more than 25 program steps.<br />
There is no space on the disc, or no<br />
tracks are available, or a general recording<br />
error has occurred<br />
You are trying to record digitally from a<br />
“second-generation” digital copy. Try analog<br />
recording (4.3.3, “SCMS and the <strong>CD</strong>-<br />
<strong>RW700</strong>”.<br />
You are trying to do digital direct recording<br />
from a source which has not been<br />
recorded at 44.1 kHz (4.3.4, “Digital<br />
direct”)<br />
Auto track is not on when an attempt is<br />
being made to rehearse track split times.<br />
An attempt has been made to set timer<br />
recording (2.5.3, “Using the timer”) with a<br />
non-recordable disc, or no disc.<br />
The disc is bad. If it is a <strong>CD</strong>-RW disc, you<br />
may refresh it (5.2.3, “Refreshing a<br />
disc”), otherwise replace the disc.<br />
An error has occurred while trying to<br />
erase the disc<br />
Either the disc is full (this message will<br />
be prefaced by Disc Full!!<br />
(4.2.5, “Full disc”) or an attempt has been<br />
mode to write more than 99 tracks.<br />
General recording error. This may be<br />
caused by vibration or a shock during<br />
recording, for example, or may be the<br />
result of a bad disc. Try recording again<br />
with the same disc. If the message<br />
appears again, try a different disc.<br />
Appears only with <strong>CD</strong>-R discs. The OPC<br />
area is full, and no further recording is<br />
possible on this disc. Finalize the disc.<br />
Symptom Possible cause and remedy<br />
Seen when a <strong>CD</strong>-RW disc OPC area is<br />
full, and the <strong>CD</strong>-<strong>RW700</strong> automatically<br />
cleans up the OPC area for further<br />
recording.<br />
, These messages indicate an internal<br />
, error in the unit. Consult your dealer or<br />
, distributor regarding repair facilities.<br />
OPC Area CLR<br />
Need Repair!<br />
System Err!<br />
Tray Error!<br />
Drive Error!<br />
6.2 Specifications<br />
Recording media type <strong>CD</strong>-R, <strong>CD</strong>-RW<br />
Recording resolution 16-bit linear<br />
Recording sampling fre- 44.1 kHz<br />
quency<br />
Frequency convertor input 32 kHz — 48 kHz<br />
Frequency response 20 Hz — 20 kHz (playback ±0.5 dB,<br />
recording ±1 dB)<br />
S/N ratio 98 dB (playback)<br />
92 dB (recording)<br />
Dynamic range 94 dB (playback)<br />
92 dB (recording)<br />
Total harmonic distortion 0.004% (playback)<br />
0.005% (recording)<br />
Channel separation 90 dB (playback : 1 kHz)<br />
80 dB (recording : 1 kHz)<br />
Wow & flutter Unmeasurable (< 0.001%)<br />
Analog inputs Unbalanced RCA<br />
Nominal input level –10 dBV (FS –16 dB)<br />
Maximum input level + 6dBV<br />
Input impedance 33 kΩ<br />
(unbalanced)<br />
Analog outputs Unbalanced RCA<br />
Nominal output level –10 dBV (FS –16 dB)<br />
Maximum output level+6 dBV<br />
Output impedance 800 Ω (unbalanced)<br />
Headphone output 6 mm (1/4”) stereo<br />
Output level<br />
Digital inputs<br />
35 mW + 35 mW (into 32 Ω)<br />
COAXIAL RCA pin, IEC60958 TYPE II<br />
OPTICAL<br />
Digital outputs<br />
TOSLINK , IEC60958 TYPE II<br />
COAXIAL RCA pin, IEC60958 TYPE II<br />
OPTICAL TOSLINK , IEC60958 TYPE II<br />
Voltage requirements USA/Canada 120 VAC, 60 Hz<br />
U.K./Europe 230 VAC, 50 Hz<br />
Australia 240 VAC, 50 Hz<br />
General export 120/230 VAC, 60 Hz<br />
Power consumption 27 W<br />
Dimensions w x h x d 483 x 98 x 312 (mm)<br />
19 x 3.9 x 12.3 (in)<br />
Weight 6.3 kg (13.9 lbs)<br />
Operating temperature 5˚C to 35˚C (41˚F to 95˚F)<br />
Supplied accessories RC-<strong>RW700</strong> remote control unit<br />
2 x type 3 (AA) batteries<br />
PRINTED IN CHINA MA-0335