
You also want an ePaper? Increase the reach of your titles
YUMPU automatically turns print PDFs into web optimized ePapers that Google loves.
4 • Recording—Advanced recording<br />
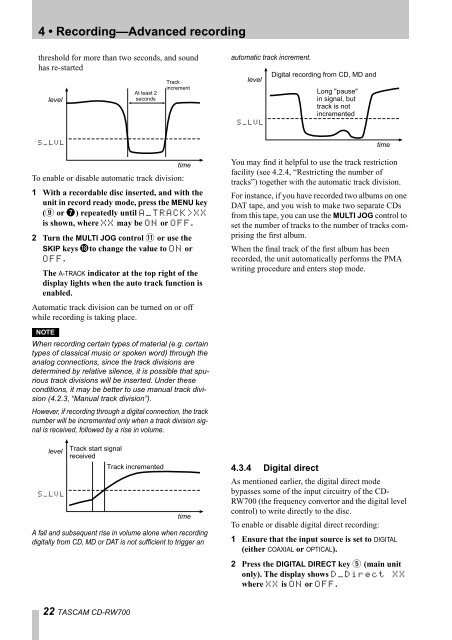
threshold for more than two seconds, and sound<br />
has re-started<br />
level<br />
S_LVL<br />
time<br />
To enable or disable automatic track division:<br />
1 With a recordable disc inserted, and with the<br />
unit in record ready mode, press the MENU key<br />
(9 or 7) repeatedly until A_TRACK>XX<br />
is shown, where XX may be ON or OFF.<br />
2 Turn the MULTI JOG control B or use the<br />
SKIP keys Ito change the value to ON or<br />
OFF.<br />
The A-TRACK indicator at the top right of the<br />
display lights when the auto track function is<br />
enabled.<br />
Automatic track division can be turned on or off<br />
while recording is taking place.<br />
NOTE<br />
When recording certain types of material (e.g. certain<br />
types of classical music or spoken word) through the<br />
analog connections, since the track divisions are<br />
determined by relative silence, it is possible that spurious<br />
track divisions will be inserted. Under these<br />
conditions, it may be better to use manual track division<br />
(4.2.3, “Manual track division”).<br />
However, if recording through a digital connection, the track<br />
number will be incremented only when a track division signal<br />
is received, followed by a rise in volume.<br />
level<br />
S_LVL<br />
A fall and subsequent rise in volume alone when recording<br />
digitally from <strong>CD</strong>, MD or DAT is not sufficient to trigger an<br />
22 TASCAM <strong>CD</strong>-<strong>RW700</strong><br />
At least 2<br />
seconds<br />
Track start signal<br />
received<br />
Track incremented<br />
Track<br />
increment<br />
time<br />
automatic track increment.<br />
level<br />
S_LVL<br />
Digital recording from <strong>CD</strong>, MD and<br />
Long "pause"<br />
in signal, but<br />
track is not<br />
incremented<br />
time<br />
You may find it helpful to use the track restriction<br />
facility (see 4.2.4, “Restricting the number of<br />
tracks”) together with the automatic track division.<br />
For instance, if you have recorded two albums on one<br />
DAT tape, and you wish to make two separate <strong>CD</strong>s<br />
from this tape, you can use the MULTI JOG control to<br />
set the number of tracks to the number of tracks <strong>com</strong>prising<br />
the first album.<br />
When the final track of the first album has been<br />
recorded, the unit automatically performs the PMA<br />
writing procedure and enters stop mode.<br />
4.3.4 Digital direct<br />
As mentioned earlier, the digital direct mode<br />
bypasses some of the input circuitry of the <strong>CD</strong>-<br />
<strong>RW700</strong> (the frequency convertor and the digital level<br />
control) to write directly to the disc.<br />
To enable or disable digital direct recording:<br />
1 Ensure that the input source is set to DIGITAL<br />
(either COAXIAL or OPTICAL).<br />
2 Press the DIGITAL DIRECT key 5 (main unit<br />
only). The display shows D_Direct XX<br />
where XX is ON or OFF.