Create successful ePaper yourself
Turn your PDF publications into a flip-book with our unique Google optimized e-Paper software.
F SYNC REC key<br />
Use this key to turn synchronized recording on and<br />
off (equivalent to L). See 4.3.1, “Synchronized<br />
recording” for details).<br />
G REC MUTE key<br />
Use this key when recording, to mute the input signal<br />
for about four seconds and then to enter record ready<br />
mode (see 4.3.5, “Rec mute function”).<br />
H SEARCH keys<br />
Use these keys to move the playback position inside<br />
a track.<br />
I SKIP keys<br />
Use these keys to move between tracks when playing<br />
back (equivalent to turning B). They are also used to<br />
set the parameter values, etc.<br />
J STOP key<br />
Use this key to stop playback or recording (equivalent<br />
to H).<br />
K PAUSE key<br />
Use this key to pause playback or recording (equivalent<br />
to J).<br />
L PLAY key<br />
Use this key to start playback, or enter record mode<br />
from record ready mode (equivalent to I).<br />
2.3.1 Use of the remote control unit<br />
When using the remote control unit, make sure:<br />
• There is a clear unobstructed path between the<br />
remote control unit and the remote sensor 7 on<br />
the main unit.<br />
• The remote control unit is located within 5 m<br />
(15 ft.) of the main unit, and is pointing at approximately<br />
right angles (±30°) to the front panel.<br />
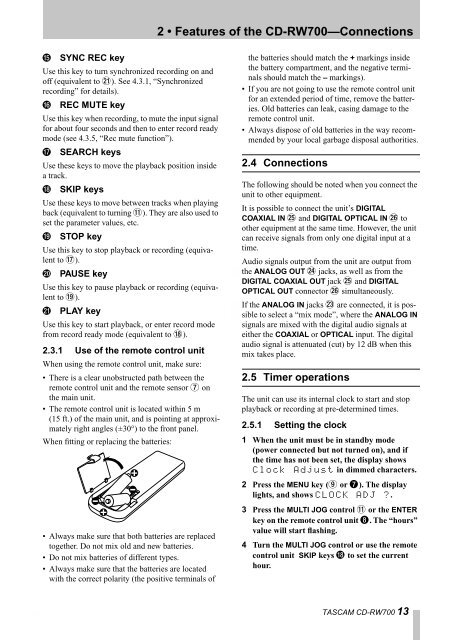
When fitting or replacing the batteries:<br />
• Always make sure that both batteries are replaced<br />
together. Do not mix old and new batteries.<br />
• Do not mix batteries of different types.<br />
• Always make sure that the batteries are located<br />
with the correct polarity (the positive terminals of<br />
2 • Features of the <strong>CD</strong>-<strong>RW700</strong>—Connections<br />
the batteries should match the + markings inside<br />
the battery <strong>com</strong>partment, and the negative terminals<br />
should match the – markings).<br />
• If you are not going to use the remote control unit<br />
for an extended period of time, remove the batteries.<br />
Old batteries can leak, casing damage to the<br />
remote control unit.<br />
• Always dispose of old batteries in the way re<strong>com</strong>mended<br />
by your local garbage disposal authorities.<br />
2.4 Connections<br />
The following should be noted when you connect the<br />
unit to other equipment.<br />
It is possible to connect the unit’s DIGITAL<br />
COAXIAL IN P and DIGITAL OPTICAL IN Q to<br />
other equipment at the same time. However, the unit<br />
can receive signals from only one digital input at a<br />
time.<br />
Audio signals output from the unit are output from<br />
the ANALOG OUT O jacks, as well as from the<br />
DIGITAL COAXIAL OUT jack P and DIGITAL<br />
OPTICAL OUT connector Q simultaneously.<br />
If the ANALOG IN jacks N are connected, it is possible<br />
to select a “mix mode”, where the ANALOG IN<br />
signals are mixed with the digital audio signals at<br />
either the COAXIAL or OPTICAL input. The digital<br />
audio signal is attenuated (cut) by 12 dB when this<br />
mix takes place.<br />
2.5 Timer operations<br />
The unit can use its internal clock to start and stop<br />
playback or recording at pre-determined times.<br />
2.5.1 Setting the clock<br />
1 When the unit must be in standby mode<br />
(power connected but not turned on), and if<br />
the time has not been set, the display shows<br />
Clock Adjust in dimmed characters.<br />
2 Press the MENU key (9 or 7). The display<br />
lights, and shows CLOCK ADJ ?.<br />
3 Press the MULTI JOG control B or the ENTER<br />
key on the remote control unit 8. The “hours”<br />
value will start flashing.<br />
4 Turn the MULTI JOG control or use the remote<br />
control unit SKIP keys I to set the current<br />
hour.<br />
TASCAM <strong>CD</strong>-<strong>RW700</strong> 13


