Mechanized Conversion Kit Installation Instructions for PC-900 - ESAB
Mechanized Conversion Kit Installation Instructions for PC-900 - ESAB
Mechanized Conversion Kit Installation Instructions for PC-900 - ESAB

Create successful ePaper yourself
Turn your PDF publications into a flip-book with our unique Google optimized e-Paper software.
MECHANIZED CONVERSION KIT INSTALLATION INSTRUCTIONS<br />
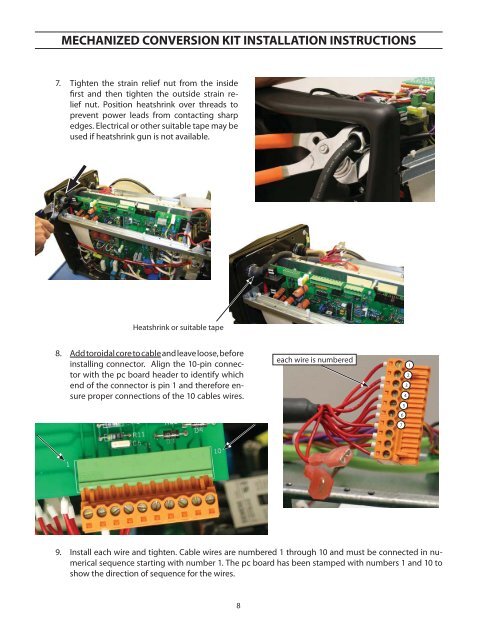
7. Tighten the strain relief nut from the inside<br />
first and then tighten the outside strain relief<br />
nut. Position heatshrink over threads to<br />
prevent power leads from contacting sharp<br />
edges. Electrical or other suitable tape may be<br />
used if heatshrink gun is not available.<br />
Heatshrink or suitable tape<br />
8. Add toroidal core to cable and leave loose, be<strong>for</strong>e<br />
installing connector. Align the 10-pin connector<br />
with the pc board header to identify which<br />
end of the connector is pin 1 and there<strong>for</strong>e ensure<br />
proper connections of the 10 cables wires.<br />
9. Install each wire and tighten. Cable wires are numbered 1 through 10 and must be connected in numerical<br />
sequence starting with number 1. The pc board has been stamped with numbers 1 and 10 to<br />
show the direction of sequence <strong>for</strong> the wires.<br />
8<br />
each wire is numbered<br />
9<br />
10<br />
8<br />
6<br />
7<br />
5<br />
3<br />
4<br />
2<br />
1