Using the Rockwell BootP Utility
Using the Rockwell BootP Utility
Using the Rockwell BootP Utility

You also want an ePaper? Increase the reach of your titles
YUMPU automatically turns print PDFs into web optimized ePapers that Google loves.
4-2 Configuring <strong>the</strong> 1756-ENBT Module<br />
<strong>Using</strong> <strong>the</strong> <strong>Rockwell</strong><br />
<strong>BootP</strong> <strong>Utility</strong><br />
Publication 1756-UM050A-EN-P - December 2001<br />
The <strong>Rockwell</strong> <strong>BootP</strong> utility is a stand alone program that incorporates<br />
<strong>the</strong> functionality of standard <strong>BootP</strong> software with a user friendly<br />
graphical interface. It is located in <strong>the</strong> Utils directory on <strong>the</strong><br />
RSLogix 5000 installation CD. The 1794-AENT adapter must have<br />
<strong>BootP</strong> enabled (factory default) to use <strong>the</strong> utility.<br />
To configure your adapter using <strong>the</strong> <strong>BootP</strong> utility, perform <strong>the</strong><br />
following steps:<br />
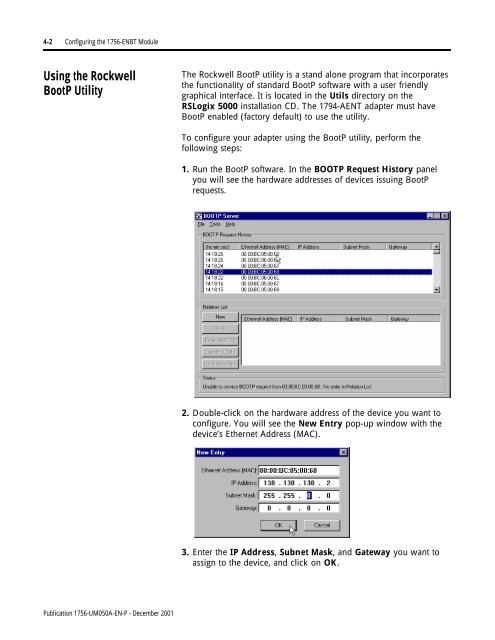
1. Run <strong>the</strong> <strong>BootP</strong> software. In <strong>the</strong> BOOTP Request History panel<br />
you will see <strong>the</strong> hardware addresses of devices issuing <strong>BootP</strong><br />
requests.<br />
2. Double-click on <strong>the</strong> hardware address of <strong>the</strong> device you want to<br />
configure. You will see <strong>the</strong> New Entry pop-up window with <strong>the</strong><br />
device’s E<strong>the</strong>rnet Address (MAC).<br />
3. Enter <strong>the</strong> IP Address, Subnet Mask, and Gateway you want to<br />
assign to <strong>the</strong> device, and click on OK.
Configuring <strong>the</strong> 1756-ENBT Module 4-3<br />
The device will be added to <strong>the</strong> Relation List, displaying <strong>the</strong><br />
E<strong>the</strong>rnet Address (MAC) and corresponding IP Address, Subnet<br />
Mask, and Gateway (if applicable).<br />
4. If you want to permanently assign this configuration to <strong>the</strong> device,<br />
highlight <strong>the</strong> device and click on <strong>the</strong> Disable BOOTP button.<br />
When power is recycled to <strong>the</strong> device, it will use <strong>the</strong> configuration<br />
you assigned and not issue a <strong>BootP</strong> request.<br />
Note: To enable <strong>BootP</strong> for a device that has had <strong>BootP</strong> disabled,<br />
highlight <strong>the</strong> device and click on <strong>the</strong> Enable BOOTP button.<br />
Publication 1756-UM050A-EN-P - December 2001
4-4 Configuring <strong>the</strong> 1756-ENBT Module<br />
Publication 1756-UM050A-EN-P - December 2001<br />
<strong>Using</strong> Force IP Renew To Reconfigure a Device<br />
The Force IP Renew feature can be used to reconfigure a device that<br />
has Bootp disabled. This can be useful:<br />
• if you do not know <strong>the</strong> IP address of a configured device (e.g.,<br />
<strong>the</strong> address is not written on <strong>the</strong> label or <strong>the</strong> label is missing), or<br />
• if you know <strong>the</strong> IP address but want to change <strong>the</strong><br />
configuration.<br />
To use this feature perform <strong>the</strong> following steps:<br />
1. Connect <strong>the</strong> device to your network and run <strong>the</strong> Bootp utility.<br />
2. Click on <strong>the</strong> New button. The New Entry pop-up window will<br />
open.<br />
3. Enter <strong>the</strong> fixed E<strong>the</strong>rnet Address (MAC) of your device.
Configuring <strong>the</strong> 1756-ENBT Module 4-5<br />
4. Enter <strong>the</strong> IP Address, Subnet Mask, and Gateway you want to<br />
assign to <strong>the</strong> device, and click on OK. The device will appear in<br />
<strong>the</strong> Relation List.<br />
5. Select <strong>the</strong> device from <strong>the</strong> Relation List and click on <strong>the</strong> Force IP<br />
Renew button. Then cycle power to <strong>the</strong> device.<br />
The device will perform its power-up diagnostics and issue a Bootp<br />
request. The Bootp utility will respond by assigning it <strong>the</strong><br />
configuration you just specified.<br />
The device is now able to communicate over <strong>the</strong> network, using<br />
<strong>the</strong> new configuration.<br />
Publication 1756-UM050A-EN-P - December 2001
4-6 Configuring <strong>the</strong> 1756-ENBT Module<br />
Publication 1756-UM050A-EN-P - December 2001<br />
Saving <strong>the</strong> Relation List<br />
You can save <strong>the</strong> Relation List to be used later. To save <strong>the</strong> Relation<br />
List perform <strong>the</strong> following steps:<br />
1. Select Save As... from <strong>the</strong> File menu. You will see <strong>the</strong> following<br />
window.<br />
2. Select <strong>the</strong> folder you want to Save in:<br />
3. Enter a File name for <strong>the</strong> Relation List (e.g., “Control System<br />
Configuration”) and click on Save.<br />
You can leave <strong>the</strong> Save as type at <strong>the</strong> default setting (Bootp Config<br />
Files (*.bpc).