Please click here - ETO Doors
Please click here - ETO Doors
Please click here - ETO Doors

Create successful ePaper yourself
Turn your PDF publications into a flip-book with our unique Google optimized e-Paper software.
hanging assembly on the assembly<br />
1 2 -1 holding block. 2 -2<br />
6<br />
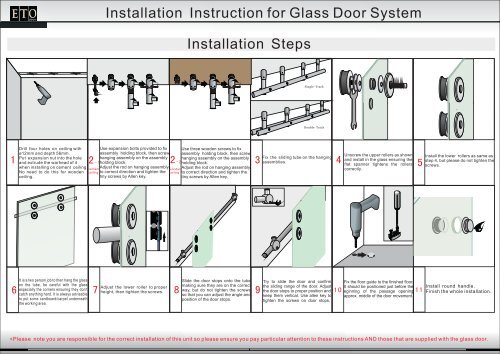
Drill four holes on ceiling with Use expansion bolts provided to fix Use three wooden screws to fix<br />
ø12mm and depth 56mm.<br />
assembly holding block,<br />
then screw assembly holding block,<br />
then screw<br />
Put expansion nut into the hole<br />
hanging assembly on the assembly<br />
and extrude the warhead of it<br />
holding block.<br />
when installing on cement<br />
ceiling. cement Adjust the rod on hanging assembly<br />
wooden Adjust the rod on hanging assembly<br />
No need to do this for wooden ceiling to correct direction and tighten the ceiling to correct direction and tighten the<br />
ceiling.<br />
tiny screws by Allen key.<br />
tiny screws by Allen key.<br />
It is a two person job to then hang the glass<br />
on the tube, be careful with the glass<br />
especially the corners ensuring they don't<br />
catch anything hard. It is always advisable<br />
to put some cardboard/carpet underneath<br />
the working area.<br />
7<br />
Installation Instruction for Glass Door System<br />
Adjust the lower roller to proper<br />
height, then tighten the screws.<br />
8<br />
Installation Steps<br />
3<br />
Single -Track<br />
Double- Track<br />
Fix the sliding tube on the hanging<br />
assemblies.<br />
4<br />
Unscrew the upper rollers as shown<br />
and install in the glass ensuring the<br />
flat spanner tightens the rollers<br />
correctly.<br />
5<br />
Install the lower rollers as same as<br />
step 4, but please do not tighten the<br />
screws.<br />
Slide the door stops onto the tube Try to slide the door and confirm Fix the floor guide to the finished floor.<br />
making sure they are on the correct the sliding range of the door. Adjust It should be positioned just before the Install round handle.<br />
way, but do not tighten the screws 9 the door stops to proper position and 10 eginning of the passage opening 11 Finish the whole installation.<br />
so that you can adjust the angle and keep them vertical. Use allen key to approx. middle of the door movement.<br />
position of the door stops.<br />
t ighten the screws on door stops.<br />
*<strong>Please</strong> note you are responsible for the correct installation of this unit so please ensure you pay particular attention to these instructions AND those that are supplied with the glass door.
Distance Between Ceiling and Ground. H1<br />
03 04 05<br />
H=H1-26mm<br />
Height of Door. H<br />
02<br />
01<br />
Installation Instruction for Glass Door System<br />
06<br />
07<br />
*<strong>Please</strong> confirm the ceiling is<br />
solid enough.<br />
01 Lower Roller (x2)<br />
02<br />
03<br />
04<br />
05<br />
06<br />
07<br />
Upper Roller<br />
Door Stopper<br />
Sliding Tube<br />
Ceiling Support<br />
Door Handle<br />
Floor Guide<br />
(x2)<br />
(x2)<br />
(x1)<br />
(x4)<br />
(x1)<br />
(x1)<br />
50<br />
Φ50<br />
2-Φ26<br />
40<br />
50<br />
26<br />
Thickness of glass door 3/8"<br />
Floor Guide<br />
80<br />
1\2 H<br />
50<br />
70<br />
You need to ensure the floor guide<br />
is adjusted correctly for 8mm glass,<br />
if you need to adjust, push the plastic<br />
part partially out of the metal and turn<br />
until in the correct position marked<br />
13.5mm.