Hotsy 558-559_0111 - ETS Company Pressure Washers and More
Hotsy 558-559_0111 - ETS Company Pressure Washers and More
Hotsy 558-559_0111 - ETS Company Pressure Washers and More

Create successful ePaper yourself
Turn your PDF publications into a flip-book with our unique Google optimized e-Paper software.
Unpacking<br />
ASSEMBLY<br />
Unpack carefully. Wear safety glasses or goggles while<br />
unpacking, assembling or operating pressure washer. If<br />
there are missing components or hidden damage<br />
immediately contact distributor or carrier concerning<br />
discrepancies.<br />
1. Cut strapping b<strong>and</strong> from pressure washer <strong>and</strong> pallet.<br />
2. Remove pressure washer from pallet.<br />
Parts Included<br />
• <strong>Pressure</strong> Washer<br />
<strong>Pressure</strong> Hose<br />
Hose Hanger<br />
W<strong>and</strong><br />
Parts Bag Containing:<br />
■ Adjustable <strong>Pressure</strong> Nozzle<br />
■ Garden Hose Connector<br />
■ Quick Disconnect<br />
■ Trigger Gun<br />
■ Garden Hose Connector Spring<br />
■ Quick Disconnect Plug<br />
Operating Instructions <strong>and</strong> Parts Manual<br />
Tools Required<br />
10" Adjustable Crescent Wrench (2 ea.)<br />
1/2" Allen Wrench<br />
Small Flat Head Screwdriver<br />
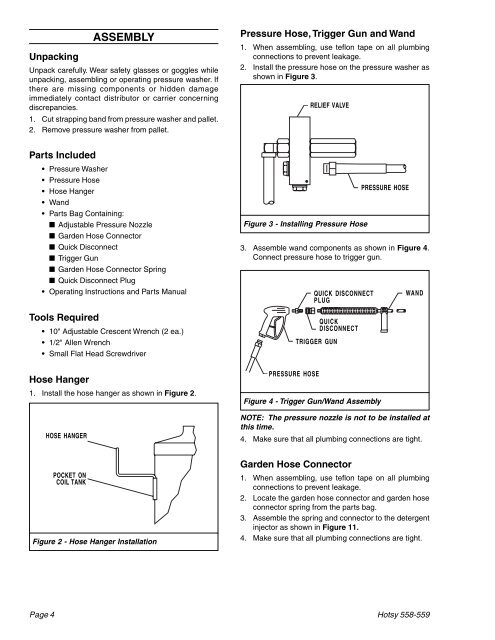
Hose Hanger<br />
1. Install the hose hanger as shown in Figure 2.<br />
HOSE HANGER<br />
POCKET ON<br />
COIL TANK<br />
Figure 2 - Hose Hanger Installation<br />
<strong>Pressure</strong> Hose, Trigger Gun <strong>and</strong> W<strong>and</strong><br />
1. When assembling, use teflon tape on all plumbing<br />
connections to prevent leakage.<br />
2. Install the pressure hose on the pressure washer as<br />
shown in Figure 3.<br />
Figure 3 - Installing <strong>Pressure</strong> Hose<br />
3. Assemble w<strong>and</strong> components as shown in Figure 4.<br />
Connect pressure hose to trigger gun.<br />
PRESSURE HOSE<br />
RELIEF VALVE<br />
QUICK DISCONNECT<br />
PLUG<br />
QUICK<br />
DISCONNECT<br />
TRIGGER GUN<br />
Figure 4 - Trigger Gun/W<strong>and</strong> Assembly<br />
NOTE: The pressure nozzle is not to be installed at<br />
this time.<br />
4. Make sure that all plumbing connections are tight.<br />
Garden Hose Connector<br />
PRESSURE HOSE<br />
1. When assembling, use teflon tape on all plumbing<br />
connections to prevent leakage.<br />
2. Locate the garden hose connector <strong>and</strong> garden hose<br />
connector spring from the parts bag.<br />
3. Assemble the spring <strong>and</strong> connector to the detergent<br />
injector as shown in Figure 11.<br />
4. Make sure that all plumbing connections are tight.<br />
Page 4 <strong>Hotsy</strong> <strong>558</strong>-<strong>559</strong><br />
WAND