Hotsy 558-559_0111 - ETS Company Pressure Washers and More
Hotsy 558-559_0111 - ETS Company Pressure Washers and More
Hotsy 558-559_0111 - ETS Company Pressure Washers and More

Create successful ePaper yourself
Turn your PDF publications into a flip-book with our unique Google optimized e-Paper software.
Before Starting<br />
<strong>Hotsy</strong> <strong>558</strong>-<strong>559</strong><br />
OPERATION<br />
1. Read all manuals provided with this pressure washer.<br />
Become familiar with location <strong>and</strong> function of all<br />
operating <strong>and</strong> safety controls.<br />
Grounding Instructions: This product must be electrically<br />
grounded. If it would malfunction or break down, grounding<br />
provides a path of least resistance for electric current to<br />
reduce the risk of electric shock. This machine must be<br />
wired into an appropriate outlet that is properly installed<br />
<strong>and</strong> grounded in accordance with all local codes <strong>and</strong><br />
ordinances.<br />
DANGER: Improper wiring connections of the equipment<br />
can result in a risk of electrocution. Check with<br />
a qualified electrician or service personnel if you are<br />
in doubt as to whether the outlet is properly grounded.<br />
WARNING: Make sure all switches <strong>and</strong> controls are<br />
in the OFF position prior to plugging in electrical cord.<br />
WARNING: DO NOT st<strong>and</strong> in water while plugging or<br />
unplugging electrical cord.<br />
CAUTION: This pressure washer is equipped with a<br />
UL approved ground fault circuit interrupter (GFCI)<br />
power cord. Use UL grounded type receptacles of<br />
proper voltage <strong>and</strong> amperage ratings. Where a properly<br />
grounded receptacle is not available, it is the<br />
personal responsibility of the owner to have one<br />
installed. Always disconnect power before servicing<br />
your pressure washer.<br />
CAUTION: This machine is equipped with a 35 foot<br />
long power cord protected by a ground fault circuit<br />
interrupter (GFCI). DO NOT use extension cords due<br />
to possible severe electrical shock <strong>and</strong>/or damage to<br />
the machine.<br />
2. Connect electrical cord to an overload protected<br />
115VAC/60Hz/1Ph grounded circuit, minimum 18 ampere<br />
rated. Test the GFCI using the reset <strong>and</strong> test<br />
procedure located on the GFCI device. Do not use<br />
machine if GFCI fails test. The GFCI must be reset<br />
<strong>and</strong> tested with every use.<br />
WARNING: Check hoses, fittings, w<strong>and</strong>, trigger gun<br />
<strong>and</strong> fuel connections daily for signs of wear, cracks<br />
<strong>and</strong> looseness, <strong>and</strong> replace as required.<br />
3. Connect water supply hose to the garden hose connector,<br />
see Figure 1 for location. The water faucet<br />
<strong>and</strong> supply hose must be capable of providing a minimum<br />
of 2.2 gallons per minute (GPM).<br />
4. This machine was factory built for either LP vapor fuel<br />
or Natural Gas. See instructions under Fuel Supply.<br />
5. Check pump oil level.<br />
6. If detergents are to be used, only use detergents<br />
intended for pressure washers. Follow instructions<br />
on the detergent container.<br />
IMPORTANT: Before installing pressure nozzle on initial<br />
start-up, turn on the water supply, start the pump<br />
by pressing the pump ON switch, <strong>and</strong> hold the trigger<br />
gun trigger open until water appears at the end of<br />
the w<strong>and</strong>. Allow water to run from the end of the w<strong>and</strong><br />
until clear to prevent the nozzle from clogging.<br />
IMPORTANT: If the pressure washer has not been<br />
used for an extended period of time, remove the pressure<br />
nozzle from the end of the trigger gun <strong>and</strong> turn<br />
on water supply, <strong>and</strong> start the pump by pressing the<br />
pump ON switch. Hold the trigger gun trigger open<br />
<strong>and</strong> allow water to run from the end of the w<strong>and</strong> until<br />
clear.<br />
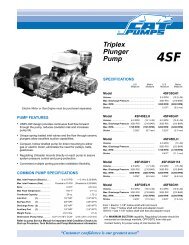
7. Install the adjustable pressure nozzle on end of w<strong>and</strong>,<br />
refer to Figure 6.<br />
ADJUSTABLE<br />
PRESSURE NOZZLE<br />
MANUAL TRIGGER LOCK<br />
Figure 6 - Nozzle Installation/Manual Trigger Lock<br />
NOTE: To prevent damage to the pressure nozzle, only<br />
place the wrench on hex area when tightening.<br />
IMPORTANT: The trigger gun provided with this pressure<br />
washer is equipped with a manual trigger lock<br />
to prevent accidental operation of the trigger gun,<br />
refer to Figure 6. The trigger lock should be used<br />
whenever the trigger gun is not in use.<br />
IMPORTANT: Pump may require priming the first time<br />
the pressure washer is run. See step 8.<br />
8. If you are running the machine for the first time, or<br />
the machine has been sitting for a period of time, the<br />
pump may require priming. To prime the pump, run<br />
pressure washer with only the pump switch on.<br />
IMPORTANT: On initial start-up or if maintenance has<br />
been performed on the burner assembly, it will be necessary<br />
to bleed the air from the gas line before the<br />
pilot will light.<br />
9. If you are running the machine for the first time or<br />
have performed maintenance to the burner assembly,<br />
there will be air in the gas line. To bleed out the air<br />
from the gas line, run pressure washer with pump<br />
<strong>and</strong> burner switches ON <strong>and</strong> thermostat on highest<br />
setting. Squeeze the trigger of the trigger gun for 15<br />
seconds. If the burner has not ignited, release the<br />
trigger for 5 seconds then squeeze for 15 seconds. If<br />
the burner has not ignited after 10 tries, see the<br />
Troubleshooting Guide in this manual.<br />
CAUTION: Have a qualified gas service technician<br />
install <strong>and</strong> service your equipment.<br />
DANGER: Never expose a spark or flame where there<br />
may be unburned gas present.<br />
Page 7