BRUKSANVISNING VÄRMEPUMP MSR3-12 - Byggmax
BRUKSANVISNING VÄRMEPUMP MSR3-12 - Byggmax
BRUKSANVISNING VÄRMEPUMP MSR3-12 - Byggmax

Create successful ePaper yourself
Turn your PDF publications into a flip-book with our unique Google optimized e-Paper software.
INSTALLATION INSTRUCTIONS<br />
3. Connective Pipe and Drainage Installation<br />
Drainage<br />
1. Run the drain hose sloping downward. Do not install the drain hose as illustrated below.<br />
2. When connecting extension drain hose, insulate the connecting part of extension<br />
drain hose with a shield pipe, do not let the drain hose slack.<br />
Connective pipe<br />
1. For the left-hand and right-hand piping, remove the pipe cover from the side panel.<br />
Explain to clients that the pipe cover must be kept as it may be used when relocate the<br />
air conditioner to any other place.<br />
2. For the rear-right-hand and rear-left-hand piping, install the piping as shown. Bend the<br />
connective pipe to be laid at 43mm height or less from the wall.<br />
3. Fix the end of the connective pipe. (Refer to Tightening Connection in REFRIGERANT<br />
PIPING CONNECTION)<br />
Right-hand piping<br />
Slid Part cover<br />
Do not block water flow by a rise.<br />
Left-hand piping<br />
Fig.8<br />
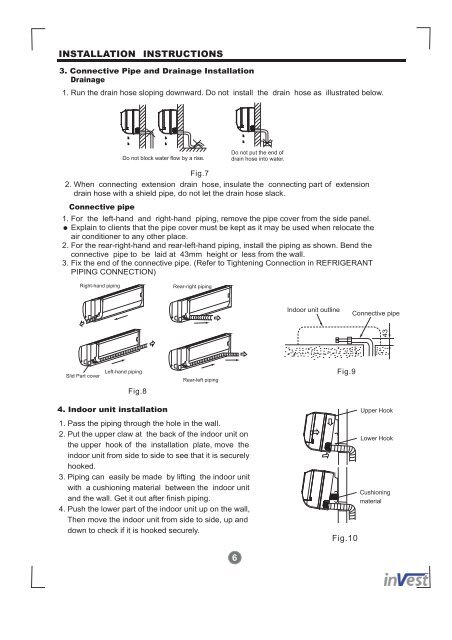
4. Indoor unit installation<br />
Fig.7<br />
Rear-right piping<br />
Rear-left piping<br />
1. Pass the piping through the hole in the wall.<br />
2. Put the upper claw at the back of the indoor unit on<br />
the upper hook of the installation plate, move the<br />
indoor unit from side to side to see that it is securely<br />
hooked.<br />
3. Piping can easily be made by lifting the indoor unit<br />
with a cushioning material between the indoor unit<br />
and the wall. Get it out after finish piping.<br />
4. Push the lower part of the indoor unit up on the wall,<br />
Then move the indoor unit from side to side, up and<br />
down to check if it is hooked securely.<br />
Do not put the end of<br />
drain hose into water.<br />
6<br />
Indoor unit outline<br />
.<br />
.<br />
. .<br />
.<br />
.<br />
.<br />
.<br />
. .<br />
.<br />
.<br />
. .<br />
. .<br />
.<br />
.<br />
.<br />
.<br />
. . .<br />
.<br />
.<br />
. .<br />
.<br />
.<br />
. . ..<br />
. .<br />
. .<br />
. . . .<br />
.<br />
.<br />
.<br />
.<br />
Connective pipe<br />
. . .<br />
. . .<br />
. . . . . . . .<br />
.. . . . . . .<br />
. . . .<br />
. . .<br />
. .<br />
.<br />
.<br />
.<br />
.<br />
.<br />
.<br />
. . .<br />
... .<br />
. .<br />
.<br />
. .<br />
.<br />
. .<br />
.<br />
.<br />
. .<br />
.<br />
.<br />
.<br />
.<br />
..<br />
.<br />
.<br />
..<br />
..<br />
.. ..<br />
.<br />
. . . . .<br />
.<br />
.<br />
. ... .<br />
. . .<br />
Fig.9<br />
Fig.10<br />
. . . . .<br />
.<br />
.<br />
.<br />
43<br />
.<br />
.<br />
. .<br />
.<br />
. . .<br />
.<br />
Upper Hook<br />
Lower Hook<br />
Cushioning<br />
material