BRUKSANVISNING VÄRMEPUMP MSR3-12 - Byggmax
BRUKSANVISNING VÄRMEPUMP MSR3-12 - Byggmax
BRUKSANVISNING VÄRMEPUMP MSR3-12 - Byggmax

You also want an ePaper? Increase the reach of your titles
YUMPU automatically turns print PDFs into web optimized ePapers that Google loves.
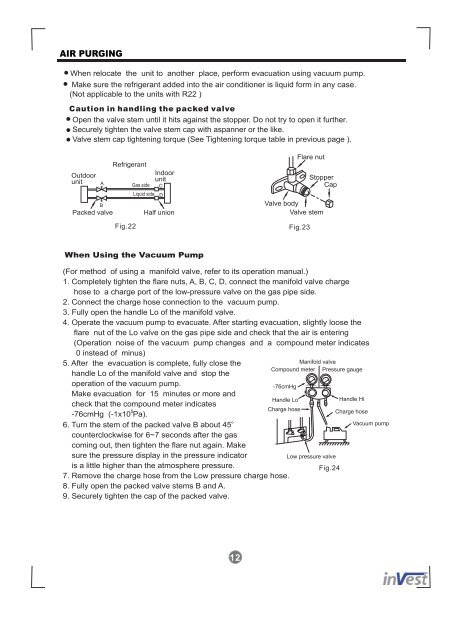
AIR PURGING<br />
When relocate the unit to another place, perform evacuation using vacuum pump.<br />
Make sure the refrigerant added into the air conditioner is liquid form in any case.<br />
(Not applicable to the units with R22 )<br />
Caution in handling the packed valve<br />
Open the valve stem until it hits against the stopper. Do not try to open it further.<br />
Securely tighten the valve stem cap with aspanner or the like.<br />
Valve stem cap tightening torque (See Tightening torque table in previous page ).<br />
Outdoor<br />
unit<br />
A<br />
B<br />
Refrigerant<br />
Gas side<br />
Liquid side<br />
Indoor<br />
unit<br />
Packed valve Half union<br />
C<br />
D<br />
Flare nut<br />
Stopper<br />
Cap<br />
Valve body<br />
Valve stem<br />
Fig.22 Fig.23<br />
When Using the Vacuum Pump<br />
(For method of using a manifold valve, refer to its operation manual.)<br />
1. Completely tighten the flare nuts, A, B, C, D, connect the manifold valve charge<br />
hose to a charge port of the low-pressure valve on the gas pipe side.<br />
2. Connect the charge hose connection to the vacuum pump.<br />
3. Fully open the handle Lo of the manifold valve.<br />
4. Operate the vacuum pump to evacuate. After starting evacuation, slightly loose the<br />
flare nut of the Lo valve on the gas pipe side and check that the air is entering<br />
(Operation noise of the vacuum pump changes and a compound meter indicates<br />
0 instead of minus)<br />
5. After the evacuation is complete, fully close the<br />
handle Lo of the manifold valve and stop the<br />
Manifold valve<br />
Compound meter Pressure gauge<br />
operation of the vacuum pump.<br />
-76cmHg<br />
Make evacuation for 15 minutes or more and<br />
check that the compound meter indicates<br />
5<br />
-76cmHg (-1x10 Pa).<br />
o<br />
6. Turn the stem of the packed valve B about 45<br />
counterclockwise for 6~7 seconds after the gas<br />
coming out, then tighten the flare nut again. Make<br />
Handle Lo<br />
Charge hose<br />
Handle Hi<br />
Charge hose<br />
sure the pressure display in the pressure indicator<br />
Low pressure valve<br />
is a little higher than the atmosphere pressure.<br />
Fig.24<br />
7. Remove the charge hose from the Low pressure charge hose.<br />
8. Fully open the packed valve stems B and A.<br />
9. Securely tighten the cap of the packed valve.<br />
<strong>12</strong><br />
Vacuum pump