
You also want an ePaper? Increase the reach of your titles
YUMPU automatically turns print PDFs into web optimized ePapers that Google loves.
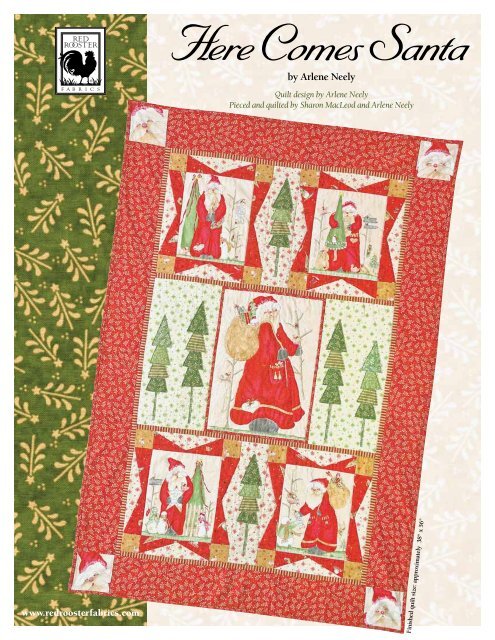
www.redroosterfabrics.com<br />
by Arlene Neely<br />
<strong>Quilt</strong> design by Arlene Neely<br />
Pieced and quilted by Sharon MacLeod and Arlene Neely<br />
Finished quilt size: approximately 38" x 56"
Fabrics from the <strong>Here</strong> <strong>Comes</strong> <strong>Santa</strong> collection (Style #4275) by Arlene Neely for Red Rooster Fabrics.<br />
Fabric reQuirements:<br />
A. Pattern #23308 – MUL1 ...............................................................1 panel<br />
B. Pattern #23309 – GRE1 ................................................................ 1 /8 yard<br />
C. Pattern #23311 – TAN1................................................................ 1 /4 yard<br />
D. Pattern #23312 – GRE1 ................................................................ 1 /4 yard<br />
E. Pattern #23312 – LTGRE1............................................................ 1 /8 yard<br />
F. Pattern #23312 – RED1 ............................................................ 1 3 /8 yards<br />
G. Pattern #23313 – LCREGRE1 ...................................................... 1 /3 yard<br />
H. Pattern #23313 – LCRERED1 ...................................................... 1 /2 yard<br />
I. Pattern #23314 – RED1 ................................................................ 1 /2 yard<br />
J. Pattern #23315 – RED1 ................................................................ 1 /4 yard<br />
K. Pattern #23315 – GRE1 ................................................................ 1 /8 yard<br />
Backing ..............................................................................................2 2 /3 yards<br />
Batting ...............................................................................................46" x 64"<br />
Template plastic<br />
cutting instructions:<br />
Please read all instructions carefully before beginning. 1 /4" seam allowance is included<br />
in measurements and all strips are cut across the width of the fabric unless noted<br />
otherwise. Label pieces and keep together until ready to sew. Cut fabrics in order given.<br />
These instructions are based on unwashed fabrics.<br />
A. Pattern #23308 – MUL1 (panel):<br />
1. Fussy-cut four medium <strong>Santa</strong> blocks to 8 1 /4" x 10 1 /4".<br />
2. Fussy-cut the large <strong>Santa</strong> to 11 1 /2" x 16 1 /2".<br />
3. Fussy-cut four little <strong>Santa</strong> heads to 4 3 /4" x 4 3 /4".<br />
B. Pattern #23309 – GRE1 (double border):<br />
1. Cut four template H for trees. note: Trees will be raw-edged stitched.<br />
C. Pattern #23311 – TAN1 (small toss):<br />
1. Cut sixteen 2 1 /2" squares, four for each of the four medium<br />
<strong>Santa</strong> blocks.<br />
Piecing instructions:<br />
A. Large <strong>Santa</strong> block<br />
1. Sew one F strip, 3 /4" x 16 1 /2", to each side of large <strong>Santa</strong> block. Press.<br />
2. Sew one F strip, 3 /4" x 12", to the top and bottom of large <strong>Santa</strong> block.<br />
Press (Block 5).<br />
B. Medium <strong>Santa</strong> blocks<br />
1. Sew templates E and F together. Press.<br />
Attach template D and press (Figure 1).<br />
Attach EFD strip to each side of the<br />
four medium <strong>Santa</strong> blocks.<br />
2. Referring to Figure 1, sew templates B<br />
and C together. Press. Attach template A<br />
and press.<br />
3. Add a 2 1 /2" C square to each end of the<br />
ABC strips. Press. Attach a strip to the<br />
top and bottom of the four medium<br />
<strong>Santa</strong> blocks (Figure 2). Press.<br />
(Blocks 1, 3, 7, 9)<br />
C. Tree blocks<br />
1. Blocks 4 and 6: Referring to quilt photo,<br />
arrange four Template H pieces from a<br />
variety of fabrics and one 1 /4" x 6 1 /4"<br />
trunk piece on a 8" x 16" G rectangle.<br />
Baste or glue-baste in place. Stitch a<br />
scant 1 /8" away from the raw edge of<br />
each piece. Make two.<br />
2. Blocks 2 and 8: Follow the directions for tree Blocks 4 and 6 to make<br />
tree Blocks 2 and 8. Place the H pieces and a 1 /4" x 4 1 /2" E tree trunk<br />
piece on a 3 1 /2" x 14 1 /4" H rectangle for each tree block. Stitch in place.<br />
E<br />
F<br />
E<br />
E<br />
F<br />
Figure 1 Make 8. Letters refer to<br />
templates.<br />
E<br />
F<br />
D<br />
D<br />
E<br />
Template C<br />
C C<br />
Template A Template B<br />
Template F<br />
Template D Template E<br />
A2<br />
Figure 2 Make 4.<br />
F<br />
D. Pattern #23312 – GRE1 (trees):<br />
1. Cut twelve template H for trees.<br />
E. Pattern #23312 – LTGRE1 (trees):<br />
1. Cut two template H for trees.<br />
2. Cut two 1 /4" x 4 1 /2" for short tree trunks.<br />
3. Cut four 1 /4" x 6 1 /4" for long tree trunks.<br />
F. Pattern #23312 – RED1 (trees):<br />
1. Cut four 2 1 /2" x length of fabric strips<br />
for binding.<br />
2. Cut two 4 3 /4" x 46 1 /2" length of fabric strips for side borders.<br />
3. Cut two 4 3 /4" x 28" strips for top and bottom borders.<br />
4. Cut two 3 /4" x 16 1 /2" strips for large <strong>Santa</strong> block.<br />
5. Cut two 3 /4" x 12" strips for large <strong>Santa</strong> block.<br />
G. Pattern #23313 – LCREGRE1 (snowflakes):<br />
1. Cut two 8" x 16" rectangles for two tree blocks.<br />
H. Pattern #23313 – LCRERED1 (snowflakes):<br />
1. Cut eight each of templates F and C, two for each of the medium<br />
<strong>Santa</strong> blocks.<br />
2. Cut two 3 1 /2" x 14 1 /4" rectangles for two tree blocks.<br />
I. Pattern #23314 – RED1 (snowman toss):<br />
1. Cut eight each of templates A, B, D, and E, two for each of the medium<br />
<strong>Santa</strong> blocks.<br />
J. Pattern #23315– RED1 (stripe):<br />
1. Cut six strips 1" x WOF". Sew together on the diagonal. Subcut into<br />
four 1" x 27" strips and two 1" x 46 1 /2" strips.<br />
K. Pattern #23315 – GRE1 (stripe):<br />
1. Cut six H tempates for trees.<br />
<strong>Quilt</strong> assembly: Refer to <strong>Quilt</strong> Diagram.<br />
1. Sew Blocks 1, 2 and 3 together for Row 1. Press.<br />
2. Sew Blocks 4, 5 and 6 together for Row 2. Press.<br />
3. Sew Blocks, 7, 8 and 9 together for Row 3.<br />
Press.<br />
4. Sew a 1" x 27" J strip to the top and bottom<br />
of Rows 1 and 3. Press.<br />
5. Sew Rows 1, 2 and 3 together. Press.<br />
6. Sew a 1" x 46 1 /2" J strip to the sides of the<br />
quilt center. Press.<br />
7. Sew a 4 3 /4" x 46 1 /2" F strip to the sides<br />
of the quilt. Press.<br />
8. Sew a 4 3 /4" square <strong>Santa</strong> head to the<br />
ends of each 4 3 /4" x 28" F strip.<br />
Press. Sew strips to top and<br />
bottom of quilt.<br />
Finishing:<br />
1. Prepare backing to<br />
measure 46" x 64".<br />
2. Layer quilt top, batting and<br />
backing. Baste layers together.<br />
3. <strong>Quilt</strong> as desired.<br />
4. Trim layers even with<br />
quilt top.<br />
5. Sew binding strips together<br />
with diagonal seams. Press<br />
seams open. Sew binding<br />
to quilt using your<br />
favorite method.<br />
Christmas Tree<br />
Template H<br />
100%<br />
No seam allowance<br />
added.
Top & Bottom<br />
Template C<br />
100%<br />
Top & Bottom<br />
Template A<br />
100%<br />
Top & Bottom<br />
Template B<br />
100%<br />
Side Template D<br />
100%<br />
Scale Check for pdf files<br />
When you print these<br />
templates, this ruler should<br />
measure 2 inches long. If<br />
it does not, change, “page<br />
scaling” to “none” in the<br />
print dialog box.<br />
0"<br />
1"<br />
2"<br />
Side Template E<br />
100%<br />
Side Template F<br />
100%
F4<br />
A3<br />
J<br />
<strong>Quilt</strong> Diagram<br />
F4 A3<br />
©2013 Red Rooster Fabrics. All rights reserved. Not intended for individual resale. The design for this Red Rooster Fabrics’ pattern is protected by U.S. copyright law.<br />
For additional copies of this pattern please call or write Red Rooster Fabrics at the address listed: 253 West 35th Street, 11th Floor, New York, NY 10001<br />
401.728.4200 • www.redroosterfabrics.com<br />
We take great care to ensure that the information included in our free pattern is accurate and presented in good faith. No warranty is provided nor results guaranteed. For your<br />
convenience, we post an up-to-date listing of corrections on our website: http://www.redroosterfabrics.com/quilt/oops.php If a correction is not noted, please contact our customer<br />
service department at info@redroosterfabrics.com. You may also call or write us at the address above.<br />
J<br />
Block<br />
2<br />
Block 1 Block 3<br />
Block 4 Block 6<br />
E1<br />
E2<br />
Block 5<br />
Block<br />
8<br />
Block 7 Block 9