free Round the Garden quilt pattern - Fat Quarter Shop
free Round the Garden quilt pattern - Fat Quarter Shop
free Round the Garden quilt pattern - Fat Quarter Shop

Create successful ePaper yourself
Turn your PDF publications into a flip-book with our unique Google optimized e-Paper software.
makower uk ®<br />
<strong>Round</strong> <strong>the</strong> <strong>Garden</strong><br />
©Mary Engelbreit Enterprises, Inc. All Rights Reserved<br />
under License to Andover Fabrics Inc.<br />
1384 Broadway • New York, NY 10018<br />
(800) 223-5678 • www.andoverfabrics.com<br />
TM<br />
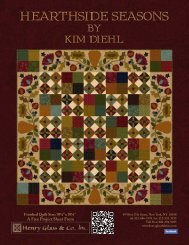
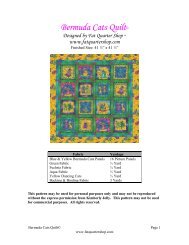
Quilt designed by Jean Ann Wright<br />
Quilt size: 75" x 90"<br />
5/30/12
©Mary Engelbreit Enterprises, Inc. All Rights Reserved<br />
under License to Andover Fabrics Inc.<br />
Quilt finishes 75" x 90"<br />
16 Block W: 9" x 9"<br />
6 Block X: 6" x 6"<br />
10 Block Y: 6" x 6"<br />
4 Block Z: 6" x 6"<br />
Classic patchwork and bright, contemporary<br />
prints combine in a satisfying mix in this<br />
bed-size <strong>quilt</strong>. A striking framework separates<br />
<strong>the</strong> blocks. Some piecing experience is helpful.<br />
Directions are given to make some units extra<br />
large to be trimmed for a perfect t. Choose <strong>the</strong><br />
lighter palette with soft teals and a splash of<br />
sun colors, or choose <strong>the</strong> darker version with<br />
more drama and intensity.<br />
TM<br />
<strong>Round</strong> <strong>the</strong><br />
<strong>Garden</strong> Quilt<br />
<strong>Round</strong> <strong>the</strong> <strong>Garden</strong> <strong>quilt</strong> designed by Jean Ann Wright<br />
Fabric Requirements<br />
Yardage Yellow Black<br />
Fabric A blocks, sashes 1w yards 5783-R 5783-K<br />
Fabric B outer border 22 yards 5784-R 5784-K<br />
Fabric C block W w yard 5786-R 5786-K<br />
Fabric D blocks Y & Z 4 yard 5787-RG 5787-KG<br />
Fabric E inner border d yard 5787-RR 5787-K<br />
Fabric F all blocks s yard 5789-R 5789-K<br />
*Fabric G all blocks, sashes 24 yards 5790-RY 5790-KR<br />
Fabric H border, block W 28 yards 5790-WW 5790-K<br />
Backing 52 yards 5785-R 5785-K<br />
*includes binding<br />
Cutting Directions<br />
Note: All measurements are cut sizes and include 4" seam allowances. Borders are cut <strong>the</strong> exact lengths required plus 4" seam<br />
allowances. WOF designates <strong>the</strong> width of fabric from selvedge to selvedge (approximately 42" wide).<br />
Fabric A Cut (31) rectangles 42" x 92"<br />
Cut (16) squares 52" x 52", cut in half diagonally twice to make 62 quarter-square triangles (2 will be leftover)<br />
Fabric B Fussy cut (2) side borders 92" x 722", cut lengthwise (see Step 7)<br />
Fussy cut (2) top/bottom borders 92" x 572", cut lengthwise<br />
Fabric C Cut (16) squares 44" x 44", cut in half diagonally twice to make 64 quarter-square triangles<br />
Cut (32) squares 3f" x 3f", cut in half diagonally to make 64 half-square triangles<br />
Fabric D Cut (5) squares 52" x 52", cut in half diagonally twice to make 18 quarter-square triangles (2 will be leftover)<br />
Fabric E Cut (7) strips 22" x WOF, pieced to make <strong>the</strong> following:<br />
(2) side borders 22" x 662"<br />
(2) top/bottom borders 22" x 552"<br />
Fabric F Cut (16) squares 44" x 44", cut in half diagonally twice to make 64 quarter-square triangles<br />
Cut (20) squares 1f" x 1f"<br />
Fabric G Cut (9) strips 22" x WOF for binding<br />
Cut (62) rectangles 12" x 92" for sashes<br />
Cut (16) squares 32" x 32"<br />
Cut (80) rectangles 1f" x 42"<br />
Fabric H Cut (2) side borders 12" x 702", cut lengthwise<br />
Cut (2) top/bottom borders 12" x 572", cut lengthwise<br />
Cut (64) rectangles 2" x 52"<br />
Cut (64) rectangles 2" x 4"<br />
Backing Cut (2) panels 40" x 95", pieced to t <strong>quilt</strong> top with overlap on all sides<br />
Page 2 of 5 Free Pattern Download Available at www.andoverfabrics.com 5/30/12
<strong>Round</strong> <strong>the</strong> <strong>Garden</strong> Quilt<br />
Making and Assembling <strong>the</strong> Quilt<br />
1. Block W: e outer pieced strips in Block W are made<br />
longer than needed and trimmed to t. Make a sample<br />
block to be sure that your piecing and pressing<br />
techniques result in <strong>the</strong> right size block, following <strong>the</strong>se<br />
directions. Referring to Diagram 1, cut one end of each<br />
2" x 4" Fabric H strip at a 45° angle as shown, cutting<br />
half <strong>the</strong> strips in mirror image.<br />
To be certain that <strong>the</strong> patches line up as required, on <strong>the</strong><br />
back side, draw a 4" seam line along <strong>the</strong> short edges of a<br />
Fabric C 44" triangle. Draw seam lines on <strong>the</strong> angled<br />
ends of a Fabric H strip and a mirror-image strip. Align<br />
<strong>the</strong> Fabric H strip with <strong>the</strong> Fabric C triangle, right sides<br />
toge<strong>the</strong>r, osetting <strong>the</strong> patches as needed to match <strong>the</strong><br />
drawn seam lines (Diagram 2). Stitch along <strong>the</strong> marked<br />
line. Press <strong>the</strong> H strip away from <strong>the</strong> triangle (Diagram<br />
3). e two patches should align along <strong>the</strong> bottom as<br />
shown. Hint: You may not need to mark seam lines on<br />
<strong>the</strong> C and H patches once you have made a few blocks.<br />
Align <strong>the</strong> marked mirror image Fabric H strip with <strong>the</strong><br />
o<strong>the</strong>r side of <strong>the</strong> triangle and stitch as before (Diagram<br />
4). Press <strong>the</strong> strip open (Diagram 5). Once you are<br />
satised with your sewing, make 64 units like this.<br />
Repeat <strong>the</strong>se steps with <strong>the</strong> 52"-long Fabric H strips to<br />
make 64 more units (Diagram 6).<br />
2. Referring to <strong>the</strong> Block W diagram, sew Fabric F 44"<br />
triangles to <strong>the</strong> sides of a Fabric G 32" square. Press seam<br />
allowances away from <strong>the</strong> center. Sew Fabric C 3f"<br />
triangles to <strong>the</strong> sides. Matching centers, sew <strong>the</strong> shorter<br />
H/C/H strips to <strong>the</strong> sides of <strong>the</strong> block. Trim even with <strong>the</strong><br />
top and bottom of <strong>the</strong> block. Sew <strong>the</strong> longer H/C/H<br />
strips to <strong>the</strong> top and bottom and trim even with <strong>the</strong> sides.<br />
e block should measure 92" from edge to edge.<br />
Continue in this manner to make 16 Block W.<br />
3. Blocks X, Y, and Z: ese blocks are made alike—only<br />
<strong>the</strong> fabrics change. G strips are cut longer than needed<br />
and <strong>the</strong> entire block is trimmed once it’s constructed. Sew<br />
Fabric G 1f" x 42" strips to opposite sides of a Fabric F<br />
1f" square. Press seam allowances toward <strong>the</strong> G’s<br />
(Diagram 7). Sew Fabric A 52" quarter-square triangles<br />
to opposite sides of ano<strong>the</strong>r G strip, aligning <strong>the</strong> patches<br />
as shown (Diagram 8). Press seam allowances toward <strong>the</strong><br />
G. Repeat to make a second unit like this. Sew <strong>the</strong><br />
Diagram 8 units to <strong>the</strong> Diagram 7 unit (Diagram 9). Trim<br />
<strong>the</strong> block to 62" square as shown in Diagram 10. Make 6<br />
Block X like this.<br />
Referring to <strong>the</strong> block diagrams, make 10 Block Y,<br />
substituting 1 Fabric D triangle for a Fabric A triangle.<br />
Likewise, make 4 Block Z by substituting 2 Fabric D<br />
triangles for 2 Fabric A triangles.<br />
Diagram 1<br />
Diagram 4<br />
H<br />
C<br />
Diagram 6<br />
Make 64<br />
52"<br />
H<br />
Diagram 10<br />
Diagram 5<br />
Make 64<br />
12" x 92"<br />
42" x 92"<br />
Diagram 3<br />
Page 3 of 5 Free Pattern Download Available at www.andoverfabrics.com 5/30/12<br />
H<br />
H<br />
cut<br />
1f" x 42"<br />
1f"<br />
2"<br />
cut<br />
Block X<br />
Make 6<br />
4"<br />
2"<br />
C<br />
44"<br />
back<br />
H<br />
Diagram 2<br />
G F<br />
G<br />
A<br />
Diagram 7<br />
Diagram 8<br />
G<br />
A<br />
F<br />
G<br />
A<br />
G<br />
trim<br />
trim<br />
trim<br />
52"<br />
D<br />
Block Y<br />
Make 10<br />
C<br />
F<br />
3f"<br />
44"<br />
G<br />
32"<br />
Block W<br />
Make 16<br />
Block Z<br />
Make 4<br />
Sash<br />
Make 31<br />
Diagram 9
<strong>Round</strong> <strong>the</strong> <strong>Garden</strong> Quilt<br />
4. Sashes: Sew Fabric G 12" x 92" strips to <strong>the</strong> long sides of Fabric A 42" x 92" rectangles (Sash diagram). Press seam<br />
allowances toward <strong>the</strong> A patches. Make 31 sashes.<br />
5. Referring to <strong>the</strong> Quilt Diagram, arrange 12 Block W, <strong>the</strong> X, Y, and Z blocks, and <strong>the</strong> sashes in horizontal rows as<br />
shown, noting <strong>the</strong> placement and orientation of <strong>the</strong> X, Y, and Z blocks. Sew <strong>the</strong> parts into 5 sash rows and 4 block<br />
rows. Join <strong>the</strong> rows.<br />
6. Sew <strong>the</strong> long Fabric E<br />
borders to <strong>the</strong> sides and <strong>the</strong><br />
short borders to <strong>the</strong> top and<br />
bottom. Add <strong>the</strong> Fabric H<br />
borders in <strong>the</strong> same order.<br />
7. Be sure to cut all Fabric B<br />
borders lengthwise from <strong>the</strong><br />
same part of <strong>the</strong> striped<br />
print, referring to <strong>the</strong> <strong>quilt</strong><br />
photograph for placement.<br />
Sew <strong>the</strong> long borders to <strong>the</strong><br />
sides, turning <strong>the</strong> borders as<br />
shown so <strong>the</strong> correct side<br />
touches <strong>the</strong> <strong>quilt</strong>. Sew Block<br />
W’s to ends of <strong>the</strong> short<br />
borders and sew to <strong>the</strong> top<br />
and bottom.<br />
Finishing <strong>the</strong> Quilt<br />
8. Layer <strong>the</strong> <strong>quilt</strong> with batting<br />
and backing and baste. Quilt<br />
in <strong>the</strong> ditch around borders,<br />
sashes, and block patches.<br />
Quilt around <strong>the</strong> printed<br />
motifs as desired. Bind to<br />
nish <strong>the</strong> <strong>quilt</strong>.<br />
H<br />
E<br />
B<br />
Blk Z<br />
Quilt Diagram<br />
Page 4 of 5 Free Pattern Download Available at www.andoverfabrics.com 5/30/12<br />
Sash<br />
Block W<br />
Blk Y<br />
Blk X