
Create successful ePaper yourself
Turn your PDF publications into a flip-book with our unique Google optimized e-Paper software.
<strong>MASTER</strong> <strong>YOUR</strong> <strong>DEVICE</strong>
Conventions used in this guide<br />
In this user guide, we use the following symbols to indicate useful and<br />
important information:<br />
This is a note. A note often gives additional information, such as what<br />
happens on your phone when you choose to do or not to do a certain<br />
action. A note also provides information that may only be applicable to<br />
some situations.<br />
This is a tip. A tip gives you an alternative way to do a particular step or<br />
procedure, or lets you know of an option that you may find helpful.<br />
This indicates that something is very important. Important information is<br />
something that you need to do in order to accomplish a certain task or to<br />
get a phone feature to work properly.<br />
This provides safety precaution information, that is, information that you<br />
need to be careful about to prevent potential problems when using your<br />
phone.
Contents<br />
Basics 20<br />
Inside the box ..................................................................................................................... 0<br />
Your phone ............................................................................................................................ 1<br />
Front panel ................................................................................................................. 1<br />
Right panel .................................................................................................................<br />
Back panel ..................................................................................................................<br />
Back cover ............................................................................................................................ 4<br />
Removing the back cover ................................................................................... 4<br />
Replacing the back cover ................................................................................... 4<br />
SIM card ................................................................................................................................. 5<br />
Inserting the SIM card .......................................................................................... 5<br />
Removing the SIM card ....................................................................................... 7<br />
Battery .................................................................................................................................... 8<br />
Inserting the battery ............................................................................................. 9<br />
Charging the battery ........................................................................................... 0<br />
Removing the battery ........................................................................................... 1<br />
Storage card ........................................................................................................................<br />
Inserting the storage card ..................................................................................<br />
Removing the storage card ...............................................................................<br />
Removing the storage card while the phone is on ................................<br />
Switching your phone on or off ................................................................................ 4<br />
Switching your phone on ................................................................................... 4<br />
Switching your phone off .................................................................................. 4<br />
Finger gestures................................................................................................................... 5
4<br />
Getting started 36<br />
Setting up your phone for the first time ................................................................ 6<br />
Home screen ........................................................................................................................ 7<br />
Extended Home screen ....................................................................................... 7<br />
Using Leap view ...................................................................................................... 8<br />
Status and notifications ................................................................................................. 9<br />
Status icons ............................................................................................................... 9<br />
Notification icons ...................................................................................................40<br />
Notification LED ......................................................................................................4<br />
Notifications panel ............................................................................................................4<br />
Opening the Notifications panel .....................................................................4<br />
Switching between recently-opened apps ............................................... 4<br />
Closing the Notifications panel ....................................................................... 44<br />
Connecting your phone to a computer ................................................................. 44<br />
Copying files to or from the storage card ................................................. 46<br />
Searching your phone and the Web ........................................................................47<br />
Setting your phone’s search options ........................................................... 48<br />
Quickly looking up information on the Web ............................................ 49<br />
Translating words to other languages ......................................................... 50<br />
Adjusting the volume ..................................................................................................... 50<br />
Adjusting the ringer volume...............................................................................51<br />
Adjusting the media volume ..............................................................................51<br />
Adjusting the earpiece volume for phone calls ........................................51<br />
Adjusting the volume via settings ...................................................................51<br />
Sleep mode ..........................................................................................................................5<br />
Switching to Sleep mode....................................................................................5<br />
Waking up from Sleep mode ............................................................................5<br />
Unlocking the screen ............................................................................................5
Personalizing 54<br />
Making your phone truly yours .................................................................................. 54<br />
Personalizing your phone with scenes .................................................................. 54<br />
Using a preset scene .............................................................................................55<br />
Creating a new scene ...........................................................................................56<br />
Renaming a scene ..................................................................................................56<br />
Deleting scenes .......................................................................................................56<br />
Changing your wallpaper ..............................................................................................57<br />
Applying a new skin .........................................................................................................58<br />
Personalizing your Home screen with widgets ..................................................59<br />
Adding a widget .....................................................................................................59<br />
Changing the settings of a widget ...............................................................60<br />
Adding icons and other shortcuts on your Home screen ..............................61<br />
Adding folders on your Home screen .....................................................................6<br />
Creating a new folder and adding items to it ...........................................6<br />
Renaming a folder ..................................................................................................6<br />
Rearranging or removing widgets and icons on your Home screen .......6<br />
Moving a widget or icon .....................................................................................6<br />
Removing a widget or icon .............................................................................. 64<br />
Rearranging the Home screen ................................................................................... 64<br />
Changing your ringtones and alarms ......................................................................65<br />
Choosing a preset sound set ............................................................................65<br />
Creating a sound set ............................................................................................ 66<br />
Customizing a sound set ................................................................................... 66<br />
Deleting sound sets .............................................................................................. 68<br />
Rearranging or hiding application tabs ................................................................. 68<br />
Putting back the tabs you’ve removed ....................................................... 69<br />
5
6<br />
Phone calls 70<br />
Making calls ......................................................................................................................... 70<br />
Making a call on the Phone dialer screen .................................................. 70<br />
Using Speed dial ......................................................................................................71<br />
Calling a phone number in a text message ...............................................7<br />
Calling a phone number in an email ..............................................................7<br />
Making an emergency call ..................................................................................7<br />
Using Assisted Dialing ..........................................................................................74<br />
Receiving calls ....................................................................................................................75<br />
Answering or rejecting an incoming call .....................................................75<br />
HTC Caller ID .......................................................................................................................77<br />
Using in-call options ........................................................................................................78<br />
Putting a call on hold ............................................................................................78<br />
Switching between calls ......................................................................................78<br />
Setting up a three-way conference call .......................................................79<br />
Turning the speakerphone on or off during a call ..................................79<br />
Muting the microphone during a call ........................................................... 80<br />
Ending a call ............................................................................................................. 80<br />
Using Call history ................................................................................................................81<br />
Checking a missed call ..........................................................................................81<br />
Checking calls in the call history ......................................................................81<br />
Adding a new phone number to your contacts from call history ..8<br />
Clearing the call history list ...............................................................................8<br />
Call services..........................................................................................................................8<br />
Visual Voice Mail ............................................................................................................... 84<br />
Setting up Visual Voice Mail ............................................................................. 84<br />
Using Visual Voice Mail ........................................................................................85<br />
Turning Airplane mode on or off ............................................................................. 86
People 87<br />
About People ......................................................................................................................87<br />
People screen ...........................................................................................................87<br />
Setting up My contact card......................................................................................... 88<br />
Ways of getting contacts into your phone .......................................................... 89<br />
Adding a new contact ......................................................................................... 89<br />
Importing contacts from your SIM card .....................................................90<br />
Importing a contact from an Exchange ActiveSync account ............91<br />
Merging contact information ........................................................................................91<br />
Accepting matched contacts suggestions ................................................9<br />
Viewing a list of all your linked contacts .....................................................9<br />
Manually merging contact information........................................................9<br />
Breaking the contact information link between contacts ..................9<br />
Your contacts list .............................................................................................................. 94<br />
Filtering your contacts list ................................................................................ 96<br />
Searching for a contact ...................................................................................... 96<br />
Backing up your contacts to the storage card ........................................97<br />
Importing contacts from the storage card ................................................97<br />
Deleting contacts ...................................................................................................97<br />
Contact information and conversations ................................................................ 98<br />
Editing a contact’s information ...................................................................... 99<br />
Sending contact information as a vCard ................................................. 100<br />
Contact groups .................................................................................................................101<br />
Creating a group ....................................................................................................101<br />
Editing a contact group .....................................................................................101<br />
Sending a message or email to a group ...................................................10<br />
Rearranging your contact groups ................................................................10<br />
Rearranging the members of a contact group ......................................10<br />
Deleting a group ...................................................................................................10<br />
7
8<br />
People widget ...................................................................................................................104<br />
Adding People widgets .....................................................................................104<br />
Setting the default communication method ...........................................104<br />
Changing the default communication method ......................................104<br />
Getting in touch with a contact ....................................................................105<br />
Keyboard 106<br />
Using the onscreen keyboard ...................................................................................106<br />
Selecting a keyboard layout ............................................................................106<br />
Entering text ...........................................................................................................107<br />
Enabling multiple keyboard languages......................................................108<br />
Changing to the landscape onscreen keyboard....................................108<br />
Entering words with predictive text .......................................................................109<br />
Setting a second language for the keyboard .........................................109<br />
Adding a word to the predictive text dictionary ...................................110<br />
Editing or deleting a word in the predictive text dictionary ............110<br />
Backing up your personal dictionary to your storage card ................111<br />
Importing your personal dictionary from your storage card .............111<br />
Entering text by speaking ............................................................................................ 11<br />
Setting the voice input language ................................................................... 11<br />
Editing text .......................................................................................................................... 11<br />
Selecting text ........................................................................................................... 11<br />
Copying and pasting text .................................................................................. 114<br />
Adjusting touch input settings .................................................................................. 114<br />
Touch Input settings............................................................................................. 114<br />
Text input ................................................................................................................... 115<br />
Messages 117<br />
About Messages ................................................................................................................117<br />
Sending a text message (SMS) ................................................................................. 118<br />
Sending a multimedia message (MMS) ................................................................1 0
Creating a slideshow ........................................................................................... 1<br />
Resuming a draft message ......................................................................................... 1<br />
Viewing and replying to a message ....................................................................... 1<br />
Viewing a message .............................................................................................. 1 4<br />
Replying to a message ....................................................................................... 1 4<br />
Replying to another phone number of the contact ............................ 1 5<br />
Viewing and saving an attachment from a multimedia message . 1 6<br />
Viewing push messages .................................................................................... 1 6<br />
Managing message conversations .......................................................................... 1 7<br />
Protecting a message from deletion ........................................................... 1 7<br />
Copying a message to your SIM card ......................................................... 1 7<br />
Deleting a single message ............................................................................... 1 8<br />
Deleting several messages within a conversation ................................ 1 8<br />
Deleting a conversation ..................................................................................... 1 9<br />
Deleting several conversations ...................................................................... 1 9<br />
Setting message options .............................................................................................1 0<br />
Accounts and sync 134<br />
Synchronizing with online accounts ......................................................................1 4<br />
About online accounts .......................................................................................1 4<br />
Synchronizing with a Google Account ...................................................... 1 5<br />
Adding a social network account .................................................................1 6<br />
Managing your online accounts .................................................................... 1 7<br />
Synchronizing with your computer ........................................................................ 1 8<br />
Installing HTC Sync ..............................................................................................1 9<br />
Setting up HTC Sync to recognize your phone .....................................140<br />
Setting the Music sync options .....................................................................14<br />
Setting the Gallery sync options ...................................................................14<br />
Setting Calendar sync options .......................................................................144<br />
Setting People sync options ...........................................................................144<br />
Setting Bookmarks sync options ..................................................................145<br />
9
10<br />
Setting Documents sync options .................................................................146<br />
Setting Maps sync options............................................................................... 147<br />
Synchronizing your phone ...............................................................................148<br />
Installing apps from your computer to your phone ............................149<br />
Synchronizing another phone with your computer ............................150<br />
Social 151<br />
Facebook for HTC Sense .............................................................................................. 151<br />
Tweeting on your phone .............................................................................................. 15<br />
Using Peep ...............................................................................................................154<br />
Sending a tweet .................................................................................................... 155<br />
Searching for Twitter users to follow .......................................................... 155<br />
Sending a direct message ................................................................................156<br />
Setting Peep options ..........................................................................................156<br />
About the Twitter widget ................................................................................. 157<br />
Friend Stream ................................................................................................................... 157<br />
Updating your status .......................................................................................... 159<br />
Commenting on and liking Facebook posts ...........................................160<br />
Checking notifications from your social networks ................................ 161<br />
About the Friend Stream widget................................................................... 161<br />
Chatting in Google Talk ................................................................................................ 16<br />
Chatting with friends .......................................................................................... 16<br />
Accepting chat invitations ............................................................................... 16<br />
Changing your online status and picture .................................................. 16<br />
Adding and managing friends........................................................................164<br />
Changing the settings and signing out......................................................165<br />
Email 166<br />
Using Gmail ........................................................................................................................166<br />
Viewing your Gmail Inbox ................................................................................166<br />
Sending a new message ...................................................................................168
Reading your messages ....................................................................................169<br />
Replying to or forwarding an email message .........................................170<br />
Searching and organizing your emails ........................................................ 171<br />
Changing Gmail settings ................................................................................... 17<br />
Getting help ............................................................................................................. 175<br />
Using Mail ............................................................................................................................ 176<br />
Adding a POP /IMAP email account .......................................................... 176<br />
Adding a Microsoft Exchange ActiveSync account ............................ 176<br />
Checking your Mail inbox ................................................................................. 177<br />
Managing email messages ................................................................................ 181<br />
Switching to other mail folders ..................................................................... 18<br />
Sending an email message .............................................................................. 18<br />
Reading and replying to an email message ............................................184<br />
Setting the priority for an email message ................................................ 185<br />
Working with Exchange ActiveSync email ..............................................186<br />
Changing email account settings ................................................................. 187<br />
Calendar 188<br />
About Calendar ................................................................................................................188<br />
Creating calendar events .............................................................................................189<br />
Inviting guests to your event (Google Account only) ........................190<br />
Sending a meeting request using Calendar (Exchange ActiveSync<br />
only) ............................................................................................................................. 191<br />
Changing calendar views ............................................................................................ 19<br />
Month view .............................................................................................................. 19<br />
Day and Agenda views ...................................................................................... 19<br />
Week view ................................................................................................................194<br />
Managing calendar events .......................................................................................... 195<br />
Viewing an event .................................................................................................. 195<br />
Editing an event ....................................................................................................196<br />
Deleting an event ..................................................................................................196<br />
11
1<br />
Sharing an event (vCalendar).........................................................................196<br />
Calendar event reminders ........................................................................................... 197<br />
Dismissing or snoozing event reminders .................................................. 197<br />
Displaying and synchronizing calendars..............................................................198<br />
Showing or hiding calendars ..........................................................................198<br />
Choosing which Google Calendars are synchronized on your<br />
phone..........................................................................................................................198<br />
Changing Calendar settings .......................................................................................199<br />
Reminder settings ................................................................................................199<br />
Calendar view settings ..................................................................................... 00<br />
About the Calendar widget ........................................................................................ 01<br />
Clock and Weather 202<br />
About the HTC Clock widget ................................................................................... 0<br />
About the Clock app .................................................................................................... 0<br />
Using Desk Clock ........................................................................................................... 04<br />
Using World Clock ......................................................................................................... 06<br />
Setting your home city ..................................................................................... 06<br />
Setting the time zone, date, and time .................................................. 207<br />
Adding a city to the World Clock screen................................................. 08<br />
Setting the alarm clock ............................................................................................... 08<br />
Setting an alarm ................................................................................................... 09<br />
Deleting an alarm ................................................................................................ 09<br />
Changing alarm sound settings ..................................................................... 10<br />
Checking weather ............................................................................................................ 11<br />
Adding a city to the Weather screen .......................................................... 1<br />
Changing the order of cities on the Weather screen.......................... 1<br />
Deleting cities from the Weather screen .................................................. 1<br />
Changing weather options............................................................................... 1<br />
About the Weather widget ........................................................................................ 14
Internet connections 215<br />
Data connection ............................................................................................................... 15<br />
Checking the data connection you are using ........................................ 15<br />
Turning the data connection on or off ....................................................... 15<br />
Creating a new access point ........................................................................... 16<br />
Enabling data roaming ....................................................................................... 16<br />
Wi-Fi .................................................................................................................................. 17<br />
Turning Wi-Fi on and connecting to a wireless network .................. 17<br />
Connecting to a Wi-Fi network with EAP-TLS security .................... 18<br />
Checking the wireless network status ........................................................ 18<br />
Connecting to another Wi-Fi network ....................................................... 19<br />
Adding connection widgets ....................................................................................... 19<br />
Connecting to a virtual private network (VPN) .............................................. 0<br />
Setting up secure credential storage ......................................................... 0<br />
Adding a VPN connection................................................................................ 1<br />
Connecting to a VPN .......................................................................................... 1<br />
Disconnecting from a VPN .............................................................................. 1<br />
Using your phone as a modem (Internet Connection Mode) ...................<br />
Connecting your phone to the Internet through a computer (Internet<br />
Pass-through) ...........................................................................................................<br />
Using your phone as a mobile hotspot ............................................................... 4<br />
Web browser 225<br />
Using your phone’s web browser ........................................................................... 5<br />
Going to a webpage ........................................................................................... 5<br />
Setting your home page .................................................................................. 6<br />
Changing the screen orientation ................................................................. 6<br />
Browsing full versions of all websites ........................................................ 6<br />
Choosing when to show Flash content .................................................... 6<br />
Navigating on a webpage ............................................................................... 7<br />
Zooming in or out on a webpage ................................................................ 7<br />
1
14<br />
Selecting a link in a webpage ........................................................................ 7<br />
Selecting an address or phone number in a webpage ..................... 8<br />
Opening a new browser window ................................................................. 8<br />
Switching between browser windows ...................................................... 8<br />
Downloading applications from the web ................................................. 9<br />
Copying text, looking up information, and sharing ....................................... 0<br />
Finding text within a webpage ..................................................................... 0<br />
Selecting text .......................................................................................................... 1<br />
Copying and pasting text ................................................................................. 1<br />
Searching or translating text..........................................................................<br />
Pasting text in a new message or social network status update .<br />
Viewing bookmarks and previously visited pages .........................................<br />
Bookmarking a webpage .................................................................................<br />
Opening a bookmark .........................................................................................<br />
Editing a bookmark ............................................................................................<br />
Viewing a previously visited page ...............................................................<br />
Clearing the list of previously visited pages ........................................... 4<br />
Viewing a page that you often visit ............................................................ 4<br />
Clearing the list of most visited pages ...................................................... 4<br />
Changing the view of bookmarks or most visited pages ................ 4<br />
Setting browser options ............................................................................................. 4<br />
Bluetooth 235<br />
Bluetooth basics ............................................................................................................. 5<br />
Turning Bluetooth on or off ............................................................................ 5<br />
Changing the phone name ............................................................................. 5<br />
Connecting a Bluetooth headset or car kit ....................................................... 6<br />
Reconnecting a headset or car kit .............................................................. 7<br />
Disconnecting or unpairing from a Bluetooth device .................................. 7<br />
Disconnecting a Bluetooth device .............................................................. 7<br />
Unpairing from a Bluetooth device............................................................. 8
Sending information using Bluetooth .................................................................. 8<br />
Where sent information is saved ................................................................. 40<br />
Receiving information using Bluetooth ................................................................ 41<br />
Adding the Bluetooth received folder to the Home screen ........... 4<br />
Camera 244<br />
Camera basics .................................................................................................................. 44<br />
Viewfinder screen ................................................................................................ 45<br />
Using the front camera ..................................................................................... 46<br />
Zooming ................................................................................................................... 46<br />
Taking a photo ................................................................................................................. 47<br />
Auto focusing ........................................................................................................ 48<br />
Recording video .............................................................................................................. 49<br />
Adding effects .................................................................................................................. 51<br />
After capturing ................................................................................................................. 51<br />
Changing camera settings ......................................................................................... 5<br />
Photos, videos, and music 254<br />
Browsing your Gallery .................................................................................................. 54<br />
About the Gallery app....................................................................................... 54<br />
Selecting an album ............................................................................................. 55<br />
Viewing photos ..................................................................................................... 56<br />
Viewing videos ...................................................................................................... 58<br />
Editing your photos ............................................................................................ 58<br />
Sending your photos and videos ................................................................. 60<br />
Sending photos or videos using Bluetooth ............................................. 61<br />
Sharing your photos and videos on the Web ......................................... 61<br />
Listening to music .......................................................................................................... 66<br />
Flipping through your albums ....................................................................... 68<br />
Browsing music in the Library ....................................................................... 69<br />
Creating a playlist ................................................................................................ 70<br />
15
16<br />
Setting a song as ringtone ............................................................................... 71<br />
Sharing music using Bluetooth ..................................................................... 74<br />
Finding music videos in YouTube ................................................................ 75<br />
About the Music widget ................................................................................... 75<br />
Sharing media on your home network ................................................................ 75<br />
Maps and location 278<br />
Turning on location services ..................................................................................... 78<br />
Using Google Maps ....................................................................................................... 78<br />
About Google Maps ........................................................................................... 78<br />
Getting around maps ......................................................................................... 79<br />
Searching for a location ................................................................................... 80<br />
Searching for a place of interest near you .............................................. 8<br />
Adding a place to search ................................................................................. 8<br />
Getting directions ................................................................................................ 8<br />
Finding your friends with Google Latitude<br />
(available by country) ....................................................................................... 84<br />
Using HTC Footprints .............................................................................................285<br />
Adding a location as a footprint .................................................................. 85<br />
Revisiting a footprint ......................................................................................... 86<br />
Editing or deleting a footprint ...................................................................... 86<br />
Sharing your footprints .................................................................................... 86<br />
Deleting multiple footprints ........................................................................... 86<br />
Exporting your footprints ................................................................................ 86<br />
Importing footprints ........................................................................................... 87<br />
Using Car Panel ............................................................................................................... 88<br />
Using VZ Navigator ....................................................................................................... 89<br />
More apps 290<br />
Watching videos on YouTube ................................................................................... 90<br />
Searching for videos ........................................................................................... 91
Sharing a video link ............................................................................................. 91<br />
Capturing a video and sharing it on YouTube ........................................ 91<br />
Reading news feeds ...................................................................................................... 9<br />
Subscribing to news channels ....................................................................... 9<br />
Reading a story .................................................................................................... 9<br />
Manually checking for new stories .............................................................. 94<br />
Starring a story ..................................................................................................... 94<br />
Adding a keyword ............................................................................................... 94<br />
Changing update schedule and content settings ............................... 95<br />
Adding the News widget ................................................................................. 95<br />
Working on documents, spreadsheets, and presentations ....................... 96<br />
Viewing a document, spreadsheet, or presentation........................... 96<br />
Editing a document or worksheet............................................................... 97<br />
Creating a new document or worksheet ................................................. 97<br />
Keeping track of your stocks .................................................................................... 98<br />
Adding a stock quote or stock market index ........................................ 99<br />
Changing the stock list order ....................................................................... 99<br />
Deleting stock quotes and indices .............................................................. 99<br />
Manually updating stock information ........................................................ 99<br />
Changing update schedule and color settings ..................................... 99<br />
About the Stocks widget ................................................................................ 00<br />
Listening to FM Radio ................................................................................................... 01<br />
Tuning in to an FM station ............................................................................... 0<br />
Closing or turning off FM Radio ................................................................... 0<br />
Adding the FM Radio widget ........................................................................ 0<br />
Recording your voice ................................................................................................... 0<br />
Sharing a voice clip ............................................................................................ 04<br />
Setting a voice clip as a ringtone ............................................................... 04<br />
Renaming a voice clip ...................................................................................... 04<br />
Using Flashlight ............................................................................................................... 05<br />
17
18<br />
Finding and installing apps from Android Market ......................................... 06<br />
Finding and installing an app ....................................................................... 06<br />
Creating a Google Checkout account ...................................................... 08<br />
Opening an installed app ................................................................................ 08<br />
Uninstalling an app ............................................................................................ 09<br />
Getting help ........................................................................................................... 09<br />
Sharing games and apps ........................................................................................... 09<br />
Security 312<br />
Protecting your SIM card with a PIN ...................................................................... 1<br />
Restoring a SIM card that has been locked out..................................... 1<br />
Protecting your phone with a screen lock .......................................................... 1<br />
Changing your screen lock .............................................................................. 1<br />
Forgot your screen lock pattern? ................................................................. 14<br />
Settings 315<br />
Settings on your phone ................................................................................................ 15<br />
Changing display settings ........................................................................................... 18<br />
Adjusting the screen brightness manually ............................................... 18<br />
Adjusting the time before the screen turns off ..................................... 18<br />
Turning automatic screen rotation off ....................................................... 18<br />
Recalibrating the G-sensor .............................................................................. 19<br />
Keeping the screen on while charging the phone ................................ 19<br />
Switching animation effects on or off ........................................................ 19<br />
Changing sound settings ............................................................................................ 0<br />
Switching between silent, vibration, and normal modes ................. 0<br />
Enabling or disabling audible selection .................................................... 0<br />
Choosing the notification sound .................................................................. 0<br />
Turning on or off automatic ring volume adjustment ........................ 1<br />
Switching to speakerphone automatically ............................................... 1<br />
Changing the phone language ................................................................................
Optimizing your phone’s battery life ....................................................................<br />
Checking the power usage of applications ...........................................<br />
Managing memory .........................................................................................................<br />
Checking how much phone memory is available for use ................<br />
Checking the available storage card space ............................................<br />
Clearing application cache and data .........................................................<br />
Uninstalling third-party applications .......................................................... 4<br />
Moving applications to or from the storage card ................................ 4<br />
Checking information about your phone ........................................................... 5<br />
Back up, update and reset 326<br />
Backing up your contacts .......................................................................................... 6<br />
Setting up Backup Assistant .......................................................................... 6<br />
Changing the backup schedule .................................................................... 6<br />
Manually backing up your contacts............................................................ 7<br />
Updating the phone software .................................................................................. 7<br />
Checking for phone system software updates manually ................. 8<br />
Restarting or factory resetting your phone ...................................................... 8<br />
Restarting your phone (soft reset) ............................................................. 8<br />
Performing a factory reset (hard reset) ................................................... 9<br />
Trademarks and copyrights 330<br />
Index 332<br />
19
Basics<br />
Inside the box<br />
You will find the following inside the box:<br />
<br />
<br />
<br />
<br />
<br />
<br />
<br />
Phone<br />
Standard Lithium Ion Battery<br />
GB microSD card (preinstalled)<br />
USB cable<br />
Power adapter<br />
Quick start guide<br />
Product Safety & Warranty Brochure
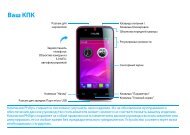
Your phone<br />
Front panel<br />
4<br />
1<br />
9<br />
8<br />
7<br />
6<br />
5<br />
1 POWER/LOCK<br />
2 Notification LED<br />
3 MENU<br />
4 HOME<br />
5 SEARCH<br />
6 BACK<br />
7 Touch screen<br />
8 Earpiece<br />
9 1.3 megapixel front camera<br />
Basics 1
Basics<br />
Right panel<br />
1<br />
1 VOLUME UP<br />
2 VOLUME DOWN
Back panel<br />
1<br />
4<br />
5<br />
7<br />
6<br />
Basics<br />
1 8 megapixel main camera<br />
2 Dual LED flash<br />
3 Back cover<br />
4 Kickstand (flip out to reveal<br />
the audio speakers)<br />
5 Microphone<br />
6 USB connector<br />
7 3.5mm headset jack
4 Basics<br />
Back cover<br />
Removing the back cover<br />
Remove the back cover to access the battery compartment and<br />
storage card and SIM card slots.<br />
1.<br />
2.<br />
With the phone switched off, hold your phone securely with the<br />
front facing down.<br />
With your thumb or finger, lift the back cover off from the notch<br />
on the top of your phone.<br />
Replacing the back cover<br />
1. Align the tabs of the back cover with the slots at the back of the<br />
phone.<br />
2.<br />
Push the back cover towards the phone. You’ll hear a click when<br />
the back cover is locked in place.
SIM card<br />
The 4G SIM card provided to you by Verizon Wireless contains your<br />
phone number, service details, and phonebook/message memory.<br />
It enables you to make calls and access the Internet using a 4G LTE<br />
network. While you’re abroad, you could also connect to a CDMA<br />
network.<br />
Basics 5<br />
The Verizon Wireless 4G SIM card is compatible with any Verizon<br />
Wireless 4G certified device. You can move the 4G SIM card from one<br />
device to another and your wireless service will work seamlessly as<br />
long as you have a compatible device and service plan. To see which<br />
devices are compatible with the Verizon Wireless 4G SIM card, visit<br />
verizonwireless.com/certifieddevice.<br />
Inserting the SIM card<br />
1. Take the back cover off.<br />
See “Removing the back cover”.<br />
2. If the battery is installed, take the battery off.<br />
See “Removing the battery”.<br />
3. Slide out the SIM card holder.
6 Basics<br />
4. With the SIM card’s gold contacts facing down and its cut-off<br />
corner facing out, insert the SIM card into the SIM card slot.
Removing the SIM card<br />
Basics 7<br />
Make sure to switch off your phone before removing your SIM card.<br />
Otherwise, the phone will automatically turn off when you remove the SIM<br />
card.<br />
1. Take the bottom cover off.<br />
See “Removing the bottom cover”.<br />
2. Take the battery off.<br />
See “Removing the battery”.<br />
3. With your thumb, slide out the SIM card slot and carefully lift the<br />
SIM card.<br />
Remember to reinsert the SIM card in your wireless device for you to<br />
use Verizon Wireless services.
8 Basics<br />
Battery<br />
Should your SIM card be lost or damaged, visit verizonwireless.com/<br />
myverizon to order a replacement SIM. You can also call 1-800-9 -0 04 to<br />
speak with a Customer Service Representative. For toll-free support outside<br />
of the U.S. call +1-908-559-4899 for 4/7 global support. For additional<br />
information about 4G SIM cards, visit verizonwireless.com/4GSISIM.<br />
Your phone uses a rechargeable battery. Please use only original<br />
batteries and accessories that came with your phone or replacements<br />
that we recommend.<br />
How long the battery can last before it needs recharging depends on<br />
how you use your phone. Among these are the phone features and<br />
accessories you use (for example, leaving your Bluetooth connection<br />
always on uses more power). Long phone calls and frequent web<br />
browsing use up much battery. Also, consider your location: poor<br />
signal strength from your mobile network and extreme temperature<br />
make the battery work harder.
Inserting the battery<br />
Insert the battery (with its exposed copper contacts first) into the<br />
battery compartment. Then gently push the battery into place.<br />
Basics 9
0 Basics<br />
Charging the battery<br />
The battery is partially charged when shipped. Before you turn on<br />
and start using your phone, it is recommended that you charge<br />
the battery. Some batteries perform best after several full charge/<br />
discharge cycles.<br />
<br />
<br />
Only the power adapter and USB sync cable provided with your<br />
phone must be used to charge the battery.<br />
Do not remove the battery from the phone while you are charging it<br />
using the power or car adapter.<br />
1. Plug the power adapter into the USB connector of your phone.<br />
2. Plug in the power adapter to an electrical outlet to start charging<br />
the battery.<br />
As the battery is being charged, the notification LED shows a solid red<br />
light. The light turns to solid green when the phone is fully charged.
When you charge the battery while the phone is on, the charging<br />
battery icon ( ) is displayed in your phone’s status bar. After the<br />
battery has been fully charged, the charging battery icon turns to a<br />
full battery icon ( ).<br />
As a safety precaution, the battery stops charging when it overheats.<br />
Removing the battery<br />
1. Take the back cover off.<br />
See “Removing the back cover”.<br />
Basics 1<br />
. Lift out the battery from the small opening on the bottom side of<br />
the battery compartment.
Basics<br />
Storage card<br />
Use the microSD card to store your photos, videos, and music. You’ll<br />
find the microSD card already inserted in your phone.<br />
Inserting the storage card<br />
1. Take the back cover off.<br />
See “Removing the back cover”.<br />
. Take the battery off.<br />
See “Removing the battery”.<br />
3. Insert the microSD card into the storage card slot with its gold<br />
contacts facing down and push it until it clicks into place.
Removing the storage card<br />
1. Take the back cover off.<br />
See “Removing the back cover”.<br />
2. Take the battery off.<br />
See “Removing the battery”.<br />
3. Push the storage card in to eject it from its slot.<br />
4. Slide the storage card out from its slot.<br />
Basics<br />
Removing the storage card while the phone is on<br />
When you need to remove the storage card while the phone is on,<br />
unmount the storage card first to prevent corrupting or damaging the<br />
files in the storage card.<br />
1.<br />
2.<br />
Press HOME > MENU, and then tap Settings.<br />
Scroll down the screen, and then tap SD & phone storage.<br />
3. Tap Unmount SD card.<br />
4.<br />
Remove the storage card by following the steps in “Removing the<br />
storage card”.
4 Basics<br />
Switching your phone on or off<br />
Switching your phone on<br />
Press and hold the POWER button for a few seconds until the screen<br />
turns on.<br />
When you turn on the phone for the first time, you’ll need to set it up. See<br />
the Getting started chapter for details.<br />
Switching your phone off<br />
1. If the display is off, press the POWER button to turn it back<br />
on, then unlock the screen by sliding down the bar on the lock<br />
screen.<br />
See “Unlocking the screen” in the Getting started chapter for<br />
details.<br />
2. Press and hold the POWER button for a few seconds.<br />
3. When the Power options menu appears, tap Power off.
Finger gestures<br />
Tap When you want to type using the keyboard, select items<br />
onscreen such as application and settings icons, or press<br />
onscreen buttons, simply tap them with your finger.<br />
Press and<br />
hold<br />
Swipe or<br />
slide<br />
Basics 5<br />
To open the available options for an item (for example, a<br />
contact or link in a web page), simply press and hold the item.<br />
To swipe or slide means to quickly drag your finger vertically<br />
or horizontally across the screen.<br />
Drag Press and hold your finger with some pressure before you<br />
start to drag. While dragging, do not release your finger until<br />
you have reached the target position.<br />
Flick Flicking the screen is similar to swiping, except that you<br />
need to swipe your finger in light, quicker strokes. This finger<br />
gesture is always in a vertical direction, such as when flicking<br />
the contacts or message list.<br />
Rotate For most screens, you can automatically change the screen<br />
orientation from portrait to landscape by turning the phone<br />
sideways. When entering text, you can turn the phone<br />
sideways to bring up a bigger keyboard.<br />
Pinch In some apps, like Gallery or the web browser, you can “pinch”<br />
the screen using two fingers (for example, thumb and index<br />
finger) to zoom in or zoom out when viewing a picture or a<br />
web page.
Getting started<br />
Setting up your phone for the first time<br />
When you switch on your phone for the first time, you’ll be asked to<br />
set up your phone. You can choose your language and whether you<br />
want your current location to be automatically detected.<br />
Just follow the onscreen instructions and you’ll be up and running<br />
with your phone in no time.<br />
Some features that need to connect to the Internet such as location-based<br />
services and auto-sync of your online accounts may incur extra data fees<br />
from Verizon Wireless. Don’t worry. You can enable or disable them in your<br />
phone’s settings as you go along later on. To find out how, see the Settings<br />
chapter.
Home screen<br />
Getting started 7<br />
Your Home screen is where you make your phone your own. It comes<br />
with a weather clock widget that shows the time and weather in<br />
your current location. You can also add your favorite apps, shortcuts,<br />
folders and widgets so they’re always just a tap away.<br />
To find out how, see the Personalizing chapter.<br />
Extended Home screen<br />
As you start to do more things with your phone, you might find that<br />
one Home screen is not enough. No problem. You can use up to six<br />
extra screens. It should be plenty.<br />
Slide your finger horizontally to the left or right and you’ll discover<br />
more space for adding icons, widgets, and more.<br />
Press HOME to return to the main Home screen (that is, the center<br />
home screen).
8 Getting started<br />
Using Leap view<br />
To jump straight to the screen that you want, press HOME while on<br />
the main Home screen or pinch the screen to show the Leap view. It<br />
reveals all seven Home screens as thumbnails.<br />
Just tap the one you want and you’ll leap right there.
Status and notifications<br />
Getting started 9<br />
Status icons<br />
You can tell a lot about your phone by checking the icons in its status<br />
bar. Here’s what each one means:<br />
Signal strength Battery is full<br />
LTE connected Battery is charging<br />
LTE in use Battery is low ( 0% remaining)<br />
G connected Battery is very low (10% remaining)<br />
G in use Bluetooth is on<br />
1xRTT connected Connected to a Bluetooth device<br />
1xRTT in use Connected to a Wi-Fi network<br />
Roaming Airplane mode<br />
No signal Silent mode<br />
No SIM card installed Vibrate mode<br />
Data synchronizing Phone microphone is mute
40 Getting started<br />
Network sharing is on Speakerphone on<br />
GPS is off<br />
Wired microphone headset<br />
connected<br />
GPS is on Wired headset connected<br />
Alarm is set<br />
Notification icons<br />
A busy life means a busy phone. Notification icons on the status bar<br />
make it easy for you to keep on top of your messages, calendar events<br />
and alarms. Here’s what each one means:<br />
New Gmail message Call in progress<br />
New Microsoft Exchange<br />
ActiveSync or POP /IMAP email<br />
Missed call<br />
Problem with email delivery Call on hold<br />
New SMS/MMS Call forwarding on<br />
Problem with SMS/MMS delivery Message forwarding on<br />
New Google Talk instant<br />
message<br />
New voicemail<br />
The phone is connected to a<br />
computer via USB cable<br />
Wi-Fi is on and wireless networks<br />
are available
Upcoming event Portable Wi-Fi Hotspot is on<br />
New updates from your social<br />
networks<br />
Uploading data (animated)<br />
Getting started 41<br />
New tweet Downloading data (animated)<br />
Matched contacts suggestion Waiting to upload<br />
New push message<br />
Bluetooth pairing request<br />
Phone software update available<br />
TV out<br />
Downloaded Android Market app<br />
installed successfully<br />
Update available for an app<br />
downloaded from Android Market<br />
Storage card is safe to remove or<br />
storage card is being prepared<br />
No storage card installed on the<br />
phone<br />
Song is playing Storage card is low on free space<br />
FM Radio app in use General notification<br />
Voice recording is on More (not displayed) notifications<br />
Compass needs orientation
4 Getting started<br />
Notification LED<br />
The notification LED shows a:<br />
<br />
<br />
<br />
<br />
Solid green light when the phone is connected to the power<br />
adapter or a computer and the battery is fully charged.<br />
Flashing green light when you have a pending notification.<br />
Solid red light when the battery is being charged.<br />
Flashing red light when the battery level reaches very low.<br />
Notifications panel<br />
When you get a new notification, you can open the Notifications panel<br />
to see the message, reminder or event notification. The Notifications<br />
panel also lets you switch between recently-opened apps as quickly as<br />
possible.<br />
Opening the Notifications panel<br />
Press and hold the status bar, then slide your finger downward to<br />
open the Notifications panel.
Getting started 4<br />
If you have several notifications, you can scroll down the screen to see<br />
them all.<br />
You can also open the Notifications panel on the Home screen by pressing<br />
MENU and then tapping Notifications.<br />
Switching between recently-opened apps<br />
On the Notifications panel, you can easily access up to eight apps you<br />
just recently opened.<br />
1. Press and hold the status bar, then slide your finger downward to<br />
open the Notifications panel.<br />
2. In the Recent apps section, slide your finger left or right to see<br />
recently-opened apps.
44 Getting started<br />
3. Tap an app to open it.<br />
You can also go to the Recent apps screen when you press and hold<br />
HOME .<br />
Closing the Notifications panel<br />
Press and hold the bottom bar of the Notifications panel, then slide<br />
your finger up the screen. Or just press BACK .<br />
Connecting your phone to a computer<br />
Whenever you connect your phone to a computer using the USB<br />
cable, the Connect to PC screen opens and lets you choose the type<br />
of USB connection. Select one of the following choices, and then tap<br />
Done:<br />
Charge only Select this option if you only want to charge the battery while<br />
your phone is connected to your computer.<br />
HTC Sync Select this option to synchronize contacts, calendar, and other<br />
information between your computer and your phone. For more<br />
information, see “Synchronizing with your computer” in the<br />
Accounts and sync chapter.
Getting started 45<br />
Disk drive This mode is available only when there’s a microSD card on your<br />
phone. Select this mode when you want to copy files between your<br />
phone’s storage card and your computer. For more information,<br />
see “Copying files to or from the storage card” in this chapter.<br />
When Disk drive mode is enabled while your phone is connected<br />
to the computer, you will not be able to use apps on your phone<br />
to access the storage card.<br />
Internet<br />
Connection<br />
Mode<br />
Internet passthrough<br />
When you do not have Internet connection on your computer,<br />
you can select this mode to share your phone’s mobile data<br />
connection with your computer. For more information, see “Using<br />
your phone as a modem (tethering)” in the Internet connections<br />
chapter.<br />
If you don’t have a data plan for your phone or you don’t have<br />
access to a Wi-Fi network, you can select this mode to share<br />
your computer’s Internet connection with your phone. For more<br />
information, see the Internet connections chapter.<br />
You can also change the type of USB connection on-the-fly, without<br />
having to disconnect and reconnect your phone. Slide open the<br />
Notifications panel, and then tap the notification that says “Select to<br />
change USB connection type” to open the Connect to PC screen again.<br />
To change the default connection type or choose between showing and<br />
hiding the Connect to PC screen, press MENU from the Home screen, and<br />
then tap Settings > Connect to PC.
46 Getting started<br />
Copying files to or from the storage card<br />
You can copy your music, photos, and other files to your phone’s<br />
storage card.<br />
1. Connect your phone to your computer using the supplied USB<br />
cable.<br />
2. On your phone’s Connect to PC screen, tap Disk drive, and then<br />
tap Done.<br />
On your computer, the connected phone is recognized as a<br />
removable disk.<br />
3. Navigate to the removable disk and open it.<br />
4. Do one of the following:<br />
<br />
<br />
Copy the files from the computer to the phone’s storage<br />
card’s root folder.<br />
Copy the files from the phone’s storage card to a folder in<br />
your computer.<br />
5. After copying the files, unmount the removable disk (that is, the<br />
connected phone) as required by your computer’s operating<br />
system to safely remove your phone.<br />
6. Do one of the following:<br />
<br />
<br />
Disconnect the phone from the computer.<br />
If you want to keep the phone connected to the computer but<br />
want the phone to be able to access the storage card, open<br />
the Notifications panel, tap Disk drive, select an option except<br />
Disk drive, and then tap Done.
Searching your phone and the Web<br />
Getting started 47<br />
Find all types of information on your phone and the Web. Search<br />
Anywhere sifts through different files, information, and apps on your<br />
phone. You can also choose to search the Web using your favorite<br />
web search service.<br />
Simply press SEARCH from the Home screen. Then enter the first<br />
few letters of what you want to search for. Matching items will be<br />
shown as you type.<br />
1 4<br />
1 This icon ( ) indicates that your phone will search for all types of<br />
information.<br />
Tap it if you want to choose and search only for one type of item, for<br />
example, Mail.
48 Getting started<br />
Type in what you want to search for.<br />
Matching search suggestions and results. You can:<br />
<br />
<br />
<br />
Scroll down to see more search results.<br />
Tap to see more results for a particular category.<br />
Tap a search result item to open its app.<br />
4 After entering a word or phrase in the search box, tap to search the Web<br />
using your favorite search service. To find out how to select a search<br />
service to use, see “Setting your phone’s search options”.<br />
Setting your phone’s search options<br />
1. From the Home screen, press SEARCH .<br />
2.<br />
When the search box appears, press MENU, and then tap<br />
Settings.<br />
3.<br />
Tap any of the following:<br />
Web search engine Choose a web search service you want to use.<br />
Select areas to<br />
search<br />
Choose the types of items or apps to include in<br />
the search. You can also press and hold and<br />
arrange items according to search priority.
Getting started 49<br />
Quickly looking up information on the Web<br />
Quick Lookup helps you learn about something right on the spot.<br />
When you enter a new word or phrase, you can readily look it up in<br />
popular websites or search services such as Wikipedia, Google Search,<br />
YouTube, Google Translate, and Google Dictionary.<br />
1. Press HOME , and then tap > Quick Lookup.<br />
. If the onscreen keyboard is open, press BACK to close it first<br />
so you’ll see the bottom tabs.<br />
3. Slide across the tabs to pick where you want to look up<br />
information. Then in the search box, enter what you want to<br />
search for.<br />
If, for example, you’ve found the information you were looking for<br />
in one tab such as Wikipedia, you can switch to the other tabs to<br />
automatically search the same item in Google Search on the Web,<br />
watch related videos in YouTube, or look up translations and meanings<br />
in Google Translate and Google Dictionary.
50 Getting started<br />
Translating words to other languages<br />
1. Press HOME , and then tap > Quick Lookup.<br />
. Press BACK to hide the onscreen keyboard first, then slide to<br />
the Google Translate tab.<br />
3. Under From language, choose the original language, then enter<br />
the word or phrase you want to translate.<br />
4. Under To language, choose from the languages available for<br />
translation.<br />
5. Tap Translate.<br />
Adjusting the volume<br />
Adjusting the ringer volume changes the volume level of the phone<br />
ringtone, while adjusting the media volume changes the volume level<br />
of sound notifications and music or video playback.
Getting started 51<br />
Adjusting the ringer volume<br />
Press the VOLUME UP or VOLUME DOWN button on the right<br />
panel of the phone to adjust the ringer volume to your desired<br />
level. The Ringer volume window appears on the screen to<br />
display the volume levels.<br />
<br />
<br />
While in the lowest ringer volume level (Silent mode), press<br />
VOLUME DOWN once to set your phone to Vibrate mode. The<br />
phone vibrates and the vibrate mode icon ( ) appears in the<br />
status bar.<br />
While in Vibrate mode, press VOLUME UP once to switch to silent<br />
mode. The speaker mute icon ( ) displays in the status bar.<br />
Adjusting the media volume<br />
When playing music or watching video, press the VOLUME UP or<br />
VOLUME DOWN button on the right panel of the phone to adjust the<br />
media volume. The Media volume window appears on the screen to<br />
display the volume level.<br />
Adjusting the earpiece volume for phone calls<br />
During a phone call, press the VOLUME UP or VOLUME DOWN button.<br />
Adjusting the volume via settings<br />
1. Press HOME > MENU, and then tap Settings > Sound ><br />
Volume.<br />
2. Drag the volume sliders to the left or right to adjust the volume<br />
levels of your phone’s ringtone, media playback, alarms, and<br />
notifications.<br />
Your phone briefly plays a sample tone with the volume being<br />
adjusted as you drag a slider.
5 Getting started<br />
3. If you want the same volume for your ringtone and notifications,<br />
select Use incoming call volume for notifications.<br />
4. When you’re done, tap OK.<br />
Sleep mode<br />
Sleep mode saves battery power by putting your phone into a low<br />
power state while the display is off. It also stops accidental button<br />
presses when the phone’s in your bag or pocket. You’ll still receive<br />
messages and calls though.<br />
To change the delay before your screen turns off, see “Adjusting the time<br />
before the screen turns off” in the Settings chapter.<br />
Switching to Sleep mode<br />
Quickly press the POWER button to turn off the display and switch<br />
your phone to Sleep mode. Your phone also automatically goes into<br />
Sleep mode when it’s idle for a while.<br />
Waking up from Sleep mode<br />
Your phone automatically wakes up when you have an incoming<br />
call. To wake it up manually, press the POWER button. You’ll need to<br />
unlock the screen.
Getting started 5<br />
Unlocking the screen<br />
Press the bar on the lock screen and then slide your finger down to<br />
unlock the screen or answer an incoming call.<br />
If you have set up a screen unlock pattern, pin, or password, you will be<br />
asked to draw the pattern on the screen or enter the PIN or password<br />
before it unlocks. See “Protecting your phone with a screen lock” in the<br />
Security chapter for details.
Personalizing<br />
Making your phone truly yours<br />
Make your phone look and sound just the way you want it. Personalize<br />
your phone with a different wallpaper, skin, ringtone, and notification<br />
sound for events such as incoming text, email, and calendar reminders.<br />
Tap the Personalize button ( ) right on the Home screen to get<br />
started.<br />
Personalizing your phone with scenes<br />
Your phone becomes multiple phones in one when you use scenes.<br />
Scenes are personalized Home screen layouts that you can quickly<br />
apply to your phone. By switching between scenes, you instantly turn<br />
your phone into your perfect weekend phone, travel phone, work<br />
phone, or pure play phone.<br />
Everytime you add or modify something on the Home screen, your phone<br />
automatically saves your changes to the current scene selected.
Personalizing 55<br />
Using a preset scene<br />
Your phone features preset scenes, each preconfigured with a<br />
different wallpaper and collection of widgets that reflect different<br />
moments in your life. You can choose a scene that is suitable for work,<br />
play, travel, or your social life.<br />
1.<br />
2.<br />
Press HOME , and then tap > Scene.<br />
Slide your finger on the screen from right to left to select the<br />
scene you want.<br />
3. Tap Apply.
56 Personalizing<br />
Creating a new scene<br />
You’ll start with an empty Home screen when you create a new scene.<br />
1.<br />
2.<br />
Press HOME , and then tap > Scene.<br />
Press MENU, then tap New.<br />
3. Enter a new scene name, then tap Done.<br />
4.<br />
Personalize the scene by adding widgets and other elements,<br />
arranging the Home screen layout, and changing the skin or<br />
wallpaper. All of your changes will be automatically saved to this<br />
scene.<br />
Renaming a scene<br />
1. Press HOME , and then tap > Scene.<br />
2.<br />
Slide your finger on the screen from right to left to select the<br />
scene you want to rename.<br />
3. Press and hold a scene thumbnail, then tap Rename.<br />
4. Enter a new scene name, then tap Done.<br />
Deleting scenes<br />
1. Press HOME , and then tap > Scene.<br />
2.<br />
3.<br />
Press MENU, then tap Delete.<br />
Slide your finger on the screen from right to left to browse<br />
through scenes, then tap one or more scenes you want to delete.<br />
4.<br />
Tap Delete.
Changing your wallpaper<br />
Personalizing 57<br />
Personalizing your wallpaper with your favorite photo is a quick and<br />
easy way to change the feel of your phone and give it a fresh look.<br />
Browse the collection of wallpapers included in your phone or choose<br />
from photos that you have taken with the camera. You can also<br />
change your Home screen to use an animated wallpaper.<br />
1.<br />
Press HOME , and then tap > Wallpaper.<br />
2. Tap one of the following:<br />
HTC wallpapers Choose a preset wallpaper, then tap Preview > Apply.<br />
Live wallpapers Choose from preset animated wallpapers. Tap<br />
Preview to view the animation, and then tap Apply.<br />
Gallery Choose a photo that you have taken using the<br />
camera or copied to your storage card. Crop the<br />
photo and then tap Save.
58 Personalizing<br />
Applying a new skin<br />
Personalize beyond the Home screen by applying a new skin. Skins are<br />
set to give a different look and feel to most of your phone’s onscreen<br />
buttons, application screens, option menus, and other items.<br />
1.<br />
2.<br />
Press HOME , and then tap > Skin.<br />
Slide your finger on the screen from right to left to select the skin<br />
you want.<br />
3. Tap Apply.
Personalizing your Home screen with widgets<br />
Personalizing 59<br />
Widgets put at-a-glance important information and media content<br />
up front on your Home screen. Some widgets are already added to<br />
your Home screen for your convenience. You can add more from the<br />
available selections of widgets, or download more widgets.<br />
Adding a widget<br />
1. Go to a part of the Home screen where there’s space to add a<br />
new widget.<br />
2.<br />
Tap > Widget.<br />
3. Select a widget that you want.<br />
4.<br />
Most HTC widgets are available in a variety of designs and sizes to<br />
suit your needs. Slide your finger on the screen from right to left<br />
to view the different styles, and then tap Select to choose one.<br />
You can also add widgets that allow you to quickly switch on or<br />
off certain settings of your phone, such as Wi-Fi, Mobile Network,<br />
Bluetooth, and more. Scroll down the widgets list, tap Settings, and<br />
then tap the widget that you want.
60 Personalizing<br />
Changing the settings of a widget<br />
Basic settings of some widgets (for example, the People and Mail<br />
widgets) can be modified from the Home screen.<br />
1. Press and hold a widget on the Home screen.<br />
The phone vibrates and you’ll see a colored box around the<br />
widget. Don’t lift your finger just yet.<br />
2. Drag the widget to the Edit button (if it’s enabled).<br />
The relevant screen where you can change some settings for this<br />
widget then opens.<br />
3. Customize the widget settings.
Personalizing 61<br />
Adding icons and other shortcuts on your Home<br />
screen<br />
Place app icons on your Home screen to open apps quicker. You<br />
can also add shortcuts to settings and specific information such as<br />
a bookmarked webpage, someone’s phone number, a music playlist,<br />
route directions, and many other items, to your Home screen.<br />
The shortcuts available depend on the apps that are installed on your<br />
phone.<br />
1.<br />
2.<br />
Go to a part of the Home screen where there’s space to add a<br />
new icon or shortcut.<br />
Tap , then do one of the following:<br />
<br />
<br />
To add an app icon, tap App and then select one from the<br />
Add app shortcut list.<br />
To add a shortcut to a setting or information, tap Shortcut and<br />
then select the type of information or setting.<br />
To add an app icon on the Home screen, you can also press HOME , tap<br />
, and then press and hold an app icon. Without lifting your finger, drag<br />
the icon to an empty area on the Home screen, and then release it.
6 Personalizing<br />
Adding folders on your Home screen<br />
Use folders to group related apps and other shortcuts to keep your<br />
Home screen tidy and organized. You can also add information folders<br />
that show up-to-date information such as Bluetooth received files,<br />
your Facebook phonebook, and more.<br />
Creating a new folder and adding items to it<br />
1. Go to a part of the Home screen where there’s space to add a<br />
new folder.<br />
2.<br />
Tap > Folder.<br />
3. Tap New Folder.<br />
4.<br />
Press and hold an app icon or a shortcut that you want to move<br />
to the folder. The phone then vibrates. Don’t lift your finger just<br />
yet.<br />
5. Drag the app icon or shortcut and drop it on top of the folder.<br />
Simply tap the folder to open it so you can access the apps and<br />
shortcuts inside the folder.<br />
Renaming a folder<br />
1. Tap the folder to open it.<br />
2.<br />
Press and hold the folder window’s title bar.<br />
3.<br />
Enter a new folder name and then tap OK.
Personalizing 6<br />
Rearranging or removing widgets and icons on<br />
your Home screen<br />
Rearrange the widgets and icons on your Home screen to give room<br />
for adding more items to the Home screen. You can also remove<br />
widgets and icons that you don’t frequently use.<br />
Moving a widget or icon<br />
1. Press and hold the widget or icon you want to move.<br />
The phone vibrates and you’ll see a colored box around the<br />
widget or icon. Don’t lift your finger just yet.<br />
2. Drag the widget or icon to a new location on the screen.<br />
You can pause at the left or right edge of the screen to drag the<br />
widget or icon onto another Home screen panel.<br />
3. When the widget or icon is where you want it, lift your finger.
64 Personalizing<br />
Removing a widget or icon<br />
1. Press and hold the widget or icon you want to remove.<br />
The phone vibrates and you’ll see a colored box around the<br />
widget or icon. Don’t lift your finger just yet.<br />
2. Drag the widget or icon to the Remove button.<br />
3. When the widget or icon also turns red, lift your finger.<br />
Rearranging the Home screen<br />
Reorder your Home screen panels in any way that fits how you use<br />
the Home screen. For example, move the panels with frequently-used<br />
widgets, shortcuts, and folders closer to the main Home screen.<br />
1. Pinch the Home screen to show the Leap view.<br />
2. Press and hold the thumbnail of the home screen you want to move.<br />
The phone then vibrates. Don’t lift your finger just yet.<br />
3. Drag the thumbnail to its new position, and then lift your finger.
The center thumbnail in Leap view is always the main Home screen.<br />
Changing your ringtones and alarms<br />
Personalizing 65<br />
Select, create, and download sound sets (different collections of<br />
ringtone, notification sounds, and alarm) so that you can instantly<br />
change from subtle ringtone and notification sounds while you’re in<br />
the office into something fun when you’re out with friends.<br />
Choosing a preset sound set<br />
1. Press HOME , and then tap > Sound set.<br />
2.<br />
On the Sound sets screen, tap a sound set name.
66 Personalizing<br />
3. You can tap to hear sample tones of the assigned ringtone,<br />
notification sounds, and alarm for that sound set.<br />
4. Tap Apply.<br />
Creating a sound set<br />
1. Press HOME , and then tap > Sound set.<br />
2.<br />
On the Sound sets screen, tap New sound set.<br />
3.<br />
Enter a new sound set name, then tap Done.<br />
The newly created sound set is then added to your phone’s list of<br />
sound sets. To find out how to assign different tones to the sound<br />
set, see “Customizing a sound set”.<br />
Customizing a sound set<br />
You can customize a sound set by applying your personal choice<br />
of ringtone, notification sounds, and alarms that may be from your<br />
phone’s preset selection or your storage card (except for notification<br />
sounds).<br />
To find out how to copy files to your storage card, see the Getting<br />
started chapter.<br />
Be sure to choose the correct sound set before changing the ringtone,<br />
notification sounds, and alarm since your phone automatically saves your<br />
changes to the current sound set selected.
Changing the ringtone<br />
1. Press HOME , and then tap > Ringtone.<br />
Personalizing 67<br />
2. Scroll through the available ringtones and tap the ringtone you<br />
want to use.<br />
The ringtone briefly plays when selected.<br />
3. If the audio file is on your storage card, tap New ringtone, select<br />
the item you want to import to the Ringtones list, then tap OK.<br />
4. Tap Apply.<br />
Changing the notification sounds<br />
1. Press HOME , and then tap > Notification sound.<br />
2. Choose the type of notification that you want to change.<br />
3. Scroll through the available tones and tap the item you want to<br />
use.<br />
A sample tone briefly plays when selected.<br />
4. Tap Apply.<br />
Changing the alarm sound<br />
1.<br />
Press HOME , and then tap > Alarm.<br />
2. Scroll through the available tones and tap the item you want to<br />
use.<br />
A sample tone briefly plays when selected.<br />
3. If the audio file is on your storage card, tap New alarm, select the<br />
item you want to import to the Alarms list, then tap OK.<br />
4. Tap Apply.
68 Personalizing<br />
Deleting sound sets<br />
1. Press HOME , and then tap > Sound set.<br />
2.<br />
Press MENU, and then tap Delete.<br />
3. Tap one or more sound sets you want to delete.<br />
4.<br />
Tap Delete.<br />
Rearranging or hiding application tabs<br />
You can rearrange the tabs at the bottom of some of your phone’s<br />
apps to prioritize the types of information you frequently use or<br />
remove the tabs you don’t really need.<br />
1. Open an app that has the usual tabs at the bottom of its screen<br />
(for example, the contact details screen in People).<br />
2. Press and hold a tab. When the screen changes and shows you<br />
an empty area, lift your finger.<br />
3. Do any of the following:<br />
Move a tab Press and hold the tab you want to move, and then<br />
drag it to its new position.<br />
Remove a tab Press and hold a tab you want to hide, then drag it<br />
up. When you see a colored box, lift your finger.<br />
You cannot hide the tab if it’s grayed out.<br />
4. When you’re done, press BACK .
Personalizing 69<br />
Putting back the tabs you’ve removed<br />
1. Open the app that you’ve previously removed some of its tabs.<br />
2. Press and hold a tab. When the screen changes and shows you<br />
some of your hidden tabs, lift your finger.<br />
3. Press and hold the tab you want to show, then drag it down to<br />
where you want to position it again.<br />
4. When you’re done, press BACK .
Phone calls<br />
Making calls<br />
Making a call on the Phone dialer screen<br />
You can either dial a number directly, or use the Smart dial feature to<br />
search and call a stored contact or a number from your call history.<br />
1. Press HOME , then tap Phone.<br />
2. Begin entering the first few digits of a phone number or<br />
characters of a contact name on the phone keypad.<br />
The Phone dialer screen then displays a list of matching numbers<br />
and names.<br />
If you enter a wrong digit or letter, tap to delete it. To erase the<br />
entire entry, press and hold .<br />
. Tap to close the phone keypad and to see if there are more<br />
matching numbers or contacts. To browse through the filtered<br />
list, flick through the list or slide your finger up or down the list<br />
slowly.<br />
4. To place a call, do one of the following:<br />
<br />
<br />
<br />
Tap a phone number or contact from the list.<br />
After entering a complete number, tap Call.<br />
To call a different phone number associated with the contact,<br />
you can tap at the right side of the contact name. On the<br />
contact details screen, tap the number you want to call.
Phone calls 71<br />
While dialing or when the call is in progress, the status bar displays the<br />
Call in progress icon ( ) and its color changes to pulsing green.<br />
What is Smart dial?<br />
The phone dialer’s Smart Dial feature makes it quick and easy for you<br />
to place a call. Simply enter the phone number or first few letters of<br />
the person’s name you want to call. Smart Dial automatically searches<br />
and filters your contacts list (stored on your phone, SIM card, and<br />
online accounts such as Google Account and Exchange ActiveSync)<br />
and the phone numbers from the call history.<br />
Using Speed dial<br />
Use Speed dial to call a phone number with a single tap. For example,<br />
if you assign a contact’s number to the number key, you can simply<br />
press and hold this key on the Phone dialer keypad to dial that<br />
number.<br />
Assigning a speed dial key<br />
1. Press HOME , then tap Phone.<br />
2.<br />
3.<br />
4.<br />
Press MENU, and then tap Speed dial > Add new.<br />
Enter the name of the contact you want to add. When the name<br />
comes up in the list, tap the name.<br />
On the Speed dial screen, choose the phone number of the<br />
contact to use, and a speed dial key to assign.<br />
5. Tap Save.<br />
Calling a speed dial number<br />
1. Press HOME , then tap Phone.<br />
2.<br />
On the phone keypad:
7 Phone calls<br />
The number 1 key is generally reserved for your voicemail.<br />
Press and hold this key to call voicemail and retrieve your<br />
voicemail messages.<br />
Press and hold the key that is associated with the contact you<br />
want to call.<br />
Calling a phone number in a text message<br />
1. Press HOME , and then tap > Messages.<br />
2.<br />
<br />
<br />
Tap the number or name of the person who sent you the text<br />
message.<br />
3. Tap the phone number within the message.<br />
4. Edit the phone number if needed, and then tap Call.<br />
To call the message sender, press and hold the sender or the received<br />
message, and then tap Call on the options menu.<br />
To find out more about text messaging, see the Messages chapter.<br />
Calling a phone number in an email<br />
1. Press HOME , and then tap > Mail.<br />
2.<br />
3.<br />
In your email account’s inbox, tap the email that contains the<br />
phone number to call.<br />
In the email body, tap the phone number. A selection menu then<br />
pops up and the phone number is highlighted.
Phone calls 7<br />
The phone will recognize a number as a phone number if the<br />
number has a minimum of 5 digits and have at least one of the<br />
following:<br />
Numbers starting with a plus sign (+). For example, +1-987-<br />
654- 1 or +1987654 1.<br />
Numbers starting with an area or country code enclosed in a<br />
parenthesis. For example, (0 )987654 1 or (0 )987-654- 1.<br />
Numbers separated by dashes. For example, (0 )-987-654- 1<br />
or 0987-654- 1.<br />
4. Tap Call.<br />
5. When the phone dialer screen opens with the phone number<br />
already entered, tap Call.<br />
To find out more about using email on your phone, see the Email<br />
chapter.<br />
Making an emergency call<br />
You can make emergency calls from your phone even if you don’t have<br />
a SIM card installed or your SIM card has been blocked.<br />
1.<br />
2.<br />
<br />
<br />
<br />
Press HOME , then tap Phone.<br />
Dial the international emergency number for your locale (for<br />
example, 000), and then tap Call.<br />
Additional emergency numbers may be included in your SIM card. Contact<br />
your Verizon Wireless for details.<br />
If you’ve enabled but forgotten your lock screen password, lock<br />
pattern, and/or the SIM lock, you can still make emergency calls by<br />
tapping Emergency call on the screen.
74 Phone calls<br />
Using Assisted Dialing<br />
Assisted Dialing allows you to easily dial international calls while<br />
roaming in another country.<br />
Turning Assisted Dialing on<br />
1. Press HOME<br />
Dialing.<br />
> MENU, and then tap Settings > Call > Assisted<br />
2.<br />
3.<br />
Select the Enable Assisted Dialing check box.<br />
Under Reference Country, select the country that you want to<br />
call.<br />
Editing a country’s international call settings<br />
1. Press HOME<br />
Dialing.<br />
> MENU, and then tap Settings > Call > Assisted<br />
.<br />
.<br />
4.<br />
5.<br />
Under Reference Country, select the country whose settings you<br />
want to edit.<br />
Press MENU and then tap Edit.<br />
Edit the Country Code, IDD Prefix (International Direct Dial),<br />
NDD Prefix (National Direct Dial), Area/City Code and National<br />
Number Length (length of phone number).<br />
Tap Save.<br />
Resetting the Reference Country to the default<br />
1. Press HOME<br />
Dialing.<br />
> MENU, and then tap Settings > Call > Assisted<br />
.<br />
Under Reference Country, select the country whose settings you<br />
want to set to default values.<br />
.<br />
Press MENU and then tap Set Default.
Receiving calls<br />
When you receive a phone call from a contact, the Incoming call<br />
screen appears and displays the caller ID icon, name, and phone<br />
number of the calling party.<br />
Phone calls 75<br />
When you receive a phone call from someone who is not stored in<br />
People, only the default caller ID icon and phone number appear on<br />
the Incoming call screen.<br />
You can use your phone’s polite ringer and pocket mode features for<br />
receiving calls. To find out how, see “Turning on or off automatic ring<br />
volume adjustment” in the Settings chapter.<br />
Answering or rejecting an incoming call<br />
If To answer the call To reject the call<br />
Display is on Tap Answer. Tap Decline.
76 Phone calls<br />
If To answer the call To reject the call<br />
Display is off When the Lock screen appears,<br />
drag the bar that shows the caller<br />
name or number downward.<br />
Drag the bar upward.<br />
Or, press MENU and then<br />
tap Decline.<br />
You can also do one of the following to reject an incoming call:<br />
<br />
<br />
Press the POWER button twice.<br />
To reject the call and send a text message, press MENU, and then<br />
tap Send message.<br />
Changing the text message to send out for rejected calls<br />
1. On the Phone dialer screen, press MENU.<br />
2.<br />
Tap Settings > Edit default message.<br />
3. Enter the new message, and then tap OK.<br />
Muting the ringing sound without rejecting the call<br />
Do one of the following:<br />
<br />
<br />
<br />
Press the VOLUME DOWN or VOLUME UP button.<br />
Press the POWER button.<br />
Place the phone face down on a leveled surface.<br />
If the phone is already facing down, the phone will still ring when there are<br />
subsequent incoming calls.
HTC Caller ID<br />
Phone calls 77<br />
Everytime you make a call or your friend gives you a ring, you get<br />
to see your friend’s latest status update from social networks like<br />
Facebook or Twitter right on the call screen.<br />
You also won’t miss people’s birthdays. You’ll see a birthday reminder,<br />
if your friend’s birthday will occur sometime within the next seven days.
78 Phone calls<br />
Using in-call options<br />
When a call is in progress, use the buttons onscreen to mute or<br />
unmute the microphone or to turn on or off the speakerphone. You<br />
can also press MENU and choose whether to add a call, place the call<br />
on hold, mute the microphone, and more.<br />
Putting a call on hold<br />
Press MENU and then tap Hold to put the call on hold. When you put<br />
a call on hold, the status bar displays the Hold call icon ( ) and its<br />
color changes to pulsing red. Press MENU, and then tap Unhold to<br />
resume the call.<br />
Switching between calls<br />
If you’re already on a call and accept another call, you can choose to<br />
switch between the two calls.<br />
1. When you receive another call, tap Answer to accept the second<br />
call, and to put the first call on hold.<br />
2. To switch between the calls, tap the person you want to talk to<br />
on the screen.<br />
3. To end the current call and return to the other call, tap End call.
Phone calls 79<br />
Setting up a three-way conference call<br />
Conference calling with your friends, family, or co-workers is easy.<br />
Make the first call (or accept a call), and then simply dial each<br />
subsequent call to add to the conference.<br />
1.<br />
2.<br />
Make a call to the first conference call participant.<br />
When connected, press MENU, tap Add call, and then dial the<br />
number of the second participant. The first participant is put on<br />
hold when you dial the second participant.<br />
3. When connected to the second participant, tap (merge).<br />
When you want to talk to a person in the conference call in<br />
private, tap , and then select Private call on the options menu.<br />
4. When finished, tap End call.<br />
Turning the speakerphone on or off during a call<br />
To turn the speakerphone on, you can do any of the following:<br />
<br />
<br />
Flip your phone over during a call (be sure that Flip for speaker is<br />
selected in HOME > MENU > Settings > Sound).<br />
On the call screen, tap .<br />
The speakerphone icon ( ) appears in the status bar when the<br />
speakerphone is on.<br />
To turn the speakerphone off, just flip the phone over again, facing it<br />
up. Or tap again.<br />
To decrease potential damage to your hearing, do not hold your phone<br />
against your ear when the speakerphone is on.
80 Phone calls<br />
Muting the microphone during a call<br />
On the call screen, tap to toggle between turning the<br />
microphone on or off. When the microphone is turned off, the Mute<br />
icon ( ) appears in the status bar.<br />
Ending a call<br />
Do one of the following to end the call:<br />
<br />
<br />
<br />
On the call screen, tap End call.<br />
If the phone display is off, press POWER to turn on the screen so you can<br />
tap End call.<br />
Slide open the Notifications panel, then tap .<br />
If you are using the provided wired headset, press the button to<br />
end the call.<br />
If the phone number of the person who called is not in your contacts<br />
list, you can choose to save the number to your contacts list after you<br />
hang up.
Using Call history<br />
Phone calls 81<br />
Use the Call history to check missed calls, your dialed numbers and<br />
received calls.<br />
Checking a missed call<br />
You will see the missed call icon in the status bar when you miss a<br />
call.<br />
1. Slide open the Notifications panel to check who the caller is.<br />
2. To return the call, tap the missed call notification. Then tap the<br />
caller’s name or number on the Call history screen.<br />
Checking calls in the call history<br />
1. Press HOME , and then tap > Call history. You can also<br />
tap on the Phone dialer screen.<br />
2.<br />
On the Call history screen, you can:<br />
<br />
<br />
<br />
<br />
Tap a name or number in the list to call.<br />
Press and hold a name or number in the list to display the<br />
options menu where you can select to check the call history<br />
details, view contact information (if the number is stored<br />
in your contacts list), send a text message, delete from call<br />
history, or block the caller.<br />
Tap to check only the call history of a particular contact.<br />
Press MENU, then tap View to display just a particular type of<br />
calls such as Missed calls or Outgoing calls.<br />
You can also access Call history from the People app. For details, see the<br />
People chapter.
8 Phone calls<br />
Adding a new phone number to your contacts from call<br />
history<br />
1. On the Call history screen, press and hold a phone number that<br />
you want to save to your contacts, and then tap Save to People.<br />
2. Choose whether to create a new contact or to save the number<br />
to an existing contact on your phone.<br />
3. Do any of the following:<br />
<br />
<br />
When creating a new contact, enter the contact name, contact<br />
type, and other information in the blank contact record that<br />
appears. The phone number is automatically added to the<br />
Mobile field in the Phone section.<br />
To store it as another type of number, for example a home<br />
number, tap the Mobile button.<br />
When saving the number to an existing contact, tap a contact<br />
stored on your phone, and then select the number type.<br />
4. Tap Save.<br />
To find out how to add new contacts or edit the contact information, see<br />
the People chapter.<br />
Clearing the call history list<br />
On the Call history screen, you can do the following:<br />
<br />
<br />
To remove one name or number from the list, press and hold<br />
the name or number, and then tap Delete from call history.<br />
To clear the entire list, press MENU, and then tap Delete all.
Call services<br />
Phone calls 8<br />
Your phone can directly link to the mobile phone network, and enable<br />
you to access and change the settings of various phone services for<br />
your phone. Call services may include call forwarding, call waiting,<br />
voicemail, and more. Contact Verizon Wireless to find out about the<br />
availability of call services for your phone.<br />
To open call services, press MENU from the Home screen, and then<br />
tap Settings > Call.<br />
Fixed Dialing<br />
Numbers<br />
Restrict outgoing calls to a fixed set of numbers. To<br />
enable this feature, you must know your SIM card’s PIN<br />
code.<br />
Voicemail service Shows the current voicemail service being used.<br />
Voicemail settings Specify another voicemail number aside from the voice<br />
mail number on your SIM card.<br />
Clear voicemail<br />
notification<br />
If you have a notification of a new voicemail, you can<br />
clear the notification with this option.<br />
Phone settings Edit the call reject message, choose whether to open<br />
the message editor when you reject a call with a<br />
message, and choose whether to allow automatic saving<br />
of an unknown contact number when a call with that<br />
number ends.<br />
Cell broadcast Enable or disable receipt of cell broadcast messages<br />
from your service provider.<br />
Cell broadcast<br />
settings<br />
Configure channels and language for cell broadcast<br />
messages.
84 Phone calls<br />
Call forwarding Select how you want your phone to handle busy,<br />
unanswered, and unreachable calls. You can also set the<br />
call forwarding option for all incoming calls.<br />
Call barring<br />
settings<br />
Additional call<br />
settings<br />
Visual Voice Mail<br />
Choose whether to block various categories of incoming<br />
and outgoing call.<br />
Enable or disable operator services such as caller ID and<br />
call waiting.<br />
Visual Voice Mail allows the management of voice mail directly<br />
from the phone rather than accessing your voice mail via traditional<br />
methods. Visual Voice Mail displays a list of messages and allows the<br />
user to choose which message to listen to or erase, without having<br />
to dial into their mailbox, listen to voice instructions, or listen to prior<br />
messages.<br />
Setting up Visual Voice Mail<br />
You must be a Verizon Wireless subscriber before continuing.<br />
1. Press HOME , and then tap > Voice Mail ><br />
Visual Voice Mail.<br />
2. When prompted, enter your basic voice mail password.<br />
3. Read the terms of use statement and then tap Subscribe to<br />
continue.<br />
4. Tap Exit and wait 5 minutes before using Visual Voice Mail.
Using Visual Voice Mail<br />
1. Press HOME , and then tap > Voice Mail.<br />
Phone calls 85<br />
The first time you run Visual Voice Mail after setting it up, you are<br />
prompted to read the terms of use statement.<br />
2. After reading the terms of use statement, scroll down and tap<br />
Accept to continue.<br />
3. On the Voicemail screen, you can:<br />
•<br />
•<br />
•<br />
Tap Compose voicemail to record and send a voice mail.<br />
View a list of received Visual Voice Mail messages.<br />
Tap MENU and sort and delete voice mails, call your voice mail<br />
box, configure voice mail settings, and more. You can also synch<br />
with the Visual Voice Mail server to refresh the Visual Voice Mail<br />
list.<br />
•<br />
•<br />
Visual Voice Mail is only available in the National Enhanced<br />
Services Coverage Area and only on select devices. Specific<br />
terms, conditions and monthly charges apply. Basic Voice Mail<br />
is required and V Block must be removed to use Visual Voice<br />
Mail.<br />
Anyone in possession of this device can access voice mail. To<br />
limit unauthorized access to voice mail, consider locking the<br />
phone when not in use.
86 Phone calls<br />
Turning Airplane mode on or off<br />
In many countries, you are required by law to turn off the phone while<br />
on board an aircraft. A way to turn off the phone function is to switch<br />
your phone to Airplane mode. When you enable Airplane mode,<br />
all wireless radios on your phone are turned off, including the call<br />
function, data services, Bluetooth, and Wi-Fi.<br />
To turn Airplane mode on or off, you can:<br />
<br />
<br />
Press and hold POWER, and then tap Airplane mode.<br />
From the Home screen, press MENU. Tap Settings > Wireless &<br />
networks, and then select or clear the Airplane mode check box.<br />
When enabled, the Airplane mode icon ( ) is displayed in the status<br />
bar.<br />
When you disable Airplane mode, the call function is turned back on and<br />
the previous state of Bluetooth and Wi-Fi is restored.
People<br />
About People<br />
With the People app, you can sync your phone with contacts from<br />
your Google Account, computer, and Facebook. You can also sync<br />
with work contacts from the Exchange ActiveSync Server in your<br />
workplace. To find out how, see “Ways of getting contacts into your<br />
phone”.<br />
Per contact, link the person’s information from all these different<br />
sources as one so you won’t have duplicated entries in your contacts<br />
list. To find out how to link, see “Merging contact information”.<br />
And that’s not all. You can manage your communications with your<br />
contacts via phone, messaging, and email without the need to jump<br />
from one app to another. After you’ve linked contacts to their social<br />
network accounts like Facebook, Twitter, and Flickr, you’ll also see<br />
their updates and events from these accounts all in one place.<br />
People screen<br />
The People screen has the following tabs:<br />
1 4
88 People<br />
1 All tab Gives you access to all contacts on your phone, including<br />
Google contacts, Exchange ActiveSync contacts, Phone<br />
contacts, contacts stored on your SIM card, and Facebook<br />
contacts. You can also use this tab to open or update My<br />
contact card. For more information, see “Setting up My<br />
contact card” in this chapter.<br />
2 Groups tab Lets you assign contacts to groups so you can easily send<br />
an SMS, MMS, or email message to a whole group. For<br />
more information, see “Contact groups” in this chapter.<br />
3 Online<br />
directories<br />
tab<br />
4 Call history<br />
tab<br />
Setting up My contact card<br />
View your friends list in your social network accounts. You<br />
can also search for contacts in your Exchange ActiveSync<br />
account to copy to your phone.<br />
Lists all your dialed numbers and received and missed<br />
calls. See “Using Call history” in the Phone calls chapter.<br />
My contact card provides a convenient way to store your personal<br />
contact information so that you can easily send it via SMS, MMS, email,<br />
or Bluetooth.<br />
1.<br />
Press HOME , and then tap > People.<br />
2.<br />
On the All tab of the People screen, tap Me.<br />
If you are logged in to your Facebook account through Facebook for HTC<br />
Sense, instead of Me, you will see the name you use in Facebook. Tap your<br />
name. Then press MENU and tap Edit.<br />
3. Enter your name and contact details.<br />
4. Tap Save.
Ways of getting contacts into your phone<br />
People 89<br />
Gmail Google contacts are imported to your phone after you<br />
sign in to your Google Account.<br />
You can also create more Google contacts right from<br />
your phone. To find out how, see “Adding a new contact“<br />
in this chapter.<br />
Facebook See “Adding a social network account” in the Accounts<br />
and sync chapter for details.<br />
Phone contacts See “Adding a new contact“ in this chapter.<br />
SIM card See “Importing contacts from your SIM card” in this<br />
chapter.<br />
Exchange<br />
ActiveSync Server<br />
Contacts on your<br />
computer<br />
See “Adding a Microsoft Exchange ActiveSync account”<br />
in the Email chapter.<br />
See “Synchronizing with your computer” in the Accounts<br />
and sync chapter.<br />
Adding a new contact<br />
1. Press HOME , and then tap > People.<br />
2.<br />
On the All tab, tap Add contact.<br />
3. Select the Contact type, for example Google or Microsoft<br />
Exchange ActiveSync. This determines which account the<br />
contact will sync with. For more information, see “Ways of<br />
getting contacts into your phone” in this chapter.<br />
Some fields may not be supported when you’re adding contacts to your<br />
SIM card.
90 People<br />
4. In the Name field, enter the first and last name of the contact,<br />
then tap OK.<br />
5. Enter the contact information in the fields provided.<br />
Press BACK if you want to close the onscreen keyboard first<br />
and easily scroll through the other fields.<br />
6. Tap Save.<br />
Importing contacts from your SIM card<br />
You can copy all your SIM contacts to your phone. You can import<br />
them as Phone contacts, Google contacts, or Exchange ActiveSync<br />
contacts, if you have set up the relevant accounts.<br />
1.<br />
2.<br />
3.<br />
Press HOME , and then tap > People.<br />
On the All tab, press MENU, and then tap Import/Export ><br />
Import from SIM card.<br />
If you have Google or Exchange ActiveSync accounts set up on<br />
your phone, tap the type for the imported contacts.<br />
4. Do one of the following:<br />
<br />
<br />
To import all contacts, press MENU, and then tap Select all.<br />
To import a contact, tap the contact.<br />
5. Tap Save.
Importing a contact from an Exchange ActiveSync<br />
account<br />
You can search for a work contact from your Exchange ActiveSync<br />
account, and then copy it to your phone.<br />
People 91<br />
You need to have your Exchange ActiveSync account set up on<br />
your phone first. To find out how, see “Adding a Microsoft Exchange<br />
ActiveSync account“ in the Email chapter.<br />
1.<br />
2.<br />
Press HOME , and then tap > People.<br />
On the Online directories tab, tap Company directory.<br />
3. Enter the name, and then tap .<br />
4.<br />
In the list, tap the name of the contact you want to copy to your<br />
phone.<br />
5.<br />
Tap Save to People.<br />
Merging contact information<br />
If you have stored contacts with the similar contact information such<br />
as name, email address, or mobile number in your phone and online<br />
accounts, your phone will try to link them as one automatically or<br />
create a list of matched contact suggestions. If it doesn’t, you can<br />
manually link them so that you won’t have duplicated entries in your<br />
contacts list.<br />
Also link your contacts with other social network accounts such as<br />
Twitter and Flickr. You’ll then see their updates and events from these<br />
accounts all in one place.
9 People<br />
Accepting matched contacts suggestions<br />
When your phone finds contact information that can be merged, you’ll<br />
see the Matched contact suggestions icon ( ) in the notification<br />
area of the status bar.<br />
1.<br />
Slide down the Notifications panel, and then tap Matched<br />
contacts suggestion. Your phone displays all suggested contacts<br />
that you can merge.<br />
2.<br />
Review the suggested links.<br />
3. When there are contacts you don’t want to merge, tap to<br />
break the contact information link.<br />
4. Tap OK.<br />
If you don’t want to merge any of your contacts, tap Dismiss all.
Viewing a list of all your linked contacts<br />
1. Press HOME , and then tap > People.<br />
2.<br />
On the All tab, press MENU, then tap More > Linked contacts.<br />
People 9<br />
The All linked contacts list then opens where you can check the<br />
account types and information merged. You can choose to tap<br />
beside an account type to break the link.<br />
3. When you’re done, tap OK.<br />
Manually merging contact information<br />
1. Press HOME , and then tap > People.<br />
2.<br />
3.<br />
On the All tab, tap the name of the contact (not the icon or<br />
photo) you want to link.<br />
On the upper-right corner of the screen, tap or (if there<br />
are suggested links).<br />
4. On the screen, you can:<br />
<br />
<br />
Under Suggest links, tap to link the contact to an<br />
account.<br />
Under Add contact, tap one of the options to link to another<br />
contact.<br />
5. Tap Done.<br />
Breaking the contact information link between contacts<br />
1. Press HOME , and then tap > People.<br />
2.<br />
On the All tab, tap the name of the contact (not the icon or<br />
photo) whose contact information link you want to break.
94 People<br />
3. On the upper-right corner of the screen, tap .<br />
4.<br />
Under the Linked contacts section, tap beside an account<br />
type to break the link.<br />
5.<br />
Tap Done.<br />
Your contacts list<br />
The All tab of the People screen shows all your contacts, including<br />
Google contacts, Exchange ActiveSync contacts, Phone contacts,<br />
contacts stored on your SIM card, and Facebook contacts.<br />
If you signed in to your Google Account and Facebook account when you<br />
first set up the phone, your contacts from those accounts will appear in the<br />
contacts list when you open People.<br />
1<br />
4<br />
7 8<br />
6<br />
5
1 Create a new contact.<br />
Tap to edit your My contact card.<br />
This icon appears when the contact:<br />
<br />
<br />
<br />
People 95<br />
Has sent you a new text or email message, or tried to call you but you<br />
missed the call.<br />
Has updated his or her Facebook profile or has added photos on Flickr<br />
or Facebook.<br />
Has upcoming Facebook events or birthday.<br />
4 Your SIM card contact.<br />
5 Tap to open the contact details screen for that contact.<br />
6 Online status of a contact whom you are friends with in Google Talk.<br />
Online status icons are displayed if you’re signed in to Google Talk using<br />
your Google Account. For details, see “Chatting in Google Talk” in the<br />
Social chapter.<br />
7 Instant status update appears when you’ve linked the contact to his or her<br />
social network account.<br />
8 Tap the photo or icon to open a menu where you can quickly choose how<br />
to communicate with the contact. Depending on the contact information<br />
stored, you can call, send a message or email, see the contact’s Facebook<br />
profile, and map his/her address in Google Maps.
96 People<br />
Filtering your contacts list<br />
You can choose to display contacts of a particular type only, for<br />
example Google contacts or Facebook contacts.<br />
1.<br />
2.<br />
3.<br />
Press HOME , and then tap > People.<br />
On the All tab, press MENU, then tap View.<br />
Select the types of contacts you want to show in your contacts<br />
list.<br />
You can also choose how you want to display and sort your contacts.<br />
4. Tap Done.<br />
Searching for a contact<br />
1. Press HOME , and then tap > People.<br />
2.<br />
Press SEARCH , then enter the first few letters of a contact’s<br />
first or last name, email, or company name.<br />
You can also type in the first few digits of your contact’s phone<br />
number. Matching contacts are displayed.
People 97<br />
3. Tap the contact to open his or her contact details screen. See<br />
“Contact information and conversations” in this chapter for details.<br />
Backing up your contacts to the storage card<br />
1. Press HOME , and then tap > People.<br />
2.<br />
Press MENU, and then tap Import/Export > Export to SD card.<br />
3. Select an account or type of contacts to export, then tap OK.<br />
Importing contacts from the storage card<br />
1. Press HOME , and then tap > People.<br />
2.<br />
Press MENU, and then tap Import/Export > Import from SD card.<br />
You can only import contacts that were exported to the storage card using<br />
the Export to SD card feature on the phone. See “Backing up your contacts<br />
to the storage card”.<br />
3. If you have Google or Exchange ActiveSync accounts set up on<br />
your phone, tap the type for the imported contacts.<br />
Deleting contacts<br />
1. Press HOME , and then tap > People.<br />
2.<br />
On the All tab, press MENU, and then tap Delete.<br />
3. Select the contacts you want to delete, and then tap Delete.<br />
4.<br />
When prompted, tap OK.
98 People<br />
Contact information and conversations<br />
When you tap a contact on the People screen, the contact details<br />
screen opens, showing you the information stored for that contact,<br />
exchanged messages and phone calls with that contact, updates and<br />
events from social networks, and more.<br />
The contact details screen has the following tabs:<br />
1<br />
4<br />
5 6<br />
1 Details tab Shows the information you have stored for the contact,<br />
and allows you to get in touch with the contact directly<br />
by tapping any of the displayed methods. For example,<br />
if the contact has a stored work phone number, tap Call<br />
work to call that number.<br />
2 Messages tab Shows your exchanged SMS messages with the contact.<br />
You can reply to the contact’s message directly from this<br />
tab. To send a new message, press MENU, and then tap<br />
New message. See the Messages chapter for details.<br />
3 Mail tab Shows all the email you have received from the contact.<br />
Tap an email to view it. To send a new email, tap New<br />
mail. To find out more about sending email, see the Email<br />
chapter.
4 Updates and<br />
events tab<br />
Shows the contact’s updates and events from social<br />
network accounts like Facebook, Twitter, and Flickr.<br />
You’ll be able to see updates such as posted status<br />
messages, uploads, and profile changes from all these<br />
accounts. To find out more about Facebook for HTC<br />
Sense, see the Social chapter.<br />
People 99<br />
5 Gallery tab Shows the contact’s Facebook and Flickr photo albums.<br />
Tap an album to look at the photos in the album.<br />
You need to be logged in to the same social networks on<br />
your phone to see the updates and events. If you are not<br />
logged in, tap the relevant link on the screen to sign in.<br />
6 Call history<br />
tab<br />
Lists all your incoming, outgoing, and missed calls to and<br />
from the contact. Tap a list item to call the contact using<br />
the displayed number.<br />
Editing a contact’s information<br />
1. Press HOME , and then tap > People.<br />
2.<br />
On the All tab, press and hold the contact, and then tap Edit<br />
contact.<br />
You cannot edit the contact information of a Facebook friend.<br />
3. Enter the new information for the contact.<br />
4. Tap Save.
100 People<br />
Sending contact information as a vCard<br />
Share the contact information on your phone in different ways such as<br />
a text or multimedia message, email, and Bluetooth. To find out about<br />
how to send through Bluetooth, see the Bluetooth chapter.<br />
Sending someone’s contact information<br />
1. Press HOME , and then tap > People.<br />
2.<br />
On the All tab, press and hold the name of the contact (not the<br />
icon or photo) whose contact information you want to send, and<br />
then tap Send contact as vCard.<br />
You cannot send contact information that’s from your Facebook account.<br />
3. Choose how you want to send it.<br />
4. Select the contact details you want to share, and then tap Send.<br />
Sending your contact information<br />
1. Press HOME , and then tap > People.<br />
2.<br />
On the All tab, tap [Your name] My contact card.<br />
3. Press MENU, then tap Send my contact info.<br />
4.<br />
Choose how you want to send it.<br />
5. Select the contact details you want to share, and then tap Send.
Contact groups<br />
People 101<br />
Assign contacts to groups so you can easily send a message or email<br />
to a whole group. You can also sync groups on your phone with the<br />
groups in your Google account, accessible via your computer’s web<br />
browser.<br />
We’ve also added the Frequent group as a special group type that<br />
automatically stores the contacts you dial or get calls from the most.<br />
Creating a group<br />
1. Press HOME , and then tap > People.<br />
2.<br />
On the Groups tab, tap Add group.<br />
3. Enter a name for the group, and then tap Add contact to group.<br />
4.<br />
Select the contacts you want to add to the group, and then tap<br />
Save.<br />
If your contacts list is long, you can use the search bar to search for<br />
contacts quickly, or press BACK to hide the onscreen keyboard and<br />
scroll through the list.<br />
5. Tap to select a photo for the group.<br />
6. Tap Save.<br />
Editing a contact group<br />
1. Press HOME , and then tap > People.<br />
2.<br />
On the Groups tab, press and hold the group, and then tap Edit<br />
group.
10 People<br />
3. You can:<br />
Tap the group name to change the name. You can only change<br />
the name for groups that you have created.<br />
Tap the icon to the left of the group name to change or<br />
remove the group photo.<br />
To add contacts to the group, tap Add contact to group,<br />
select the contacts you want to add, and then tap Save.<br />
To remove a contact from the group, tap at the right side<br />
of the contact name.<br />
4. Tap Save.<br />
Sending a message or email to a group<br />
You will be charged by your mobile provider for each message sent. For<br />
example, if you send a message to a group of five people, you will be<br />
charged for five messages.<br />
1.<br />
2.<br />
<br />
<br />
<br />
<br />
Press HOME , and then tap > People.<br />
On the Groups tab, tap the group you want to send a message or<br />
email to.<br />
3. Go to the Group action tab, and then do one of the following:<br />
<br />
<br />
Tap Send group message to send a message to the group. For<br />
information about composing and sending messages, see the<br />
Messages chapter.<br />
Tap Send group mail to send an email to the group. For<br />
information on composing and sending email, see the Email<br />
chapter.
Rearranging your contact groups<br />
1. Press HOME , and then tap > People.<br />
2.<br />
3.<br />
On the Groups tab, press MENU, and then tap Rearrange.<br />
People 10<br />
Press and hold at the end of the group name you want to<br />
move. When the row is highlighted, drag it to its new position.<br />
4. Tap Save.<br />
Rearranging the members of a contact group<br />
1. Press HOME , and then tap > People.<br />
2.<br />
On the Groups tab, tap the group to see its members.<br />
3. Press MENU, and then tap Rearrange.<br />
4.<br />
Press and hold at the end of the contact’s name you want to<br />
move. When the row is highlighted, drag it to its new position.<br />
5. Tap Save.<br />
Deleting a group<br />
1. Press HOME , and then tap > People.<br />
2.<br />
On the Groups tab, press and hold the group you want to delete,<br />
and then tap Delete group.<br />
You can only delete groups that you have created.
104 People<br />
People widget<br />
Put the group of people you contact most right on the Home screen<br />
of your phone by adding them as the People widget. Using the People<br />
widget, you can instantly place a call, send a message, or view details<br />
of a favorite contact with a single tap.<br />
Adding People widgets<br />
Stay in touch with different circles of friends or colleagues in your<br />
life. You can add several People widgets on the Home screen, with a<br />
different group of contacts on each widget.<br />
1.<br />
2.<br />
Press HOME , and then tap > Widget > People.<br />
Choose the widget style, and then tap Select.<br />
3. Select the group you want to add as a widget.<br />
4.<br />
Drag the widget to a blank space on a Home screen. When the<br />
widget is where you want it, lift your finger.<br />
5. Repeat the above steps to add another People widget.<br />
Setting the default communication method<br />
1. On the Home screen, go to the People widget.<br />
2.<br />
3.<br />
Tap a contact on the widget.<br />
On the Select default action screen, tap the communication<br />
method you want for the contact.<br />
Changing the default communication method<br />
1. On the Home screen, go to the People widget.<br />
2.<br />
Tap the name of a contact on the widget to open the person’s<br />
contact card.
3. Press MENU, and then tap More > Set widget action.<br />
4.<br />
On the Select default action screen, tap the communication<br />
method you want for the contact.<br />
Getting in touch with a contact<br />
1. On the Home screen, go to the People widget.<br />
2.<br />
People 105<br />
Tap a contact (photo not the name) on the widget. The default<br />
communication method will be performed.<br />
If you have not set a default communication method, you need<br />
to choose one first. See “Setting the default communication<br />
method”.<br />
Tap the name of the contact to open the contact details screen for that<br />
contact.
Keyboard<br />
Using the onscreen keyboard<br />
When you start an app or select a field that requires text or numbers,<br />
the onscreen keyboard becomes available.<br />
After entering your text, you can tap or press BACK to close the<br />
onscreen keyboard.<br />
Selecting a keyboard layout<br />
You can choose from three different keyboard layouts to suit your<br />
typing style.<br />
1. On the onscreen keyboard, tap the Language key (for example,<br />
tap if you’re currently using the English onscreen keyboard).<br />
Then on the International keyboard options menu, tap Settings.<br />
If tapping the Language key doesn’t display the International<br />
keyboard menu, press HOME > MENU, and tap Settings ><br />
Language & keyboard > Touch Input.<br />
2. Tap Keyboard types, and then select the keyboard layout that<br />
you want to use. Choose one from the following:<br />
QWERTY This layout is similar to a desktop computer keyboard.<br />
This is the default keyboard layout.<br />
Phone Keypad This layout resembles the traditional mobile phone keypad.<br />
Compact<br />
QWERTY<br />
This layout features two letters on each key. The key<br />
size is slightly bigger than on the full QWERTY layout.
Keyboard 107<br />
Entering text<br />
Use the following keys while entering text using the onscreen keyboard:<br />
Press and hold keys with gray characters at the top to enter numbers,<br />
symbols, or accented letters. The gray character displayed on the key<br />
is the character that will be inserted when you press and hold that<br />
key. Some keys have multiple characters or accents associated with<br />
them.<br />
Shift key. Tap to enter an uppercase letter. Tap twice to turn on caps<br />
lock.<br />
Tap to switch to the numeric and symbol keyboard.<br />
Enter key. Tap to create a new line.<br />
Tap the Up, Down, Left, or Right key to move the text cursor in the direction<br />
that you want while you are entering or editing text.<br />
Backspace key. Tap to delete the previous character.<br />
Language key. The key you see depends on the keyboard language<br />
you are currently using. Tap to switch to another keyboard language<br />
(see “Enabling multiple keyboard languages”). You can also access<br />
onscreen keyboard settings.<br />
Tap to toggle between Multitap and XT9 predictive modes when<br />
using the Compact QWERTY or Phone keypad layout. For more<br />
information, see “Entering words with predictive text”.<br />
Tap to hide the onscreen keyboard.
108 Keyboard<br />
Enabling multiple keyboard languages<br />
If there are multiple keyboard languages available on your phone, you<br />
can choose which languages to enable in the onscreen keyboard so<br />
that you can switch to these languages and use them to enter text.<br />
1. On the onscreen keyboard, tap the Language key (for example,<br />
tap if you’re currently using the English onscreen keyboard).<br />
Then on the International keyboard options menu, tap Settings.<br />
If tapping the Language key doesn’t display the International<br />
keyboard menu, press HOME > MENU, and tap Settings ><br />
Language & keyboard > Touch Input.<br />
2. Tap International keyboard.<br />
3. Choose the languages that you want.<br />
Available languages depend on the region where you purchased<br />
the phone.<br />
Changing to the landscape onscreen keyboard<br />
When entering text, you can choose to use the landscape orientation<br />
of the onscreen keyboard. Turn your phone sideways to use a larger<br />
keyboard for easy typing.<br />
<br />
The Auto-rotate screen check box in HOME > MENU > Settings ><br />
Display needs to be selected for the screen orientation to automatically<br />
change.<br />
<br />
The landscape orientation keyboard is not supported in all apps.
Entering words with predictive text<br />
Keyboard 109<br />
The onscreen keyboard has predictive text to help you type quickly<br />
and accurately. Predictive text input is enabled by default, and word<br />
suggestions are displayed as you type.<br />
To enter a word in predictive mode, do any of the following:<br />
If you see the word you want highlighted in green or orange, you<br />
can simply tap the space bar to insert the word into your text.<br />
If you see the word you want shown in the suggestions before<br />
you have finished typing the entire word, tap the word to insert it<br />
into your text.<br />
<br />
If an arrow is shown to the right of the suggestion list, tap the<br />
arrow to see more suggestions.<br />
Setting a second language for the keyboard<br />
Aside from the keyboard language you are currently using, you can<br />
set the predictive text to be bilingual. As you type, you’ll get word<br />
suggestions in two languages that you’ve selected.<br />
1. On the onscreen keyboard, tap the Language key (for example,<br />
tap if you’re currently using the English onscreen keyboard).<br />
Then on the International keyboard options menu, tap Settings.<br />
If tapping the Language key doesn’t display the International<br />
keyboard menu, press HOME > MENU, and tap Settings ><br />
Language & keyboard > Touch Input.
110 Keyboard<br />
2. Tap Bilingual prediction, and then choose the language you want.<br />
Adding a word to the predictive text dictionary<br />
Your phone comes with a list of words that it references for predictive<br />
text suggestions. Sometimes you may need to add a word to the<br />
predictive text dictionary, for example a name or a specialized<br />
technical word.<br />
While entering text using the QWERTY keyboard layout, if you tap any<br />
word on the suggestion list, it is automatically added to the predictive<br />
text dictionary if it was not in the dictionary already.<br />
You can also add a word to the list manually:<br />
1.<br />
2.<br />
From the Home screen, press MENU, and then tap Settings ><br />
Language & keyboard > Touch Input.<br />
Tap Personal dictionary > Edit personal dictionary > Add new.<br />
3. Enter the word to add, and then tap OK.<br />
Editing or deleting a word in the predictive text dictionary<br />
You can edit or remove words that you previously added to the<br />
predictive text dictionary.<br />
1.<br />
2.<br />
From the Home screen, press MENU, and then tap Settings ><br />
Language & keyboard > Touch Input.<br />
Tap Personal dictionary > Edit personal dictionary.<br />
<br />
<br />
To edit a word, tap the word itself.<br />
To delete words from the dictionary, press MENU and tap<br />
Delete. Then choose the words to remove and tap OK.
Keyboard 111<br />
Backing up your personal dictionary to your storage card<br />
You can use your storage card to back up the new words you’ve<br />
added to the predictive text dictionary.<br />
1.<br />
2.<br />
From the Home screen, press MENU, and then tap Settings ><br />
Language & keyboard > Touch Input.<br />
Tap Personal dictionary > Sync personal dictionary > Copy to<br />
storage card.<br />
3. When prompted, tap OK.<br />
Importing your personal dictionary from your storage<br />
card<br />
1. From the Home screen, press MENU, and then tap Settings ><br />
Language & keyboard > Touch Input.<br />
2.<br />
Tap Personal dictionary > Sync personal dictionary > Restore<br />
from storage card.<br />
3.<br />
When prompted, tap OK.
11 Keyboard<br />
Entering text by speaking<br />
No time to type? Try speaking the words to enter it in most text fields<br />
that let you use the onscreen keyboard.<br />
Simply press and hold the Language key. When your phone cues you<br />
to “Speak now”, tell your phone what you want to be typed in.<br />
<br />
<br />
First make sure to select the language you’ll be using in the Voice input &<br />
output settings. See “Setting the voice input language”.<br />
Since your phone uses Google’s speech-recognition service, you need to<br />
be connected to the Internet to enter text by speaking.<br />
Setting the voice input language<br />
1. From the Home screen, press MENU, then tap Settings > Voice<br />
input & output > Voice recognizer settings.<br />
2. Tap Language, then choose the language you want.<br />
Editing text<br />
Available languages depend on the voice input languages<br />
supported by Google.<br />
You can select, copy, or cut the text you enter using the onscreen<br />
keyboard, then paste it in another text field within or across apps.<br />
Some apps may offer their own way of selecting or copying text.
Keyboard 11<br />
Selecting text<br />
Highlight a portion of a text or select all that you want to copy or cut.<br />
1.<br />
Press and hold the text field that contains the text to select. Don’t<br />
lift your finger just yet to display the magnifier.<br />
2. Drag your finger to move the text cursor to a letter within the<br />
text that you want to select. It should be easy since the magnifier<br />
gives you a bigger view of the text.<br />
3. After positioning the text cursor, lift your finger. The text<br />
selection menu then pops up.<br />
4. Do one of the following:<br />
<br />
<br />
Tap Select text. When the word where you’ve placed the text<br />
cursor is highlighted, drag the start and end markers to select<br />
the text you want.<br />
Tap Select all to select everything in the text field.
114 Keyboard<br />
Copying and pasting text<br />
1. After you have selected the text you want to copy, tap Copy or<br />
Cut.<br />
The selected text is then copied to the clipboard.<br />
2. Within the same or another app, press and hold a text field<br />
where you want to paste the text. Don’t lift your finger just yet to<br />
display the magnifier.<br />
3. Drag your finger to move the text cursor to where you want to<br />
paste the text.<br />
4. After positioning the text cursor, lift your finger. The text<br />
selection menu then pops up.<br />
5. Tap Paste.<br />
Adjusting touch input settings<br />
Open the Touch Input settings by doing one of the following:<br />
<br />
<br />
On the onscreen keyboard, tap the Language key (for example,<br />
tap if you’re currently using the English onscreen keyboard).<br />
Then on the International keyboard options menu, tap Settings.<br />
Press HOME , and then tap MENU and then tap Settings ><br />
Language & keyboard > Touch Input.<br />
Touch Input settings<br />
Keyboard types Select the keyboard layout to use. You can choose<br />
from QWERTY, Phone Keypad, or Compact QWERTY.<br />
International<br />
keyboard<br />
Add or remove languages from the onscreen<br />
keyboard language list.
Keyboard 115<br />
Bilingual prediction Select a secondary keyboard language to use. See<br />
“Setting a second language for the keyboard”.<br />
Text input Set text input options when entering text, calibrate<br />
the keyboard, and set a sound and/or vibration<br />
feedback whenever you tap a key. See “Text input”<br />
for details.<br />
Tutorial Learn how to use the onscreen keyboard with this<br />
interactive tutorial.<br />
Personal dictionary Add, edit or remove words in the predictive text<br />
dictionary. See “Entering words with predictive text”.<br />
Text input<br />
QWERTY<br />
Prediction Select to enable the word prediction feature which<br />
provides a list of possible words that reflect the<br />
characters of the keys you have tapped as well as<br />
characters of nearby keys.<br />
Spell correction Select to correct typographical errors by selecting<br />
from a list of possible words that reflect the<br />
characters of the keys you have tapped as well as<br />
characters of nearby keys.<br />
Phone keypad & compact QWERTY<br />
Spell correction Select to correct typographical errors by selecting<br />
from a list of possible words that reflect the<br />
characters of the keys you have tapped as well as<br />
characters of nearby keys.
116 Keyboard<br />
Phone keypad & compact QWERTY<br />
Word completion When using the Compact QWERTY or Phone keypad,<br />
lets you select from a list of possible combinations<br />
based on the characters that appear on the keys that<br />
you tapped.<br />
Other settings<br />
Sound feedback Select to hear a clicking sound whenever you tap a<br />
key on the keyboard.<br />
Vibrate when typing Select to enable vibration feedback whenever you<br />
tap a key on the keyboard.<br />
Finger touch precision<br />
Calibration tool Tap to re-calibrate the keyboard touch accuracy. Recalibrate<br />
the keyboard if you feel that the keyboard<br />
keys are not responding accurately to your taps.<br />
Reset calibration Tap to reset the calibration back to factory default.
Messages<br />
About Messages<br />
Keep in touch with important people in your life. Use the Messages app<br />
to compose and send text (SMS) and multimedia messages (MMS).<br />
Press HOME , and then tap > Messages.<br />
On the All messages screen, all your sent and received messages are<br />
neatly grouped into conversations, by contact name or phone number.<br />
You can:<br />
<br />
Scroll up or down the list of conversations by swiping your finger<br />
on the screen.
118 Messages<br />
<br />
<br />
Tap a contact name or number to view the exchange of<br />
messages.<br />
Tap the photo or icon to open a menu where you can quickly<br />
choose how to communicate with the contact.<br />
You can also view your messages on the Home screen with the<br />
Messages widget. If this widget is not there already, you can add it by<br />
following the steps in “Personalizing your Home screen with widgets”<br />
in the Personalizing chapter.<br />
Sending a text message (SMS)<br />
If you exceed the limit on the number of characters for a single text<br />
message, your text message will be delivered as one but will be billed<br />
as more than one message.<br />
1.<br />
2.<br />
Press HOME , and then tap > Messages.<br />
On the All messages screen, tap Compose message.<br />
3. Fill in one or more recipients. You can:<br />
<br />
Enter the first few letters of a contact name or starting digits<br />
of a mobile number. As you type, matching names with phone<br />
numbers from your stored contacts are displayed. Tap a name<br />
or one of the contact’s number.
Messages 119<br />
Tap the icon, and then select the phone numbers of the<br />
contacts to whom you want to send the message. You can<br />
also select contact groups as recipients.<br />
When you have selected all the message recipients, tap Done.<br />
Enter the complete phone numbers directly in the To field.<br />
4. Tap the box that says “Tap to add text”, and then enter your<br />
message.<br />
5. Tap Send.<br />
Or press BACK to save it as a draft. To open and edit a draft<br />
message, see “Resuming a draft message”.<br />
Your text message automatically becomes a multimedia message when you<br />
enter an email address as the recipient, add a message subject, attach an<br />
item, or compose a very long message.
1 0 Messages<br />
Sending a multimedia message (MMS)<br />
To compose a multimedia message, start by creating a new text<br />
message. Then choose the type of attachment to include in your<br />
message.<br />
1.<br />
2.<br />
Press HOME , and then tap > Messages.<br />
On the All messages screen, tap Compose message.<br />
3. Fill in one or more recipients. You can:<br />
<br />
<br />
<br />
Enter the first few letters of a contact name or starting digits<br />
of a mobile number. As you type, matching names with phone<br />
numbers and email addresses from your stored contacts are<br />
displayed. Tap a contact’s number or email address.<br />
Email addresses will be displayed when Show email address<br />
is selected in Recipient list settings. To find out more about<br />
message settings, see “Setting message options”.<br />
Tap the icon, and then select the phone numbers of the<br />
contacts to whom you want to send the message. You can<br />
also select contact groups as recipients.<br />
When you have selected all the message recipients, tap Done.<br />
Enter the complete phone numbers or email address directly<br />
in the To field.<br />
4. To add a subject line, press MENU and then tap Add subject.<br />
5. Tap the box that says “Tap to add text”, and then enter your<br />
message.<br />
6. Tap and then choose the type of attachment.<br />
Picture Select Camera to take a photo and attach it, or<br />
Gallery to attach a photo from your storage card.
Messages 1 1<br />
Video Select Camcorder to capture a video and attach it,<br />
or Videos to attach a video from your storage card.<br />
Audio Select Voice Recorder to make a voice recording<br />
and attach it, or Music & sounds to attach a music<br />
file or voice recording from your storage card.<br />
App<br />
recommendation<br />
Choose an app you’ve installed from Android<br />
Market that you want to share with others. The URL<br />
from which the app can be downloaded will be<br />
inserted to your message.<br />
Location Add your current location (requires GPS to be<br />
turned on), or a location you pick on a map to your<br />
message. See the Maps and location chapter for<br />
more details.<br />
Contact (vCard) Select a contact, and then select the information to<br />
attach.<br />
Appointment<br />
(vCalendar)<br />
Select the calendar event you want to attach.<br />
Slideshow See “Creating a slideshow” for details.<br />
7. To make changes to your attachment, tap or (depending<br />
on the type of file you’ve attached).<br />
You can also press MENU, then tap Remove to start over.<br />
8. Tap Send.<br />
Or press BACK to save it as a draft. To open and edit a draft<br />
message, see “Resuming a draft message”.
1 Messages<br />
Creating a slideshow<br />
In a multimedia message, you can add slides, each containing a photo,<br />
video, or audio.<br />
1.<br />
2.<br />
In the multimedia message you’re composing, tap ><br />
Slideshow.<br />
On the Edit slideshow screen, tap Add slide.<br />
3. Tap Slide 1.<br />
4.<br />
To compose your slideshow, do any of the following:<br />
Add a picture Tap Insert picture.<br />
Add a video Press MENU, and then tap Add video (you cannot<br />
add both a picture and a video on the same slide).<br />
Add music or a<br />
voice recording<br />
Press MENU, and then tap Add audio.<br />
Add a caption Tap the box that says “Add text”.<br />
Add a new slide Tap Add slide.<br />
View the next or<br />
previous slide<br />
Preview your<br />
slideshow<br />
Tap or .<br />
Press MENU, and then tap Preview.<br />
For more options, press MENU, and then tap More.<br />
5. When finished, tap Done to attach the slideshow to your<br />
message.<br />
6. Tap Send.<br />
Or press BACK to save it as a draft. To open and edit a draft<br />
message, see “Resuming a draft message”.
Resuming a draft message<br />
1.<br />
2.<br />
Messages 1<br />
On the All messages screen, press MENU, and then tap Drafts.<br />
Tap the message to resume editing it.<br />
3.<br />
When you finish editing the message, tap Send.<br />
Viewing and replying to a message<br />
Depending on your notification settings, the phone plays a ringtone,<br />
vibrates, or displays the message briefly in the status bar when you<br />
receive a new message. A new message icon is also displayed in<br />
the status bar.<br />
You can change the notification for new messages. See “Setting message<br />
options”.
1 4 Messages<br />
Viewing a message<br />
To open and read your received messages, you can:<br />
<br />
<br />
Press and hold the status bar, and then slide your finger down<br />
to open the Notifications panel. Then tap the new message<br />
notification.<br />
Open the Messages app to access and read the message.<br />
While reading the message, you can:<br />
Call or save a phone<br />
number contained in the<br />
message<br />
Tap the phone number. Then choose whether to dial<br />
the number or add it to your contacts.<br />
Open a link in the message Tap the link to open it in the web browser.<br />
Send to or save an email<br />
address contained in the<br />
message<br />
Tap the email address. Then choose whether to send<br />
an email, send a multimedia message, or save the<br />
email address to your contacts.<br />
Forward a message Press and hold the message to open the options<br />
menu, and then tap Forward.<br />
Check message details Press and hold the message to open the options<br />
menu, and then tap View message details.<br />
Replying to a message<br />
1. On the All messages screen, tap a contact (or phone number) to<br />
display the exchange of messages with that contact.<br />
2. To reply to the message, tap the text box at the bottom of the<br />
screen, then enter your reply message.<br />
You can also reply with a multimedia message. See “Sending a<br />
multimedia message (MMS)” for details.<br />
3. Tap Send.
Messages 1 5<br />
Replying to another phone number of the contact<br />
When a contact has multiple phone numbers stored on your phone,<br />
you’ll see the particular phone number used within the message.<br />
There’s also a bold letter before the phone number to indicate the<br />
number type (for example, M stands for Mobile).<br />
Keep in mind that your response will be sent to the phone number of<br />
the latest message you’ve received from this contact.<br />
If you want to change the phone number before you send out your<br />
reply, press MENU, then tap More > Recipient phone number. Select<br />
another phone number of this contact, and then tap OK.
1 6 Messages<br />
Viewing and saving an attachment from a multimedia<br />
message<br />
If you are concerned about the size of your data downloads, check the<br />
multimedia message size first before you download it.<br />
<br />
<br />
<br />
<br />
When Auto-retrieve in MMS settings is disabled, only the message header is<br />
downloaded. To download the entire message, tap the Download button at<br />
the right side of the message. To find out more about message settings, see<br />
“Setting message options”.<br />
If there’s a media attachment such as a photo or video in a<br />
received message, tap it to view the content.<br />
If the attachment is a contact (vCard), tap it to view the contact<br />
information, then tap Save to add to your contacts.<br />
Open the People app to view the contact. See the People<br />
chapter.<br />
If the attachment is an appointment or event (vCalendar), tap it<br />
and then choose the calendar where to save it. Tap Import.<br />
Open the Calendar app to view the appointment or event. See<br />
the Calendar chapter.<br />
To save the attachment to your storage card, press and hold the<br />
multimedia message, and then tap Save [attachment type] on<br />
the options menu.<br />
Viewing push messages<br />
Push messages contain a web link. Often, the link will be to download<br />
a file that you have requested, for example a ringtone.<br />
When you receive a push message, a notification icon is displayed<br />
in the status bar.
Messages 1 7<br />
Opening and reading a new push message<br />
1. Press and hold the status bar, and then slide the status bar down<br />
to open the Notifications panel.<br />
2.<br />
Tap the new message.<br />
3. Tap Visit website.<br />
Viewing all your push messages<br />
1. Press HOME , and then tap > Messages.<br />
2.<br />
Press MENU, and then tap Push messages.<br />
Managing message conversations<br />
Protecting a message from deletion<br />
You can lock a message so that it will not be deleted even if you<br />
delete the other messages in the conversation.<br />
1.<br />
2.<br />
On the All messages screen, tap a contact (or phone number) to<br />
display the exchange of messages with that contact.<br />
Press and hold the message that you want to lock.<br />
3. Tap Lock message on the options menu.<br />
A lock icon ( ) is displayed at the right hand side of the message.<br />
Copying a message to your SIM card<br />
1. On the All messages screen, tap a contact (or phone number) to<br />
display the exchange of messages with that contact.<br />
2.<br />
Press and hold a message, and then tap Copy to SIM.<br />
A SIM card icon ( ) is displayed at the right hand side of the<br />
message.
1 8 Messages<br />
Deleting a single message<br />
1. On the All messages screen, tap a contact (or phone number) to<br />
display the exchange of messages with that contact.<br />
2.<br />
3.<br />
Press and hold the message that you want to delete.<br />
If the message is locked, tap Unlock message on the options<br />
menu, and then press and hold the message to display the<br />
options menu again.<br />
4. Tap Delete message on the options menu.<br />
5. When prompted to confirm, tap OK.<br />
Deleting several messages within a conversation<br />
1. On the All messages screen, tap a contact (or phone number) to<br />
display the exchange of messages with that contact.<br />
2.<br />
Press MENU and then tap More > Delete.<br />
3.<br />
Tap Delete by selection.<br />
You can also tap Delete by phone number if the contact used multiple<br />
phone numbers throughout the conversation and you want to delete the<br />
messages sent from a particular number.<br />
4. Select the messages you want to delete and then tap Delete.
Messages 1 9<br />
Deleting a conversation<br />
1. On the All messages screen, press and hold a contact (or phone<br />
number) whose messages you want to delete, and then tap<br />
Delete.<br />
While looking at the exchange of messages in a conversation,<br />
you can also press MENU and then tap More > Delete > Delete<br />
thread.<br />
Any locked messages in the conversation thread will not be<br />
deleted unless you select the Delete locked messages check box.<br />
2. When prompted to confirm, tap OK to delete the entire thread.<br />
Deleting several conversations<br />
1. On the All messages screen, press MENU, and then tap Delete.<br />
2.<br />
Select the conversation threads you want to delete.<br />
3.<br />
Tap Delete.<br />
Any locked messages will not be deleted.
1 0 Messages<br />
Setting message options<br />
On the All messages screen, press MENU and then tap Settings. You’ll<br />
find several groups of settings.<br />
Received messages<br />
Received notification Receive a notification in the status bar when a new<br />
message arrives.<br />
Play notification<br />
sound<br />
Set your phone to play a sound when a new message<br />
arrives.<br />
Notification sound Choose a sound that will play when you receive a<br />
message.<br />
Vibrate Set your phone to vibrate when a new message<br />
arrives.<br />
Sent messages<br />
Sent notification Receive a notification in the status bar when a<br />
message is sent successfully.<br />
Failure notification Receive a notification in the status bar when a<br />
message is not sent successfully.<br />
Play notification<br />
sound<br />
Set your phone to play a sound when a sent or failure<br />
notification is received.<br />
Notification sound Choose a sound that will play when there’s a sent or<br />
failure notification.<br />
Vibrate Set your phone to vibrate when a new message<br />
arrives.
Display message on<br />
screen<br />
Storage settings<br />
Messages 1 1<br />
Set your phone to show pop-up notifications (not<br />
just in the status bar) when your messages are sent<br />
successfully or not. You can also select None to<br />
disable this option.<br />
Delete old messages Automatically delete older messages, except for<br />
locked messages, when the set limits are reached.<br />
Text message limit Choose the maximum number of text messages<br />
to store in each conversation thread (this does not<br />
include locked messages).<br />
Multimedia message<br />
limit<br />
Recipient list settings<br />
Choose the maximum number of MMS messages<br />
to store in each conversation thread (this does not<br />
include locked messages).<br />
Show email address Search and display the email addresses of stored<br />
contacts when you’re adding message recipients.<br />
SMS settings<br />
Delivery reports Receive a report on the delivery status of your<br />
message.<br />
Priority setting Set the message priority of SMS messages sent.<br />
Send callback<br />
number<br />
Divert return calls to another phone number.
1 Messages<br />
Callback number Set the phone number to be used for diverted calls.<br />
Manage SIM card<br />
messages<br />
MMS settings<br />
View text messages stored on your SIM card. You can<br />
also delete or copy these messages to your phone’s<br />
memory.<br />
Delivery reports Receive a report on the delivery status of your<br />
message.<br />
Read reports Receive a report whether each recipient has read the<br />
message or deleted it without reading.<br />
Auto-retrieve Automatically retrieve all your MMS messages<br />
completely. When selected, the MMS message<br />
header plus the message body and attachments will<br />
automatically download to your phone. If you clear<br />
this check box, only the MMS message header will be<br />
retrieved and shown on the All messages screen.<br />
Roaming autoretrieve<br />
Automatically retrieve all your MMS messages<br />
completely when roaming. This may incur significant<br />
phone charges.<br />
Priority setting Set the message priority of MMS messages sent.<br />
Maximum message<br />
size<br />
Set the maximum file size of an MMS message. The<br />
MMS message will not be sent out if it exceeds the<br />
file size set here.
Voicemail notification settings<br />
Play notification<br />
sound<br />
Messages 1<br />
Set your phone to play a sound when a sent or failure<br />
notification is received.<br />
Notification sound Choose a sound that will play when there’s a sent or<br />
failure notification.<br />
Vibrate Set your phone to vibrate when a new voicemail<br />
arrives.
Accounts and sync<br />
Synchronizing with online accounts<br />
About online accounts<br />
These are some of the types of information your phone can sync with<br />
your online accounts:<br />
<br />
<br />
<br />
<br />
<br />
Gmail and Exchange ActiveSync email.<br />
Google and Exchange ActiveSync contacts, as well as your<br />
friends’ contact information in Facebook® and their Twitter<br />
profiles. For information on contacts, see the People chapter.<br />
Calendar events from your Google accounts, from Exchange<br />
ActiveSync, and from your Facebook account. For information on<br />
using Calendar, see the Calendar chapter.<br />
Status updates and links shared by your friends and yourself on<br />
social networks such as Facebook and Twitter. For details, see<br />
the Social chapter.<br />
Flickr and Facebook photo uploads. For information on viewing<br />
photos, see the Photos, videos, and music chapter.<br />
You can set up an Exchange ActiveSync account on your phone either in<br />
the Mail app or the Accounts & sync setting.<br />
To set it up in the Mail app, see “Adding a Microsoft Exchange ActiveSync<br />
account” in the Email chapter.
Accounts and sync 1 5<br />
Synchronizing with a Google Account<br />
Signing in to your Google Account lets you sync Gmail and your<br />
Google contacts and calendars between your phone and the Web.<br />
You also need to sign in to a Google Account to use Google apps such<br />
as Google Talk and Android Market.<br />
If you skipped signing in to a Google Account when you first set up your<br />
phone, you may encounter problems when using some Google apps. If<br />
these problems persist, you may need to factory reset your phone and<br />
enter your Google Account details when you set up the phone again. To<br />
factory reset your phone, see “Restarting or factory resetting your phone”<br />
in the Update and reset chapter.<br />
Adding more Google Accounts<br />
You can add more than one Google Account on your phone. However,<br />
subsequent Google Accounts can only sync contacts, emails, and<br />
calendar events. Other Google services use the first Google Account<br />
you added.<br />
1.<br />
2.<br />
3.<br />
Press HOME > MENU, and then tap Settings > Accounts &<br />
sync.<br />
Tap Add account > Google.<br />
Follow the onscreen instructions to sign in to an account or<br />
create a new account.<br />
Forgot your Google Account password?<br />
If you have forgotten your Google Account password, you can try to<br />
recover it by going to the Google website.<br />
1.<br />
2.<br />
On your phone or computer, open your web browser and go to<br />
https://www.google.com/accounts/ForgotPasswd.<br />
Enter the email address or username that you use to sign in to<br />
your Google Account.
1 6 Accounts and sync<br />
3.<br />
Complete the word verification process. Enter the characters that<br />
you see onscreen and click Submit.<br />
An email will be sent to the alternate email address you provided<br />
when you created your Google Account. Follow the instructions in the<br />
email to reset your password.<br />
If you don’t have an alternate email address or cannot access the<br />
email account you used to create your Google Account, you can<br />
reset your Google Account after 4 hours by answering the security<br />
question for password recovery.<br />
Adding a social network account<br />
If you skipped setting up your social network account (such as<br />
Facebook, Twitter, or Flickr) when you first turned on and set up your<br />
phone, you can still sign in to these accounts through your phone’s<br />
settings.<br />
1.<br />
2.<br />
3.<br />
Press HOME > MENU, and then tap Settings > Accounts &<br />
sync.<br />
Tap Add account, and then tap the account type you want to<br />
add.<br />
Follow the onscreen instructions to enter your account<br />
information.<br />
Your social network account will be added to the list on the Accounts<br />
& sync screen.
Managing your online accounts<br />
Accounts and sync 1 7<br />
Changing general sync settings<br />
1. Press HOME<br />
sync.<br />
> MENU, and then tap Settings > Accounts &<br />
2.<br />
Select or clear the following:<br />
Background<br />
data<br />
If this is selected, apps can send and receive online<br />
account information even if you are not currently using<br />
them.<br />
Auto-sync If this is selected, apps can use the sync schedule defined<br />
in the account settings. If this is cleared, you will need to<br />
sync accounts manually. For instructions on doing this,<br />
see “Synchronizing an account manually”.<br />
Synchronizing an account manually<br />
1. Press HOME<br />
sync.<br />
> MENU, and then tap Settings > Accounts &<br />
2.<br />
Tap the account that you want to sync.<br />
3. Tap Sync now.<br />
Changing account settings<br />
You can change settings such as the sync frequency and the types of<br />
information synchronized, the kinds of notification you receive, and<br />
the way that account information is displayed.<br />
1.<br />
2.<br />
On the Accounts & sync screen, tap the account that you want to<br />
edit.<br />
Tap the type of information you want to sync or select an item to<br />
edit its settings.
1 8 Accounts and sync<br />
Removing an account<br />
You can remove an account to delete it and all information associated<br />
with it from your phone, for example messages, contacts, or settings.<br />
Removing an account does not delete information from the online<br />
service itself.<br />
You cannot remove some accounts, such as the first Google Account you<br />
signed into on the phone, except by deleting all personal information from<br />
your phone with a hard reset. For instructions on doing this, see “Restarting<br />
or factory resetting your phone” in the Update and reset chapter.<br />
1.<br />
2.<br />
3.<br />
Press HOME > MENU, and then tap Settings > Accounts &<br />
sync.<br />
Tap the account that you want to remove.<br />
Tap Remove account, and then confirm that you want to remove<br />
the account.<br />
Synchronizing with your computer<br />
You have your new vacation photos on your phone while your<br />
business calendar is on your computer. Why not make these types of<br />
files and information available on both devices? With HTC Sync, you<br />
can:<br />
<br />
<br />
<br />
Sync your contacts between your Microsoft® Outlook®, Outlook®<br />
Express or Windows Contacts on your computer and your phone.<br />
Sync your calendar events between the Outlook or Windows<br />
Calendar on your computer and your phone.<br />
Bring your photos, videos, documents, songs, and playlists from<br />
your computer to your phone and enjoy them on the go.
Accounts and sync 1 9<br />
Easily import your captured photos and videos from your phone<br />
to your computer.<br />
Sync bookmarks inside the “HTC Bookmarks” favorites folder on<br />
your computer and all bookmarks stored on your phone’s web<br />
browser.<br />
Download maps and useful add-on services for your phone’s<br />
Locations app to your computer first, and then sync them to your<br />
phone.<br />
Install third-party mobile phone apps (not downloaded from<br />
Android Market) from your computer.<br />
You need a microSD card inserted into your phone to be able to sync<br />
multimedia files, maps, and documents.<br />
Installing HTC Sync<br />
Visit our support website (www.htc.com/support) for downloading<br />
HTC Sync.<br />
<br />
<br />
<br />
The HTC Sync can be installed on a computer running Windows 7,<br />
Windows Vista, or Windows XP.<br />
HTC Sync requires USB .0 on your computer to connect and sync with<br />
your phone.<br />
For trouble-free installation, first quit all running programs and<br />
temporarily exit from your anti-virus program before you start installing<br />
HTC Sync.
140 Accounts and sync<br />
1. Copy HTCSync.exe to your computer.<br />
2. On your computer, double-click HTCSync.exe and follow the<br />
onscreen instructions to install HTC Sync.<br />
After installing HTC Sync, the HTC Sync icon ( ) is added to<br />
your computer’s system tray (check the bottom-right side of your<br />
computer screen). You can double-click this icon to open HTC Sync.<br />
Setting up HTC Sync to recognize your phone<br />
After installing, set up HTC Sync to recognize your phone.<br />
1. Connect your phone to your computer using the supplied USB<br />
cable.<br />
2. On your phone’s Connect to PC screen, tap HTC Sync, and then<br />
tap Done.<br />
On your computer, wait for HTC Sync to recognize your phone.<br />
3. When the Device setup screen opens, enter a name for your<br />
phone, and then click Save.<br />
The Device panel then opens.
1<br />
4<br />
Accounts and sync 141<br />
1 Click a category of items to see its sync options on the right section of<br />
the Device panel.<br />
Click Overview to see your phone’s basic software information and<br />
storage card usage, change the phone name, or install third-party apps<br />
to your phone.<br />
2 Shows the available sync options for the category you’ve selected.<br />
3 Click to start synchronization.<br />
4 Estimated storage usage bar. When there are new items to be<br />
synchronized and added to your phone, this bar shows the estimated<br />
storage card space that will be used.
14 Accounts and sync<br />
Setting the Music sync options<br />
Bring the music tracks and songs you play on your computer to your<br />
phone. If you have playlists created in iTunes® or Windows Media®<br />
Player, you can sync these too and enjoy them on the go.<br />
You can sync audio files in these formats:<br />
*.aac, *.amr, *.m4a, *.mid, *.midi, *.mp , *.ogg, *.wav, and *.wma.<br />
1. On the Device panel, click Music, and then click the On button.<br />
Turning Music sync on means you want this category included<br />
every time you sync your computer and phone.<br />
2. Select Sync music files from, and then click Add.<br />
3. Choose the folder that contains your audio files, and then click<br />
OK.<br />
All supported audio files added to this folder will also be copied<br />
to your phone’s storage card during synchronization.<br />
4. Select Sync music files from iTunes and Windows Media Player if<br />
you’re using any of these apps on your computer. Then, choose<br />
one of the following:<br />
All songs and<br />
playlists<br />
Choose to sync all songs and playlists from iTunes<br />
and Windows Media Player.<br />
Selected playlists Choose to select only your favorite playlist titles.
Accounts and sync 14<br />
Setting the Gallery sync options<br />
You can choose to automatically copy your phone camera shots to<br />
your computer. At the same time, when you select a folder from your<br />
computer, the photos and videos stored in it are also synchronized on<br />
your phone’s storage card.<br />
You can sync photos and videos in these formats:<br />
<br />
<br />
1.<br />
Photos: *.bmp, *.gif, *.jpeg, *.jpg, and *.png.<br />
Videos: *. gp, *. g , *.mp4, and *.wmv.<br />
On the Device panel, click Gallery, and then click the On button.<br />
Turning Gallery sync on means you want this category included<br />
every time you sync your computer and phone.<br />
2. To automatically import your camera shots to your computer<br />
during synchronization, select Copy device Camera Shots to PC.<br />
Photos and videos from your storage card will be saved to the<br />
\My Photos\Device Camera Shots folder on your computer.<br />
3. Select Sync PC photos & videos from, and then click Add.<br />
4. Choose the folder on your computer that contains your<br />
multimedia files, and then click OK.<br />
All supported image and video files added to this folder will also<br />
be copied to your phone’s storage card during synchronization.
144 Accounts and sync<br />
Setting Calendar sync options<br />
Your phone can sync appointments and events with your calendar in<br />
Outlook (Outlook XP, Outlook 00 or Outlook 007) or Windows<br />
Calendar (for Windows Vista).<br />
1.<br />
On the Device panel, click Calendar, and then click the On<br />
button.<br />
Turning Calendar sync on means you want this category included<br />
every time you sync your computer and phone.<br />
2. Select the app you want to sync calendar events with.<br />
3. Choose the number of days of calendar events to sync. You can<br />
choose One week ago, Two weeks ago, or One month ago.<br />
4. In cases when conflicting information are found on both the<br />
phone and computer, choose which information you want to<br />
keep.<br />
You can only sync the following calendar event details: Event name, Event<br />
date, Start time, End time, Event location, Description, Reminder, and<br />
Repetition.<br />
Setting People sync options<br />
Sync your phone contacts with your Outlook (Outlook XP, Outlook<br />
00 or Outlook 007), Outlook Express, or Windows Contacts (for<br />
Windows Vista).<br />
If you have contacts to sync from your SIM card, you have to import<br />
these first to your phone storage.<br />
1. On the Device panel, click People, and then click the On button.<br />
Turning People sync on means you want this category included<br />
every time you sync your computer and phone.
2. Choose the app you want to sync your contacts with.<br />
Accounts and sync 145<br />
3. In cases when conflicting information are found on both the<br />
phone and computer, choose which information you want to<br />
keep.<br />
Only the contact fields supported on your phone will be synchronized.<br />
Setting Bookmarks sync options<br />
Sync the bookmarks inside the “HTC Bookmarks” favorites folder in<br />
your computer’s web browser with the bookmarks stored on your<br />
phone’s web browser.<br />
1. On the Device panel, click Bookmarks, and then click the On<br />
button.<br />
Turning Bookmarks sync on means you want this category<br />
included every time you sync your computer and phone.<br />
2. Choose the web browser that stores the bookmarks to sync with<br />
your phone.<br />
<br />
<br />
<br />
Only the web page title and URL information are synchronized.<br />
If you are using Firefox® and have selected it to sync with your phone,<br />
make sure to close all Firefox browser windows before you begin<br />
synchronization.<br />
When conflicting information are found on both the phone and<br />
computer, HTC Sync keeps the information from your computer.
146 Accounts and sync<br />
Setting Documents sync options<br />
You can sync files and documents from your computer to your phone.<br />
Make sure that your phone has the app needed to open or view such<br />
files and documents.<br />
Usually, your phone can open and view these file types: Microsoft<br />
Office 00 and 007 Word (.doc), Excel (.xls), and PowerPoint (.ppt),<br />
PDF files (.pdf), Text files (.txt).<br />
You can also sync email attachments that you stored on your phone’s<br />
storage card to your computer.<br />
To sync email attachments stored on your phone’s storage card to your<br />
computer, you must set up an Exchange ActiveSync or POP /IMAP email<br />
account on your phone using Mail. For more information on how to do this,<br />
see the Email chapter.<br />
1. On the Device panel, click Documents, and then click the On<br />
button.<br />
Turning Documents sync on means you want this category<br />
included every time you sync your computer and phone.<br />
2. To sync email attachments that you’ve stored on your phone’s<br />
storage card, select Copy all download Mail documents to PC.<br />
When you sync the phone with your computer, email<br />
attachments will be saved to the \My Documents\Device<br />
documents\ folder on your computer.<br />
3. To sync files and documents from your computer to your phone’s<br />
storage card, select Sync PC documents from, and then click<br />
Add.<br />
4. Choose a folder that contains the files you want to sync with<br />
your phone, and then click OK.
Accounts and sync 147<br />
When you sync the phone with your computer, the files and<br />
documents from your computer will be saved to the \My<br />
Documents\Documents\ folder on your phone’s storage card.<br />
Setting Maps sync options<br />
Before going on a trip to another city or country, you can download<br />
the maps you need using HTC Sync on your computer, then sync it to<br />
your phone. Aside from different maps, you can also purchase licenses<br />
for other useful data such as driving and walking navigation, safety<br />
camera map views, and more.<br />
To find out how you can use the downloaded content on your phone,<br />
see the Maps and location chapter for more information.<br />
1. On the Device panel, click Maps, and then click the On button.<br />
Turning Maps sync on means you want this category included<br />
every time you sync your computer and phone.<br />
2. Choose one of the following:<br />
All Maps and Licenses Choose to sync all maps and licenses<br />
between your computer and your phone.<br />
Select Maps and Licenses Choose to sync only the maps and licenses<br />
you want.<br />
3. If you want to purchase and download more maps and other<br />
data, click Get more Maps and Licenses.<br />
The Maps feature will be available in the next release of HTC Sync. You<br />
can use it to download maps, voices, and add-on services for your phone’s<br />
Locations app to your computer first, and then sync them to your phone.<br />
Visit our support website (www.htc.com/support) from time to time to<br />
check for updates and more information.
148 Accounts and sync<br />
Synchronizing your phone<br />
When you are done setting up synchronization for your selected<br />
categories, click the Sync now button.<br />
After synchronization is complete, click Disconnect and safely remove<br />
your phone as required by your computer’s operating system. The<br />
next time you connect your phone to your computer, synchronization<br />
automatically begins based on your sync options.<br />
Always check the estimated file size of new items that you want to<br />
synchronize with your phone. You will see a warning icon beside the<br />
estimated storage usage bar when there isn’t enough space left on your<br />
storage card.
Accounts and sync 149<br />
Installing apps from your computer to your phone<br />
If you have app (*.apk files) on your computer, you can use HTC Sync<br />
to install them to your phone. We strongly recommend that you install<br />
only app that you trust.<br />
Before you begin, make sure that your phone is set to allow app from<br />
your computer to be installed to your phone. To do this, press MENU<br />
from the Home screen, tap Settings > Applications, and then select<br />
the Unknown sources check box.<br />
1. Connect your phone to the computer with the supplied USB cable.<br />
2. On your phone’s Connect to PC screen, tap HTC Sync and then<br />
tap Done.<br />
HTC Sync automatically starts on your computer.<br />
3. On the Device panel of HTC Sync, click Application installer.<br />
4. Locate the app on your computer, and then click Open.<br />
5. Click Done. The installation process starts on your phone.<br />
6. Check your phone’s screen to see if there are additional<br />
instructions to complete the installation.<br />
7. After installation is complete, you can click Disconnect and safely<br />
remove your phone as required by your computer’s operating<br />
system.
150 Accounts and sync<br />
Synchronizing another phone with your computer<br />
HTC Sync can synchronize up to three phones with your computer,<br />
making your favorite music, videos, photos, and files always available<br />
to you.<br />
Make sure that all the phones you connect with your computer and<br />
synchronize using HTC Sync are running on Android .1 or later.<br />
1. Connect the other phone to your computer using the supplied<br />
USB cable.<br />
2. On the phone’s Connect to PC screen, tap HTC Sync, and then<br />
tap Done.<br />
3. On your computer, wait for HTC Sync to recognize the other<br />
phone. When the Device setup screen opens, enter a name for<br />
the phone, and then click Save.<br />
4. You can separately customize your sync settings for this phone.<br />
To switch between the connected phones, click Devices on the<br />
top left corner of the Device panel, and then click the phone’s<br />
name or image.
Social<br />
Facebook for HTC Sense<br />
If you signed in to your Facebook account when you turned on and<br />
set up your phone for the first time, that means your Facebook<br />
account is linked to Facebook for HTC Sense on your phone. (If you<br />
did not do this, see the Accounts and sync chapter to find out how to<br />
sign in to Facebook for HTC Sense.)<br />
With Facebook for HTC Sense, you can:<br />
<br />
See all your Facebook contacts and their instant status updates<br />
in People.<br />
When you tap a contact on the People screen, slide<br />
to the Updates and events tab to see updates such<br />
as posted status messages, uploads, and profile<br />
changes.<br />
When there is a notification of the contact’s birthday,<br />
you can tap the notification to call the contact<br />
directly or send a message greeting.
15 Social<br />
<br />
<br />
<br />
See Facebook photos right on the Gallery app.<br />
You can also upload one or more photos from your<br />
storage card to Facebook, then tag and add captions<br />
that go with it.<br />
When you’re viewing the albums of a Facebook<br />
friend, you can also share a link to a particular album,<br />
or comment on the album photos.<br />
To know more about viewing Facebook photos, see<br />
the Photos, videos, and music chapter.<br />
Check your friends’ Facebook status updates in Friend Stream.<br />
See “Friend Stream” to find out the things you can do on the<br />
Friend Stream app.<br />
Add your Facebook events and your friends’ birthdays to the<br />
Calendar app. See the Calendar chapter for details.
Tweeting on your phone<br />
Social 15<br />
You can post and read tweets, send and receive direct messages,<br />
search for new Twitter users to follow using the Peep app. Peep is a<br />
Twitter client that lets you enjoy “tweeting” on your phone.<br />
You can also link your contacts in People to their Twitter profiles<br />
(if you’re following them). To find out how, see “Merging contact<br />
information” in the People chapter.<br />
If you did not sign in to your Twitter account when you first turned on<br />
the phone, you can do one of the following:<br />
<br />
<br />
Sign in to your Twitter account from Peep. Press HOME , and<br />
then tap > Peep, then follow the onscreen instructions.<br />
Add the Twitter for HTC Sense account in Settings > Accounts &<br />
sync. To find out how, see “Adding a social network account” in<br />
the Accounts and sync chapter.<br />
Twitter for HTC Sense and Peep share the same login credentials. This<br />
means that when you use Peep on your phone for tweeting, you can also<br />
link your contacts to their Twitter profiles via Twitter for HTC Sense.
154 Social<br />
Using Peep<br />
Press HOME , and then tap > Peep. Peep opens in the All<br />
tweets tab.<br />
1<br />
4<br />
5 6 7 8<br />
1 Tap in this area to compose and send a tweet.<br />
Tap a person’s name to check profile details and all of his or her tweets.<br />
If you have linked the contact in People, tap the photo or icon to open<br />
a menu where you can quickly choose how to communicate with the<br />
contact.<br />
4 Press and hold a tweet to open an options menu to reply, send a direct<br />
message, retweet, and more.<br />
5 All tweets tab. View all the tweets from people you follow and tweets that<br />
you have posted.
6 Mentions tab. View all tweets that mention your username using the<br />
“@[your username]” convention.<br />
7 Direct message tab. View all private/direct messages that you have<br />
received or sent.<br />
8 Favorites tab. View tweets that you have marked as favorites.<br />
Social 155<br />
Sending a tweet<br />
1. On the All tweets tab, tap the box that says “What’s happening?”.<br />
2.<br />
Type your tweet.<br />
3. Add a picture or location to your tweet.<br />
<br />
<br />
Tap to post a picture from Gallery or Camera to your<br />
default photo hosting site and add the link to the picture in<br />
your tweet.<br />
Tap to insert your location into the tweet. You can choose<br />
to add a map link, insert your location name, or insert your<br />
position coordinates.<br />
4. Tap Update.<br />
Searching for Twitter users to follow<br />
1. On the Peep screen, press the SEARCH button.<br />
2.<br />
Type a Twitter name in the search box.<br />
You can also narrow down the search when you tap > Users.<br />
3. Tap .<br />
4. In the list of search results, tap the Twitter user you want to<br />
follow.<br />
5. Press MENU, and then tap Follow.
156 Social<br />
Unfollowing a Twitter user<br />
1. On the Peep screen, tap the name of the Twitter user you want to<br />
stop following.<br />
2.<br />
Press MENU, and then tap Unfollow.<br />
Sending a direct message<br />
You can only send a direct message to someone who is following you.<br />
1.<br />
On the Peep screen, press MENU, and then tap New message.<br />
2. Tap the To field, and then enter the name. As you enter<br />
characters, the names of the Twitter users that match the<br />
characters you enter will appear. Tap the name when you see it.<br />
3. Enter your message, and then tap Update.<br />
You can also send a direct message when you press and hold a tweet<br />
of the person you want to send the direct message to, and then tap<br />
Send direct message on the options menu.<br />
Setting Peep options<br />
On the Peep screen, press MENU, and then tap More > Settings. You<br />
can set these options:<br />
Account settings Sign out of your Twitter account.<br />
General settings Choose whether to show the screen name or the real<br />
name of the people you follow.<br />
Send & receive Set the frequency to check for new tweets and set the<br />
number of tweets to download.<br />
Services Set your photo hosting site, photo quality, location<br />
options, and URL shortening host.<br />
Notification settings Select when and how you want to be notified.
Social 157<br />
About the Twitter widget<br />
Use the Twitter widget to send and follow your tweets right on your<br />
Home screen.<br />
To find out how to add a widget to the Home screen, see “Personalizing<br />
your Home screen with widgets” in the Personalizing chapter.<br />
Friend Stream<br />
Friend Stream connects you to your social networks. Share and<br />
get updates from friends in popular networks like Facebook and<br />
Twitter in a single feed. With Friend Stream, you can easily track your<br />
friends’ status messages, photo uploads, notifications, and more — or<br />
comment and post your own.<br />
<br />
<br />
You must be signed in to at least one social network account to<br />
use Friend Stream. To find out how, see “Adding a social network<br />
account” in the Accounts and sync chapter.<br />
To use your Facebook account on Friend Stream, you need to be<br />
signed in via Facebook for HTC Sense. See “Facebook for HTC<br />
Sense” in this chapter.
158 Social<br />
1<br />
4<br />
1 Tap in this area to compose and send a status update.<br />
If you have linked the contact in People, tap the photo or icon to open<br />
a menu where you can quickly choose how to communicate with the<br />
contact.<br />
3 When you tap someone’s status update, you can:<br />
<br />
<br />
<br />
Open Peep and view all tweets. See “Tweeting on your phone” in this<br />
chapter.<br />
Write a comment. Like or unlike someone’s Facebook posts.<br />
Look at someone’s album photos.<br />
4 When you tap someone’s name, you can:<br />
<br />
<br />
<br />
Check the person’s profile details.<br />
Look at the person’s Facebook wall.<br />
Check the person’s posted tweets.<br />
5 Slide to the other tabs to view social network updates grouped as status<br />
updates only, photo uploads, links, updates from members of your<br />
Facebook list, or social network notifications.<br />
5
Social 159<br />
Updating your status<br />
You can update your status simultaneously on all the social network<br />
accounts you are signed in to.<br />
1.<br />
2.<br />
Press HOME , and then tap > Friend Stream.<br />
On the All updates tab, tap the box that says “What’s on your mind?”.<br />
3.<br />
Enter your status update.<br />
4. If you do not want to send the status update to all your social<br />
network accounts, tap and clear the check boxes of the<br />
social networks to exclude.<br />
5. Tap and then choose what you want to attach to your tweet<br />
or status update.<br />
App<br />
recommendation<br />
Choose an app you’ve installed from Android<br />
Market that you want to share with others. The URL<br />
from which the app can be downloaded will be<br />
inserted to your status.<br />
To find out more about sharing app, see “Sharing<br />
games and apps” in the More apps chapter.<br />
Picture Select From Camera to take a photo and attach<br />
it or From Gallery to attach a photo from your<br />
storage card.
160 Social<br />
Location Add your current location or a location you pick<br />
on a map. See the Maps and location chapter for<br />
details.<br />
6. Tap Share.<br />
Commenting on and liking Facebook posts<br />
After tapping someone’s status update on the All updates tab, you<br />
can do the following:<br />
1<br />
1 Tap a photo or the album name shown in the status update to view and<br />
comment on the album photos using the Gallery app. See the Photos,<br />
videos, and music chapter.<br />
Type what you think about the person’s status update.<br />
Like or unlike the person’s status update.
Social 161<br />
Checking notifications from your social networks<br />
Slide to the Notifications tab to easily see a single feed of your<br />
notifications from different social networks. It can be a comment on<br />
your Facebook post, a mention or direct message in Twitter, a tagged<br />
photo of you, and more.<br />
About the Friend Stream widget<br />
Use the Friend Stream widget so you can easily update your status<br />
and view other people’s status updates right on the Home screen.<br />
If you don’t have this widget on your Home screen, see “Personalizing<br />
your Home screen with widgets” in the Personalizing chapter to find<br />
out how to add it to the Home screen.
16 Social<br />
Chatting in Google Talk<br />
Google Talk is Google’s instant messaging program. It lets you<br />
communicate with other people that also use Google Talk.<br />
If you signed in to your Google Account when you first set up the<br />
phone, you are already signed in to Google Talk.<br />
Chatting with friends<br />
1. Press HOME , and then tap > Talk.<br />
2.<br />
3.<br />
Tap a friend in the Friends list.<br />
Enter your message in the text box. You can also insert a smiley<br />
by pressing MENU, and then tapping More > Insert smiley.<br />
4. Tap Send.<br />
5.<br />
While chatting, press MENU and then tap any of these options:<br />
Chat off record Your Google Talk messages are stored in the Chats<br />
folder of your Gmail account. Tap this option if you<br />
don’t want to store your chat messages.<br />
Switch chats If you have more than one chat going, tap this to<br />
switch chat with another friend.<br />
Friends list Return to the Friends list.<br />
Add chat Add another friend to your chat. The friend you<br />
invited and the friend your currently chatting with<br />
receive an invitation to a group chat. Each one who<br />
accepts the invitation joins the group chat.<br />
End chat End your current chat.<br />
More Clear the chat history, insert a smiley or view your<br />
friend’s contact details.
Social 16<br />
Accepting chat invitations<br />
When a friend sends you a Google Talk message, you receive a<br />
notification. Their entry in the Friends list turns white and displays the<br />
message.<br />
Do one of the following:<br />
<br />
<br />
In the Friends list, tap the friend who sent you the invitation to<br />
chat.<br />
Open the Notifications panel, and then tap the chat notification.<br />
See “Opening the Notifications panel” in the Getting started<br />
chapter.<br />
Changing your online status and picture<br />
1. Press HOME , and then tap > Talk.<br />
2.<br />
3.<br />
4.<br />
5.<br />
In the Friends list, tap your name to open the Set Status screen.<br />
Enter your new status message, or press BACK to choose a<br />
custom status from the list.<br />
Tap the online status beside your picture, and then select the<br />
status you want on the menu.<br />
Tap your picture, and then tap Remove to remove your photo, or<br />
Change to select another picture on the storage card. Note that if<br />
you’ve selected a big picture, you will be asked to crop it.<br />
6.<br />
Tap Done.<br />
Your online status, message, and picture appear in your contact’s<br />
Friends lists and in other apps where your Google Talk status are<br />
displayed.
164 Social<br />
Adding and managing friends<br />
The Friends list is where you add and manage your friends in Google<br />
Talk.<br />
1.<br />
Press HOME , and then tap > Talk.<br />
2.<br />
In the Friends list, do any of the following.<br />
Invite a friend 1. Press MENU, and then tap Add friend.<br />
View all<br />
friends<br />
Make a friend<br />
popular<br />
. Enter the Google Talk instant messaging ID or<br />
Gmail address of the friend you want to add.<br />
. Tap Send invitation.<br />
Initially, only those friends that you often chat with<br />
— the most popular — are shown in the Friends list.<br />
To view all your friends, press MENU, and then tap All<br />
friends. To view only friends that you often chat with,<br />
press MENU, and then tap Most popular.<br />
1. Press MENU, and then tap All friends.<br />
. Press and hold a friend’s name, and then tap<br />
Always show friend.<br />
Block a friend You can block a friend from sending you messages.<br />
When blocked, your friend is removed from the Friends<br />
list and is added to the blocked friends list.<br />
1. Press MENU, and then tap All friends.<br />
Unblock a<br />
friend<br />
View all<br />
invited friends<br />
. Press and hold a friend’s name, and then tap Block<br />
friend.<br />
1. Press MENU, and then tap More > Blocked.<br />
. Tap the name of the blocked friend, and then tap OK.<br />
Press MENU, and then tap More > Invites. Friends who<br />
have not yet accepted your invitation are listed in the<br />
screen.
Changing the settings and signing out<br />
1. Press HOME , and then tap > Talk.<br />
2.<br />
In the Friends list, press MENU and then tap:<br />
<br />
<br />
Settings to change the app and notification settings.<br />
Sign out to sign out from Google Talk.<br />
Social 165
Email<br />
Using Gmail<br />
Gmail is Google’s web-based email service. When you first set up your<br />
phone, make sure you sign into your Google Account so you can send<br />
and receive Gmail messages. If you didn’t do so, go to the Accounts &<br />
sync setting to sign in.<br />
You can also set up more than one Google Account on your phone,<br />
and then switch between accounts in Gmail. To find out how to set up<br />
several Google Accounts, see “Adding more Google Accounts” in the<br />
Accounts and sync chapter.<br />
Viewing your Gmail Inbox<br />
The Inbox conversations list is your default Gmail view. All your<br />
received emails are delivered to your Inbox.<br />
Gmail groups each message you send with all the responses you<br />
receive. This conversation list continues to grow as new replies arrive,<br />
so you can always see your messages in context. A new message<br />
or a change to the subject of a current message will begin a new<br />
conversation.<br />
1. Press HOME , and then tap > Gmail.<br />
Your inbox appears.
2. Do any of the following:<br />
View more email<br />
messages<br />
Read a new email<br />
message<br />
Select messages<br />
and conversations<br />
Display messages<br />
and conversations<br />
of another label<br />
Email 167<br />
If the Inbox is full, swipe your finger up the screen<br />
to view more messages and conversations.<br />
Tap the unread message or the conversation with<br />
an unread message (just arrived items display in<br />
bold). For more information, see “Reading your<br />
messages”.<br />
Tap the box ( ) before the email or conversation.<br />
Then tap the onscreen buttons at the bottom to<br />
choose what to do with the selected messages or<br />
conversations.<br />
Tap Inbox at the top left of the screen, and<br />
then tap another label (such as Sent, Drafts, or<br />
your created label) to view its messages and<br />
conversations.
168 Email<br />
Switch to your<br />
other Gmail<br />
account<br />
Tap the current account at the top right of the<br />
screen, and then tap another account you want to<br />
switch to.<br />
Refresh the Inbox Press MENU, and then tap Refresh.<br />
Sending a new message<br />
1. Press HOME , and then tap > Gmail.<br />
. In the Inbox, press MENU and then tap Compose.<br />
. If you’ve set up multiple Google Accounts on your phone, choose<br />
which Gmail address you want to use for sending your email.<br />
Tap the box that shows your current Gmail address, and then tap<br />
another address that you want to use for sending.<br />
4. Enter the message recipient’s email address in the To field. If you<br />
are sending the email to several recipients, separate the email<br />
addresses with a comma.<br />
As you enter email addresses, any matching addresses from your<br />
contacts list are displayed. Tap a match to enter that address<br />
directly.<br />
If you want to send a carbon copy (Cc) or a blind carbon copy (Bcc) of the<br />
email to other recipients, press MENU and then tap Add Cc/Bcc.<br />
5. Enter the email subject, and then compose your email.<br />
6. If you want to attach a picture, press MENU and then tap Attach.<br />
Locate and then tap the picture you want to attach.<br />
7. After composing your message, tap .
Email 169<br />
While composing the message, tap to save it as a draft. Or press the<br />
BACK button to discard the message.<br />
To view your draft email messages, in the Inbox, tap Inbox at the top left<br />
of the screen and then tap Drafts.<br />
To view your sent messages, in the Inbox, tap Inbox at the top left of the<br />
screen and then tap Sent.<br />
Reading your messages<br />
Depending on your notification settings, the phone plays a ringtone or<br />
vibrates when you receive a new email. A new email icon ( ) also<br />
appears on the notifications area of the status bar to tell you that you<br />
have a new email. For more information on email notification settings,<br />
refer to “Changing Gmail settings” later in this chapter.<br />
1. Press and hold the status bar, and then slide down your finger on<br />
the screen to open the Notifications panel.<br />
2. Tap the new email.<br />
3. In the Inbox, tap the unread email or the conversation with the<br />
unread email to view it.<br />
4. On the email message or conversation, do any of the following:<br />
<br />
<br />
<br />
Scroll through the messages in the conversation by swiping<br />
your finger up or down the screen.<br />
If you have two or more email messages in the conversation,<br />
tap to expand all message headers in the<br />
conversation.<br />
Tap the star ( ) to star the message. See “Searching and<br />
organizing your emails” for more information.
170 Email<br />
<br />
<br />
<br />
<br />
<br />
If the sender is a friend in Google Talk, check the button ( )<br />
before the star in the message header to know your friend’s<br />
online status.<br />
Tap Archive to remove the conversation from your Inbox and<br />
transfer it to the All mail folder in your Google Account.<br />
Tap Delete to delete the conversation from your Inbox.<br />
If you’ve archived or deleted a conversation by accident, tap Undo at the<br />
top of the conversations list. The conversation is returned to your Inbox.<br />
To view your archived or deleted messages, in the Inbox, tap Inbox at the<br />
top left of the screen and then tap All Mail (for archived messages) or<br />
Trash (for deleted messages).<br />
<br />
<br />
Tap or to see the previous or next conversation in<br />
your Inbox.<br />
Press MENU to see more options.<br />
Replying to or forwarding an email message<br />
1. Press HOME , and then tap > Gmail.<br />
2. In the Inbox, tap the email message or conversation.<br />
If the email message is long, swipe your finger up the screen.<br />
3. To reply to the sender, tap . Or, tap and choose whether to<br />
Reply all or Forward.<br />
4. Do one of the following:<br />
<br />
<br />
If you selected Reply or Reply to all, enter your reply message.<br />
If you selected Forward, specify the message recipients.<br />
Tap Respond inline if you want to interleave your new message with the<br />
received email. But this removes any attachments or formatting in the<br />
original email.<br />
5. Tap tap .
Searching and organizing your emails<br />
Email 171<br />
Searching for messages<br />
You can search for messages that contain one or more words in their<br />
contents or in their addresses, subjects, labels, and so on. When you<br />
search for messages, all of the messages in your Gmail account on the<br />
web are included (except those labeled Trash or Spam), not just those<br />
that you’ve synchronized onto your phone.<br />
1. Press HOME , and then tap > Gmail.<br />
2. In the Inbox, press SEARCH.<br />
3. Enter the word or words to search for.<br />
4. Tap , or tap the Enter key on the onscreen keyboard.<br />
A conversation list opens, displaying all of the conversations with<br />
messages that contain the words you searched for. The words you<br />
searched for are displayed below the status bar. You work with the<br />
conversations in this list just as you would with the conversations in<br />
your Inbox or any other conversation list.<br />
Starring an email message or conversation<br />
You can star an important message or a conversation so that you can<br />
easily find it again. To view just starred messages or conversations<br />
with starred messages, see “Filtering conversations” in this chapter.<br />
1. Press HOME , and then tap > Gmail.<br />
2. Do one of the following:<br />
<br />
In the Inbox, tap the star ( ) to the right of the conversation<br />
subject to star the latest message in the conversation.<br />
Conversations with starred messages are displayed with a star<br />
in your Inbox and in other conversation lists.
17 Email<br />
<br />
In the inbox, tap a conversation and then go to the message<br />
that you want to star. Touch the star ( ) in the message<br />
header.<br />
To unstar a message or conversation, touch its star again. You can<br />
also tap a star in a conversation list to unstar all messages in that<br />
conversation.<br />
Labeling conversations<br />
You can organize conversations by labeling them. Gmail has several<br />
preset labels you can use, and you can also add your own labels, using<br />
Gmail on the web.<br />
1. Press HOME , and then tap > Gmail.<br />
. Select the check boxes of the conversations that you want to<br />
label.<br />
. Tap Labels at the bottom of the screen.<br />
4. Select the labels that you want to assign to the conversation, and<br />
then tap OK.<br />
Filtering conversations<br />
You can choose to display conversations that have the same label or<br />
only those that are starred.<br />
1. Press HOME , and then tap > Gmail.<br />
. When viewing your Inbox or another conversation list, tap the<br />
name of the current label at the top left of the screen to open the<br />
labels selection screen.<br />
3. Tap a label to view a list of conversations bearing that label.<br />
The conversation list resembles your Inbox, but the label replaces<br />
“Inbox” below the status bar. You work with labeled conversations lists<br />
in the same way as with your Inbox.
Cleaning up your Inbox<br />
You can clean up your Inbox by archiving, deleting, or muting<br />
conversations. You can also report a conversation as spam to stop<br />
receiving any future messages from that sender.<br />
1. Press HOME , and then tap > Gmail.<br />
Email 17<br />
2. In the Inbox, tap the box ( ) before the conversations you want<br />
to work on, and then do any of the following:<br />
Delete Tap Delete.<br />
If you’ve deleted the conversation by accident, tap Undo at<br />
the top of the screen to move the conversation back to the<br />
Inbox.<br />
Archive Tap Archive.<br />
If you’ve archived the conversation by accident, tap Undo at<br />
the top of the screen to move the conversation back to the<br />
Inbox.<br />
Mute Press MENU, and then tap Mute.<br />
If you ‘mute’ a conversation, you will not receive any future<br />
messages for that conversation.<br />
Report<br />
as spam<br />
Press MENU, and then tap Report spam.<br />
The Gmail webmail service works hard to prevent spam<br />
(unwanted and unsolicited “junk” mail) from reaching your<br />
Inbox. But when spam makes it through, you can help<br />
improve the service by reporting the conversation as spam.<br />
Changing Gmail settings<br />
1. Press HOME , and then tap > Gmail.<br />
2. In the Inbox, press MENU and then tap More > Settings.<br />
3. Set the following options:
174 Email<br />
Signature Enter a signature that automatically appears at the<br />
end of your email messages.<br />
Confirm actions Show a confirmation box when you archive, delete<br />
or send a conversation.<br />
Reply all Select this check box if you want to replace the<br />
Reply button ( ) in message headers with the<br />
Reply all button ( ), so you don’t need to tap the<br />
arrow ( ) to access it.<br />
Auto-advance Select which conversation to display after you<br />
delete or archive a conversation.<br />
Message text size Adjust the size of text in your email messages.<br />
Batch operations When selected, this adds a check box to the left of<br />
each conversation so you can add it to a batch.<br />
Clear search<br />
history<br />
Remove the searches you have performed.<br />
Labels Set how many days and which Gmail labels to<br />
synchronize.<br />
See “Changing Gmail synchronization settings” in<br />
this chapter.<br />
Email<br />
notifications<br />
Show a notification icon on the status bar when<br />
you receive a new email.<br />
Select ringtone Choose a notification sound for new email<br />
messages.<br />
Vibrate Make your phone vibrate when you receive a new<br />
email message.<br />
Notify once When cleared, you are notified every time you<br />
receive a new email message.
Changing Gmail synchronization settings<br />
1. Press HOME , and then tap > Gmail.<br />
Email 175<br />
2. In the Inbox, press MENU, and then tap More > Settings > Labels.<br />
3. To set the number of days to synchronize, tap Number of days to<br />
sync.<br />
4. To set synchronization for a particular message label, tap the<br />
label, and then select whether you want messages bearing<br />
that label to sync according to the default number of days you<br />
selected earlier, sync all, or sync none of them.<br />
Getting help<br />
To find out more about using Gmail, press MENU, and then tap More ><br />
Help. The web browser will take you to the Google Mobile Help site.
176 Email<br />
Using Mail<br />
Use the Mail app to add your webmail and other POP or IMAP email<br />
accounts. You can also set up and use your Exchange ActiveSync<br />
email on your phone.<br />
Adding a POP3/IMAP email account<br />
1. Press HOME , and then tap > Mail.<br />
2.<br />
Do one of the following:<br />
<br />
<br />
If this is your first time to add an email account in Mail, tap<br />
Other (POP3/IMAP) on the Choose a mail provider screen.<br />
If you’ve already added an email account in Mail, press MENU,<br />
and then tap More > New account. If the Choose a mail<br />
provider screen is displayed, tap Other (POP3/IMAP).<br />
3. Enter the email address and password for your email account and<br />
then tap Next.<br />
4. If the account type you want to set up is not in the phone<br />
database, you’ll be asked to enter more details.<br />
5. Enter the account name and your name and then tap Finish<br />
setup.<br />
Adding a Microsoft Exchange ActiveSync account<br />
You can add one or more Microsoft Exchange ActiveSync accounts<br />
on your phone. You can sync with Microsoft Exchange Server 00<br />
Service Pack (SP ) or later.<br />
You can add up to 15 Exchange ActiveSync accounts on your phone.
1.<br />
2.<br />
Press HOME , and then tap > Mail.<br />
Do one of the following:<br />
<br />
<br />
Email 177<br />
If this is your first time to add an email account in Mail, tap<br />
Microsoft Exchange ActiveSync on the Choose a mail provider<br />
screen.<br />
If you’ve already added an email account in Mail, press<br />
MENU, and then tap More > New account. If the Choose a<br />
mail provider screen is displayed, tap Microsoft Exchange<br />
ActiveSync.<br />
3. Enter the Exchange ActiveSync account details, and then tap<br />
Next. Your corporate Exchange Server must support auto-detect<br />
for the phone to automatically set up the Exchange ActiveSync<br />
account. If your corporate Exchange Server does not support<br />
auto-detect, you’ll need to enter your Exchange Server settings<br />
after you tap Next. Ask your Exchange Server administrator for<br />
details.<br />
4. Choose the types of information you want to sync. Also choose<br />
how often you want to update and sync email to your phone.<br />
5. Enter your account name, then tap Finish setup.<br />
Checking your Mail inbox<br />
When you open the Mail app, it displays the inbox of one of your email<br />
accounts that you’ve set up on your phone. To switch between email<br />
accounts, tap the bar that shows the current email account, and then<br />
tap another account.
178 Email<br />
Viewing the unified inbox of all your email accounts<br />
You can view email from all your accounts just in one place without<br />
having to switch to different accounts.<br />
Just tap the bar that shows the current email account, and then tap<br />
All accounts.<br />
Email messages are color coded so you can easily distinguish which<br />
email accounts they belong to.<br />
Up to 15 email accounts can be shown in the unified inbox.
Email 179<br />
Different views of your inbox<br />
If you have lots of email messages, it may take you some time to<br />
browse through the long list and find a single email or related email<br />
messages. To skim through your email messages easier, tap one of the<br />
following tabs to change the view of your inbox:<br />
Received. Displays email messages as individual items.<br />
Conversations. Displays email messages as conversations, grouped<br />
according to the subject line. Tap a subject in the list to show the email<br />
conversation.<br />
Favorites. Displays all email messages from a contact group. To choose<br />
which contact group to display, press MENU, tap View, and then select<br />
a group.<br />
To find out more about working with contact groups, see “Contact<br />
groups” in the People chapter.<br />
Unread. Displays unread messages.<br />
Marked (Exchange ActiveSync only). Displays all flagged messages.<br />
Meeting invitations (Exchange ActiveSync only). Displays meeting<br />
invitations which you have not yet accepted or declined.<br />
Attachments. Displays all messages that have attachments.<br />
You can rearrange the tabs to the order that you want. To find out how, see<br />
“Rearranging or hiding application tabs” in the Personalizing chapter.
180 Email<br />
Refreshing your email account<br />
Whatever your automatic synchronization settings are, you can also<br />
synchronize your sent and received emails manually at any time.<br />
<br />
<br />
While in the account you want to sync, press MENU, and then tap<br />
Refresh.<br />
If you have several email accounts, you can refresh them all at the<br />
same time. Go to the unified inbox first. Then press MENU and<br />
tap Refresh.<br />
To find out how to display the unified inbox, see “Viewing the<br />
unified inbox of all your email accounts”.<br />
Sorting email messages<br />
You can sort email messages by date received, priority, subject,<br />
sender, or size.<br />
On the inbox, press MENU, tap Sort, and select from the sorting<br />
options.<br />
Quickly browsing your inbox<br />
If you have a long list of email messages in your inbox, it may not be<br />
easy to browse the list and find an email that you want.<br />
You can quickly browse through your inbox by using finger gestures.<br />
1.<br />
2.<br />
Choose a sorting order for displaying your email messages. See<br />
“Sorting email messages”.<br />
Press and hold your two fingers on any email message, and then<br />
slightly drag downward without lifting your fingers.
Email 181<br />
Your screen then jumps to the next or previous set of email messages<br />
based on your chosen sorting order. For instance:<br />
<br />
<br />
If your email messages are arranged by date, your screen jumps<br />
to the email messages received on the previous or next date,<br />
depending on your sorting order.<br />
If your email messages are arranged alphabetically by sender<br />
name or subject, your screen jumps to the previous or next<br />
sender or subject, depending on what’s your sorting order.<br />
Managing email messages<br />
Deleting an email message<br />
1. On the inbox, press and hold the message you want to delete.<br />
2.<br />
On the options menu, tap Delete.<br />
Selecting several email messages<br />
1. Tap the check boxes of email messages to select them.<br />
2.<br />
Choose what you want to do with the selected messages: Mark<br />
unread, Delete, or Move to another folder.
18 Email<br />
You cannot move email messages when you’re in the unified (All accounts)<br />
inbox.<br />
Moving several email messages to another folder<br />
1. Switch to the email account you want to use.<br />
2.<br />
Go to the Received tab or any other tab (except for the<br />
Conversations tab).<br />
3. Tap the check boxes of email messages you want to move.<br />
4.<br />
Tap Move to, and then tap the folder where to move the email<br />
messages.<br />
Moving an email message after reading<br />
In the open message, press MENU, and then tap More > Move to.<br />
Deleting all messages<br />
1. First tap the check box of any email message.<br />
2.<br />
Press MENU, and then tap Select all.<br />
3. Tap Delete.<br />
Switching to other mail folders<br />
1. Press MENU, and then tap Folders.<br />
2.<br />
Tap the mail folder whose messages you want to view.<br />
Sending an email message<br />
1. Press HOME , and then tap > Mail.<br />
2.<br />
Switch to the email account that you want to use for sending<br />
email.<br />
3.<br />
On the email account inbox, tap Compose mail.
Email 18<br />
4. Fill in one or more recipients. You can:<br />
Enter email addresses directly in the To field, separating them<br />
with a comma. As you enter email addresses, any matching<br />
addresses from your contacts list are displayed. Tap a match<br />
to enter that address directly.<br />
<br />
Tap the icon, and then choose the contacts to whom you<br />
want to send the message. You can also select contact groups<br />
as recipients, or search and add contacts from the company<br />
directory if you have set up an Exchange ActiveSync account<br />
on your phone. When you have selected all the message<br />
recipients, tap Done.<br />
If you want to send a carbon copy (Cc) or a blind carbon copy (Bcc) of the<br />
email to other recipients, press MENU, and then tap Show Cc/Bcc.<br />
5. Enter the subject, and then compose your message.<br />
6. To add an attachment, press MENU, tap Attach, and choose from<br />
the following options:<br />
Picture Select Camera to take a photo and attach it, or<br />
Gallery to attach a photo from your storage card.<br />
Video Select Camcorder to capture a video and attach it,<br />
or Videos to attach a video from your storage card.<br />
Audio Select Voice Recorder to make a voice recording<br />
and attach it, or Files to attach a music file or voice<br />
recording from your storage card.<br />
App<br />
recommendation<br />
Choose an app you’ve installed from Android Market<br />
that you want to tell other people about. The URL<br />
from which the app can be downloaded will be<br />
inserted in your email. See “Sharing games and<br />
apps” in the More apps chapter.
184 Email<br />
Location You can attach location information. Send your<br />
current location (requires GPS to be turned on) or<br />
a location you pick on a map. For more information,<br />
see the Maps and location chapter.<br />
Document Attach a PDF file or an Office document such as a<br />
text file or a spreadsheet.<br />
Contact (vCard) Attach someone’s contact information.<br />
Appointment<br />
(vCalendar)<br />
Attach a calendar event.<br />
File Attach any file from your storage card.<br />
7. Tap Send to send the message immediately, or tap Save as draft<br />
to send it later.<br />
If there’s no Wi-Fi or data connection available or Airplane mode is on<br />
when you send your email, the email will be saved to the Outbox folder.<br />
Once there’s Wi-Fi or data connection available, the saved email will be sent<br />
automatically next time your phone syncs.<br />
Resuming a draft email message<br />
1. In the email account inbox, press MENU, and then tap Folders ><br />
Drafts.<br />
2.<br />
Tap the message.<br />
3. When you finish editing the message, tap Send.<br />
Reading and replying to an email message<br />
1. Press HOME , and then tap > Mail.<br />
2.<br />
Switch to the email account you want to use.<br />
3.<br />
On the email account inbox, tap the email you want to read.
4. Do any of the following:<br />
Reply to the message Tap Reply or Reply all.<br />
Forward the message Press MENU, and then tap More > Forward.<br />
Delete the message Press MENU, and then tap Delete.<br />
Mark the message as<br />
unread<br />
Press MENU, and then tap Mark unread.<br />
Setting the priority for an email message<br />
You can set the priority for an email message that you send.<br />
1.<br />
2.<br />
While composing the message, press MENU.<br />
Tap Set priority.<br />
3.<br />
Select the priority for the message.<br />
If you selected High or Low priority, the priority appears below the<br />
subject line of the message.<br />
Email 185
186 Email<br />
Working with Exchange ActiveSync email<br />
If you sync your phone with your work Exchange ActiveSync account,<br />
you can read, reply, send, and manage email in the same easy way<br />
as with a POP /IMAP account. In addition, you can also use some<br />
powerful Exchange features.<br />
To find out how you can set up your Exchange ActiveSync account,<br />
see “Adding a Microsoft Exchange ActiveSync account” in this chapter.<br />
Flagging an email<br />
While viewing the inbox, tap the white flag icon that appears on<br />
the right of an email message. The icon turns red after you flagged<br />
the email.<br />
While reading an email, you can also tap the flag icon in the email.<br />
Setting out of the office status<br />
You can set your out of office status and auto-reply message right<br />
from your phone.<br />
1.<br />
2.<br />
Switch to your Exchange ActiveSync account.<br />
Press MENU and then tap More > Out of the office.<br />
3. Tap the box, and then select Out of the office.<br />
4.<br />
Set the dates and times for the period when you will be out of<br />
the office.<br />
5. Enter the auto-reply message.<br />
6. Tap Save.<br />
Sending a meeting request<br />
1. Switch to your Exchange ActiveSync account.<br />
2.<br />
Go to the Meeting invitations tab, and then tap New meeting<br />
invitation.
3. Enter the meeting details.<br />
4. Tap Send.<br />
Email 187<br />
Changing email account settings<br />
1. Switch to the email account whose settings you want to change.<br />
2.<br />
Press MENU and then tap More > Settings.<br />
3. Select from the following:<br />
Account settings Change the email account settings such as the name,<br />
email address, password, and description.<br />
General settings Set the font size when reading emails, enable,<br />
disable or set the signature, set the account as the<br />
default email account, and set where to save email<br />
attachments.<br />
Send & Receive Set the maximum email file size limit when receiving<br />
and frequency to check for new emails and how<br />
many to check for. You can also set to have emails<br />
that you send bcc’d to yourself.<br />
Notification<br />
settings<br />
Set email notification settings.<br />
Delete account Tap to delete the email account.<br />
4. Press BACK to save your changes.<br />
Deleting an email account<br />
1. Switch to the email account you want to delete.<br />
2.<br />
Press MENU, and then tap More > Settings > Delete account.
Calendar<br />
About Calendar<br />
Never miss an important date again. Use your phone’s Calendar to<br />
schedule your events, meetings, and appointments.<br />
You can set up your phone to stay in sync with the following types of<br />
calendars:<br />
<br />
<br />
<br />
On your phone, sign in to your Google Account so you’ll be able<br />
to sync your phone’s Calendar with your Google Calendar online.<br />
You can add multiple Google accounts. If you have not signed in<br />
to your Google Account yet, see the Accounts and sync chapter<br />
to find out how to sign in.<br />
If you’re using Microsoft Outlook on your computer, you can set<br />
up HTC Sync on your computer to sync Outlook Calendar with<br />
your phone’s Calendar. See “Synchronizing with your computer”<br />
in the Accounts and sync chapter.<br />
If you have a Microsoft Exchange ActiveSync account and<br />
you have added it on your phone, you can sync your phone’s<br />
Calendar with your Exchange ActiveSync calendar events. See<br />
the Email and Accounts and sync chapters for details.<br />
If you’ve signed in to your social network accounts such as Facebook,<br />
birthdays and events of friends from your social networks will appear<br />
in Calendar. To find out how to sign in to your social networks, see<br />
“Adding a social network account” in the Accounts and sync chapter.
Creating calendar events<br />
Calendar 189<br />
You can create events that appear on your phone only, as well as<br />
events that sync with your Google Calendar, your computer’s Outlook<br />
Calendar, or Exchange ActiveSync calendar.<br />
1. Press HOME , and then tap , and then tap Calendar.<br />
2. On any Calendar view, press MENU and then tap New event.<br />
When you are in the Month or Agenda view, you can also tap at the<br />
bottom-right of the screen to create a new event.<br />
3. If you have more than one calendar, select a calendar in which to<br />
add the event:<br />
<br />
<br />
<br />
Select your Google Account to create a Google Calendar<br />
event. If you have several Google Calendars on the Web, select<br />
one in which to add your event.<br />
Select PC Sync to create calendar events on your phone.<br />
You can sync them with your computer using HTC Sync. For<br />
details, see the Accounts and sync chapter.<br />
Select your Exchange ActiveSync account to create an<br />
Exchange ActiveSync calendar event.<br />
4. Enter a name for the event.<br />
5. To specify the date and time of the event, do one of the<br />
following:<br />
<br />
<br />
If there is a time frame for the event, tap the From and To date<br />
and time to set them.<br />
If it is a special occasion such as a birthday or a whole-day<br />
event, set the From and To date, then select the All day check<br />
box.
190 Calendar<br />
6. Enter the event location and description.<br />
7. Set the reminder time.<br />
You can add another reminder time in a Google Calendar event. Press<br />
MENU and then tap Add reminder.<br />
8. If the event occurs on a regular basis, tap the Repetition box and<br />
then choose how often the event occurs.<br />
9. Tap Save.<br />
Inviting guests to your event (Google Account only)<br />
If you want to invite guests to your event, you need to create and add<br />
the event in your Google Calendar. An invitation email will be sent to<br />
your guests using your Google Account.<br />
1. Open Calendar and create a new event. Tap the Calendar field<br />
and then select your Google Account (or one of your other<br />
Google Calendars). For the steps, see “Creating calendar events”.<br />
2. Add details about the event, such as date and time, location, and<br />
more.<br />
3. In the Guests field, enter the email addresses of everyone you<br />
want to invite to the event. Separate multiple addresses with<br />
commas ( , ).<br />
If the people to whom you send invitations use Google Calendar,<br />
they’ll receive an invitation in Calendar and by email.<br />
4. Tap Save to add the event to your Google Calendar.
Calendar 191<br />
Sending a meeting request using Calendar (Exchange<br />
ActiveSync only)<br />
If you have an Exchange ActiveSync account set up on your phone,<br />
you can use Calendar to create a meeting appointment and send<br />
a meeting request email to the people you want to invite to your<br />
meeting.<br />
1. Open Calendar and create a new event. Tap the Calendar field<br />
and then select your Exchange ActiveSync account. For the<br />
steps, see “Creating calendar events”.<br />
2. Add details about the meeting, such as date and time, location,<br />
and more.<br />
3. Press MENU and then tap Meeting Invitation.<br />
4. Tap and choose attendees from your contacts or Company<br />
directory.<br />
5. Enter your message and then tap Send.
19 Calendar<br />
Changing calendar views<br />
When you open Calendar, it displays the Month view by default.<br />
You can also display the Calendar in Agenda, Day, or Week view. To<br />
change between calendar views, press MENU, and then choose the<br />
type of view that you want.<br />
Month view<br />
In Month view, you’ll see markers on days that have events.<br />
When in Month view:<br />
<br />
<br />
<br />
<br />
Tap on the bottom left of the screen to switch to Agenda<br />
view. Tap on the bottom right to create a new event.<br />
Tap a day to view the events of that day.<br />
Press and hold a day to open an options menu from which you can<br />
also choose to create an event or switch to either Day or Agenda view.<br />
Slide your finger up or down the screen to view earlier or later<br />
months.
Calendar 19<br />
Day and Agenda views<br />
Day view displays a list of the events of one day and also shows<br />
weather information at the bottom of the screen when you’re viewing<br />
events of the current day. Agenda view shows a list of all your events<br />
in chronological order.<br />
The color bars on the left side of the events indicate the type of<br />
calendar in which the event is part of. To find out what each color<br />
represents, press MENU and then tap More > Calendars.<br />
When in Day view, slide left or right across the screen to view earlier<br />
or later days.<br />
<br />
<br />
In Day view, the weather information appears only if the event is within<br />
the five-day forecast of the Weather app.<br />
Weather information does not appear in Day view when you change<br />
Day view to display as a time list. See “Changing Calendar settings” for<br />
details.
194 Calendar<br />
Week view<br />
Week view displays a chart of the events of one week.<br />
When in Week view:<br />
<br />
<br />
<br />
You can press and hold on a time slot to create a new event at<br />
that time.<br />
Tap an event to view its details.<br />
Slide left or right across the screen to view earlier or later weeks.
Managing calendar events<br />
Calendar 195<br />
You can view, edit, delete, or share events that you created. You can<br />
also view and share event invitations that other people sent to you.<br />
Viewing an event<br />
1. Press HOME , and then tap , and then tap Calendar.<br />
2. In Month view, tap the day when the event takes place, and then<br />
tap the event to open it.<br />
The Event details screen then opens and shows the summary of<br />
the event.<br />
3. When viewing the event summary, you can do the following:<br />
<br />
<br />
<br />
<br />
<br />
<br />
<br />
Find the event’s location in Maps.<br />
Call any phone number included in the event location or<br />
description.<br />
Check the participants of the event you sent or are invited to.<br />
Respond whether you’ll attend the event you’re invited to.<br />
If it’s an Exchange ActiveSync calendar event, reply by email<br />
to the organizer or to all the guests. Press MENU, and then<br />
either tap Reply or Reply all.<br />
Select any text and look it up on the web. To learn more, see<br />
“Selecting text” in the Keyboard chapter and “Quickly looking<br />
up information on the Web” in the Getting started chapter.<br />
Tap the reminder time to change it. Press BACK to save<br />
changes.
196 Calendar<br />
Editing an event<br />
1. While viewing an event, press MENU, and then tap Edit event.<br />
2. Make your changes to the event.<br />
3. When you’re done editing, tap Save.<br />
Deleting an event<br />
There are a number of ways to delete an event.<br />
While viewing the summary of an event on the Event details<br />
screen, press MENU and then tap Delete event.<br />
In Day, Agenda or Week view, press and hold an event and<br />
then tap Delete event.<br />
When editing an event, scroll down to the bottom of screen<br />
and then tap Delete.<br />
If the event repeats, you’ll be asked whether you want to delete<br />
just that occurrence, this and all future occurrences, or all past<br />
and future occurrences in your Calendar.<br />
Sharing an event (vCalendar)<br />
You can share a calendar event as a vCalendar to someone’s phone<br />
using Bluetooth or by sending it as a file attachment with your email<br />
or message.<br />
1.<br />
2.<br />
<br />
<br />
<br />
While viewing an event, press MENU, and then tap<br />
Share vCalendar.<br />
Do one of the following:<br />
<br />
Tap Bluetooth. you’ll be asked to turn on Bluetooth on your<br />
phone and connect to the receiving Bluetooth device. Follow<br />
the steps in “Sending information using Bluetooth” in the<br />
Bluetooth chapter.
Calendar 197<br />
Tap Mail. A new message window opens and automatically<br />
includes the vCalendar as an attachment. Your default email<br />
account that’s selected in the Mail app will be used to send.<br />
For more information, see the Email chapter.<br />
Tap Message. A new message window opens and<br />
automatically includes the vCalendar as a multimedia<br />
attachment. For more information, see the Messages chapter.<br />
Calendar event reminders<br />
If you have set at least one reminder for an event, the upcoming event<br />
icon will appear in the notifications area of the status bar to remind<br />
you of the upcoming event.<br />
Dismissing or snoozing event reminders<br />
1. Tap the status bar, then slide your finger down the screen to<br />
open the Notifications panel.<br />
2. Do one of the following:<br />
<br />
<br />
<br />
Tap Clear to dismiss event reminders and all other<br />
notifications. Other types of notifications such as new<br />
messages and missed calls will also be deleted.<br />
After sliding open the Notifications panel, tap the calendar<br />
event reminder. You’ll then see a list of all pending event<br />
reminders. Tap Snooze all to snooze all event reminders for<br />
five minutes, or tap Dismiss all to dismiss all event reminders.<br />
Press BACK to keep the reminders pending in the<br />
notifications area of the status bar.
198 Calendar<br />
Displaying and synchronizing calendars<br />
You can select which calendars to show or hide on your phone’s<br />
Calendar, and which ones to keep synchronized.<br />
Showing or hiding calendars<br />
In any Calendar view, press MENU , tap More > Calendars, and then<br />
select or clear a calendar to show or hide it. Tap All calendars to<br />
display all calendars.<br />
The calendars are kept synchronized on your phone, whether or not<br />
you hide them.<br />
Choosing which Google Calendars are synchronized on<br />
your phone<br />
You can choose which Google Calendars to keep synchronized on<br />
your phone or which ones to stop synchronizing.<br />
Stop synchronizing a Google Calendar<br />
1. In any Calendar view, press MENU and then tap More > Calendars.<br />
2.<br />
3.<br />
4.<br />
Press MENU again and then tap Remove calendars.<br />
Select a Google Calendar to remove from your calendars list, and<br />
then tap OK.<br />
Press BACK to update Calendar with the new changes and<br />
return to the Calendar view you were viewing.<br />
The calendars that you remove from your calendars list will no longer<br />
be synchronized on your phone, but you remain subscribed to them<br />
and can work with them in Google Calendar on the Web.
Calendar 199<br />
Adding a Google Calendar to sync with<br />
Only the calendars that you’ve created or subscribed to on the Web,<br />
but previously removed from your calendars list, are shown in the list<br />
of calendars that you can add.<br />
1.<br />
2.<br />
3.<br />
4.<br />
In any Calendar view, press MENU and then tap More > Calendars.<br />
Press MENU again and then tap Add calendars.<br />
Select a Google Calendar to add to your calendars list, and then<br />
tap OK.<br />
Press BACK to update Calendar with the new changes and<br />
return to the Calendar view you were viewing.<br />
Changing Calendar settings<br />
You can change Calendar settings to specify how it displays events<br />
and how it notifies you of upcoming events. In any Calendar view, press<br />
MENU and then tap More > Settings to access Calendar’s settings.<br />
Reminder settings<br />
Choose how you want Calendar to issue event reminders when there<br />
are upcoming events.<br />
All calendars Select this check box to use the same event reminder<br />
settings for all types of calendars. If you clear this check<br />
box, you can set different reminder settings for each<br />
calendar.<br />
Set alerts &<br />
notifications<br />
Default reminder<br />
time<br />
Configure event reminders to open an alert, send you a<br />
notification, or turn off event notifications on your phone.<br />
Choose how soon before an event you want to be<br />
notified.
00 Calendar<br />
Select ringtone Choose a ringtone to sound when you receive an event<br />
reminder.<br />
Vibrate Choose whether you want your phone to vibrate when<br />
you receive an event notification.<br />
Hide declined<br />
events<br />
Choose whether to show or hide events to which you’ve<br />
declined invitations.<br />
Calendar view settings<br />
Choose what appears in Calendar when opened and what’s shown in<br />
Day, Week, and Month views.<br />
Start in Choose the default Calendar view that is displayed when<br />
you open Calendar.<br />
Day views Choose whether to display Day view in the form of an<br />
event list or time list.<br />
First day of week Set the Month and Week views to start on a Sunday or<br />
Monday.<br />
Include weather Make sure this check box is selected so that weather<br />
information is shown in Day view’s event list.<br />
City By default, Day view displays your current location’s<br />
weather. You can change it to display the weather of<br />
another city.
About the Calendar widget<br />
Calendar 01<br />
There’s a Calendar widget available that you can add to your Home<br />
screen, and it comes in different calendar views. Tapping a day or<br />
event on the widget brings you to the Calendar app. To find out how<br />
you can add a widget, see “Personalizing your Home screen with<br />
widgets” in the Personalizing chapter.
Clock and Weather<br />
About the HTC Clock widget<br />
Use the HTC Clock widget to see your current date, time, and location.<br />
It’s added by default on your Home screen. Tap the weather image<br />
to open the Weather app and check for more weather forecasts. See<br />
“Checking weather” for details.<br />
If you want to show the time of another city, just add another clock<br />
widget to the extended Home screen. Select from a variety of looks<br />
and designs. To find out how you can add a widget, see “Personalizing<br />
your Home screen with widgets” in the Personalizing chapter.
About the Clock app<br />
Clock and Weather 0<br />
Get more from the Clock app than just the regular date and time. Use<br />
your phone as a desk clock complete with weather information. Or let<br />
it serve as a night clock or a screensaver. As a world clock, see what<br />
time it is in several cities across the globe. You could also use it as an<br />
alarm clock, stopwatch, and countdown timer.<br />
To open the Clock app, you can:<br />
<br />
<br />
Tap the HTC Clock widget on the Home screen.<br />
Press HOME , and then tap > Clock.<br />
Tap the tabs at the bottom row or slide your finger across the tabs to<br />
switch between the different functions of the Clock app.<br />
1 4 5
04 Clock and Weather<br />
Using Desk Clock<br />
1 Desk Clock tab<br />
World Clock tab<br />
Alarms tab<br />
4 Stopwatch tab<br />
5 Timer tab<br />
Opening the Clock app brings you directly to the Desk Clock screen.<br />
The Desk Clock displays the current date, time, and weather. It also<br />
has an alarm clock indicator and a battery charging indicator. You can<br />
dim the screen to show only the time and date on the Desk Clock.<br />
5<br />
4<br />
1
Clock and Weather 05<br />
1 Shows whether the alarm clock is on or off. To find out how to turn on and<br />
set the alarm clock, see “Setting the alarm clock”.<br />
Shows the weather information of your current location. Tapping it brings<br />
you to the Weather app where you can see weather forecasts of the<br />
next few days. See “Checking weather” for more information about the<br />
Weather app.<br />
Shows the battery charge level. You’ll see it only when your phone is<br />
plugged with the power adapter or connected to your computer.<br />
4 Tap to dim the screen and display only the time and date on the Desk<br />
Clock. To light up the screen again, tap anywhere on the screen or press<br />
the BACK button on your phone.<br />
5 Tap to dim the screen and go into screensaver mode. When in screensaver<br />
mode, the time and date will change position on the screen after every<br />
few minutes. To light up the screen again, tap anywhere on the screen or<br />
press the BACK button on your phone.<br />
You can change the Desk Clock screen to display the date and time of<br />
another time zone. To find out how to select a different time zone, see<br />
“Setting the time zone, date, and time”.
06 Clock and Weather<br />
Using World Clock<br />
Use the Clock app’s World Clock screen to check the current time in<br />
several places around the globe simultaneously. You can also set your<br />
home city, add more cities to the world clock list, and manually set<br />
your time zone, date, and time.<br />
Setting your home city<br />
1. Tap the HTC Clock widget on the Home screen.<br />
2.<br />
Tap the World Clock tab.<br />
3. Press MENU and then tap Home settings.<br />
4.<br />
Enter your home city’s name. As you enter letters, the list is<br />
filtered to show matching cities and countries.<br />
5.<br />
Scroll through the list and tap your home city.
Clock and Weather 07<br />
Setting the time zone, date, and time<br />
To set the time zone, date, and time on your phone manually, you need<br />
to turn off auto time synchronization first.<br />
1.<br />
2.<br />
3.<br />
Tap the HTC Clock widget on the Home screen.<br />
Tap the World Clock tab.<br />
Press MENU and then tap Local time settings to open the Date &<br />
time settings screen.<br />
4. Clear the Automatic check box.<br />
5.<br />
6.<br />
7.<br />
8.<br />
9.<br />
Tap Select time zone. Scroll through the list and then tap the<br />
time zone that you want.<br />
To change the date, tap Set date. Adjust the date by rolling the<br />
day, month, and year scroll wheels onscreen and then tap OK.<br />
To change the time, tap Set time. Adjust the time by rolling the<br />
hour and minute scroll wheels onscreen and then tap OK.<br />
Tap the Use 24-hour format check box to toggle between using a<br />
1 -hour or a 4-hour time format.<br />
Tap Select date format then select how you want dates to be<br />
displayed. (The selected date format also applies to the date<br />
displayed in the alarm clock.)<br />
You can also press HOME > MENU and then tap Settings ><br />
Date & time to open the Date & time settings screen.
08 Clock and Weather<br />
Adding a city to the World Clock screen<br />
Add more cities to the World Clock screen so you can instantly check<br />
the date and time in these cities. In addition to the current and home<br />
cities, the World Clock screen can display up to 15 cities.<br />
1.<br />
2.<br />
3.<br />
4.<br />
Tap the HTC Clock widget on the Home screen.<br />
Tap the World Clock tab.<br />
Tap Add city. Enter the city name you want to add. As you enter<br />
letters, the list is filtered to show matching cities and countries.<br />
Scroll through the matching list and tap the city that you want to<br />
add.<br />
Setting the alarm clock<br />
You can use the Clock app’s Alarms screen to set up one or more<br />
wake-up alarms.
Setting an alarm<br />
1. Tap the HTC Clock widget on the Home screen.<br />
2. Tap the Alarms tab.<br />
Clock and Weather 09<br />
3. Select the check box of an alarm. and then tap that alarm.<br />
4. On the Set alarm screen, drag your finger up or down to roll the<br />
time scroll wheels and set the alarm time.<br />
5. Scroll through the Set alarms screen to see all the available alarm<br />
options. You can:<br />
Enter the alarm Description and choose the Alarm sound to<br />
use.<br />
Tap Repeat. Select what days of the week to sound the alarm<br />
and then tap OK.<br />
Select the Vibrate check box if you want your phone to also<br />
vibrate when the alarm goes off.<br />
6. When you’ve finished setting the alarm, tap Done.<br />
<br />
<br />
<br />
<br />
<br />
To turn off an alarm, tap (clear) the check box of that alarm.<br />
If you need to set more than three alarms, press MENU while you’re on<br />
the Alarms screen and then tap Add alarm.<br />
Deleting an alarm<br />
1. Tap the HTC Clock widget on the Home screen.<br />
2.<br />
Tap the Alarms tab.<br />
3. On the Alarms screen, press MENU and then tap Delete.<br />
4.<br />
Select the alarms you want to delete and then tap Delete.
10 Clock and Weather<br />
Changing alarm sound settings<br />
If you’ve set one or more alarms, you can change their settings such<br />
as the alarm volume, how long to snooze the alarm, and more.<br />
1.<br />
2.<br />
3.<br />
Tap the HTC Clock widget on the Home screen.<br />
Tap the Alarms tab.<br />
On the Alarms screen, press MENU and then tap Settings. You<br />
can change the following settings:<br />
Alarm in silent<br />
mode<br />
Selected by default, this option allows the alarm to<br />
sound even when your phone’s volume is set to silent<br />
mode. Clear this check box if you want to silence the<br />
alarm when the volume is in silent mode.<br />
Alarm volume Set the volume level that you want for the alarm.<br />
Snooze<br />
duration<br />
Side button<br />
behavior<br />
Set how long to snooze between alarms.<br />
Choose what happens to the alarm when pressing the<br />
side button (VOLUME UP/DOWN) of your phone. You<br />
can set the button to snooze, dismiss the alarm, or<br />
disable the button.<br />
The side button works only when the phone’s screen<br />
is not locked. While on the lock screen, tap the<br />
onscreen Snooze button to snooze, or slide down the<br />
screen to dismiss the alarm.
Checking weather<br />
Clock and Weather 11<br />
If you consented to turn location service on when you were setting<br />
up your phone for the first time, you’ll see the weather of your current<br />
location right on the HTC Clock widget of your Home screen.<br />
You can also check the current weather and weather forecasts for<br />
the next four days of the week. In addition to your current location’s<br />
weather, this app also displays the weather forecasts of other cities<br />
around the globe.<br />
If you declined to turn location service on during first-time setup of your<br />
phone, turn location service on in your phone’s settings so that you’ll be<br />
able to check your current location’s weather on the HTC Clock widget,<br />
Weather app, and the Weather widget. Press HOME > MENU, and then<br />
tap Settings > Location, and then select the Use wireless networks check<br />
box.<br />
1. Connect to the Internet using your phone’s Wi-Fi or data<br />
connection. To find out how, see the Internet connections<br />
chapter.<br />
2. Press HOME , and then tap > Weather.<br />
3. On the Weather screen, you’ll first see your current location’s<br />
weather. To check the weather in other cities, swipe your finger<br />
up or down the screen.
1 Clock and Weather<br />
4. The Weather app automatically downloads and displays the<br />
latest weather updates. Tap to update the information<br />
anytime.<br />
5. To see more weather details on the Web, tap Weather at the<br />
bottom center of the Weather screen.<br />
Adding a city to the Weather screen<br />
Add more cities to the Weather screen so you can instantly check the<br />
weather forecasts in these cities. In addition to your current location,<br />
the Weather screen can display up to 15 cities.<br />
1.<br />
2.<br />
On the Weather screen, tap .<br />
Enter the location you want to add. As you type, the list is filtered<br />
to show the possible locations based on the letters you entered.<br />
3.<br />
Tap the desired city to select it.
Clock and Weather 1<br />
Changing the order of cities on the Weather screen<br />
1. On the Weather screen, press MENU and then tap Rearrange.<br />
2.<br />
Press and hold at the end of the item you want to move.<br />
When the row is highlighted in green, drag it to its new position,<br />
then release.<br />
3. Tap Done.<br />
Deleting cities from the Weather screen<br />
1. On the Weather screen, press MENU and then tap Delete.<br />
2.<br />
Select the cities you want to remove and then tap Delete.<br />
Changing weather options<br />
1. On the Weather screen, press MENU and then tap Settings.<br />
2.<br />
You can change the following weather settings:<br />
Update when<br />
opened<br />
Update<br />
automatically<br />
Select this check box to refresh weather<br />
updates every time you open the Weather app.<br />
Select this check box to automatically<br />
download weather updates.<br />
Update schedule Set an auto update schedule.<br />
Temperature scale Choose whether to display weather in Celsius or<br />
Fahrenheit.
14 Clock and Weather<br />
About the Weather widget<br />
Use the Weather widget to instantly check weather forecasts of your<br />
current location and other cities without having to open the Weather<br />
app. The Weather widget comes in different looks and styles.<br />
You can add this widget to the Home screen, if it’s not yet added. To<br />
find out how you can add a widget, see “Personalizing your Home<br />
screen with widgets” in the Personalizing chapter.
Internet connections<br />
Data connection<br />
Your phone will be automatically set up to use the Verizon Wireless<br />
data network when you turn on your phone (if the SIM card is<br />
inserted) for the first time.<br />
Checking the data connection you are using<br />
1. Press HOME > MENU, and then tap Settings.<br />
2.<br />
Tap Wireless & networks > Mobile networks > Network operators<br />
or Access Point Names.<br />
Turning the data connection on or off<br />
Turning your data connection off can help save battery life and save<br />
money on data charges. However, if you don’t have data connection<br />
turned on and you’re also not connected to a Wi-Fi network, you<br />
won’t receive automatic updates to your email, social network<br />
accounts, and other synchronized information.<br />
1.<br />
2.<br />
3.<br />
Press HOME > MENU, and then tap Settings.<br />
Tap Wireless & networks.<br />
Select the Mobile network check box to turn on the data<br />
connection; clear the check box to turn off the data connection.
16 Internet connections<br />
Creating a new access point<br />
Before you add another data connection on your phone, have the<br />
access point name and settings (including username and password if<br />
required) from Verizon Wireless ready.<br />
1.<br />
2.<br />
Press HOME > MENU, and then tap Settings.<br />
Tap Wireless & networks > Mobile networks > Access Point<br />
Names.<br />
3. On the APNs screen, press MENU and then tap New APN.<br />
4.<br />
On the Edit access point screen, enter the APN settings. Tap the<br />
APN setting item to edit it.<br />
5. Press MENU and then tap Save.<br />
Enabling data roaming<br />
Data roaming lets you connect to Verizon Wireless’s partner networks<br />
and access data services when you’re out of Verizon Wireless’s<br />
coverage area.<br />
1.<br />
Using data services while roaming will be costly. Check with Verizon<br />
Wireless for data roaming rates before you use data roaming.<br />
2.<br />
Press HOME > MENU, and then tap Settings.<br />
Tap Wireless & networks > Mobile networks, and then select the<br />
Data roaming check box.<br />
Select the Data roaming sound check box if you’d like your<br />
phone to play a sound so you’ll know when it’s connecting to a<br />
roaming network.
Wi-Fi<br />
Internet connections 17<br />
To use Wi-Fi on your phone, you need access to a wireless access<br />
point or “hotspot”. The availability and strength of the Wi-Fi signal will<br />
vary depending on objects, such as buildings or simply a wall between<br />
rooms, the Wi-Fi signal has to pass through.<br />
Turning Wi-Fi on and connecting to a wireless network<br />
1. Press HOME > MENU, and then tap Settings.<br />
2.<br />
3.<br />
4.<br />
Tap Wireless & networks, and then select the Wi-Fi check box<br />
to turn Wi-Fi on. The phone then scans for available wireless<br />
networks.<br />
Tap Wi-Fi settings. The network names and security settings of<br />
detected Wi-Fi networks are displayed in the Wi-Fi networks<br />
section.<br />
If the wireless network you want to connect to is not in the list<br />
of detected networks, scroll down the screen, and then tap Add<br />
Wi-Fi network. Enter the wireless network settings, and then tap<br />
Save.<br />
5. Tap the Wi-Fi network you want to connect to.<br />
<br />
<br />
If you selected an open network, you’ll be automatically<br />
connected to the network.<br />
If you selected a network that is secured with WEP, enter the<br />
key and then tap Connect.<br />
Depending on the network type and its security settings, you may also<br />
need to enter more information or choose a security certificate.
18 Internet connections<br />
When your phone is connected to a wireless network, the Wi-Fi icon<br />
appears in the status bar and tells you the approximate signal<br />
strength (number of bands that light up).<br />
The next time your phone connects to a previously accessed secured<br />
wireless network, you won’t be asked to enter the key or other<br />
security information again, unless you reset your phone to its factory<br />
default settings.<br />
Connecting to a Wi-Fi network with EAP-TLS security<br />
You may need to install a network certificate (*.p1 ) to your<br />
phone before you can connect to a Wi-Fi network with EAP-TLS<br />
authentication protocol.<br />
1.<br />
2.<br />
Save the certificate file to the root folder of the storage card.<br />
Press HOME > MENU, and then tap Settings.<br />
3. Tap Security > Install from SD card.<br />
4.<br />
5.<br />
Select the network certificate needed to connect to the EAP-TLS<br />
network.<br />
Follow the steps in the previous section to connect to the Wi-Fi<br />
network.<br />
Checking the wireless network status<br />
1. Press HOME > MENU, and then tap Settings.<br />
2.<br />
3.<br />
Tap Wireless & networks.<br />
On the Wireless & networks screen, tap Wi-Fi settings, and then<br />
tap the wireless network that the phone is currently connected<br />
to.<br />
A message box is then displayed showing the Wi-Fi network name,<br />
status, speed, signal strength, and more.
Internet connections 19<br />
If you want to remove the wireless network settings on your phone, tap<br />
Forget. You’ll need to enter the settings again if you want to connect to this<br />
wireless network.<br />
Connecting to another Wi-Fi network<br />
1. Press HOME > MENU, and then tap Settings.<br />
2.<br />
3.<br />
Tap Wireless & networks > Wi-Fi settings. Detected Wi-Fi<br />
networks are displayed in the Wi-Fi networks section.<br />
To manually scan for available Wi-Fi networks, on the Wi-Fi<br />
settings screen, press MENU and then tap Scan.<br />
4.<br />
Tap another Wi-Fi network to connect to it.<br />
Adding connection widgets<br />
Add the Mobile Network and Wi-Fi widgets or the Data dashboard<br />
widget to the Home screen to make it faster for you to turn on or off<br />
these connections. Tap the widget or icon on the dashboard to turn<br />
on or off the connection.<br />
To find out how to add widgets, see “Adding a widget” in the<br />
Personalizing chapter.
0 Internet connections<br />
Connecting to a virtual private network (VPN)<br />
Add, set up, and manage virtual private networks (VPNs) so you can<br />
connect and access resources inside a secured local network, such as<br />
your corporate network.<br />
Depending on the type of VPN you’re using at work, you may be<br />
asked to enter your login credentials and install security certificates<br />
before you can connect to your company’s local network. You can get<br />
this information from your network administrator.<br />
Also, your phone must first establish a Wi-Fi or data connection<br />
before you can start a VPN connection. For information about setting<br />
up and using these connections on your phone, see “Data connection”<br />
and “Wi-Fi” in this chapter.<br />
Setting up secure credential storage<br />
If your network administrator tells you to download and install security<br />
certificates, you must first set up the phone’s secure credential storage.<br />
1.<br />
2.<br />
Press HOME > MENU, and then tap Settings.<br />
Tap Security > Set password.<br />
3. Enter a new password for the credential storage.<br />
4. Scroll down and confirm the password, and then tap OK.<br />
5.<br />
Select the Use secure credentials check box.<br />
You can then download and install the certificates needed to access<br />
your local network. Your network administrator can tell you how to do<br />
this.
Adding a VPN connection<br />
1. Press HOME > MENU, and then tap Settings.<br />
2.<br />
Tap Wireless & networks > VPN settings.<br />
Internet connections 1<br />
3. Tap Add VPN, and then tap the type of VPN you want to add.<br />
4.<br />
Tap the VPN settings and set them up according to the security<br />
details your network administrator gave you.<br />
5. Press MENU, and then tap Save.<br />
The VPN is then added to the VPNs section of the VPN settings<br />
screen.<br />
Connecting to a VPN<br />
1. Press HOME > MENU, and then tap Settings.<br />
2.<br />
Tap Wireless & networks > VPN settings.<br />
3. In the VPNs section, tap the VPN that you want to connect to.<br />
4.<br />
When asked, enter your log in credentials, and then tap Connect.<br />
When you’re connected, the VPN connected icon appears in<br />
the notification area of the title bar.<br />
You can then open the web browser to access resources such as your<br />
corporate network intranet.<br />
Disconnecting from a VPN<br />
1. Press and hold the title bar, and then slide down your finger to<br />
open the Notifications panel.<br />
2.<br />
Tap the VPN connection to return to the VPN settings screen,<br />
and then tap the VPN connection to disconnect from it.<br />
When your phone has disconnected from the VPN, the VPN<br />
disconnected icon is displayed in the notification area of the title bar.
Internet connections<br />
Using your phone as a modem (Internet<br />
Connection Mode)<br />
No Internet connection available for your computer? No problem. Use<br />
your phone’s data connection to connect to the Internet using your<br />
computer.<br />
You need your SIM card inserted on your phone to use the data<br />
connection. To find out how to set up and use the data connection,<br />
see “Data connection” earlier in this chapter.<br />
Before you can use your phone as a modem, be sure to install HTC<br />
Sync on your computer first. To find out how to install HTC Sync, see<br />
“Synchronizing with your computer” in the Accounts and sync chapter.<br />
1.<br />
2.<br />
3.<br />
Make sure your phone’s data connection is turned on. See<br />
“Turning the data connection on or off” earlier in this chapter to<br />
find out how to turn on the phone’s data connection.<br />
Connect the phone to the computer using the provided USB cable.<br />
On the Connect to PC screen, select Internet Connection Mode,<br />
and then tap Done.
Internet connections<br />
Connecting your phone to the Internet through a<br />
computer (Internet Pass-through)<br />
If you don’t have a data plan for your phone or you don’t have access<br />
to a Wi-Fi network, you can still go online on your phone by using<br />
your computer’s Internet connection.<br />
Before you can use your computer as a modem, be sure to install<br />
HTC Sync on your computer first. To find out how to install HTC Sync,<br />
see “Synchronizing with your computer” in the Accounts and sync<br />
chapter.<br />
1.<br />
Make sure your computer is connected to the Internet.<br />
Two things to check for your computer’s Internet connection. One, we<br />
recommend that you turn off your local network’s firewall. Two, if your<br />
computer connects to the Internet via PPP (e.g. Dial UP, xDSL, or VPN),<br />
Internet Pass-through will only support TCP protocol.<br />
2. Connect the phone to the computer using the provided USB<br />
cable.<br />
3. On the Connect to PC screen, select Internet Pass-through, and<br />
then tap Done.<br />
4. On the message window, tap OK.
4 Internet connections<br />
Using your phone as a mobile hotspot<br />
Share your data connection with other devices by turning your phone<br />
into a wireless router. Make sure your phone’s data connection is<br />
turned on before you use it as a wireless router. To find out how to<br />
turn on your phone’s data connection, see “Data connection” earlier in<br />
this chapter.<br />
1.<br />
Press HOME > MENU, and then tap Settings.<br />
2.<br />
Tap Wireless & networks > Mobile hotspot settings.<br />
The first time you open Portable Wi-Fi hotspot, a brief introduction<br />
describing the application is displayed. Tap OK.<br />
3. Enter a name in Router name (SSID), or use the default router<br />
name.<br />
4. Choose the type of Security and set the Password (key) for your<br />
wireless router. If you selected None in Security, you don’t need<br />
to enter a password.<br />
The password is the key other people need to enter on their device<br />
so they can connect and use your phone as a wireless router.<br />
5. Select the Mobile Hotspot check box to turn on your phone’s<br />
wireless router.<br />
Your phone is ready to be used as a wireless router when you see on<br />
the status bar. Up to eight devices can connect to your phone’s wireless<br />
router at a time.
Web browser<br />
Using your phone’s web browser<br />
You must have an active data connection or Wi-Fi connection to access the<br />
Internet.<br />
Do one of the following to open the web browser and start surfing the<br />
Web:<br />
<br />
<br />
On the Home screen, tap Internet.<br />
Press HOME , and then tap > Internet.<br />
Going to a webpage<br />
1.<br />
On the browser screen, press MENU and then tap the URL field<br />
on top of the screen.<br />
2. Enter the webpage address using the keyboard. As you enter the<br />
address, matching webpage addresses will appear on the screen.<br />
Tap an address to go directly to that webpage or continue<br />
entering the webpage address.<br />
3. Tap the Enter key on the onscreen keyboard.
6 Web browser<br />
Setting your home page<br />
1. From the browser screen, press MENU, and then tap More ><br />
Settings > Set home page.<br />
2.<br />
On the Set home page screen, select the home page you want to use.<br />
Changing the screen orientation<br />
The phone automatically changes the screen orientation depending<br />
on how you’re holding your phone.<br />
Turn your phone sideways to display the web browser in landscape<br />
orientation.<br />
If the screen orientation doesn’t change automatically, please switch<br />
automatic screen orientation on. Press HOME > MENU, tap Settings ><br />
Display, and then select the Auto-rotate screen check box.<br />
Browsing full versions of all websites<br />
Some websites display a mobile version of their pages on phone web<br />
browsers. You can choose to view the full version of all pages, even for<br />
these sites.<br />
From the browser screen, press MENU, tap More > Settings, and then<br />
clear the Mobile view check box.<br />
Choosing when to show Flash content<br />
Choose which Flash® content you want to see by switching to On<br />
demand. By switching to On demand, you decide when Flash content<br />
appear on a webpage.<br />
1.<br />
From the browser screen, press MENU, and then tap More ><br />
Settings > Enable plugins.<br />
2.<br />
Tap On demand.<br />
After switching to On demand, you can show the Flash content by<br />
tapping on the web page.
Web browser 7<br />
Navigating on a webpage<br />
You can swipe your finger on the screen to navigate and view other<br />
areas of the webpage.<br />
Zooming in or out on a webpage<br />
Tap the screen twice quickly to zoom in, then tap the screen twice<br />
quickly again to zoom out. You can also use your fingers to spread or<br />
pinch the screen to zoom in and out.<br />
Selecting a link in a webpage<br />
You can tap a link with your finger to open it, or press and hold a link<br />
for more options.<br />
Link What to do<br />
Webpage address<br />
(URLs)<br />
<br />
<br />
Tap the link to open the webpage.<br />
Press and hold the link to open a menu that allows<br />
you to open, bookmark, copy to the clipboard, or<br />
share the link via email or your social networks.<br />
Email address Tap to send an email message to the email address.<br />
<br />
Press and hold, then tap Copy on the menu to copy<br />
the email address to the clipboard. You can paste the<br />
email address later when creating a new contact or<br />
sending a new email message.
8 Web browser<br />
Selecting an address or phone number in a webpage<br />
You can map an address or call a phone number on a webpage.<br />
Link What to do<br />
Location address Tap the address to copy it or map it using Google Maps.<br />
Phone number Tap the phone number to copy, call, send a text message<br />
to that number, or save the number to a contact in People.<br />
Opening a new browser window<br />
Open multiple browser windows to make it easier for you to switch<br />
from one website to another. You can open up to 4 browser windows.<br />
1. While viewing a webpage, press MENU and then tap Windows.<br />
2. Tap .<br />
A new browser window opens and goes to the home page that is set.<br />
Switching between browser windows<br />
1. While viewing a web page, do one of the following:<br />
<br />
<br />
Press MENU and then tap Windows.<br />
Pinch the screen (zoom out) until you see the other browser<br />
windows.<br />
2. Select the browser window you want to view by sliding your<br />
finger on the screen from right to left.
You can also do the following:<br />
1<br />
1 Tap a webpage to display it in full screen.<br />
2 Tap to close a webpage.<br />
Downloading applications from the web<br />
Web browser 9<br />
All downloaded applications are saved to the storage card. Before you<br />
download an application from the web, make sure that you have installed<br />
a storage card on your phone. For information on how to install a storage<br />
card, refer to the Basics chapter.<br />
Before you can download applications from the web, you must first<br />
enable downloading from the phone settings.<br />
1.<br />
2.<br />
Press HOME > MENU, and then tap Settings.<br />
Tap Applications, and then select the Unknown sources check box.<br />
3.<br />
When the Attention dialog box opens, tap OK.<br />
Applications downloaded from the web can be from unknown sources. To<br />
protect your phone and personal data, download applications only from<br />
trusted sources such as Android Market. Refer to “Finding and installing<br />
apps from Android Market” in the More apps chapter for details.<br />
Viewing your downloads<br />
While viewing a webpage, press MENU and then tap More > Downloads.
0 Web browser<br />
Copying text, looking up information, and sharing<br />
You can select text and then:<br />
<br />
<br />
<br />
<br />
<br />
Copy it.<br />
Search it using Google Search.<br />
Look it up on Wikipedia, YouTube, or Google Dictionary.<br />
Get a translation of the text from Google Translate.<br />
Share the text in a new email, text, or multimedia message or in<br />
your status update on a social network.<br />
Finding text within a webpage<br />
1. While viewing a webpage, press MENU and then tap More > Find<br />
on page.<br />
2.<br />
Enter what you want to search for. As you enter characters,<br />
matching characters will be highlighted. Tap the left or right<br />
arrow to go to the previous or next matching item.
Selecting text<br />
1. Press and hold on a word.<br />
Web browser 1<br />
2. Drag the start and end markers to highlight the surrounding text<br />
you want to select.<br />
1<br />
1 Start and end markers. Drag to increase or decrease<br />
the text selection area.<br />
To select text in a link, press and hold the link, and then tap Copy link URL.<br />
Copying and pasting text<br />
1. After you have selected the text you want to copy, tap<br />
selected text is then copied to the clipboard.<br />
. The<br />
2.<br />
In a text entry field (for example while composing a message),<br />
press and hold at the point where you want to paste the text.<br />
3.<br />
Tap Paste.
Web browser<br />
Searching or translating text<br />
1. After you have selected the text you want to search or translate,<br />
tap .<br />
2. Tap one of the following tabs:<br />
Wikipedia. Look for related information on Wikipedia, based on<br />
the text that you selected.<br />
Google Search. Look for related information using Google<br />
Search, based on the text that you selected.<br />
YouTube. Look for videos on YouTube, based on the text that<br />
you selected.<br />
Google Translate. Translate the text to another language.<br />
Google Dictionary. Look up the selected text in the dictionary.<br />
Pasting text in a new message or social network status<br />
update<br />
1. After you have selected the text you want to share, tap .<br />
2. Select an option to paste the selected text in a new email, text or<br />
multimedia message or in your status update on a social network<br />
such as Twitter. See the Email, Messages, and Social chapters for<br />
more information on using these features.
Web browser<br />
Viewing bookmarks and previously visited pages<br />
You can store as many bookmarks as you want on your phone. You<br />
can also access a convenient History list of the sites you have visited,<br />
or quickly view the pages that you access most often.<br />
Bookmarking a webpage<br />
1. While viewing a webpage, press MENU, and then tap Add<br />
bookmark.<br />
2.<br />
Edit the bookmark name if needed, and then tap Add.<br />
Opening a bookmark<br />
1. While viewing a webpage, press MENU, and then tap Bookmarks.<br />
2.<br />
On the Bookmarks tab , navigate to the bookmark you want<br />
to open, and then tap it.<br />
Editing a bookmark<br />
1. While viewing a webpage, press MENU, and then tap Bookmarks.<br />
2.<br />
On the Bookmarks tab , press MENU and then tap Edit.<br />
3. Tap the bookmark you want to edit.<br />
4. Enter your changes, and then tap Edit.<br />
Viewing a previously visited page<br />
1. While viewing a webpage, press MENU, and then tap Bookmarks.<br />
2.<br />
On the History tab , navigate to the page you want to view<br />
and then tap the page.
4 Web browser<br />
Clearing the list of previously visited pages<br />
1. While viewing a webpage, press MENU, and then tap Bookmarks.<br />
2.<br />
On the History tab , press MENU, and then tap Clear history.<br />
Viewing a page that you often visit<br />
1. While viewing a webpage, press MENU, and then tap Bookmarks.<br />
2.<br />
On the Most visited tab , navigate to the page you want to<br />
view, and then tap the page.<br />
Clearing the list of most visited pages<br />
1. While viewing a webpage, press MENU, and then tap Bookmarks.<br />
2.<br />
On the Most visited tab , press MENU, and then tap Clear all.<br />
Changing the view of bookmarks or most visited pages<br />
1. While viewing a webpage, press MENU, and then tap Bookmarks.<br />
2.<br />
On the Bookmarks tab or the Most visited tab , press<br />
MENU, and then tap Thumbnails, List, or Grid to change the view.<br />
For example, if you are in Thumbnails view and you want to view<br />
bookmarks in a grid, press MENU > List, and then press MENU ><br />
Grid.<br />
Setting browser options<br />
Customize the web browser to suit your browsing lifestyle. Set display,<br />
privacy, and security options when using the web browser.<br />
From the browser screen, press MENU, and then tap More > Settings.
Bluetooth<br />
Bluetooth basics<br />
Turning Bluetooth on or off<br />
1. Press HOME<br />
networks.<br />
> MENU, and then tap Settings > Wireless &<br />
2.<br />
Select or clear the Bluetooth check box.<br />
An even easier way to turn Bluetooth on or off is with the Bluetooth<br />
widget or Bluetooth setting shortcut on the Home screen. To find<br />
out how to add widgets and shortcuts to the Home screen, see the<br />
Personalizing chapter.<br />
Turn off Bluetooth when not in use to save battery power, or in places<br />
where using a wireless device is prohibited, such as on board an aircraft and<br />
in hospitals.<br />
Changing the phone name<br />
The phone name identifies your phone to other devices.<br />
1.<br />
2.<br />
Press HOME > MENU, and then tap Settings > Wireless &<br />
networks > Bluetooth settings.<br />
If the Bluetooth check box is not selected, select it to turn<br />
Bluetooth on.<br />
3. Tap Device name.<br />
4.<br />
Enter the name for your phone in the dialog box, and then tap<br />
OK.
6 Bluetooth<br />
Connecting a Bluetooth headset or car kit<br />
You can listen to music over a Bluetooth stereo headset, or have<br />
hands-free conversations using a compatible Bluetooth headset or car<br />
kit. It’s the same procedure to set up stereo audio and hands-free.<br />
<br />
<br />
For you to listen to music with your headset or car kit, the<br />
headset or car kit must support the A DP Bluetooth profile.<br />
Before you connect your headset, you need to make it<br />
discoverable so your phone can find it. You can find out how<br />
to do this by referring to your headset manual.<br />
1. Press HOME > MENU, and then tap Settings > Wireless &<br />
networks > Bluetooth settings.<br />
2. If the Bluetooth check box is not selected, select it to turn<br />
Bluetooth on.<br />
3. Make sure that the headset is discoverable.<br />
4. Tap Scan for devices. Your phone will start to scan for Bluetooth<br />
devices within range.<br />
5. When you see the name of your headset displayed in the<br />
Bluetooth devices section, tap the name. Your phone then<br />
automatically tries to pair with the headset.<br />
6. If automatic pairing fails, enter the passcode supplied with your<br />
headset.<br />
The pairing and connection status is displayed below the handsfree<br />
headset or car kit name in the Bluetooth devices section. When<br />
the Bluetooth headset or car kit is connected to your phone, the<br />
Bluetooth connected icon is displayed in the status bar. Depending<br />
on the type of headset or car kit you have connected, you can then<br />
start using the headset or car kit to listen to music and/or make and<br />
receive phone calls.
Bluetooth 7<br />
Reconnecting a headset or car kit<br />
Normally, you can easily reconnect your headset by switching on<br />
Bluetooth on your phone, and then turning on the headset. However,<br />
you might have to connect manually if your headset has been used<br />
with another Bluetooth device.<br />
1.<br />
2.<br />
Press HOME > MENU, and then tap Settings > Wireless &<br />
networks > Bluetooth settings.<br />
If the Bluetooth check box is not selected, select it to turn<br />
Bluetooth on.<br />
3. Make sure that the headset is discoverable.<br />
4. Tap the headset’s name in the Bluetooth devices section.<br />
5.<br />
If prompted to enter a passcode, try 0000 or 1 4, or consult the<br />
headset/car kit documentation to find the passcode.<br />
If you still cannot reconnect to the headset or car kit, follow the<br />
instructions in “Unpairing from a Bluetooth device”, and then follow<br />
the steps under “Connecting a Bluetooth headset or car kit”.<br />
Disconnecting or unpairing from a Bluetooth<br />
device<br />
Disconnecting a Bluetooth device<br />
1. Press HOME > MENU, and then tap Settings > Wireless &<br />
networks > Bluetooth settings.<br />
2.<br />
In the Bluetooth devices section, press and hold the device to<br />
disconnect.<br />
3.<br />
Tap Disconnect.
8 Bluetooth<br />
Unpairing from a Bluetooth device<br />
You can make your phone forget its pairing connection with another<br />
Bluetooth device. To connect to the other device again, you may need<br />
to enter or confirm a passcode again.<br />
1.<br />
2.<br />
Press HOME > MENU, and then tap Settings > Wireless &<br />
networks > Bluetooth settings.<br />
In the Bluetooth devices section, press and hold the device to<br />
unpair.<br />
3. Tap Disconnect & unpair.<br />
Or, tap Unpair if the Bluetooth device is currently not connected<br />
to your phone.<br />
Sending information using Bluetooth<br />
You can use Bluetooth to send information from your phone to<br />
another Bluetooth enabled device such as a phone or notebook<br />
computer. You can send the following types of information, depending<br />
on the device you are sending to:<br />
<br />
<br />
<br />
<br />
Photos and videos<br />
Calendar events<br />
Contacts<br />
Audio files<br />
Before you begin, set the receiving device to discoverable mode. You<br />
may also need to set it to “Receive Beams” or “Receive Files”. Refer to<br />
the device’s documentation for instructions on receiving information<br />
over Bluetooth.
Bluetooth 9<br />
The first time you transfer information between your phone and<br />
another device, you need to enter or confirm a security passcode.<br />
After that, your phone and the other device are paired, and you will<br />
not need to exchange passcodes to transfer information in the future.<br />
1. On your phone, open the app that contains the information or file<br />
you want to send.<br />
2. Follow the steps for the type of item you want to send:<br />
Captured<br />
photo or video<br />
Photos or<br />
videos<br />
After capturing, on the Camera preview screen, tap<br />
the Share button , and then tap Bluetooth.<br />
1. On the Albums tab of the Gallery app,<br />
choose an album.<br />
. Tap the Share button , and then tap Bluetooth.<br />
. Choose the photos and videos you want to share,<br />
and then tap Next.<br />
Contact 1. On the All tab of the People app, press and<br />
hold a contact, and then tap Send contact as vCard.<br />
. Tap the down arrow icon, and then select<br />
Bluetooth from the displayed list.<br />
Calendar event In Day view, Agenda view, or Week view, press and<br />
hold the event, and then tap Share vCalendar ><br />
Bluetooth.<br />
Music track With the track displayed on the Music app’s Now<br />
playing screen, press MENU, and then tap Share ><br />
Bluetooth.<br />
Voice recording On the main Voice Recorder screen, tap the Share<br />
button , and then tap Bluetooth.
40 Bluetooth<br />
3. Turn on Bluetooth if you’re asked to do so.<br />
4. If you haven’t paired with the receiving device before, tap Scan<br />
for devices.<br />
5. Tap the name of the receiving device.<br />
6. If prompted, accept the pairing request on your phone and the<br />
receiving device.<br />
Also enter the same passcode on both your phone and the other<br />
device, or confirm the auto-generated passcode.<br />
7. On the receiving device, accept the file.<br />
Where sent information is saved<br />
When you send information from your phone using Bluetooth, the<br />
location where it’s saved depends on the type of information and the<br />
receiving device.<br />
If you send a calendar event or contact, it is normally added directly<br />
to the corresponding app on the receiving device. For example, if you<br />
send a calendar event to a compatible phone, the event is shown in<br />
that phone’s calendar app.<br />
If you send another file type to a Windows computer, it is normally saved<br />
in the Bluetooth Exchange folder within your personal document folders.<br />
<br />
<br />
<br />
On Windows XP, the path may be:<br />
C:\Documents and Settings\[your username]\My Documents\<br />
Bluetooth Exchange<br />
On Windows Vista, the path may be:<br />
C:\Users\[your username]\Documents<br />
On Windows 7, the path may be:<br />
C:\Users\[your username]\My Documents\Bluetooth Exchange<br />
Folder
Bluetooth 41<br />
If you send a file to another device, the saved location may depend on<br />
the file type. For example, if you send an image file to another mobile<br />
phone, it may be saved in a folder named “Images”.<br />
Receiving information using Bluetooth<br />
Your phone is capable of receiving a wide variety of file types with<br />
Bluetooth, including photos, music tracks, and documents such as<br />
PDFs.<br />
The first time you transfer information between your phone and<br />
another device, you need to enter or confirm a security passcode.<br />
After that, your phone and the other device are paired, and you will<br />
not need to exchange passcodes to transfer information in the future.<br />
To receive files using Bluetooth, you need to have a microSD card on<br />
your phone.<br />
1.<br />
2.<br />
Press HOME > MENU, and then tap Settings > Wireless &<br />
networks > Bluetooth settings.<br />
If the Bluetooth check box is not selected, select it to turn<br />
Bluetooth on.<br />
3. Select the Discoverable check box.<br />
4.<br />
On the sending device, send one or more files to your phone.<br />
Refer to the device’s documentation for instructions on sending<br />
information over Bluetooth.<br />
5. If prompted, accept the pairing request on your phone and the<br />
receiving device.<br />
Also enter the same passcode on both your phone and the other<br />
device, or confirm the auto-generated passcode.
4 Bluetooth<br />
A Bluetooth authorization request is then displayed on your<br />
phone.<br />
6. If you want to automatically receive files from the sending device<br />
in the future, select the Always check box.<br />
7. Tap Accept or OK.<br />
8. When your phone receives a file transfer request notification,<br />
slide down the Notifications panel, tap the incoming file<br />
notification, and then tap Accept.<br />
9. When a file is transferred, a notification is displayed. To open the<br />
file immediately, slide down the Notifications panel, and then tap<br />
the relevant notification.<br />
When you open a received file, what happens next depends on<br />
the file type:<br />
<br />
Media files and documents are usually opened directly in a<br />
compatible app. For example, if you open a music track, it<br />
starts playing in the Music app.
Bluetooth 4<br />
For a vCalendar file, choose the calendar where you want to<br />
save the event, and then tap Import. The vCalendar is added<br />
to your Calendar events. For information on using Calendar,<br />
see the Calendar chapter.<br />
For a vCard contact file, if there are multiple vCard files on<br />
your storage card, you can choose to import one, several, or<br />
all of those contacts to your contacts list.<br />
Adding the Bluetooth received folder to the Home screen<br />
You can add a folder to the Home screen that shows all files you have<br />
received with Bluetooth.<br />
1.<br />
2.<br />
3.<br />
<br />
<br />
Press HOME , and then tap .<br />
On the Personalize screen, tap Folder > Bluetooth received.<br />
Press and hold the Bluetooth received folder icon, and drag it to<br />
the Home screen position you want.<br />
To view the folder contents, tap the folder icon. To open a file, tap the<br />
file name.
Camera<br />
Camera basics<br />
Whether traveling for business or fun, enjoy taking photos and videos<br />
of your trip and encounters with your phone’s camera.<br />
<br />
<br />
Be sure to plug in your microSD card before you use your phone’s camera.<br />
Photos and videos captured with the camera will be stored onto your<br />
microSD card.<br />
If you have not yet inserted your microSD card to your phone, follow the<br />
steps in “Inserting the storage card” in the Basics chapter to insert it.<br />
To open the camera in photo mode and take photos, tap<br />
from the Home screen, and then tap Camera.<br />
To open the camera directly in video mode so you can<br />
immediately start capturing videos, tap from the Home<br />
screen, and then tap Camcorder.
Camera 45<br />
Viewfinder screen<br />
When you’re in photo mode and you turn your phone left or right, the<br />
camera onscreen controls automatically rotate to how you hold the<br />
phone. You’ll find the following onscreen controls on the Viewfinder<br />
screen:<br />
1<br />
2<br />
1 Auto focus indicator See “Auto focusing”.<br />
Zoom bar See “Zooming”.<br />
Gallery button See the “Photos, videos, and music” chapter.<br />
4 Effects button See “Adding effects”.<br />
5 Shutter release/Record button Tap to take a photo or start capturing video.<br />
6 Flash button See “Taking a photo” and “Recording video”.<br />
7 Mode button Tap to switch between photo and video<br />
modes.<br />
7<br />
6<br />
5<br />
4<br />
3
46 Camera<br />
Using the front camera<br />
It’s easy taking photos and videos of yourself. While on the Viewfinder<br />
screen, tap MENU > Switch Camera.<br />
Some camera features are not available while you’re using the front camera,<br />
such as auto focusing, zooming, and using flash and face detection.<br />
Zooming<br />
Before taking a photo or video, you can first use the onscreen zoom<br />
bar to zoom in or out of your subject.<br />
Simply slide your finger across the zoom bar to zoom in or out.<br />
When you’re recording video, the zoom bar is always shown onscreen.<br />
You can freely zoom in or out while recording.<br />
If you choose 7 0p HD resolution for video recording, there’s no zooming<br />
available.
Taking a photo<br />
1. Press HOME , and then tap > Camera.<br />
2. Before taking the photo, you can zoom in or out first on your<br />
subject. To find out how, see “Zooming”.<br />
3. Tap the Flash button repeatedly to choose a flash mode<br />
depending on your lighting conditions.<br />
Auto flash Flash on Flash off<br />
4. Choose the resolution and other camera settings you want to<br />
use. See “Changing camera settings” for details.<br />
Camera 47<br />
5. You can choose an effect to apply to your photo. See “Adding<br />
effects” for details.<br />
6. Point the camera and focus on your subject. See “Auto focusing”<br />
for details. Then tap to take the photo.<br />
You can also set the camera to automatically take a photo<br />
without the need for you to tap the shutter release button. See<br />
“Auto capturing” for details.<br />
7. Choose what you want to do with the photo you’ve just taken.<br />
See “After capturing“ for details.
48 Camera<br />
Auto focusing<br />
Whenever you point the camera at a different subject or location, it<br />
shows the auto focus indicator at the center of the Viewfinder screen.<br />
Let the camera auto focus on the center of the screen. Or you can tap<br />
another area on the screen that you want to focus on.<br />
Face detection<br />
If you turn Face detection on in the camera settings, the camera will<br />
automatically recognize faces and adjust the focus when you’re taking<br />
photos of people. When you see boxes on people’s faces, tap to<br />
take the photo.
Recording video<br />
1. Press HOME , and then tap > Camcorder.<br />
Camera 49<br />
2. Choose the video quality and other camera settings you want to<br />
use. See “Changing camera settings” for details.<br />
To record video in HD, set video quality to HD 720P. Or for<br />
sharing on the Web, select Online (HD).<br />
3. You can choose an effect to apply to your video. See “Adding<br />
effects” for details.<br />
4. Frame your subject on the Viewfinder screen.<br />
5. Tap to start recording.<br />
6. You can freely zoom in or out while recording video. To find out<br />
how, see “Zooming”.<br />
7. You can change focus to a different subject or area by just<br />
tapping it on the Viewfinder screen.<br />
8. Tap the Flash button to switch the camera light on or off during<br />
recording.<br />
Light on Light off<br />
9. To stop recording, tap again.<br />
10. Choose what you want to do with the video you’ve just recorded.<br />
See “After capturing“ for details.
50 Camera<br />
Camera flash doesn’t turn on?<br />
The camera flash uses much battery power. To save battery power, the<br />
camera disables it (even when it’s set on) when one of the following<br />
occurs:<br />
You have an incoming call<br />
The camera flash will be disabled temporarily when you have an<br />
incoming call. After the call ends, you’ll be able to use it again.<br />
If you have set the flash to Auto flash or Flash on in photo mode or<br />
Light on in video mode, it turns back on after you answer and end the<br />
call.<br />
Your phone’s battery level reaches 15% or lower<br />
Recharge the battery so that the camera can have enough battery<br />
power to use the flash.<br />
Cold weather may lower battery performance which<br />
affects the flash<br />
To make sure the camera has enough battery life to power up the flash,<br />
keep your phone warm. When not in use, put the phone inside your<br />
jacket to keep it warm, and try to avoid sudden temperature changes<br />
that may affect battery performance.
Adding effects<br />
Camera 51<br />
Want to make your photos look more interesting? Easy. Use the<br />
available camera effects to make your photos look like they’ve been<br />
taken through special lenses and filters. You can also add certain<br />
effects to videos.<br />
Choose an effect first before you start taking a photo or video. Just tap<br />
. Then scroll through the available effects and tap one that you like.<br />
When you choose certain photo effects such as depth of field,<br />
distortion, or vignette, drag the bar that appears on the right side of<br />
the screen to adjust the intensity of the effect.<br />
After capturing<br />
After capturing a photo or video, the Review screen will display the<br />
photo or the starting image of the video that you have just captured.<br />
Tap the onscreen buttons to choose what you want to do next.<br />
Camera. Return to the Viewfinder screen.<br />
Delete. Delete the photo or video.<br />
Share. Send the photo or video to another phone or your computer<br />
using Bluetooth, send it by email, or select a social network where you<br />
want to upload it to.<br />
Set as. Choose how you want to use the photo, such as to use it as<br />
your wallpaper.<br />
Play. Watch the video.
5 Camera<br />
Changing camera settings<br />
Open the menu panel to access and change camera settings. To open<br />
it, just press MENU.<br />
Scroll through the menu panel and choose the settings that you want.<br />
Some camera features are not available while you’re using the front camera,<br />
such as auto focusing, zooming, and using flash and face detection.<br />
Switch camera Lets you switch between using your phone’s main<br />
camera or front camera.<br />
Self-timer<br />
(photo mode only)<br />
If you need to take a group photo or your own<br />
photo, you can set a time delay before your camera<br />
automatically takes the photo.<br />
Image adjustments Slide your finger across each of the slider bars to adjust<br />
the exposure, contrast, saturation, and sharpness.<br />
White balance White balance enables the camera to capture colors<br />
more accurately by adjusting to your current lighting<br />
environment. White balance settings include: Auto,<br />
Incandescent, Fluorescent, Daylight, and Cloudy.<br />
Resolution/Video<br />
quality<br />
ISO (photo mode<br />
only)<br />
Choose a photo or video resolution to use.<br />
You can choose an ISO level or set it back to Auto.<br />
Higher ISO numbers are better for taking pictures in<br />
low light conditions.<br />
Review duration Set the time for a captured photo or video to be<br />
displayed on the Review screen before the camera<br />
changes back to the Viewfinder screen.
Widescreen<br />
(photo mode only)<br />
Geo-tag photos<br />
(photo mode only)<br />
Camera 5<br />
When this check box is selected (default), photo<br />
resolutions available for selection are in 5: ratio and<br />
you can use the entire Viewfinder screen to frame your<br />
subject. When not selected, photo resolutions available<br />
for selection are in standard 4: ratio.<br />
Select this check box when you want to store GPS<br />
location in your captured photos.<br />
Auto focus This option enables or disables centered auto focus.<br />
Auto focus is enabled by default.<br />
Face detection<br />
(photo mode only)<br />
This option allows the main camera to automatically<br />
recognize faces and adjust the focus when you take<br />
people photos. Face detection will be turned off if you<br />
disable auto focus.<br />
Shutter sound Select or clear this check box, depending on whether<br />
you want the camera to play a sound when you press<br />
the shutter release or record button.<br />
Grid (photo mode<br />
only)<br />
Mirror mode (front<br />
camera only only)<br />
Record with audio<br />
(video mode only)<br />
Select this check box when you want to display a grid<br />
on the Viewfinder screen so you can easily frame and<br />
center your subject before taking the photo.<br />
When this check box is selected (default), you could<br />
view your self-portrait as in a mirror.<br />
Select or clear the check box, depending on whether<br />
you want to record audio when capturing videos.<br />
Reset to default Change the camera back to default settings.
Photos, videos, and<br />
music<br />
Browsing your Gallery<br />
About the Gallery app<br />
Relive the fun while viewing photos and videos of your latest travels or<br />
your pet’s newest tricks. Get an audience by tagging your Facebook<br />
and Flickr friends. You can even play your media on a TV screen.<br />
To start using Gallery, check first if you have photos or videos copied on<br />
your storage card. To find out how to copy files, see “Copying files to or<br />
from the storage card” in the Getting started chapter.<br />
What’s more, you can edit and add effects to your photos. You can also<br />
easily turn a photo as your contact icon, location icon, or wallpaper.
Selecting an album<br />
Press HOME , and then tap > Gallery.<br />
Photos, videos, and music 55<br />
The Gallery app opens in the Albums screen where your photos and<br />
videos are organized by albums for easy viewing.<br />
The following are preset albums:<br />
<br />
<br />
<br />
<br />
<br />
Camera shots lets you view photos and videos that are stored in<br />
the camera’s folder.<br />
Photos and videos that you set as your favorites will be grouped<br />
under My favorites.<br />
All photos lets you view all photos that are stored in all the<br />
folders on the storage card.<br />
All videos lets you view all videos that are stored in all the folders<br />
on the storage card.<br />
All downloads lets you view photos and videos that you<br />
downloaded.
56 Photos, videos, and music<br />
Folders in your storage card that contain photos and videos will also<br />
be treated as albums and will be listed below the preset albums. The<br />
actual folder names will be used as the album names.<br />
Simply tap an album to view the photos and/or videos in that album.<br />
If there are photos or videos under the root path of your storage card (that<br />
are not contained in folders), they will be grouped under the Other album.<br />
Viewing photos<br />
After you’ve selected an album, you can browse through your photos<br />
and videos. Depending on how you hold your phone, the screen<br />
automatically switches to either grid view or filmstrip view:<br />
<br />
While in grid view, slide your finger up or down to scroll through<br />
the thumbnails. Tap a photo or video to view it in full screen.
Photos, videos, and music 57<br />
While in filmstrip view (when you turn your phone sideways),<br />
slide your finger left or right across the screen to go through<br />
your photos and videos. Tap a photo or video to view it in full<br />
screen.<br />
Zooming in or out on a photo<br />
There are two ways you can zoom in or out of a photo:<br />
<br />
<br />
Tap the screen twice quickly to zoom in, then tap the screen<br />
twice quickly again to zoom out.<br />
You can also use pinch zooming. Press your thumb and index<br />
finger on the screen and then spread your fingers apart to zoom<br />
in. Pinch your fingers together to zoom out.
58 Photos, videos, and music<br />
Viewing videos<br />
Video is always displayed in landscape mode when you play it. Use the<br />
onscreen controls to play, pause, or stop the video. For an enhanced<br />
audio experience, tap to turn on SRS. Tap to toggle between<br />
full and best-fit screens.<br />
<br />
<br />
SRS enhancement is not available when you’re using a Bluetooth stereo<br />
headset.<br />
Another way to easily get to your videos is to tap from the Home<br />
screen, and then tap Videos.<br />
Editing your photos<br />
Do basic editing tasks on your photos such as rotate and crop. You<br />
can also enhance your photos by applying effects such as high<br />
contrast, vintage, and more.<br />
Rotating a photo<br />
1. On the Gallery app’s Albums screen, tap an album.<br />
2.<br />
3.<br />
Press and hold on the photo that you want to rotate.<br />
In the menu that opens, tap Edit, and then tap either Rotate left<br />
or Rotate right.
Cropping a photo<br />
1. On the Gallery app’s Albums screen, tap an album.<br />
2.<br />
3.<br />
Press and hold on the photo that you want to crop.<br />
Photos, videos, and music 59<br />
In the menu that opens, tap Edit, and then tap Crop. You’ll see a<br />
crop box around the photo.<br />
4. To adjust the crop box size, press and hold the edge of the box.<br />
When directional arrows appear, drag your finger inward to or<br />
outward to resize the crop box.<br />
5. To move the crop box to the part of the photo that you want to<br />
crop, drag the crop box to the desired position.<br />
6. Tap Save to keep the changes.<br />
The cropped photo is saved in the storage card as a copy. The<br />
original photo remains unedited.<br />
Adding effects<br />
1. On the Gallery app’s Albums screen, tap an album.<br />
2. Press and hold on the photo that you want to add effects to.<br />
3. In the menu that opens, tap Edit, and then tap Effects. On the<br />
panel that opens, you’ll see options available to you.<br />
4. Tap an effect to apply on the photo.
60 Photos, videos, and music<br />
5. Tap Save to keep the changes.<br />
The enhanced photo is saved in the storage card as a copy. The<br />
original photo remains unedited.<br />
Sending your photos and videos<br />
Send photos and videos via email or MMS. You can also send them to<br />
another phone or your computer using Bluetooth.<br />
Sending photos or videos by email<br />
You can send several photos, videos, or both in an email message.<br />
They are added as file attachments in your email.<br />
1.<br />
2.<br />
Press HOME , and then tap > Gallery.<br />
Tap the album where the photos or videos you want to share are<br />
in.<br />
3. Tap , and then tap Gmail or Mail.<br />
4. Select the photos or videos you want to share and then tap Next.<br />
5. Compose your message and then tap Send.<br />
If you selected Mail and you have multiple email accounts, the default email<br />
account will be used.<br />
Sending a photo or video by MMS<br />
1. Press HOME , and then tap > Gallery.<br />
2.<br />
Tap the album where the photo or video you want to share is in.<br />
3. Tap , and then tap Messages.<br />
4. Tap the photo or video you want to send.<br />
5.<br />
The photo or video is automatically added into the MMS message.
Photos, videos, and music 61<br />
If you want to add more photos to your slideshow attachment,<br />
tap Add slide, and then tap Insert picture. When finished, tap<br />
Done.<br />
6. Compose your message and then tap Send.<br />
Sending photos or videos using Bluetooth<br />
You can select several photos, videos, or both and send them to<br />
someone’s phone or your computer using Bluetooth.<br />
1.<br />
2.<br />
Press HOME , and then tap > Gallery.<br />
Tap the album where the photos or videos you want to share are<br />
in.<br />
3. Tap , and then tap Bluetooth.<br />
4. Select the photos or videos you want to share and then tap Next.<br />
5.<br />
In the next few steps, you’ll be asked to turn on Bluetooth on<br />
your phone and connect to the receiving Bluetooth device so the<br />
files can be sent. Follow the steps in “Sending information using<br />
Bluetooth” in the Bluetooth chapter<br />
Sharing your photos and videos on the Web<br />
Using the Gallery app, you can share photos and videos on your social<br />
networks, as well as post videos on YouTube.<br />
You can also use the Camera or Camcorder app to share a photo or<br />
video right after you’ve captured it. See the Camera chapter.
6 Photos, videos, and music<br />
Sharing photos or videos on Facebook<br />
You need to be logged in to your Facebook account to be able to<br />
upload photos or videos.<br />
1.<br />
2.<br />
Press HOME , and then tap > Gallery.<br />
Tap the album where the photos or videos you want to share are<br />
in.<br />
3. Tap , and then tap Facebook for HTC Sense.<br />
4. Select the photos or videos you want to share and then tap Next.<br />
5.<br />
Enter a different caption on each photo or video.<br />
You can also tag friends on your photos. Tap Tag this photo, and<br />
then tap the part where your friend is. From the list that shows,<br />
select who you want to tag.<br />
6. Slide to the left to go to the next photo or video.<br />
7. Tap Upload.
Photos, videos, and music 6<br />
8. Select which album to upload to and set privacy settings for the<br />
uploaded photos or videos.<br />
9. Tap Done.<br />
Sharing photos or videos on Flickr<br />
You need to be logged in to your Flickr account to be able to upload<br />
photos or videos.<br />
1.<br />
2.<br />
Press HOME , and then tap > Gallery.<br />
Tap the album where the photos or videos you want to share are<br />
in.<br />
3. Tap , and then tap Flickr.<br />
4. Select the photos or videos you want to share and then tap Next.<br />
5.<br />
Enter a different title and description on each photo or video.<br />
You can also tag friends on your photos. Tap Tag this photo, and<br />
then tap the part where your friend is. From the list that shows,<br />
select who you want to tag.<br />
6. Slide to the left to go to the next photo or video.
64 Photos, videos, and music<br />
7. Tap Upload.<br />
8. Select which album to upload to and set privacy settings for the<br />
uploaded photos or videos.<br />
9. Tap Done.<br />
Sharing photos on Picasa<br />
You need to be signed in to a Google Account to be able to upload<br />
photos to the Picasa photo organizing service.<br />
1.<br />
2.<br />
Press HOME , and then tap > Gallery.<br />
Tap the album where the photos you want to share are in.<br />
3. Tap , and then tap Picasa.<br />
4. Select the photos you want to share and then tap Next.<br />
5. Enter a caption for the photos you’re uploading.<br />
6.<br />
7.<br />
Select the online album where you want to upload the photos, or<br />
tap to create a new album.<br />
Tap Upload.<br />
You can view the photos online at http://picasaweb.google.com.<br />
Sharing videos on YouTube<br />
You can share your videos by uploading them to YouTube. Please<br />
sign in to your YouTube or Google Account, if you’re asked to do so.<br />
1.<br />
2.<br />
Press HOME , and then tap > Gallery.<br />
Tap the album where the videos you want to share are in.<br />
3. Tap , and then tap YouTube.<br />
4. Select the videos you want to share and then tap Next.<br />
5. Enter a title for the videos you’re uploading.<br />
6.<br />
Tap More details and enter the prompted information, such as
7.<br />
description and tags, and select a privacy option.<br />
Tap Upload.<br />
Photos, videos, and music 65<br />
Viewing photos in your social networks<br />
Right on the Gallery app, check what you and your friends have<br />
uploaded to your social networks (Facebook and Flickr only).<br />
Viewing photos on Facebook<br />
You need to be logged in to your Facebook account to view Facebook<br />
photos.<br />
1.<br />
2.<br />
3.<br />
Press HOME , and then tap > Gallery.<br />
Tap the Facebook tab.<br />
Tap your account name or your friend’s account on the list to<br />
view the photos in the account.<br />
You can view photos in your online albums the same way as how<br />
you view photos in your storage card.<br />
Viewing photos on Flickr<br />
You need to be logged in to your Flickr account to view Flickr photos.<br />
1. Press HOME , and then tap > Gallery.<br />
2. Tap the Flickr tab.<br />
You may be asked to give authorization for the app to connect to<br />
the Flickr website. If this happens, you need to give authorization<br />
to access your Flickr account.<br />
3. Tap your account name or your friend’s account on the list to<br />
view the photos in the account.<br />
You can view photos in your online albums the same way as how<br />
you view photos in your storage card.
66 Photos, videos, and music<br />
Commenting photos in your social networks<br />
Add comments to your uploaded photos as well as your friends’.<br />
1. Do one of the following:<br />
<br />
<br />
While browsing online albums, press and hold a photo and<br />
then tap Add comment.<br />
While viewing a photo in full screen, tap anywhere on the<br />
screen, and then tap .<br />
2. Tap the box that says “Write a comment”.<br />
3. Enter your text, and then tap Comment.<br />
Listening to music<br />
Enjoy listening to songs and music on your phone using the Music<br />
app.<br />
You need to copy music files to your storage card first to use the Music app<br />
to play music. To find out how to copy files, see “Copying files to or from<br />
the storage card” in the Getting started chapter.<br />
Press HOME , and then tap > Music.<br />
The Music app opens in the Playback screen. Tap the onscreen icons<br />
to control music playback, select a song to play, repeat songs, and<br />
more.
1<br />
4 5 6<br />
1 Turn shuffle on or off.<br />
(Shuffle is off when button is gray.)<br />
Photos, videos, and music 67<br />
Press and drag your finger across the progress bar to jump to any part of<br />
the song.<br />
Go to the Library.<br />
4 Go to the previous song in the Now playing list.<br />
5 Play, pause, or resume playing the song.<br />
6 Go to the next song in the Now playing list.<br />
7 Switch between showing the Now playing list and Playback screen. You<br />
can rearrange songs in the Now playing list.<br />
8 Enjoy listening to music with SRS. Or, if you’re using a wired headset, you<br />
can also choose from various preset equalizer settings. (SRS and equalizer<br />
are not available when you’re using a Bluetooth stereo headset.)<br />
9 Cycle through the repeat modes: Repeat all songs, Repeat current song,<br />
and Don’t repeat.<br />
9<br />
8<br />
7
68 Photos, videos, and music<br />
When you’re listening to music and the screen turns off, press POWER<br />
to turn the screen back on and control the music playback directly on<br />
the Lock screen.<br />
If you don’t see the playback controls on the Lock screen, tap<br />
anywhere on the screen to display them.<br />
You can also pause music playback right from the Notifications panel.<br />
To find out how to open the Notifications panel, see the Getting<br />
started chapter.<br />
Flipping through your albums<br />
Swipe your finger left or right across the screen to go to the next or<br />
previous music album.<br />
When you turn your phone sideways to the left, you get a wider view<br />
of your screen and can skim through your albums with more ease.
Photos, videos, and music 69<br />
If you have lots of albums, flick left or right across the screen to<br />
quickly skim through them.<br />
To look at one album at a time, slide your finger left or right.<br />
Tap to see the song list of the current album.<br />
Browsing music in the Library<br />
Tap on the Music app’s Playback screen or Now playing list to go<br />
to the Library.<br />
In the Library, your music is organized by categories such as Artists<br />
and Albums. Choose a category by tapping one of the tabs at the<br />
bottom of the screen.<br />
When you tap a song in a category to play it, the Now playing list is<br />
updated with the song list from your selected category.<br />
You can add, remove, or rearrange the tabs in the Library. To find out how,<br />
see “Rearranging or hiding application tabs” in the Personalizing chapter.
70 Photos, videos, and music<br />
Creating a playlist<br />
Personalize your music experience by creating music playlists. Make<br />
a playlist containing just your favorite songs or create one to match<br />
your mood for the day. You can make as many playlists as you like.<br />
1.<br />
2.<br />
3.<br />
Press HOME , and then tap > Music.<br />
Tap to go to the Library.<br />
In the Library, tap or slide your finger on the bottom row to go to<br />
the Playlists category.<br />
4. Tap Add playlist.<br />
5. Enter a playlist name, and then tap Add songs to playlist.<br />
6.<br />
7.<br />
Choose a category. If you go to the Songs category, you can see<br />
a complete list of songs on your storage card.<br />
Select the check boxes of songs you want to add to the playlist<br />
and then tap Add.<br />
8. Tap Save.<br />
Playing the songs in a playlist<br />
1. In the Library, tap or slide your finger on the bottom row to go to<br />
the Playlists category.<br />
2.<br />
Tap a playlist to open it.<br />
3. Tap the first song or any song in the playlist.<br />
When you tap a song in the list to play it, the Now playing list is<br />
updated with the songs from your playlist.<br />
Managing playlists<br />
After creating a playlist, you can add more songs to it, rearrange their<br />
order, and more.<br />
1.<br />
In the Library, tap or slide your finger on the bottom row to go to
2.<br />
the Playlists category.<br />
Tap a playlist to open it.<br />
3. Press MENU, and then choose what you want to do:<br />
Add more<br />
songs to a<br />
playlist<br />
Rearrange<br />
songs<br />
Delete songs<br />
from a playlist<br />
Change playlist<br />
name<br />
1.<br />
1.<br />
1.<br />
.<br />
.<br />
.<br />
.<br />
.<br />
Tap Add songs.<br />
Photos, videos, and music 71<br />
Go to the Songs category or any other category.<br />
Select the songs you want to add to the playlist<br />
and then tap Add.<br />
Tap Change order.<br />
Press and hold at the end of the song title<br />
you want to move. When the row is highlighted,<br />
drag it to its new position, then release.<br />
Tap Done.<br />
Tap Remove songs.<br />
Select the songs you want to delete and then tap<br />
Remove.<br />
Tap Rename playlist.<br />
Deleting playlists<br />
1. In the Library, tap or slide your finger on the bottom row to go to<br />
the Playlists category.<br />
2.<br />
Press MENU and then tap Delete playlists.<br />
3.<br />
Select the playlists to delete and then tap Delete.<br />
Setting a song as ringtone<br />
You can choose a song from the Music app’s Library and set it as your<br />
phone’s ringtone or a ringtone for a certain contact.
7 Photos, videos, and music<br />
1.<br />
2.<br />
3.<br />
4.<br />
5.<br />
6.<br />
Press HOME , and then tap > Music.<br />
Tap to go to the Library.<br />
In the Library, choose the song that you want to use as ringtone<br />
and then play it back.<br />
On the Playback screen, press MENU and then tap More > Set as<br />
ringtone.<br />
If you chose an MP song, you can trim it first and set the<br />
part that you trimmed as the ringtone. See “Trimming an MP<br />
ringtone”.<br />
In the Set as ringtone options menu, tap Phone ringtone or<br />
Contact ringtone.<br />
If you select Contact ringtone, you need to choose the contacts<br />
you want to associate the song with in the next screen.
Photos, videos, and music 7<br />
Trimming an MP3 ringtone<br />
The Music app has a built-in ringtone trimmer. You can trim an MP<br />
song and set a part of it as your ringtone.<br />
1. On the Playback screen, press MENU, and then tap More > Set as<br />
ringtone > Trim the ringtone.<br />
2. Use the onscreen controls to trim your ringtone.<br />
1 Trim sliders<br />
Left button<br />
1<br />
Right button<br />
4 Play/Pause button<br />
5 Markers. (These show where the ringtone starts and ends.)<br />
5<br />
4
74 Photos, videos, and music<br />
To trim, you can:<br />
First drag the two trim sliders approximately to the part where<br />
you want the ringtone to begin and end.<br />
Then tap the right and left arrow buttons to more precisely set<br />
the start and end points of the ringtone.<br />
3. After you’ve finished trimming, tap Set as. Then choose whether<br />
to set the trimmed song as your Phone ringtone or Contact<br />
ringtone.<br />
Checking if the song was added as a ringtone<br />
1. Press HOME > MENU, and then tap Settings.<br />
2.<br />
On the Settings screen, tap Sound > Phone ringtone. The song<br />
should be in the ringtone list and selected.<br />
Sharing music using Bluetooth<br />
You can choose a song from the Music app’s Library and send it to<br />
someone’s phone or your computer using Bluetooth.<br />
1.<br />
2.<br />
<br />
<br />
Press HOME , and then tap > Music.<br />
Tap to go to the Library.<br />
3. In the Library, tap the song that you want to share.<br />
4.<br />
5.<br />
On the Playback screen, press MENU and then tap Share ><br />
Bluetooth.<br />
In the next few steps, you’ll be asked to turn on Bluetooth on<br />
your phone and connect to the receiving Bluetooth device so<br />
the music can be sent. Follow the steps in “Sending information<br />
using Bluetooth” in the Bluetooth chapter.
Photos, videos, and music 75<br />
Finding music videos in YouTube<br />
You can find music videos of the song you’re listening to in YouTube.<br />
It’s simple. On the Playback screen, just press MENU and then tap Find<br />
videos.<br />
About the Music widget<br />
You can use the Music widget to play music right from your Home<br />
screen. To find out how you can add this widget to your Home<br />
screen, see “Personalizing your Home screen with widgets” in the<br />
Personalizing chapter.<br />
Sharing media on your home network<br />
Sharing photos, videos, and music with a bigger circle of friends<br />
is easy on your home network. Simply connect your phone to the<br />
network and instantly show your captured photos and videos on a big<br />
TV, or start streaming your favorite music tracks on hi-fi speakers — all<br />
via DLNA®. For more information about DLNA, visit www.dlna.org.<br />
Before you share media through the network:<br />
<br />
<br />
Connect your phone to the network via Wi-Fi. To find out how to<br />
connect to a Wi-Fi network, see the Internet chapter.<br />
Connect the TV or speakers to the network. Check the<br />
documentation that came with your TV or speakers to know how.
76 Photos, videos, and music<br />
1. Open the Gallery or Music app.<br />
2. Locate the media that you want to share, and then tap it.<br />
3. While viewing the photo or playing the video or music, press<br />
MENU, and then tap Select player.<br />
4. Choose the device on your network where you want to play the<br />
media.<br />
5. Once connected to the other device, your phone opens up the<br />
Controller screen where you can tap:<br />
Controls To<br />
Play the media on the other device.<br />
Pause the music or video playback.<br />
Play the previous photo or music track.<br />
Play the next photo or music track.<br />
Shuffle your music playlist.
Controls To<br />
/<br />
Photos, videos, and music 77<br />
Select a repeat mode for photos or music tracks.<br />
Show available media that you can share.<br />
View the media information such as the file name, title,<br />
and duration.<br />
Connect to another photo/video player on the network.<br />
Connect to another music player on the network.<br />
Adjust the volume of the video or music you’re playing on<br />
the other device. You can also drag the volume slider to<br />
adjust the volume.<br />
While playing a media on another device, you can press BACK and do<br />
other things on your phone. To return to the Controller screen, slide open<br />
the Notifications panel, and then tap the device you’re connected to.<br />
6. To stop sharing your media, tap to disconnect your phone<br />
from the other device.<br />
Until you disconnect the phone from the other device, other media that you<br />
open from the Gallery or Music app are shared on the other device.
Maps and location<br />
Turning on location services<br />
In order to find your location on your phone, you need to enable<br />
location sources.<br />
1.<br />
2.<br />
Press HOME > MENU, and then tap Settings > Location.<br />
Under Location ON Settings, tap the location services you want<br />
to use.<br />
Using Google Maps<br />
About Google Maps<br />
Google Maps lets you track your current location, view real-time traffic<br />
situations, and receive detailed directions to your destination. It also<br />
provides a search tool where you can locate places of interest or an<br />
address on a map, or view locations at street level.<br />
<br />
<br />
<br />
You need an active mobile data or Wi-Fi connection to use Google Maps.<br />
To find your location with Google Maps, you need to enable location<br />
sources. To learn how, see “Turning on location services” in this chapter.<br />
The Google Maps application does not cover every country or city.
Maps and location 79<br />
Getting around maps<br />
When you open Google Maps, you can easily find your location on the<br />
map or check out nearby places by panning and zooming in and out<br />
on the map.<br />
To find your location with Google Maps, you need to enable location<br />
sources. See “Turning on location services” in this chapter to learn<br />
how.<br />
1.<br />
2.<br />
Press HOME , and then tap > Maps.<br />
Tap to show your current location. The blue marker shows<br />
your location on the map.<br />
3.<br />
Do any of the following on the map:<br />
Move around Swipe your finger to any direction on the screen to<br />
view nearby places on the map.<br />
Zoom in Place your thumb and index fingers on top of the<br />
<br />
<br />
area that you want to zoom in, and then spread<br />
your fingers across the map.<br />
Tap .<br />
Double-tap the area on the map that you want to<br />
zoom in.<br />
Zoom out Pinch your thumb and index finger on the map to<br />
zoom out.<br />
Tap .<br />
View<br />
information<br />
for a random<br />
location<br />
1. Press and hold a location on the map. A balloon<br />
opens over the location, with the address and a<br />
thumbnail from street view (if available).<br />
. Tap the balloon to see more information.<br />
You can get directions to the location, check for<br />
nearby places of interest, and more.
80 Maps and location<br />
Searching for a location<br />
In Google Maps, you can search for a location, such as an address or a<br />
type of business or establishment (for example, museums).<br />
1.<br />
2.<br />
3.<br />
Press HOME , and then tap > Maps.<br />
Enter the place you want to search in the search box.<br />
As you enter the location to look for, suggested matches from<br />
your contacts, the web, and previously searched items are<br />
displayed.<br />
Tap to search for the location you entered or tap a suggested<br />
search item.<br />
The search results are displayed as markers on the map.<br />
4. Do any of the following:<br />
<br />
<br />
If the first search result ( ) is what you’re looking for, tap<br />
the balloon. Otherwise, tap to go to the next search result<br />
until you find the location you’re searching for, and then tap its<br />
balloon.<br />
Tap to show the search results as a list, and then tap the<br />
location.<br />
Details about the selected location displays on the screen.
6. Do any of the following:<br />
<br />
<br />
Maps and location 81<br />
Tap the onscreen buttons to view the location on a map, get<br />
directions, view the location in Street View, if available, and<br />
more. Scroll down the screen to view more options.<br />
Swipe left or right across the screen to view the information<br />
for the next or previous search result.<br />
Clearing the map<br />
After you’ve search on a map, you can clear away the various markers<br />
drawn on it by pressing MENU, and then tapping More > Clear Map.
8 Maps and location<br />
Searching for a place of interest near you<br />
Use Places to find places of interest near your current location. Places<br />
uses Google Maps to search common places that you would want to<br />
find, such as the nearest gas station or ATM kiosk.<br />
Before you use Places, you need to enable location sources. See<br />
“Turning on location services” in this chapter to learn how.<br />
1.<br />
2.<br />
Press HOME , and then tap > Places.<br />
Tap the place you want to search.<br />
3. Do any of the following:<br />
When one or two places of interest are found, the search<br />
results are displayed as markers on the map. You can tap the<br />
marker, and then tap the balloon to view more information<br />
about the place.<br />
When several places are found, the search results display in a<br />
list. Tap a place to show its location on a map, and then tap its<br />
balloon to view more information about the place.<br />
See “Searching for a location” in this chapter to learn what you<br />
can do on the location information screen.<br />
Adding a place to search<br />
In Places, you can add other places of interest that you frequently<br />
search for, such as a church or a pizza restaurant.<br />
1.<br />
2.<br />
3.<br />
<br />
<br />
Press HOME , and then tap > Places.<br />
Tap Add.<br />
Enter the place you want to add to Places’ search items, and then<br />
tap Add. The place is added as a button on the Places’ screen.
Maps and location 8<br />
Getting directions<br />
Get detailed directions to your destination. Google Maps can provide<br />
directions for travel by foot, public transportation, or car.<br />
1.<br />
2.<br />
3.<br />
Press HOME , and then tap > Maps.<br />
While viewing a map, press MENU, and then tap Directions.<br />
Use your current location as the starting point, or enter a<br />
location from where to start in the first text box. Then enter your<br />
destination in the second text box.<br />
Or tap to select an address from your contacts, starred<br />
places, or a point that you tap on a map.<br />
4. Choose how you want to get to your destination by tapping the<br />
car, public transit, or walk button.<br />
5. Tap Go.<br />
6. If the place you’ve set as your destination has several locations<br />
available, choose which one to go to.<br />
The next screen displays the directions to your destination in a list.<br />
7. Tap an item to view the directions on the map.<br />
8. Tap the arrow buttons on the map to follow the directions.<br />
When you’re finished viewing or following the directions, press MENU<br />
and then tap More > Clear Map to reset the map. Your destination is<br />
automatically saved in the Google Maps history.
84 Maps and location<br />
Finding your friends with Google Latitude (available by<br />
country)<br />
Google Latitude user location service lets you and your friends share<br />
locations and status messages with each other. It also lets you send<br />
text and email messages, make phone calls, and get directions to your<br />
friends’ locations.<br />
Your location is not shared automatically. You must join Latitude,<br />
and then invite your friends to view your location or accept their<br />
invitations. Only friends that you have explicitly invited or accepted<br />
can see your location.<br />
To learn more about Latitude, visit Google Latitude on the web:<br />
http://www.google.com/mobile/latitude/<br />
Opening and joining Latitude<br />
1. Press HOME , and then tap > Maps.<br />
2.<br />
3.<br />
<br />
<br />
While viewing a map, press MENU and then tap Join Latitude.<br />
After you’ve joined Latitude and closed the application, you can<br />
do any of the following to open it from the Home screen:<br />
Tap > Latitude.<br />
Tap > Maps, press MENU, and then tap Latitude.
Using HTC Footprints<br />
Maps and location 85<br />
HTC Footprints provides an easy way to record favorite places and<br />
revisit those places. A footprint consists of a photo of a location such<br />
as a restaurant, a sightseeing destination, etc., stored together with a<br />
precise GPS position and other information about that location such<br />
as the street address and phone number.<br />
The next time you want to visit the same place, simply access the<br />
footprint. You can then dial the phone number or view the location in<br />
the map.<br />
Adding a location as a footprint<br />
1. Press HOME , and then tap > Footprints.<br />
2.<br />
Tap Save to Footprints.<br />
3. You can:<br />
<br />
<br />
Tap to take a picture and add it as a photo for the footprint.<br />
Tap to fine tune the position of the footprint on the map.<br />
4. Tap Done.<br />
Before pressing Done, tap the photo to change the name, category, or<br />
address of the footprint, enter the phone and website, and add a voice<br />
memo to the footprint.
86 Maps and location<br />
Revisiting a footprint<br />
1. While on Footprints, tap a category.<br />
2. Tap the footprint you want to revisit.<br />
3. Tap the information fields to get directions, share the footprint,<br />
call a stored phone number, and more.<br />
Editing or deleting a footprint<br />
1. While on Footprints, tap a category.<br />
2. Press and hold the footprint you want to edit or delete.<br />
3. Tap Edit or Delete on the options menu.<br />
Sharing your footprints<br />
1. Create a footprint. See “Adding a location as a footprint” earlier in<br />
this chapter to find out how.<br />
2. Tap the footprint that you have just created.<br />
3. Tap Share, and then choose how you want to share the footprint.<br />
Deleting multiple footprints<br />
1. While on Footprints, tap a category.<br />
2. Press MENU, and then tap Delete.<br />
3. Select the footprints you want to delete, and then tap Delete.<br />
Exporting your footprints<br />
Back up footprints by exporting them to the storage card. You can<br />
also open exported footprints files in other applications such as<br />
Google Earth on your PC. To transfer files from your storage card to<br />
your computer, see “Copying files to or from the storage card” in the<br />
Getting started chapter.
1. While on Footprints, tap a category.<br />
2. Press MENU, and then tap Export.<br />
Maps and location 87<br />
3. Select the footprints you want to export, and then tap Export.<br />
Press MENU and then tap Unmark all to deselect all the footprints.<br />
Exported footprints are saved as .kmz files in the Footprints folder on<br />
your storage card. If you exported multiple footprints at one time, they<br />
are saved together in one .kmz file.<br />
Importing footprints<br />
Bring back footprints you previously backed up to the storage card<br />
to your phone. You can also import .kmz files that you saved in other<br />
applications, or use a photo as a footprint.<br />
1. While on Footprints, press MENU, and then tap Import.<br />
2. Do one of the following:<br />
<br />
<br />
To import a saved footprint or another .kmz file from the<br />
storage card, tap Footprints data, and then tap the file you<br />
want to import. If a footprint on your phone is the same as the<br />
one you want to import, you’re asked whether you want to<br />
overwrite it.<br />
To import a photo, tap Photos, navigate to the photo you<br />
want to import, and then tap the photo. You can then add<br />
Footprints information such as location and category.
88 Maps and location<br />
Using Car Panel<br />
Easily access footprints and other points of interest with Car Panel,<br />
and then start navigation to show you how to get there.<br />
Press HOME , and then tap > Car Panel.<br />
1<br />
6<br />
5<br />
4<br />
1 Select a footprint to set as a destination.<br />
Use voice search to look for a destination.<br />
Search for a destination to go to. Check<br />
the places you’ve searched before, and<br />
then choose one to set as your destination.<br />
4 Make a phone call.<br />
5 View your current location on a map.<br />
6 Get detailed driving text instructions on<br />
how to get to your destination.
Using VZ Navigator<br />
Maps and location 89<br />
VZ Navigator® tells you where you are and what’s nearby using Bing<br />
search. Transform your phone into a powerful navigation device so<br />
you can discover destinations around town or around the globe.<br />
Press HOME , and then tap > VZ Navigator.<br />
For more information about VZ Navigator, visit:<br />
http://www.verizonwireless.com/vznavigator
More apps<br />
Watching videos on YouTube<br />
Use the YouTube app to check out what’s popular on the online videosharing<br />
website.<br />
1.<br />
2.<br />
<br />
<br />
You need an active Wi-Fi or data connection to access YouTube.<br />
The first time you use certain YouTube functions such as video sharing,<br />
sign in using your YouTube or Google Account, if you’re asked to do so.<br />
Press HOME , and then tap > YouTube.<br />
Scroll through the list of videos, and then tap a video to watch it.<br />
3. While watching a video, you can:<br />
<br />
<br />
<br />
<br />
Turn your phone sideways or double-tap the screen to watch<br />
the video in full screen.<br />
Tap the video screen to pause, resume playback, or drag the<br />
slider to jump to a different part of the video.<br />
Tap a tab to learn more about the video, see related videos,<br />
or check out what other viewers think. You can also slide your<br />
finger across the tabs to see if there are more tabs available.<br />
Tap the thumbs-up or thumbs-down icon to add your video<br />
rating. Tap More to see other options.<br />
4. Press MENU, and then tap Home to return to the YouTube main<br />
screen.
Searching for videos<br />
1. On the YouTube main screen, press SEARCH .<br />
2.<br />
Enter a search keyword, and then tap .<br />
3. Scroll through the results and tap a video to watch it.<br />
More apps 91<br />
You also have the option to show results that were just recently posted.<br />
Tap All time, and then select a time period you want.<br />
Clearing the search history<br />
1. On the YouTube main screen, press MENU, and then tap Settings.<br />
2.<br />
Tap Clear search history, and then tap OK when prompted.<br />
Sharing a video link<br />
Share a video by sending its link to your contacts.<br />
1.<br />
2.<br />
On the video’s watch screen, tap More > Share.<br />
Choose how you want to share the video link from the available<br />
options.<br />
Capturing a video and sharing it on YouTube<br />
1. Press HOME , and then tap > YouTube.<br />
2.<br />
Tap .<br />
3. Press to start capturing video. When you are done capturing,<br />
press again. Tap Done.<br />
4. Enter a title, description, and tags for your video.<br />
5. Set the privacy level.<br />
6.<br />
Tap Upload.
9 More apps<br />
Reading news feeds<br />
Don’t get left behind with yesterday’s stories. Use the News app to<br />
subscribe to news feeds that cover breaking news, sports, top blogs,<br />
and more. You can also get updates based on specific keywords you<br />
want.<br />
Press HOME , and then tap > News.<br />
1 2<br />
1 Subscriptions tab. Tap to list the channels you’ve subscribed to. To find<br />
out how to subscribe, see “Subscribing to news channels”.<br />
My Items tab. Tap to show links to your starred items and added<br />
keywords. See “Starring a story” and “Adding a keyword”.
Subscribing to news channels<br />
1. Press HOME , and then tap > News.<br />
2.<br />
On the Subscriptions tab, tap Add feeds.<br />
3. Do one of the following:<br />
Tap To<br />
Any category<br />
(such as Blogs, Entertainment,<br />
Sports, and more)<br />
Choose from popular news feeds.<br />
More apps 9<br />
Search more Enter a keyword to search the Web for<br />
related news feeds or enter the complete<br />
URL of a news feed to subscribe to.<br />
4. After selecting the channel or channels to subscribe to, tap Add.<br />
Reading a story<br />
1. Press HOME , and then tap > News.<br />
2.<br />
On the Subscriptions tab, tap a channel.<br />
3.<br />
Tap a story to read it. While reading the story, you can:<br />
Tap To<br />
Star the story as a favorite.<br />
Share a link to the story from the available options.<br />
Go to the web page where the story is published.<br />
Go to the next or previous story in the channel.
94 More apps<br />
4. If you want to read the whole story, tap Read full article. This<br />
opens the story in the web browser. See “Using your phone’s web<br />
browser” in the Web browser chapter to learn how to navigate<br />
the web page.<br />
Manually checking for new stories<br />
On the Subscriptions tab, press MENU, and then tap Refresh.<br />
Starring a story<br />
Star your favorite stories to read them again later. Starred stories are<br />
displayed on the Starred tab. Do one of the following:<br />
On a list of stories, tap next to a story.<br />
While reading a story, tap near the top-right corner of the<br />
screen.<br />
You can remove the star from a story by tapping the star icon again.<br />
Adding a keyword<br />
Easily find stories that interest you by entering a search keyword. Stories<br />
that contain the keyword are grouped together on the Keywords tab.<br />
1.<br />
2.<br />
<br />
<br />
Press HOME , and then tap > News.<br />
On the My items tab, tap Keywords > Add keywords.<br />
3.<br />
Enter the keyword, and then tap Add.<br />
Your new keyword is displayed on the Keywords tab. Tap the<br />
keyword to show the stories that contain that keyword.
More apps 95<br />
Changing update schedule and content settings<br />
In the News app, press MENU, tap Settings, and then do the following:<br />
Tap To<br />
Accounts & sync Manage sync options and general News settings.<br />
Update when<br />
opened<br />
Update the content of the channels you’ve subscribed to<br />
every time you open the News app.<br />
Update schedule Choose a time interval when the channels you’ve<br />
subscribed to are updated. Select Manual to refresh the<br />
content only when you like.<br />
News content Choose how to read news stories by default: whether as a<br />
summary or as a full web page article.<br />
Mobile view If you’ve selected to view the news content as a web page<br />
article, choose whether to show the web page article in<br />
mobile or full version.<br />
Adding the News widget<br />
Read snippets of stories that you have subscribed to right on the<br />
Home screen. To find out how to add this widget to your Home<br />
screen, see “Personalizing your Home screen with widgets” in the<br />
Personalizing chapter.
96 More apps<br />
Working on documents, spreadsheets, and<br />
presentations<br />
Need to tweak a report while you’re on the go? Use Quickoffice to<br />
easily view, edit, or even create Microsoft Office Word (.doc) and<br />
Microsoft Office Excel (.xls) files. You can also use it to view Microsoft<br />
PowerPoint (.ppt) presentations and text (.txt) files on your phone.<br />
Press HOME , and then tap > Quickoffice.<br />
If you have a long file list, press MENU and then tap Sort to arrange<br />
your files by name or date. Press SEARCH to look for specific filenames.<br />
Viewing a document, spreadsheet, or presentation<br />
1. On the Quickoffice main screen, tap the file you want to open.<br />
2. While viewing a file, you can:<br />
<br />
<br />
<br />
Slide your finger on the screen to pan or go through the pages<br />
of the file.<br />
Turn your phone left sideways to view the file in landscape mode.<br />
To zoom in, spread your thumb and index finger across the<br />
screen. To zoom out, pinch your thumb and index finger on<br />
the screen.<br />
After you zoomed in on a PowerPoint slide, double-tap the slide to make it<br />
fit with the screen’s width.<br />
<br />
<br />
Press MENU and then tap Worksheet to view other<br />
worksheets in an Excel file.<br />
Tap a URL link in a Word or PowerPoint file to open the web<br />
page in the web browser.
More apps 97<br />
When you open Word documents, Quickoffice reformats the<br />
text to make it fit the screen’s width. Press MENU, and then<br />
tap View to switch between normal and reformatted modes.<br />
Quickoffice does not reflow text in tables.<br />
Editing a document or worksheet<br />
1. While viewing a document or worksheet, press MENU, and then<br />
tap Edit.<br />
2. Make your changes on the file.<br />
3. When done, press MENU > More, and then tap Save or Save as to<br />
keep your changes.<br />
Creating a new document or worksheet<br />
1. On the Quickoffice main screen, press MENU, and then tap New.<br />
2. Choose a file type to create:<br />
<br />
<br />
Word 97 - 00 document<br />
Excel 97 - 00 workbook<br />
3. Start entering text.<br />
4. When done, press MENU > More, and then tap Save as to keep<br />
your changes.
98 More apps<br />
Keeping track of your stocks<br />
Use the Stocks app to get the latest stock updates for stock quotes<br />
and market indices you follow.<br />
Press HOME , and then tap > Stocks.<br />
1<br />
1 Tap an item to view from the list of stock quotes and market indices.<br />
Tap to update the stock information.<br />
Tap to add a stock quote or stock market index.<br />
4 Slide to other tabs to view up to two years of an item’s past trade<br />
information.<br />
5 Tap to view related news for a selected item.<br />
6 View an item’s trade information, and as well as its price chart for a<br />
specific period.<br />
6<br />
5<br />
4
Adding a stock quote or stock market index<br />
1. On the Stocks main screen, tap .<br />
More apps 99<br />
2. Enter the stock quote or stock market index on the text field, and<br />
then tap .<br />
3. On the results list, tap the stock quote or stock market index you<br />
want to add.<br />
Changing the stock list order<br />
1. On the Stocks main screen, press MENU, and then tap Rearrange.<br />
2.<br />
Press and hold at the end of the item you want to move.<br />
When the row is highlighted in green, drag it to its new position,<br />
and then release.<br />
3. Tap Done.<br />
Deleting stock quotes and indices<br />
1. On the Stocks main screen, press MENU, and then tap Delete.<br />
2.<br />
Select the items you want to delete, and then tap Delete.<br />
Manually updating stock information<br />
On the Stocks main screen, press MENU, and then tap Update.<br />
Changing update schedule and color settings<br />
Downloading stock information automatically may incur additional fees<br />
from Verizon Wireless.
00 More apps<br />
In the Stocks app, press MENU, tap Settings, and then do the<br />
following:<br />
Tap To<br />
Update when opened Update the stock information every time you open<br />
the Stocks app.<br />
Scheduled sync Set automatic downloads of stock information.<br />
Update schedule Choose a time interval for checking updates.<br />
Set color for price raise Change the color for displaying stock price<br />
increases to either red or green, depending on<br />
what’s being used in your country.<br />
About the Stocks widget<br />
Use the Stocks widget to instantly check stock updates right on your<br />
Home screen. It comes in different looks and styles. To find out how to<br />
add this widget to your Home screen, see “Personalizing your Home<br />
screen with widgets” in the Personalizing chapter.
Listening to FM Radio<br />
More apps 01<br />
Tune in and listen to chart-topping pop songs using your phone’s FM<br />
Radio app.<br />
You need to connect a headset first to the audio jack of your phone to use<br />
FM Radio. FM Radio uses the stereo headset as the FM radio antenna.<br />
Press HOME , and then tap > FM Radio.<br />
The first time you open FM Radio, it automatically scans for available<br />
FM stations, saves them as presets, and plays the first FM station found.<br />
1<br />
4 5<br />
1 Drag to tune in to a frequency on the FM band.<br />
Tap to fine tune the radio frequency by -0.1 MHz.<br />
8<br />
7<br />
6
0 More apps<br />
View the All presets list.<br />
4 Tap to search the FM band for the previous FM station”.<br />
5 Tap to search the FM band for the next FM station.<br />
6 Tap to change the name of the current station you are tuned into.<br />
7 Tap to fine tune the radio frequency by +0.1 MHz.<br />
8 Switch off and close FM Radio.<br />
Tuning in to an FM station<br />
There are several things you can do while you’re on the FM Radio screen:<br />
<br />
<br />
<br />
<br />
<br />
Tap and then select a station you want to listen to.<br />
Tap to go to the previous available FM station, or to<br />
go to the next available FM station.<br />
Press the VOLUME UP and VOLUME DOWN buttons on the<br />
side of the phone to adjust the volume.<br />
To repeat scanning and saving of FM stations, press MENU,<br />
and then tap Scan & Save. Press BACK to stop the autoscan.<br />
Press MENU to mute the sound or to change the sound output<br />
to Mono or Stereo.<br />
You can also switch the sound output between the Speaker<br />
and Headset.
Closing or turning off FM Radio<br />
To close the FM Radio screen:<br />
More apps 0<br />
Press BACK . FM Radio continues to run in the background,<br />
and you can still listen to the radio while using other apps on<br />
your phone.<br />
To go back to the FM Radio screen, slide open the<br />
Notifications panel, and then tap FM Radio.<br />
To turn off completely and close FM Radio:<br />
Tap on the upper-right corner of the FM Radio screen.<br />
Adding the FM Radio widget<br />
Use the FM Radio widget to listen to your favorite FM stations right on<br />
your Home screen. To find out how to add this widget to your Home<br />
screen, see “Personalizing your Home screen with widgets” in the<br />
Personalizing chapter.<br />
Recording your voice<br />
Don’t just think out loud. Use Voice Recorder to quickly capture your<br />
thoughts. You can also record your voice and set it as a ringtone.<br />
1.<br />
2.<br />
<br />
<br />
You need to have a microSD card on your phone to use Voice Recorder.<br />
Press HOME , and then tap > Voice Recorder.<br />
Hold the phone’s microphone near your mouth.<br />
3.<br />
Tap to start recording a voice clip.
04 More apps<br />
Voice Recorder can run on the background while you do other things<br />
on your phone, except when you open other apps that also use audio<br />
functions. To go back to the Voice Recorder screen, slide open the<br />
Notifications panel, and then tap Voice Recorder.<br />
4. Tap to stop recording.<br />
5. Type a name for the voice clip and tap Save.<br />
6. To play back the voice clip, tap .<br />
7. To show options for sharing, deleting, or renaming the voice clip,<br />
press MENU.<br />
Sharing a voice clip<br />
1. On the Voice Recorder screen, tap .<br />
2.<br />
3.<br />
Press and hold the voice clip you want to share, and then tap<br />
Share.<br />
From the available options, choose how you want to share the<br />
voice clip.<br />
Setting a voice clip as a ringtone<br />
1. On the Voice Recorder screen, tap .<br />
2.<br />
Press and hold the voice clip you want to set as a ringtone, and<br />
then tap Set as ringtone.<br />
Renaming a voice clip<br />
1. On the Voice Recorder screen, tap .<br />
2.<br />
Press and hold the voice clip you want to rename, and then tap<br />
Rename.<br />
3.<br />
Enter the name, and then tap Save.
Using Flashlight<br />
More apps 05<br />
Never get caught in the dark again. Use the Flashlight app to turn on<br />
your phone’s LED flashlight to shine a light wherever you need it.<br />
Press HOME , and then tap > Flashlight.<br />
<br />
<br />
<br />
To adjust the brightness of the light, simply tap the onscreen<br />
power button on the flashlight handle.<br />
To switch flashlight modes, press MENU and then select Auto<br />
flash, SOS, or Manual.<br />
To close the flashlight, press BACK .
06 More apps<br />
Finding and installing apps from Android Market<br />
Android Market is the place to go to find new apps for your phone.<br />
Choose from a wide variety of free and paid apps ranging from<br />
productivity apps, entertainment, to games. When you find an app<br />
you want, you can easily download and install it on your phone with<br />
just a few taps of your finger.<br />
To access Android Market, you must first connect to the Internet using<br />
your phone’s Wi-Fi or data connection and sign in to your Google<br />
Account.<br />
Paid apps are currently only available in certain countries.<br />
Finding and installing an app<br />
When you install apps from Android Market and use them on your<br />
phone, they may require access to your personal information (such as<br />
your location, contact data, and more) or access to certain functions or<br />
settings of your phone. Download and install only apps that you trust.<br />
<br />
<br />
You need a Google Checkout account to purchase items on Android<br />
Market. See “Creating a Google Checkout account” to set up a Google<br />
Checkout account if you do not have one.<br />
Be cautious when downloading apps that have access to your phone’s<br />
functions or a significant amount of your data. You’re responsible for the<br />
results of using downloaded apps on your phone.<br />
1. Press HOME , and then tap > Market.<br />
When you open Android Market for the first time, the Terms of<br />
Service window will appear. Tap Accept to continue.
2. Do any of the following to find an app:<br />
To Do this<br />
Browse featured apps Scroll through the list of featured apps.<br />
Browse apps by<br />
categories<br />
More apps 07<br />
Tap Apps or Games, and then tap a category.<br />
Under a category, you can filter the apps by<br />
Top paid, Top free or Just in.<br />
Search for an app Tap on the Android Market home screen,<br />
enter the name or type of app you’re looking for,<br />
and then tap to the right of the search box.<br />
3. When you find the app that you like, tap it and read its<br />
description and user comments.<br />
4. To download or purchase the app, tap Free (for free apps) or the<br />
price below Buy (for paid apps).<br />
The subsequent screen notifies you whether the app will<br />
require access to your personal information or access to certain<br />
functions or settings of your phone.<br />
5. If you agree to the conditions, tap OK to begin downloading and<br />
installing the app.<br />
If you selected a paid app, after tapping OK, you will be<br />
redirected to the Google Checkout screen to pay for the app<br />
before it’s downloaded to your phone.<br />
You can uninstall an app for a refund within a limited time after your<br />
purchase. To know more about the refund policy for paid apps, please visit<br />
the Android Market Help site (http://market.android.com/support).
08 More apps<br />
Creating a Google Checkout account<br />
You must have a Google Checkout account associated with your<br />
Google Account to purchase items from Android Market.<br />
To create a Google Checkout account, do one of the following:<br />
<br />
<br />
On your computer, go to http://checkout.google.com.<br />
The first time you use your phone to buy an app from Android<br />
Market, follow the prompts onscreen to enter your billing<br />
information.<br />
When you’ve used Google Checkout once to purchase an app from Android<br />
Market, the phone remembers your password, so you don’t need to enter<br />
it the next time. For this reason, you should secure your phone to prevent<br />
others from using it without your permission. See the Security chapter to<br />
learn how to secure your phone.<br />
Opening an installed app<br />
Do one of the following:<br />
<br />
<br />
<br />
If you see this icon ( ) on the status bar, open the<br />
Notifications panel, and then tap the app. See “Opening the<br />
Notifications panel” in the Getting started chapter.<br />
Press HOME , and then tap > Market > My apps. On the<br />
My apps screen, tap the app and then tap Open.<br />
Press HOME , and then tap . On the All apps screen, locate<br />
the app, and then tap it.
More apps 09<br />
Uninstalling an app<br />
You can uninstall any app that you have downloaded and installed<br />
from Android Market.<br />
1.<br />
2.<br />
Press HOME , and then tap > Market > My Apps.<br />
Tap the app you want to uninstall, and then tap Uninstall.<br />
3. When asked, tap OK.<br />
4.<br />
Choose the reason for removing the app, and then tap OK.<br />
Getting help<br />
If you need help or have questions about Android Market, press MENU,<br />
and then tap Help. The web browser will take you to the Android<br />
Market Help site.<br />
Sharing games and apps<br />
Having fun with a game or app that you’ve downloaded from Android<br />
Market? Share it instantly with your circle of friends.<br />
For your friends to link to the app and download it from Android Market,<br />
they must be using an Android phone.<br />
1. Press HOME , and then tap .<br />
2. Press MENU, and then tap Share.<br />
You’ll then see the list of games and apps that you downloaded<br />
and installed from Android Market.
10 More apps<br />
3. Tap an app, and then choose how to share it:<br />
Bluetooth Send the link using Bluetooth.<br />
See the Bluetooth chapter.<br />
Facebook Post the link to Facebook.<br />
See the Social chapter.<br />
Friend<br />
Stream<br />
Post the link to Facebook and Twitter.<br />
See the Social chapter.<br />
Gmail Send the link using your Gmail account.<br />
See the Email chapter.<br />
Mail Send the link using your POP /IMAP or Exchange<br />
ActiveSync email account.<br />
See the Email chapter.<br />
Message Send the link in a text message.<br />
See the Messages chapter.<br />
Peep Share the link in Twitter.<br />
See the Social chapter.
More apps 11<br />
When your friends see the link in your sent message, email, or status<br />
update, they can simply tap the link to go directly to the game or app<br />
in Android Market to download it.<br />
<br />
<br />
While entering your status update in Friend Stream, you can also tap<br />
to choose from games or apps that you want to share in your social<br />
networks.<br />
If you’ve already created a new text or email message, press MENU and<br />
then tap Attach > App recommendation to choose from your list of<br />
installed games and apps.
Security<br />
Protecting your SIM card with a PIN<br />
Add another layer of security for your phone by assigning a PIN<br />
(personal identification number).<br />
Make sure you have the default SIM PIN provided by Verizon Wireless<br />
before continuing.<br />
1.<br />
2.<br />
Press HOME > MENU, and then tap Settings > Security.<br />
Tap Set up SIM card lock, then select Lock SIM card.<br />
3. Enter the default SIM card PIN, and then tap OK.<br />
4. To change the SIM card PIN, tap Change SIM PIN.<br />
Emergency calls can be placed at any time without requiring a PIN. See<br />
“Making an emergency call” in the Phone calls chapter for more details.<br />
Restoring a SIM card that has been locked out<br />
If you enter the wrong PIN more times than the maximum number of<br />
attempts allowed, your SIM card will become “PUK-locked”. You need<br />
a PUK code to restore access to the phone. This code may have been<br />
provided by Verizon Wireless when you received your SIM card.<br />
1.<br />
2.<br />
On the Phone dialer screen, enter the PUK code, and then tap<br />
Next.<br />
Enter the new PIN you want to use, and then tap Next.<br />
3.<br />
Enter the new PIN again, and then tap Next.
Protecting your phone with a screen lock<br />
Security 1<br />
Protect your personal information and prevent others from using your<br />
phone without your permission by setting a screen lock password, a<br />
PIN, or a lock pattern.<br />
Your screen lock will be asked every time your phone is turned on or<br />
when it’s idle for a certain period of time.<br />
1.<br />
2.<br />
Press HOME > MENU, and then tap Settings > Security.<br />
Tap Set up screen lock.<br />
3. Tap one of the following:<br />
None Disable the screen lock you’ve previously created.<br />
Pattern Set a screen lock pattern by following the onscreen instructions.<br />
PIN Set a numeric password of at least four digits.<br />
Password Set an alpha-numeric password.<br />
4. On the Security screen, tap Lock phone after, then specify the<br />
idle time you can allow before the screen is locked.<br />
You can also clear the Use visible pattern on the Security screen if you<br />
don’t want your screen lock pattern to display as you draw it onscreen.<br />
Changing your screen lock<br />
1. Press HOME > MENU, and then tap Settings > Security.<br />
2.<br />
3.<br />
Tap Change screen lock.<br />
Enter your current screen lock to confirm that you want to<br />
change it.<br />
4.<br />
Choose a different screen lock type, then enter your new pattern,
14 Security<br />
PIN, or password.<br />
Or tap None if you don’t want to use a screen lock.<br />
Forgot your screen lock pattern?<br />
If you’ve forgotten your screen lock pattern, you have up to five<br />
attempts to try and unlock your phone. If this fails, you can unlock your<br />
phone by entering your Google Account user name and password.<br />
1.<br />
2.<br />
3.<br />
4.<br />
5.<br />
On the unlock screen, enter your lock pattern.<br />
After the fifth attempt and you’re asked to wait for 0 seconds,<br />
tap OK.<br />
If the display goes off, press the POWER button to turn the<br />
display back on, and then press the bar on the lock screen and<br />
slide your finger down to unlock the screen.<br />
Tap the Forgot pattern button in the lower right corner when it<br />
appears.<br />
Enter your Google Account name and password, and then tap<br />
Sign in.<br />
You’ll then be asked to create a new screen lock pattern. If you no<br />
longer want to do so, tap Cancel.
Settings<br />
Settings on your phone<br />
Control and customize phone settings on the Settings screen.<br />
Press HOME > MENU, and then tap Settings.<br />
Personalize Choose a scene, set the Home screen or Lockscreen<br />
wallpaper to use, apply a skin, and set sound options. You<br />
can also rename or delete a custom scene by pressing and<br />
holding a scene in Scenes.<br />
Wireless &<br />
networks<br />
Set up your phone’s wireless connections, such as Wi-Fi and<br />
Bluetooth, enable the Airplane mode, or set the options for<br />
mobile networks, roaming, Wi-Fi hotspot, Virtual Private<br />
Networks, and more.<br />
Call Set up call services such as voicemail, call forwarding, call<br />
waiting, and caller ID.<br />
Sound Choose sounds to use for your phone ringtone and<br />
notifications.<br />
Adjust media playback volume. See “Adjusting the<br />
volume” in the Getting started chapter.<br />
Set to lower the ring volume when you move the phone<br />
when it’s ringing, make the phone ring louder when inside<br />
a bag or pocket, and turn on the spekerphone when you<br />
flip over the phone.<br />
<br />
Turn on or off sound and vibrate features such as Audible<br />
touch tones, Quiet ring on pickup, Pocket mode, and more.
16 Settings<br />
Display Set up display settings such as automatic screen orientation,<br />
brightness, screen timeout, and more.<br />
Accounts &<br />
sync<br />
Log in or out of your social network accounts, Google<br />
Account, Exchange ActiveSync account, and Verizon<br />
Wireless Backup Assistant acount. You can also manage<br />
synchronization and other settings for your accounts. See the<br />
Accounts and sync chapter for details.<br />
Location Select the sources to use when determining your location.<br />
Search Select items to include when you do a search on your phone<br />
and set Google search options.<br />
Privacy Choose to automatically back up some settings on the phone<br />
(e.g. Wi-Fi passwords or Bookmarks) to Google servers using<br />
your Google Account so you can restore them when needed.<br />
Connect to<br />
PC<br />
<br />
<br />
Set the default USB connection type to use whenever you<br />
connect your phone to your computer.<br />
Or, select the Ask me check box to set your phone<br />
to always display the screen for selecting the USB<br />
connection type. To find out more, see “Connecting your<br />
phone to a computer” in the Getting started chapter.<br />
Security Set a screen lock, enable the SIM card lock, or manage the<br />
phone’s credential storage. See the Security chapter for details.<br />
Dock If you purchased the car kit, choose the behavior when you<br />
mount your phone to the car kit.<br />
Power saver Turn on power saver to automatically switch to power saving<br />
mode when the battery level goes down to the level that you<br />
set. See “Optimizing your phone’s battery life” in this chapter<br />
for details.<br />
Applications Manage running applications, move applications to or from<br />
the storage card, and install or uninstall programs.
SD & phone<br />
storage<br />
<br />
<br />
<br />
Settings 17<br />
Check the available storage card and phone memory.<br />
From this screen, be sure to unmount your microSD card<br />
before you remove it from your phone.<br />
You can also do a factory reset. See the Update and reset<br />
chapter for more details.<br />
Date & time Set the date and time, time zone, and date or time format. To<br />
turn off auto time synchronization and be able to manually<br />
change time zone settings, see “Setting the time zone, date,<br />
and time” in the Clock and Weather chapter.<br />
Language &<br />
keyboard<br />
Set the operating system language and region. You can also<br />
set onscreen keyboard options.<br />
Accessibility This option appears only after you’ve downloaded and<br />
installed an accessibility tool, such as a screen reader that<br />
provides voice feedback. You can turn accessibility functions<br />
or services on or off.<br />
Voice input &<br />
output<br />
Software<br />
update<br />
Set up the voice input options of your phone. Also, if you’ve<br />
installed a text-to-speech (voice data) application, use this to<br />
set the text-to-speech settings.<br />
Enable or disable the automatic check feature for software<br />
updates for your phone. You can also tap Check new to<br />
manually check for software updates.<br />
About phone View different information about your phone, such as the<br />
mobile network type, signal strength, battery level, battery<br />
use of individual applications, software version of your phone,<br />
and more. See “Checking information about your phone” in<br />
this chapter.
18 Settings<br />
Changing display settings<br />
Adjusting the screen brightness manually<br />
1. Press HOME > MENU, and then tap Settings.<br />
2.<br />
Tap Display > Brightness.<br />
3. Clear the Automatic brightness check box.<br />
4.<br />
Drag the brightness slider to the left to decrease or to the right<br />
to increase the screen brightness. Tap OK.<br />
Adjusting the time before the screen turns off<br />
After a period of inactivity, the phone screen turns off to conserve<br />
battery power. You can set the idle time before the screen turns off.<br />
1.<br />
2.<br />
Press HOME > MENU, and then tap Settings.<br />
Tap Display > Screen timeout.<br />
3. Tap the time before the screen turns off.<br />
Turning automatic screen rotation off<br />
By default, the screen orientation automatically adjusts depending on<br />
how you hold the phone.<br />
1.<br />
Automatic rotation is not supported in all application screens.<br />
Press HOME > MENU, and then tap Settings.<br />
2.<br />
Tap Display, and then clear the Auto-rotate screen check box.
Settings 19<br />
Recalibrating the G-sensor<br />
Recalibrate the screen if you feel that the screen orientation does not<br />
respond properly to the way you hold the phone.<br />
1.<br />
2.<br />
Press HOME > MENU, and then tap Settings.<br />
Tap Display > G-Sensor calibration.<br />
3. Place the phone on a flat and level surface, and then tap Calibrate.<br />
4. After the recalibration process, tap OK.<br />
Keeping the screen on while charging the phone<br />
You can keep the phone screen from turning off while you’re charging<br />
the phone.<br />
1.<br />
2.<br />
Press HOME > MENU, and then tap Settings.<br />
Tap Applications > Development.<br />
3. Select the Stay awake check box.<br />
Switching animation effects on or off<br />
You can turn off the animation or enable only some animations when<br />
switching between screens.<br />
1.<br />
2.<br />
Press HOME > MENU, and then tap Settings.<br />
Tap Display > Animation.<br />
3.<br />
On the options menu, select the animation setting you want.
0 Settings<br />
Changing sound settings<br />
Switching between silent, vibration, and normal modes<br />
To change back from silent to normal mode, simply press the<br />
VOLUME UP button.<br />
<br />
<br />
<br />
To change back from vibration to normal mode, press the<br />
VOLUME UP button twice.<br />
Press HOME > MENU, , and then tap Settings > Sound > Sound<br />
profile.<br />
You can also add the Profile widget to your Home screen. To find<br />
out how to add a widget, see “Personalizing your Home screen<br />
with widgets” in the Personalizing chapter.<br />
Enabling or disabling audible selection<br />
You can choose to play a sound when you’re selecting items onscreen.<br />
1.<br />
2.<br />
Press HOME > MENU, and then tap Settings.<br />
Tap Sound, and then select the Audible selection check box.<br />
Choosing the notification sound<br />
You can choose a default sound for your phone to play whenever<br />
there are new notifications.<br />
1.<br />
2.<br />
3.<br />
Press HOME > MENU, and then tap Settings.<br />
Tap Sound > Notification sound.<br />
Select your preferred notification sound in the list, and then tap<br />
OK.
Settings 1<br />
To use different sounds for different types of notifications, set the<br />
notification sounds in the respective applications. For example, to<br />
set different sounds for received and sent text messages, open the<br />
Messages application, then press MENU and tap Settings.<br />
Turning on or off automatic ring volume adjustment<br />
Quiet ring on pickup<br />
Your phone has a quiet ring feature that automatically lowers the ring<br />
volume when you move your phone.<br />
1.<br />
2.<br />
Press HOME > MENU, and then tap Settings.<br />
Tap Sound, and then select or clear the Quiet ring on pickup<br />
check box.<br />
Turning on Pocket mode<br />
To help avoid missing incoming calls when your phone is in your<br />
pocket or bag, the pocket mode feature gradually increases the ring<br />
volume and vibrates when you receive a call. When not in your pocket<br />
or bag, the phone will ring at the normal volume you set.<br />
1.<br />
2.<br />
Press HOME > MENU, and then tap Settings.<br />
Tap Sound, and then select or clear the Pocket mode check box.<br />
Switching to speakerphone automatically<br />
You can switch to speakerphone by simply flipping over your phone.<br />
1.<br />
Press HOME > MENU, and then tap Settings.<br />
2.<br />
Tap Sound, and then select or clear the Flip for speaker check box.
Settings<br />
Changing the phone language<br />
When you turn your phone on for the first time, you’re asked to<br />
choose the language you want to use for your phone. If you want,<br />
you can still change the phone language after you set up your phone.<br />
Changing the language adjusts the keyboard layout, date and time<br />
formatting, and more.<br />
The languages available to choose from may depend on the version of<br />
phone you have.<br />
1.<br />
2.<br />
Press HOME > MENU, and then tap Settings.<br />
Tap Language & keyboard > Select language.<br />
3. Tap the language and corresponding region you want to use.<br />
4.<br />
Press HOME to return to the Home screen. You may need to<br />
wait a few seconds for the new language to be applied.<br />
Optimizing your phone’s battery life<br />
You can set the phone to automatically switch to power saving mode<br />
when the battery level reaches a certain level.<br />
1.<br />
2.<br />
Press HOME > MENU, and then tap Settings.<br />
Tap Power saver.<br />
3. Select the Enable power saver check box.<br />
4.<br />
5.<br />
Tap Turn power saver on at, and then select when to switch to<br />
power saver mode.<br />
In the Power saver settings section, set and select the phone<br />
behavior when the phone switches to power saving mode.
Checking the power usage of applications<br />
1. Press HOME > MENU, and then tap Settings.<br />
2.<br />
Tap About phone > Battery > Battery use.<br />
Managing memory<br />
Settings<br />
Checking how much phone memory is available for use<br />
1. Press HOME > MENU, and then tap Settings.<br />
2.<br />
Tap SD & phone storage. The available phone memory is<br />
displayed in the Internal phone storage section.<br />
Checking the available storage card space<br />
1. Press HOME > MENU, press MENU, and then tap Settings.<br />
2.<br />
Tap SD & phone storage. The total and available storage card<br />
space is displayed in the SD card section.<br />
Clearing application cache and data<br />
1. Press HOME > MENU, and then tap Settings.<br />
2.<br />
3.<br />
Tap Applications > Manage applications.<br />
On the Manage applications screen, switch to the Running tab,<br />
and then tap the application whose cache and/or data you want<br />
to delete.<br />
4. In the Application info screen, tap Clear data and/or Clear cache.
4 Settings<br />
Uninstalling third-party applications<br />
You cannot uninstall applications that are preinstalled on the phone.<br />
1.<br />
2.<br />
Press HOME > MENU, and then tap Settings.<br />
Tap Applications > Manage applications.<br />
3. On the Downloaded tab, tap the application you want to uninstall.<br />
4. On the Application info screen, tap Uninstall.<br />
Moving applications to or from the storage card<br />
Move applications that you’ve downloaded to the phone to the<br />
storage card if your phone’s memory is getting low. Or, if your storage<br />
card is getting full, you can also move applications that are on your<br />
storage card to the phone.<br />
1.<br />
2.<br />
You can only move applications that are not preinstalled on your phone.<br />
Press HOME > MENU, and then tap Settings.<br />
Tap Applications > Manage applications.<br />
3. On the Downloaded tab, tap the application you want to move.<br />
4.<br />
On the Application info screen, tap Move to SD card or Move to<br />
phone.
Checking information about your phone<br />
1.<br />
2.<br />
Press HOME > MENU, and then tap Settings.<br />
Tap About phone.<br />
3.<br />
Select one of the following:<br />
Settings 5<br />
Tell HTC Turn Tell HTC on or off. When enabled, you’re<br />
helping us know when your phone encounters a<br />
technical problem.<br />
Network Check information about Verizon Wireless and its<br />
service status.<br />
Phone identity Check information about your phone and the SIM<br />
card you’re using.<br />
Battery Check information about the battery such as its<br />
current battery level, status, and what programs<br />
are using the battery.<br />
Hardware<br />
information<br />
Software<br />
information<br />
Check the Wi-Fi MAC and Bluetooth addresses.<br />
Check the version and other information about the<br />
Android platform being used by the phone. You<br />
can also check the version of the web browser.<br />
Legal information Read legal information from HTC and Google, and<br />
licenses used by the phone.
Back up, update and<br />
reset<br />
Backing up your contacts<br />
Your phone features Verizon Backup Assistant, which automatically<br />
backs up your contacts to an online server. You must first create an<br />
account on the Verizon Wireless website.<br />
You can set up the Backup Assistant when you first turn on your<br />
phone. See “Getting started” in the Basics chapter for details.<br />
If you did not set up Backup Assistant when you first turned on your<br />
phone, you can set it up in Settings.<br />
Setting up Backup Assistant<br />
If you did not set up Backup Assistant during when you first turned on<br />
your phone, you can enable it in Settings.<br />
1.<br />
2.<br />
Press HOME > MENU, and then tap Settings.<br />
Scroll down the screen, and then tap Accounts & sync.<br />
3. Tap Backup Assistant.<br />
4.<br />
Follow the instructions on the screen to sign in to Backup<br />
Assistant and back up your contacts.<br />
Changing the backup schedule<br />
1. Press HOME > MENU, and then tap Settings.<br />
2.<br />
Scroll down the screen, and then tap Accounts & sync.
3. Tap Backup Assistant.<br />
Update and reset 7<br />
4. Tap Schedule and select a backup option from the menu.<br />
Manually backing up your contacts<br />
1. Press HOME > MENU, and then tap Settings.<br />
2.<br />
Scroll down the screen, and then tap Accounts & sync.<br />
3. Tap Backup Assistant.<br />
4. Tap Sync now.<br />
For more information on how to use Backup Assistant and to create<br />
a Backup Assistant account, go to: https://wbillpay.verizonwireless.<br />
com/vzw/nos/ba_nab/overview_def.jsp<br />
Updating the phone software<br />
From time to time, software updates for your phone may be available.<br />
Your phone can check and then notify you if there’s a new update. You<br />
can then download and install the software update using your phone’s<br />
Wi-Fi or data connection.<br />
<br />
<br />
Checking and downloading phone software updates may incur additional<br />
data transfer fees from Verizon Wireless.<br />
Make sure your phone has a microSD card inserted. The update will be<br />
downloaded to the microSD card.<br />
Depending on the type of update, the update may erase all your<br />
personal data and customized settings, and also remove any<br />
applications you’ve installed. Make sure that you’ve backed up the<br />
information and files you want to keep.<br />
<br />
When there is an update available, the Install system software
8 Update and reset<br />
<br />
update dialog box will appear onscreen. Select Install now and<br />
then tap OK.<br />
If you’re in the middle of a call and there’s an update available,<br />
you’ll receive an update notification. After you end the call, slide<br />
open the Notifications panel (see “Opening the Notifications<br />
panel” in the Getting started chapter). Then tap the update<br />
notification to download and install the software update.<br />
Wait for the update process to finish. When the update is finished, the<br />
phone will automatically reset.<br />
Checking for phone system software updates manually<br />
1. Press HOME > MENU, and then tap Settings.<br />
2.<br />
Tap Software update > Check new.<br />
Restarting or factory resetting your phone<br />
Restarting your phone (soft reset)<br />
If your phone is running slower than normal, an application is not<br />
performing properly, or your phone becomes unresponsive, try<br />
restarting your phone and see if that helps solve the problem.<br />
1.<br />
2.<br />
If the display is off, press the POWER button to turn it back on.<br />
Unlock your phone if the Lock screen is displayed. See<br />
“Unlocking the screen” in the Getting started chapter.<br />
3. Press and hold the POWER button, and then tap Restart.<br />
4.<br />
When asked to confirm, tap Restart.<br />
If you can’t restart the phone following the above steps, remove the<br />
battery, wait for a few seconds, reinsert the battery, and then turn the<br />
phone on.
Update and reset 9<br />
Performing a factory reset (hard reset)<br />
If you’re passing your phone on to someone else or your phone has a<br />
persistent problem that cannot be solved, you can do a factory reset<br />
(also called a hard reset). This returns your phone to the state it was in<br />
before the first time you turned it on.<br />
Factory reset will not erase the data and files that are on the storage card.<br />
Factory reset is not a step to be taken lightly. It’ll permanently<br />
delete all your data and customized settings, and will remove any<br />
applications you’ve downloaded and installed. Be sure to back up any<br />
data and files you want to keep before you do a factory reset.<br />
Performing a factory reset via settings<br />
1. Press HOME > MENU, and then tap Settings.<br />
2.<br />
3.<br />
Tap SD & phone storage > Factory data reset.<br />
On the Factory data reset screen, tap Reset phone, and then tap<br />
Erase everything.<br />
Performing a factory reset using phone buttons<br />
If you can’t turn on your phone or access the phone settings, you can<br />
still perform a factory reset by using the buttons on the phone.<br />
1.<br />
2.<br />
3.<br />
With the phone turned off, press and hold the VOLUME DOWN<br />
button, and then press-hold the POWER button.<br />
Wait for the screen with the three Android images to appear, and<br />
then release the VOLUME DOWN button.<br />
Press VOLUME DOWN to select FACTORY RESET, and then<br />
press the POWER button.
Trademarks and<br />
copyrights<br />
Copyright © 010 HTC Corporation. All Rights Reserved.<br />
The HTC logo, the HTC quietly brilliant logo, HTC ThunderBolt, HTC Sense,<br />
Footprints, HTC Sync, and HTC Care are trademarks and/or service marks<br />
of HTC Corporation.<br />
Copyright © 010 Google Inc. Used with permission.<br />
Google, the Google logo, Android, Google Search, Google Maps, Gmail,<br />
Google Mail, YouTube, Android Market, and Google Talk are trademarks of<br />
Google Inc.<br />
Google, the Google logo and Google Maps are trademarks of Google, Inc.<br />
TeleAtlas® Map Data © 010. Street View Images © 010 Google.<br />
Microsoft, Windows, Windows XP, Windows Vista, ActiveSync, and Outlook<br />
are either registered trademarks or trademarks of Microsoft Corporation in<br />
the United States and/or other countries.<br />
Bluetooth and the Bluetooth logo are trademarks owned by Bluetooth SIG,<br />
Inc.<br />
Wi-Fi is a registered trademark of the Wireless Fidelity Alliance, Inc.<br />
microSD is a trademark of SD Card Association.<br />
Copyright © 010 Adobe Systems Incorporated. All Rights Reserved.<br />
Java, J ME and all other Java-based marks are trademarks or registered<br />
trademarks of Sun Microsystems, Inc. in the United States and other countries.<br />
Facebook is a trademark of Facebook, Inc.
Trademarks and copyrights 1<br />
Twitter is a trademark of Twitter, Inc., and is used under license.<br />
Flickr is a trademark of Yahoo! Inc.<br />
DLNA is a registered trademark, DLNA disc logo is a service mark, and<br />
DLNA Certified is a trademark of the Digital Living Network Alliance.<br />
All other company, product and service names mentioned herein are<br />
trademarks, registered trademarks or service marks of their respective<br />
owners.<br />
HTC shall not be liable for technical or editorial errors or omissions<br />
contained herein, nor for incidental or consequential damages resulting<br />
from furnishing this material. The information is provided “as is” without<br />
warranty of any kind and is subject to change without notice. HTC also<br />
reserves the right to revise the content of this document at any time<br />
without prior notice.<br />
No part of this document may be reproduced or transmitted in any form or<br />
by any means, electronic or mechanical, including photocopying, recording<br />
or storing in a retrieval system, or translated into any language in any form<br />
without prior written permission of HTC.
Index<br />
4G LTE 215<br />
A<br />
Access point 216<br />
Adding a city to the Weather<br />
screen 212<br />
Adding a city to the World Clock<br />
screen 208<br />
Airplane mode 86<br />
Alarm clock 208<br />
Alarms<br />
- changing the alarm sound 67<br />
Album (Gallery app) 255<br />
Android Market 306<br />
Answering an incoming call 75<br />
Apps<br />
- adding icons from the Home<br />
screen 61<br />
- rearranging or hiding tabs 68<br />
- switching between recentlyopened<br />
apps 4<br />
App Sharing 309<br />
Attachments<br />
- types of message attachments 1 0<br />
- viewing and saving message<br />
attachments 1 6<br />
Auto focus 248, 253<br />
B<br />
Backing up contacts 326<br />
Backup Assistant 326<br />
Battery 28<br />
- charging 0<br />
- inserting 9<br />
- optimizing<br />
Bluetooth<br />
- Bluetooth received folder 4<br />
- changing phone name 5<br />
- connecting headset or car kit 6<br />
- receiving information 41<br />
- sending information 8<br />
- sending photo/video 51<br />
- sending photos or videos 61<br />
- sharing music 74<br />
- turning on or off 5<br />
Bookmarks 233<br />
Bottom cover<br />
- removing 4<br />
- replacing 4<br />
Browser 225<br />
C<br />
Calendar 188<br />
- widget 01<br />
Calendar events<br />
- creating 189
- deleting 196<br />
- editing 196<br />
- inviting guests to a Google<br />
calendar event 190<br />
- sending an Exchange ActiveSync<br />
meeting request 191<br />
- sharing a vCalendar 196<br />
- viewing 195<br />
Caller ID 75, 77<br />
Call history 81<br />
Calls<br />
- answering a call 75<br />
- ending a call 80<br />
- making a call 70<br />
- putting a call on hold 78<br />
- rejecting a call 75<br />
- switching between calls 78<br />
Call services 83<br />
Camera 244<br />
- secondary (front) camera 46<br />
car panel 288<br />
Charging the battery 30<br />
Chat invitations<br />
- accepting 16<br />
- inviting a friend in Google Talk 164<br />
Chatting in Google Talk 162<br />
Checking information about your<br />
phone 325<br />
Checking notifications from social<br />
networks 161<br />
Checking weather 211<br />
Clock 202<br />
Clock widget (HTC) 202<br />
Conference call 79<br />
Index<br />
Connected media 275<br />
Connect to PC 44<br />
Contact groups 101<br />
- creating 101<br />
- deleting a group 10<br />
- editing a contact group 101<br />
- rearranging your contact<br />
groups 10<br />
- Sending a message or email to a<br />
group 10<br />
Contact information<br />
- editing 99<br />
- merging 91<br />
- sending 100<br />
Contacts<br />
- adding a new contact 89<br />
- backing up your contacts to the<br />
storage card 97<br />
- importing from an Exchange<br />
ActiveSync account 91<br />
- importing from your SIM card 90<br />
Contacts list 94<br />
- filtering 96<br />
Conversations 98, 127<br />
Copying files to or from the storage<br />
card 46<br />
Copying text 230<br />
D<br />
Data connection 215<br />
Date and time 207<br />
Desk Clock 204
4 Index<br />
E<br />
Editing text 112<br />
Effects (camera) 251<br />
Email<br />
- sending photo/video 51<br />
- sending photos or videos 60<br />
Emergency call 73<br />
Event reminders 197<br />
Exchange ActiveSync 176, 186<br />
Extended Home screen 37<br />
F<br />
Facebook<br />
- commenting photos 66<br />
- Facebook for Android 15<br />
- Facebook for HTC Sense 151<br />
- sharing photos 6<br />
- view photos 65<br />
Facebook for HTC Sense<br />
- sharing photo/video 51<br />
Face detection<br />
- manual capturing 48<br />
Factory reset 328<br />
Finger gestures 35<br />
Flashlight 305<br />
Flash settings (camera)<br />
- photo mode 47<br />
- video mode 49<br />
Flickr<br />
- commenting photos 66<br />
- sharing photos 6<br />
- viewing photos 65<br />
FM Radio 301<br />
Folders 62<br />
- creating a new folder 6<br />
- renaming a folder 6<br />
Footprints 285<br />
Friend Stream 157<br />
- checking notifications 161<br />
- commenting on and liking<br />
Facebook posts 160<br />
- Friend Stream widget 161<br />
G<br />
G-sensor 319<br />
Gallery 254<br />
Gmail/Google Mail<br />
- about 166<br />
- adding a signature 174<br />
- changing the settings 17<br />
- labeling a conversation 17<br />
- muting a conversation 17<br />
- reading emails 169<br />
- replying/forwarding emails 170<br />
- searching emails 171<br />
- sending an email 168<br />
- spam 17<br />
- star an email 171<br />
- using batch operations 174<br />
- viewing the Inbox 166<br />
Google Accounts 135<br />
Google Dictionary 232<br />
Google Latitude 284<br />
Google Maps 278<br />
Google Talk 162<br />
Google Translate 232<br />
Groups 101
H<br />
Home city 206<br />
Home page 226<br />
Home screen 37<br />
- adding folders 6<br />
- adding icons and shortcuts 61<br />
- adding widgets 59<br />
- changing the wallpaper 57<br />
- extended Home screen 7<br />
- personalizing with scenes 54<br />
- rearranging Home screen items 6<br />
- rearranging the home panels 64<br />
HTC Caller ID 77<br />
HTC Clock widget 202<br />
HTC Sync 138<br />
I<br />
Internet connection mode 45<br />
Internet connections 215<br />
Internet pass-through 45<br />
K<br />
Keyboard 106<br />
- adjusting touch input settings 114<br />
- changing to the landscape<br />
onscreen keyboard 108<br />
- copying and pasting text 114<br />
- enabling multiple keyboard<br />
languages 108<br />
L<br />
Latitude 284<br />
Leap view 38<br />
Library (Music) 269<br />
Linking contact information 91<br />
Live wallpapers 57<br />
Locations<br />
- Footprints 85<br />
Location services 278<br />
Lock message 127<br />
Lock screen 53<br />
M<br />
Mail app<br />
- about 176<br />
- all accounts 178<br />
- checking email 177<br />
- deleting conversation 170<br />
- deleting email 181, 18<br />
- different views of inbox 179<br />
- Exchange ActiveSync 176, 186<br />
- marking unread 181<br />
- moving 181, 18<br />
- POP /IMAP account 176<br />
- quick browsing 180<br />
- reading and replying 184<br />
- selecting email messages 181<br />
- sending 18<br />
- setting priority 185<br />
- settings 187<br />
- sorting 180<br />
- switching folders 18<br />
- unified inbox 178<br />
Making calls 70<br />
Managing memory 323<br />
Maps 278<br />
Index 5
6 Index<br />
Matched contacts suggestions 92<br />
Media volume 51<br />
Meeting request 186<br />
Memory 323<br />
Merging contact information 91<br />
Messages 117<br />
- about the Messages app 117<br />
- deleting a message 1 8<br />
- protecting a message 1 7<br />
- replying to a message 1 4<br />
- resuming a draft message 1<br />
- sending a multimedia message 1 0<br />
- sending a text message 118<br />
- settings 1 0<br />
- viewing a message 1 4<br />
microSD card 32<br />
Microsoft Exchange ActiveSync 176<br />
Missed call 81<br />
MMS 120<br />
- attaching files and information 1 0<br />
- creating a slideshow 1<br />
- settings 1<br />
Mobile network connection 215<br />
Modem 222<br />
MP3 273<br />
Music 266<br />
- creating a playlist 70<br />
- sharing 74<br />
Muting the microphone 80<br />
My contact card<br />
- creating 88<br />
- sending your contact<br />
information 100<br />
N<br />
News feeds 292<br />
Notification icons 40<br />
Notification sound 67, 320<br />
Notifications panel 42<br />
O<br />
Online accounts 134<br />
Onscreen keyboard 106<br />
Optimizing your phone’s battery<br />
life 322<br />
P<br />
Peep 153<br />
People<br />
- about 87<br />
- contact information and<br />
conversations 98<br />
- People screen 87<br />
- People widget 104<br />
Personalizing 54<br />
Phone<br />
- front, top, left, and back panels 1<br />
- phone dialer 70<br />
Photo<br />
- sharing 51<br />
- taking a photo 47<br />
Photo editing 258<br />
- adding effects 59<br />
- cropping 59<br />
- rotating 58<br />
Photos<br />
- commenting in your social<br />
networks 66
- editing 58<br />
- sending by Bluetooth 61<br />
- sending by email 60<br />
- sending by MMS 60<br />
- sharing on Facebook 6<br />
- sharing on Flickr 6<br />
- sharing on Picasa 64<br />
- viewing 56<br />
- viewing albums in social<br />
networks 65<br />
- zooming in or out 57<br />
Pinch 35<br />
Pocket mode 321<br />
POP3/IMAP 176<br />
Predictive text 109<br />
- Personal dictionary 110<br />
- setting a second language for the<br />
keyboard 109<br />
PUK 312<br />
Push messages 126<br />
Q<br />
Quick Lookup 49<br />
Quickoffice 296<br />
Quiet ring on pickup 321<br />
R<br />
Recalibrating the G-sensor 319<br />
Recent apps 43<br />
Recording<br />
- video 49<br />
Recording your voice 303<br />
Rejecting an incoming call 75<br />
Restarting 328<br />
Ringer volume 51<br />
Ringtone 65, 271<br />
- trimming 7<br />
S<br />
Scenes 54<br />
- creating 56<br />
- deleting 56<br />
- renaming 56<br />
Screen lock<br />
- changing your screen lock 1<br />
- lock password 1<br />
- lock pattern 1<br />
- PIN 1<br />
Screen unlock pattern 313<br />
Search Anywhere 47<br />
- searching your phone and the<br />
Web 47<br />
- setting search options 48<br />
Searching for a contact 96<br />
Security 312<br />
Selecting text 231<br />
Settings 315<br />
- alarm sound 10<br />
- calendar 199<br />
- camera 5<br />
- date and time 07<br />
- weather 1<br />
Setting up My contact card 88<br />
Setting up your phone for the first<br />
time 36<br />
Index 7
8 Index<br />
Sharing<br />
- photo 51<br />
- video 51<br />
- YouTube 91<br />
Shortcuts 61<br />
SIM card 28<br />
- copying a message to 1 7<br />
- inserting 5<br />
- removing 7<br />
- restoring a SIM card that has been<br />
locked out 1<br />
- SIM PIN 1<br />
Skins 58<br />
Sleep mode 52<br />
Slideshow 122<br />
SMS<br />
- composing and sending 118<br />
- settings 1 1<br />
Social network accounts 136<br />
Social networks<br />
- sharing photo/video 51<br />
Sound sets<br />
- choosing a preset sound set 65<br />
- creating 66<br />
- customizing 66<br />
- deleting 68<br />
Speakerphone 79<br />
Speed dial 71<br />
Status icons 39<br />
Stocks 298<br />
Stopwatch 203<br />
Storage 323<br />
Storage card 28<br />
- copying files to or from 46<br />
- inserting<br />
- removing<br />
- removing while phone is on<br />
Switching between calls 78<br />
Switching your phone on or off 34<br />
T<br />
Talk 162<br />
Tethering 222<br />
Text<br />
- editing 11<br />
- entering text by speaking 11<br />
- entering text using the onscreen<br />
keyboard 107<br />
- using predictive text input 109<br />
Timer 203<br />
Time zone 207<br />
Touch input settings 114<br />
Translating words 50<br />
Turning your phone on or off 34<br />
Tweeting on your phone 154<br />
Twitter 154<br />
- Twitter for HTC Sense 15<br />
- Twitter widget 157<br />
U<br />
Uninstalling third-party<br />
applications 324<br />
Unlocking the screen 53<br />
Updating the phone software 327<br />
Using your phone as a modem 222
V<br />
vCalendar 196<br />
vCard 100<br />
Vibrate mode 51<br />
Video<br />
- capturing/recording 49<br />
- sharing 51<br />
Videos 290<br />
- sending by Bluetooth 61<br />
- sending by email 60<br />
- sending by MMS 60<br />
- sharing on Facebook 6<br />
- sharing on Flickr 6<br />
- sharing on YouTube 64<br />
- viewing 58<br />
Visual Voice Mail 84<br />
Voice Recorder 303<br />
Volume<br />
- adjusting the earpiece volume for<br />
calls 51<br />
- adjusting the media volume 51<br />
- adjusting the ringer volume 51<br />
- adjusting via settings 51<br />
VPN 220<br />
W<br />
Wallpaper 57, 251<br />
Weather 211<br />
Weather widget 214<br />
Web browser 225<br />
Wi-Fi 217<br />
Index 9<br />
Widgets 59, 295, 300, 303<br />
- adding 59<br />
- changing the widget settings 60<br />
World Clock 206<br />
Y<br />
YouTube 264, 290<br />
- sharing video 51<br />
Z<br />
Zooming (camera) 246