Installation instructions and User guide - Fisher & Paykel
Installation instructions and User guide - Fisher & Paykel
Installation instructions and User guide - Fisher & Paykel

Create successful ePaper yourself
Turn your PDF publications into a flip-book with our unique Google optimized e-Paper software.
CoolDrawer<br />
RB90S model<br />
<strong>Installation</strong> <strong>instructions</strong><br />
<strong>and</strong> <strong>User</strong> <strong>guide</strong><br />
EU
Contents<br />
Introduction 2<br />
Important safety <strong>instructions</strong> 3<br />
Before you start 5<br />
Getting started quickly 6<br />
Customising the storage environment 8<br />
Freezer mode 9<br />
Additional Freezer mode functions 10<br />
Chill mode 12<br />
Fridge mode 13<br />
Pantry mode 15<br />
Wine mode 17<br />
Which storage mode should I use? 19<br />
General operating <strong>instructions</strong> 25<br />
Temperature adjustment 25<br />
Key Lock 26<br />
Sabbath mode 26<br />
Fault alarm 27<br />
Control panel beeps 27<br />
Customisable storage containers 28<br />
Normal operating sounds 29<br />
Food storage tips 30<br />
Why food spoils 31<br />
Keeping food fresh 32<br />
Fruit <strong>and</strong> vegetable care 35<br />
Frozen food care 38<br />
Keeping food safe 41<br />
Caring for your appliance 43<br />
Cleaning 43<br />
Before you call for service 44<br />
Customer Care<br />
European directive 2002/96/EC on Waste Electrical<br />
48<br />
<strong>and</strong> Electronic Equipment (WEEE) 49<br />
Important!<br />
SAVE THESE INSTRUCTIONS<br />
The model shown in this <strong>User</strong> Guide may not be available in all markets <strong>and</strong> is<br />
subject to change at any time. For current details about model <strong>and</strong> specification<br />
availability in your country, please visit our local website listed on the back cover<br />
or contact your local <strong>Fisher</strong> & <strong>Paykel</strong> dealer.<br />
1
2<br />
Introduction<br />
Thank you for buying a <strong>Fisher</strong> & <strong>Paykel</strong> CoolDrawer food care system.<br />
At <strong>Fisher</strong> & <strong>Paykel</strong> we aim to provide innovative products that are simple to use, ergonomic <strong>and</strong><br />
kind to the environment.<br />
Thous<strong>and</strong>s of hours of food care research <strong>and</strong> over 75 years of refrigeration experience has been<br />
programmed into your appliance, to provide you with the best possible performance.<br />
Your appliance will be unlike any refrigeration system you have previously owned, offering you a<br />
new level of flexibility, ergonomics <strong>and</strong> performance.<br />
Your appliance provides you with the ability to customise its storage environment to suit your<br />
changing needs. It can be a refrigerator one day, <strong>and</strong> a freezer or wine cellar the next.<br />
You can place the CoolDrawer where it best suits you; under the counter of the kitchen, in the<br />
living room, or even in the recreation room. The choice is yours.<br />
It is important you take the time to read these <strong>instructions</strong> carefully to ensure you have all<br />
the information you need to use <strong>and</strong> enjoy your CoolDrawer. This will allow you to take full<br />
advantage of the unique food care features this system has to offer you <strong>and</strong> help you achieve the<br />
best possible food preservation performance.<br />
We hope you enjoy your new food care system, we have certainly enjoyed designing it for you.<br />
Important!<br />
It is important that this <strong>User</strong> Guide is retained with your appliance for future reference. Should<br />
the appliance be sold or transferred to another owner, please ensure the <strong>User</strong> Guide is left<br />
with the appliance. This will ensure that the new owner can familiarise themselves with the<br />
information <strong>and</strong> warnings contained within the Guide.
■■<br />
■■<br />
■■<br />
■■<br />
■■<br />
■■<br />
■■<br />
■■<br />
■■<br />
■■<br />
■■<br />
■■<br />
WARNING!<br />
Electric Shock Hazard<br />
Follow the IMPORTANT SAFETY INSTRUCTIONS outlined in this<br />
<strong>User</strong> Guide, before operating this appliance.<br />
Failure to do so can result in death, electric shock, fire or injury<br />
to persons.<br />
To reduce the risk of fire, electric shock, or injury to persons read the IMPORTANT SAFETY<br />
INSTRUCTIONS before operating this appliance.<br />
Use this appliance only for its intended purpose as described in this <strong>User</strong> Guide.<br />
READ ALL INSTRUCTIONS CAREFULLY BEFORE USING THE APPLIANCE<br />
When using this appliance always exercise basic safety precautions including the following:<br />
Danger<br />
This appliance is not intended for use by young children or infirm persons without supervision.<br />
Young children should be supervised to ensure they do not play with the appliance.<br />
Risk of child entrapment. Before you throw away your old refrigerator or freezer:<br />
– Take off the doors<br />
– Leave the shelves in place so that children may not easily climb inside.<br />
Disposal<br />
Extreme care must be taken when disposing of your old appliance to avoid hazards. The<br />
refrigerant gas must be safely removed <strong>and</strong> for the safety of young children, remove doors.<br />
Your local <strong>Fisher</strong> & <strong>Paykel</strong> Appliances Authorised Service Centre Dealer or Customer Care<br />
Centre will be able to give advice on environmentally friendly methods of disposing of your old<br />
refrigerator or freezer.<br />
Electrical<br />
Important safety <strong>instructions</strong><br />
This appliance must be properly installed in accordance with the installation <strong>instructions</strong> before<br />
it is used.<br />
Never unplug your appliance by pulling on the power cord.<br />
Always grip the plug firmly <strong>and</strong> pull straight out from the outlet.<br />
Do not plug in any other appliance at its power point or use extension cords or double adapters.<br />
Repair or replace immediately all electric service cords that have become frayed or otherwise<br />
damaged. Do not use a cord that shows cracks or abrasion along its length or at either the plug<br />
or appliance end.<br />
If the power supply cord is damaged, contact your local <strong>Fisher</strong> & <strong>Paykel</strong> Appliances Authorised<br />
Service Centre Dealer to purchase a replacement spare part.<br />
Care should be taken when the appliance is installed or removed, to reduce the likelihood of<br />
damage to the power supply cord.<br />
Disconnect power to appliance before cleaning.<br />
3
■■<br />
■■<br />
■■<br />
■■<br />
■■<br />
■■<br />
■■<br />
■■<br />
4 Important safety <strong>instructions</strong><br />
Storing food <strong>and</strong> drinks<br />
Never store volatile/flammable materials or solvents in your appliance as they may explode or<br />
adversely react with materials in this appliance.<br />
Never freeze liquids in glass containers. Liquid exp<strong>and</strong>s during freezing, which may cause the<br />
container to explode.<br />
Never freeze carbonated drinks. They may explode.<br />
Do not consume food if it is too cold. Frozen food may be cold enough to cause damage when<br />
brought into contact with bare skin, eg. frozen ice cubes.<br />
Power failure – food safety<br />
Do not refreeze frozen foods that have thawed completely. Follow the recommendations below if<br />
you discover food in your freezer has thawed:<br />
1) Ice crystals still visible – food may be refrozen but should be stored for a shorter period than<br />
recommended.<br />
2) Thawed but refrigerator cold – refreezing generally not recommended. Fruits <strong>and</strong> some<br />
cooked food can be refrozen but use as soon as possible. Meat, fish, poultry – use immediately<br />
or cook then refreeze. Vegetables – discard as they usually go limp <strong>and</strong> soggy.<br />
3) Thawed <strong>and</strong> warmer than 5ºC – discard all foods.<br />
Do not refreeze frozen foods that have thawed completely. The food may be dangerous to eat.<br />
Cleaning<br />
Many commercially available cleaning products contain solvents which may attack plastic<br />
components of your appliance <strong>and</strong> cause them to crack. Please refer to the cleaning care section<br />
of this <strong>guide</strong> for further advice.<br />
Always keep the floor around the toe-kick area clean, to limit the amount of dirt or dust that may<br />
enter the condenser cooling circuit of the product.<br />
SAVE THESE INSTRUCTIONS
■■<br />
■■<br />
■■<br />
■■<br />
■■<br />
■■<br />
■■<br />
■■<br />
■■<br />
■■<br />
Before placing food in the drawer<br />
Clean the inside of the appliance with warm water <strong>and</strong> a little liquid detergent to remove<br />
manufacturing <strong>and</strong> transportation dust.<br />
Ideally, allow the drawer to run empty overnight, or for at least 5 hours, to allow it to cool to the<br />
appropriate temperature before placing food inside.<br />
The appliance may have an odour initially, but this will go when the compartment has cooled<br />
sufficiently.<br />
Energy efficiency<br />
For the most energy efficient use of your appliance:<br />
Ensure your CoolDrawer has adequate ventilation as recommended in the installation <strong>instructions</strong>.<br />
Allow good clearances in front of air ducts within the CoolDrawer.<br />
Cool hot foods down before placing them in the CoolDrawer.<br />
Do not overfill the CoolDrawer.<br />
Keep door openings to a minimum.<br />
Select a temperature setting that isn't too cold.<br />
Check your door seals for leaks.<br />
If your appliance is turned off for any reason, wait 10 minutes before turning it back on. This will<br />
allow the refrigeration system pressures to equalise before restarting.<br />
The temperature of the drawer is accurately controlled <strong>and</strong> does not change with the<br />
temperature or humidity of the surroundings; whether summer or winter.<br />
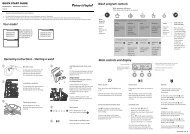
Storage bins featuring humidity<br />
control system (refer to page 13)<br />
Humidity control buttons<br />
(refer to pages 13 <strong>and</strong> 14)<br />
Main storage tray<br />
Before you start<br />
Compact storage tray<br />
Tall storage bin<br />
Fig. 1 Compartment layout<br />
5<br />
Control panel (refer to page 6)
6 Getting started quickly<br />
Operating <strong>instructions</strong><br />
Important!<br />
Before placing food into the CoolDrawer for the first time, it is important that you allow the<br />
drawer to run empty overnight, or for at least 5 hours, to allow it to cool to the appropriate<br />
temperature before placing food inside.<br />
Control panel features<br />
A Sabbath mode, Control panel beeps, Fault alarm<br />
B Key Lock<br />
C Temperature adjustment<br />
D Mode select<br />
E Storage modes<br />
F Function select<br />
G Additional Freezer functions (only active once Freezer mode is selected)<br />
A B C D<br />
Fig.2 CoolDrawer control panel
Getting started quickly<br />
Important!<br />
Your cabinet will default to ‘Freezer mode’ when you first turn it on. If you do not wish to use the<br />
appliance as a freezer, simply select another option from the other four storage modes displayed<br />
on the control panel.<br />
To use the control panel<br />
1 Unlock the control panel by pressing <strong>and</strong> holding the LOCK button for 3 seconds. A beep will<br />
sound <strong>and</strong> the Key Lock light will go out.<br />
2 Simply match the type of items that you wish to store in the CoolDrawer to the relevant storage<br />
environment (refer to page 8).<br />
3 Press the MODE SELECT button to scroll to the desired mode, which best represents the food<br />
items you wish to store.<br />
4 The storage mode icon selected will flash until the CoolDrawer reaches a suitable temperature<br />
for food to be added (this will take between 1 – 6 hours approximately).<br />
E<br />
F G<br />
7
8 Customising the storage environment<br />
The CoolDrawer has a wide range of operating modes, from a deep freezer, freezer, chiller, fridge,<br />
pantry <strong>and</strong> even a wine cooler.<br />
Storage modes<br />
To change the storage mode:<br />
1 Press <strong>and</strong> hold the LOCK button for 3 seconds to unlock the control panel.<br />
2 Press the MODE SELECT button.<br />
3 Scroll to the required storage mode.<br />
4 The storage mode icon will flash until the CoolDrawer is at a suitable<br />
temperature for food to be added (this will take between 1 – 6 hours).<br />
Freezer mode (-18°C / 0°F)<br />
For general frozen food storage (refer to page 9).<br />
Chill mode (-0.5°C / 31°F)<br />
Premium extra-cold storage for highly perishable fresh meat, fish <strong>and</strong> poultry (refer<br />
to page 12).<br />
Fridge mode (3°C / 37°F)<br />
General storage for fresh food, dairy <strong>and</strong> leftovers (refer to page 13).<br />
Pantry mode (12°C / 54°F)<br />
Ideal for tropical fruit <strong>and</strong> temperature sensitive foods that require extra care,<br />
eg. bananas, tomatoes. Also perfect for foods recommending storage in a ‘cool,<br />
dark place’ (refer to page 15).<br />
Wine mode (7 – 15°C / 45 – 59°F)<br />
Provides ideal long term cellaring for wine, as well as 2 additional customised<br />
short term storage environments (refer to page 17).
Freezer mode<br />
The use of temperatures of -18°C / 0°F or colder to store food means that the food can be kept<br />
for longer periods than when refrigerator temperatures are used. This is because the growth<br />
of bacteria, moulds <strong>and</strong> yeasts are stopped, <strong>and</strong> chemical <strong>and</strong> physical reactions are severely<br />
restricted at such low temperatures. This results in food staying fresher for longer.<br />
To use Freezer mode:<br />
1 Press <strong>and</strong> hold the LOCK button for 3 seconds to unlock the control panel.<br />
2 Press the MODE SELECT button.<br />
3 Scroll to FREEZER mode.<br />
4 The Freezer mode icon will flash until the CoolDrawer is at a suitable<br />
temperature for food to be added (this will take between 1 – 6 hours).<br />
Recommended freezer storage times for food stored on freezer mode<br />
These times should not be exceeded.<br />
Customising the storage environment<br />
M o n t h s<br />
1 Bacon, casseroles, milk<br />
2<br />
Bread, ice-cream, sausages, pies (meat <strong>and</strong> fruit), prepared<br />
shellfish, oily fish<br />
3 Non-oily fish, shellfish, pizza, cakes <strong>and</strong> muffins<br />
4 Ham, beef <strong>and</strong> lamb chops, poultry pieces<br />
6<br />
12<br />
Butter, vegetables (blanched), eggs whole <strong>and</strong> yolks, cooked<br />
crayfish, minced meat (raw), pork (raw)<br />
Fruit (dry or in syrup), egg whites, beef (raw), whole chicken,<br />
lamb (raw), fruit cakes<br />
For optimum freezing results we recommend removing storage bins from the CoolDrawer <strong>and</strong><br />
placing packaged food directly on the trays.<br />
9
10<br />
Customising the storage environment<br />
Additional freezer mode functions<br />
Note: only one Freezer mode function may be operated at any one time.<br />
Bottle Chill<br />
This function allows you to rapidly chill your beverages in the freezer without the worry of<br />
forgetting about them. Activating Bottle Chill drops the freezer down to its coldest setting for<br />
15 minutes. After 15 minutes, an alarm will sound to remind you to remove your beverage. The<br />
user alarm will continue to sound until the drawer is opened <strong>and</strong> the display panel is unlocked.<br />
The Bottle Chill light will also flash.<br />
Remember to remove your beverage when the alarm sounds, to ensure the liquid does not<br />
freeze.<br />
Important!<br />
This function can only be activated when the CoolDrawer is set to ‘Freezer’ setting.<br />
To use the Bottle Chill function:<br />
1 Press <strong>and</strong> hold the LOCK button for 3 seconds to unlock the control panel.<br />
2 Press the FUNCTION SELECT button to select BOTTLE CHILL. The Bottle<br />
Chill timer will start automatically.<br />
3 Place your beverage into the CoolDrawer.<br />
To turn Bottle Chill off at any time, press the FUNCTION SELECT button<br />
three times until no Freezer function lights are displayed.<br />
The Temperature adjustment light will scroll back <strong>and</strong> forth over the 15 minute period to remind<br />
you that Bottle Chill is active.<br />
Fast Freeze<br />
The Fast Freeze function has been designed to assist in preserving fresh food quality by freezing<br />
food at a faster rate than the normal freezer setting. Activating Fast Freeze drops the freezer<br />
temperature down to its coldest temperature for 24 hours. You may wish to use this when<br />
freezing meat or when you are making frozen desserts. It is also good to use when arriving home<br />
from the supermarket <strong>and</strong> adding fresh food into the freezer.<br />
Important!<br />
This function can only be activated when the CoolDrawer is set to ‘Freezer’ setting.
■■<br />
■■<br />
Additional freezer mode functions<br />
Customising the storage environment<br />
To use the Fast Freeze function:<br />
1 Press <strong>and</strong> hold the LOCK button for 3 seconds to unlock the control panel.<br />
2 Press the FUNCTION SELECT button to select FAST FREEZE. Fast Freeze<br />
will start automatically.<br />
3 Place your fresh food to be frozen into the CoolDrawer.<br />
4 Fast Freeze will automatically switch off after 24 hours <strong>and</strong> return to<br />
Freezer mode.<br />
To turn Fast Freeze off at any time, press the FUNCTION SELECT button<br />
twice until no Freezer function lights are displayed.<br />
The Temperature adjustment light will scroll back <strong>and</strong> forth over the 24 hour period to remind<br />
you that Fast Freeze is active.<br />
For best results, we recommend that you activate this function approximately 2 hours before it is<br />
required. Alternatively, activate it when placing food into the freezer.<br />
Deep Freeze<br />
The key to long term frozen storage is low temperature. The lower the temperature, the longer<br />
frozen food will its vital flavour <strong>and</strong> quality.<br />
The reduced temperature of Deep Freeze will keep frozen food at its best for longer periods.<br />
Deep Freeze sets the compartment at -25°C / -13°F.<br />
Ensure that food is placed in thick freezer proof packaging.<br />
Important!<br />
This function can only be activated when the CoolDrawer is set to ‘Freezer’ mode.<br />
To use the Deep Freeze function:<br />
1 Press <strong>and</strong> hold the LOCK button for 3 seconds to unlock the control panel.<br />
2 Press the FUNCTION SELECT button to select DEEP FREEZE.<br />
To turn Deep Freeze off at any time, press the FUNCTION SELECT button<br />
once until no Freezer function lights are displayed.<br />
Note:<br />
Deep Freeze function has no additional temperature adjustment.<br />
While Deep Freeze is active no lights will be displayed on the temperature adjustment area.<br />
11
12<br />
Customising the storage environment<br />
Chill mode<br />
Chill mode sets the CoolDrawer at a temperature that is ideal for the storage of highly perishable<br />
fresh meats, poultry <strong>and</strong> fish products. It is ideal to hold highly perishable food at a temperature<br />
as close to freezing as possible to retain their vital freshness.<br />
Chill mode sets the CoolDrawer at -0.5°C / 31°F, just above the freezing temperature for meat.<br />
This reduces the amount of microbial activity <strong>and</strong> slows physical changes, ensuring that meat<br />
stays fresher for longer.<br />
The initial quality of the perishable food that is placed in Chill mode will be critical to successful<br />
storage. Ensure that meat is as fresh as possible when purchased <strong>and</strong> stored.<br />
The Chill mode can also be used for chilling alcoholic beverages.<br />
Important!<br />
This setting is not recommended for any other food or non-alcoholic drink items.<br />
To use Chill mode:<br />
1 Press <strong>and</strong> hold the LOCK button for 3 seconds to unlock the<br />
control panel.<br />
2 Press the MODE SELECT button.<br />
3 Scroll to CHILL mode.<br />
4 The Chill mode icon will flash until the CoolDrawer is at a suitable<br />
temperature for food to be added (this will take between 1 – 6 hours).<br />
Research tells us that highly perishable food stored on Chill mode will last 2 – 3 times longer<br />
than when stored at normal refrigerator temperatures.
■■<br />
■■<br />
■■<br />
Fridge mode<br />
Customising the storage environment<br />
Fridge mode is the ideal storage environment for most fresh foods.<br />
When storing fresh fruit <strong>and</strong> vegetables, we recommend that they are stored in the top or<br />
bottom bins on the left-h<strong>and</strong> side of the drawer. Both of these bins are humidity controlled.<br />
This will help to preserve the quality of the fruit <strong>and</strong> vegetables, increasing their storage life.<br />
Ensure all food is well wrapped (except for fruit <strong>and</strong> vegetables stored in the vegetable bins),<br />
covered or placed in a container before it is stored.<br />
To use Fridge mode:<br />
1 Press <strong>and</strong> hold the LOCK button for 3 seconds to unlock the<br />
control panel.<br />
2 Press the MODE SELECT button.<br />
3 Scroll to FRIDGE mode.<br />
4 The Fridge mode icon will flash until the CoolDrawer is at a suitable<br />
temperature for food to be added (this will take between 1 – 6 hours).<br />
Fruit <strong>and</strong> vegetable Humidity Control System (HCS)<br />
Humidity control cover<br />
The vegetable bins feature a unique hidden cover which provides two functions:<br />
The humidity cover seals the bins <strong>and</strong> provides a humid micro climate to extend storage times of<br />
fruit <strong>and</strong> vegetables.<br />
The humidity cover prevents condensation, which forms at high humidity, from dripping down<br />
onto the fruit <strong>and</strong> vegetables by retaining the moisture droplets in the lid.<br />
Fig 3. Humidity control buttons<br />
13
■■<br />
■■<br />
■■<br />
14<br />
Customising the storage environment<br />
Humidity control<br />
Each fruit <strong>and</strong> vegetable bin has a humidity control button that can be adjusted to care for fruit<br />
or vegetables depending on what is stored in the bins. The humidity controls are located on the<br />
left h<strong>and</strong> side of the CoolDrawer (as shown in fig 3, on the previous page).<br />
If possible, try to store fruit <strong>and</strong> vegetables separately. This will help to extend their storage life.<br />
If there is too much water in the bins (due to the high humidity in the bins), the control can be<br />
adjusted to the FRUIT setting <strong>and</strong>/or the water can be wiped out as required.<br />
Remember a small amount of water in the bins is beneficial for fruit <strong>and</strong> vegetable storage. The<br />
vegetable screens, in the bottom of the bins, will ensure that fresh produce is held above any<br />
moisture in the bottom of the bins to retain optimum freshness.<br />
To adjust the humidity setting:<br />
The picture on the top of the humidity control button will show the current<br />
setting. To change the setting, simply push the adjustment button.<br />
Suitable for: Suitable for:<br />
Salad greens (high humidity)<br />
– Lettuce<br />
– Spinach<br />
Broccoli<br />
Cabbage<br />
Carrots<br />
For a more detailed list please refer to pages 22 – 24.<br />
Fruit with skin/ peel (reduced humidity)<br />
– Apples<br />
– Pears<br />
– Kiwifruit
Pantry mode<br />
Customising the storage environment<br />
The Pantry mode finally provides a solution for all those foods that you didn’t previously know<br />
what to do with, <strong>and</strong> have always resorted to storing on the bench or in the cupboard.<br />
The Pantry mode is designed specifically for foods that require a 'cool, dark place' for storage.<br />
Sensitive food<br />
There are a wide variety of foods that often perish quickly if stored at room<br />
temperature but can be damaged by normal refrigerator temperatures,<br />
eg. bananas <strong>and</strong> tomatoes.<br />
The Pantry mode provides a stable storage environment at 12°C / 54°F,<br />
making it an ideal environment for sensitive food items. Pantry mode<br />
also allows tropical fruits, eg. avocados, melons <strong>and</strong> pineapples, to ripen<br />
slowly under controlled conditions, without the risk of damage from low<br />
temperatures.<br />
A cool cupboard<br />
Freshly baked items such as cakes <strong>and</strong> breads can quickly turn mouldy when placed in the<br />
cupboard but become hard <strong>and</strong> stale when placed in a conventional refrigerator. The Pantry<br />
mode provides ideal storage for these items so that they remain fresher for longer. It is also a<br />
great place to store dried goods, cereals <strong>and</strong> other items that can become a target for mould <strong>and</strong><br />
insects when stored at room temperature.<br />
Important!<br />
The Pantry mode is not suitable for highly perishable fresh dairy <strong>and</strong> meat items, or<br />
pre-cooked foods.<br />
To use Pantry mode:<br />
1 Press <strong>and</strong> hold the LOCK button for 3 seconds to unlock the control panel.<br />
2 Press the MODE SELECT button.<br />
3 Scroll to PANTRY mode.<br />
4 The Pantry mode icon will flash until the CoolDrawer is at a suitable<br />
temperature for food to be added (this will take between 1 – 6 hours).<br />
15
■■<br />
■■<br />
■■<br />
■■<br />
16<br />
Customising the storage environment<br />
The following table shows some examples of food items that are suitable for the Pantry mode.<br />
Fruits Vegetables General Foods<br />
Avocado<br />
Bananas<br />
Feijoas<br />
Grapefruit<br />
Guava<br />
Lemons<br />
Limes<br />
Mangos<br />
Passionfruit<br />
Papaya/ Pawpaw<br />
Pineapple<br />
Tomatoes<br />
Watermelons<br />
Additional uses for Pantry mode<br />
Basil<br />
Courgettes/zucchinis<br />
Cucumbers<br />
Eggplant/aubergine<br />
Potatoes<br />
Pumpkin<br />
Squash<br />
Taro<br />
Baked goods<br />
Breads<br />
Chocolate<br />
Cereals<br />
Dried goods<br />
Dried Herbs<br />
Nuts<br />
Keep your natural cosmetic <strong>and</strong> skin care products in Pantry mode to keep them fresher<br />
for longer.<br />
When the weather is hot, keep your moisturiser, toner <strong>and</strong> spritzer cool for a refreshing lift<br />
when applied.<br />
Use Pantry mode to ripen moulded cheeses, eg. brie, camembert, blue cheese. Ensure that<br />
cheeses are well wrapped, <strong>and</strong> once ripened, place back into Fridge mode.<br />
Keep dry goods out of reach of insects <strong>and</strong> high humidity in summer months.
Wine mode<br />
Customising the storage environment<br />
The conditions in which wine is stored can have large effects on its overall taste <strong>and</strong> aroma.<br />
Warmer temperatures can cause premature aging of wines <strong>and</strong> loss of quality. Cold temperatures<br />
can be just as bad, causing irreversible damage to the flavour. Temperature fluctuations can also<br />
have a negative impact on wine quality. Typical household fluctuations in temperature from day<br />
to night can cause harm to wine over time.<br />
Wine mode provides an ideal controlled environment for the long <strong>and</strong> short-term storage of<br />
both red <strong>and</strong> white wines.<br />
Long-term storage<br />
For long-term storage (longer than one week) of both red <strong>and</strong> white wines, the ideal recommended<br />
storage temperature is 12°C / 54°F. When Wine mode is selected, the CoolDrawer is automatically<br />
set to this ideal, constant temperature, to provide the optimum conditions for long term storage.<br />
Short-term storage / serving<br />
Wine mode is also ideal for short-term storage (less than one week) of wines. Both red <strong>and</strong><br />
white wines require different serving temperatures to ensure an optimum taste experience.<br />
White wines should be served at cooler temperatures (approximately 7°C / 45°F) whereas red<br />
wines are better served at warmer temperatures (approximately 15°C / 59°F). Wine mode can be<br />
customised to provide these two optimum serving temperatures.<br />
Serving temperature Wine type<br />
7°C / 45°F Suitable for the majority of white wines including<br />
Chardonnay, Sauvignon Blancs, Rieslings, Chenin Blancs<br />
<strong>and</strong> Pinot Gris. If white wines are served too cold, the<br />
aromas <strong>and</strong> flavours will be minimised <strong>and</strong> you won’t get<br />
full enjoyment.<br />
15°C / 59°F Suitable for red wines including Merlot, Bordeaux,<br />
Zinf<strong>and</strong>el, Cabernet Sauvignon <strong>and</strong> Syrah/Shiraz. If red<br />
wines are served too warm the alcohol can produce an<br />
unpleasant bite on the palate.<br />
17
18<br />
Customising the storage environment<br />
To use Wine mode:<br />
1 Press <strong>and</strong> hold the LOCK button for 3 seconds to unlock the control panel.<br />
2 Press the MODE SELECT button.<br />
3 Scroll to WINE mode.<br />
4 The Wine mode icon will flash until the CoolDrawer is at a suitable<br />
temperature for wine bottles to be added (this will take between 1 – 6 hours).<br />
To customise the storage environment for ideal serving temperatures:<br />
Use the Temperature adjustment control to change the temperature.<br />
Fig.4 Adjusting temperature<br />
Cellar (default setting)<br />
Automatically selected when Wine mode is selected.<br />
Long term wine storage for red <strong>and</strong> white wine cellaring.<br />
White wine<br />
For white wine short term storage <strong>and</strong> serving press the<br />
COLDER button to select the white wine (-) setting.<br />
Red wine<br />
For red wine short term storage <strong>and</strong> serving press the<br />
WARMER button to select the red wine (+) setting.
Which storage mode should I use?<br />
Important!<br />
These times are intended as a <strong>guide</strong> only. If products have a “best-before” or “use-by” date, always<br />
refer to this for storage times. Always check food for signs of spoilage before consumption.<br />
Approximate storage time Recommended storage mode<br />
Frozen Fresh<br />
(Freezer mode)<br />
Meat, fish <strong>and</strong> poultry<br />
Meat<br />
Beef (roasts, steaks) 6 – 12 months 1 week ** *<br />
Pork (roasts, steaks) 4 – 8 months 3 – 7 days ** *<br />
Lamb (chops, roasts) 8 – 12 months 5 – 12 days ** *<br />
Other meat (eg.<br />
Kidneys, Liver etc)<br />
Ground meat<br />
3 – 5 months 3 – 5 days<br />
Beef hamburger<br />
(ground)<br />
3 – 4 months 1 – 2 days ** *<br />
Pork, Lamb, Veal,<br />
Turkey (ground)<br />
3 – 4 months 1 – 2 days ** *<br />
Processed meat products<br />
Ham (lean) 1 – 2 months 3 – 5 days ** *<br />
Bacon 1 month 2 – 3 weeks ** *<br />
Sausage (raw) 1 – 2 months 1 – 7 days ** *<br />
Sausage (smoked<br />
links or patties)<br />
Poultry<br />
1 – 2 months 1 – 3 weeks ** *<br />
Chicken or Turkey<br />
(pieces)<br />
4 – 6 months 2 – 5 days ** *<br />
Chicken or Turkey<br />
(whole)<br />
8 – 12 months 2 – 7 days ** *<br />
Goose or Duck<br />
Fish <strong>and</strong> shellfish<br />
6 months 2 – 5 days ** *<br />
Haddock, Cod, Hake,<br />
Tuna<br />
3 – 4 months 2 – 7 days ** *<br />
Oily fish (eg. Salmon,<br />
Mackerel)<br />
3 – 6 months 3 – 8 days ** *<br />
Shellfish (prepared) 6 months 1 – 5 days ** *<br />
Lobster, Crayfish<br />
(cooked)<br />
2 – 3 days 6 months ** *<br />
** Longer term frozen storage<br />
* Shorter term frozen storage<br />
Fresh storage<br />
19
20 Which storage mode should I use?<br />
Approximate storage time Recommended storage mode<br />
Frozen Fresh<br />
(Freezer mode)<br />
Dairy products, cooked foods <strong>and</strong> deli items<br />
Dairy products<br />
Butter 6 months<br />
1 – 3<br />
months<br />
** *<br />
Fresh cheeses<br />
(eg. ricotta,<br />
mozzarella or cottage)<br />
ns<br />
1 – 2<br />
weeks<br />
Cheese (eg. cheddar) ns 3 months<br />
Grated cheese<br />
(airtight)<br />
ns<br />
1 – 2<br />
weeks<br />
** *<br />
Moulded cheeses<br />
(to ripen)<br />
ns<br />
1 – 4<br />
weeks<br />
Milk, low fat 1 month<br />
1 – 2<br />
weeks<br />
** *<br />
Yogurt ns 1 month<br />
Ice Cream<br />
Eggs<br />
2 – 6 months ns ** *<br />
Fresh eggs (in shell) 6 months<br />
2 – 4<br />
weeks<br />
** *<br />
Cooked eggs (hard)<br />
Deli items<br />
Store brought<br />
ns 1 week<br />
salads (eg. pasta,<br />
tuna, chicken,<br />
ham, egg)<br />
ns 1 – 3 days<br />
Lunch meats (thinly<br />
sliced)<br />
ns 1 – 3 days<br />
Pre-prepared<br />
convenience meals<br />
ns 1 – 2 days<br />
Cooked foods <strong>and</strong> leftovers<br />
Leftovers – reheat<br />
until steaming<br />
before consuming<br />
ns 1 – 2 days<br />
Cooked meat <strong>and</strong><br />
meat dishes<br />
1 – 2 months 2 – 4 days ** *<br />
Pies (meat <strong>and</strong> fruit) 1 – 2 months 2 – 4 days ** *<br />
** Longer term frozen storage<br />
* Shorter term frozen storage<br />
Fresh storage<br />
ns Not suitable
Which storage mode should I use?<br />
Approximate storage time Recommended storage mode<br />
Frozen Fresh<br />
(Freezer mode)*<br />
Other<br />
Bread 2 months 2 – 7 days ** *<br />
Baked goods 3 months 2 – 7 days ** *<br />
Vegetables<br />
(blanched)<br />
6 months ns ** *<br />
Fruit (dry or in<br />
syrup)<br />
12 months ns ** *<br />
Oil (salad <strong>and</strong><br />
cooking)<br />
– –<br />
Beverages (general) – –<br />
Alcoholic beverages<br />
(to be chilled)<br />
– –<br />
Wine – –<br />
** Longer term frozen storage<br />
* Shorter term frozen storage<br />
Fresh storage<br />
ns Not suitable<br />
21
22 Which storage mode should I use?<br />
Fresh vegetables<br />
Approximate storage<br />
time<br />
Artichokes 1 – 2 weeks<br />
Asparagus 2 – 3 weeks<br />
Avocado 2 – 4 weeks<br />
Beans (snap, green) 7 – 10 days<br />
Bean Sprouts 7 – 10 days<br />
Beets (topped) Up to 4 months<br />
Belgian endive 2 – 4 weeks<br />
Bok Choy 3 weeks<br />
Broccoli 1 – 2 weeks<br />
Brussel sprouts 3 – 5 weeks<br />
Cabbage 1 – 2 months<br />
Carrots (topped) 1 – 3 months<br />
Cauliflower 3 – 4 weeks<br />
Celery 1 – 2 months<br />
Chard 1 – 2 weeks<br />
Corn (sweet <strong>and</strong> baby) 1 week<br />
Cucumber 1 – 2 weeks<br />
Daikon Up to 4 months<br />
Eggplant (aubergine) 1 – 2 weeks<br />
Garlic 6 months<br />
Ginger 6 months<br />
Herbs 1 – 2 weeks<br />
Horseradish 10 – 12 months<br />
Leafy greens, general 1 – 2 weeks<br />
Leek 1 – 2 months<br />
Lettuce 2 – 3 weeks<br />
Mushrooms 1 – 2 weeks<br />
Recommended storage mode
Fresh vegetables<br />
Approximate storage<br />
time<br />
Okra 7 – 10 days<br />
Onion Up to 6 months<br />
Parsnips 1 – 3 months<br />
Peas (in pods) 1 – 2 weeks<br />
Peppers 2 – 3 weeks<br />
Potato 2 – 7 months<br />
Pumpkin (uncut) 1 – 3 months<br />
Radicchio 4 – 8 weeks<br />
Radish 1 – 2 months<br />
Rhubarb 2 – 4 weeks<br />
Rutabaga 4 – 6 months<br />
Shallot 1 – 2 weeks<br />
Spinach 1 – 2 weeks<br />
Squash (summer) 1 – 2 weeks<br />
Sweet potato or yam 2 – 7 months<br />
Taro Up to 4 months<br />
Turnip 2 – 5 months<br />
Watercress 2 – 3 weeks<br />
Recommended humidity setting:<br />
Which storage mode should I use?<br />
Recommended storage mode<br />
Select VEGETABLE humidity setting for storage bin (refer to page 14).<br />
23
24 Which storage mode should I use?<br />
Fresh fruit<br />
Approximate storage<br />
time<br />
Apples 1 – 3 months<br />
Apricots 1 – 2 weeks<br />
Bananas 1 – 4 weeks<br />
Berries 3 – 18 days<br />
Cherries (sweet) 2 – 4 weeks<br />
Cranberries 2 – 4 months<br />
Dates Up to 6 months<br />
Feijoa 2 – 3 weeks<br />
Fig, fresh 7 – 10 days<br />
Gooseberry 3 – 4 weeks<br />
Grapes 1 – 4 weeks<br />
Guavas 2 – 3 weeks<br />
Lemons 1 – 6 weeks<br />
Limes 1 – 6 weeks<br />
M<strong>and</strong>arins 1 – 6 weeks<br />
Mangos 2 – 4 weeks<br />
Melons 2 – 4 weeks<br />
Nashi (Asian pear) 1 – 3 months<br />
Nectarines 2 – 4 weeks<br />
Oranges 1 – 6 weeks<br />
Olives, fresh 4 – 6 weeks<br />
Papayas 1 – 3 weeks<br />
Passionfruit 3 – 4 weeks<br />
Peaches 2 – 4 weeks<br />
Pears 1 – 3 months<br />
Persimmons 1 – 3 months<br />
Pineapples 2 – 4 weeks<br />
Plums <strong>and</strong> prunes 2 – 5 weeks<br />
Pomegranates 2 – 3 months<br />
Tomatoes 1 – 5 weeks<br />
Watermelon 2 – 3 weeks<br />
Quince 2 – 3 months<br />
Recommended humidity setting:<br />
Recommended storage mode<br />
Select FRUIT humidity setting for storage bin (refer to page 14).
■■<br />
Temperature adjustment<br />
Each of the storage modes will automatically default to<br />
an ideal temperature setting. This setting provides the<br />
recommended temperature for this storage environment.<br />
However, if you want to increase or decrease the<br />
temperature of the CoolDrawer, this can be done using<br />
the Temperature adjustment control.<br />
The recommended temperature is always the centre light.<br />
To adjust the temperature<br />
The pre-set temperature for each storage environment will<br />
show one illuminated light in the centre of the scale<br />
■■ To increase the temperature, simply touch the ‘warmer’<br />
icon (+).<br />
Each light displayed will increase the temperature setting<br />
slightly. When all four lights on the right are showing, you<br />
have reached the warmest setting.<br />
■■ To decrease the temperature, simply touch the ‘colder’<br />
icon (-).<br />
Each light displayed will decrease the temperature setting<br />
slightly. When all four lights on the left are showing, you<br />
have reached the coldest setting.<br />
General operating <strong>instructions</strong><br />
Fig.5 Adjusting temperature<br />
25
■■<br />
■■<br />
■■<br />
■■<br />
■■<br />
■■<br />
■■<br />
■■<br />
■■<br />
26<br />
General operating <strong>instructions</strong><br />
Key Lock<br />
The Key Lock mode disables the control panel so that the storage environment cannot<br />
accidentally be changed.<br />
The display will automatically lock after 15 seconds of the display not being used or when the<br />
drawer is closed. The red lock icon will appear above the Lock button when the panel is locked.<br />
Sabbath mode<br />
To use the Key Lock mode:<br />
Press the LOCK button for 3 seconds to lock or unlock the control panel.<br />
To use the Sabbath mode:<br />
Press <strong>and</strong> hold the LOCK button for 3 seconds to unlock the control panel.<br />
To activate <strong>and</strong> deactivate the Sabbath mode press <strong>and</strong> hold the LOCK <strong>and</strong><br />
MODE SELECT buttons for 4 seconds until the Sabbath mode icon<br />
is displayed.<br />
When the appliance is in Sabbath mode:<br />
The light will not operate when the drawer is opened.<br />
The drawer alarm will not operate.<br />
The display will not be illuminated.<br />
Opening the drawer will not affect the compressor or fans.<br />
If the power to the drawer is turned off whilst in this mode, the appliance will continue in<br />
Sabbath mode when the power is restored.<br />
Sabbath mode will automatically de-activate 80 hours after activation.<br />
To de-activate earlier than 80 hours press <strong>and</strong> hold the LOCK <strong>and</strong> MODE SELECT buttons for 4 seconds.
■■<br />
■■<br />
■■<br />
Fault Alarm<br />
If the electronic controller detects a fault which may affect operation, an alarm<br />
will sound <strong>and</strong> the fault icon on the display panel will flash. The audible alarm<br />
will stop when any button is pressed but the lights will continue flashing.<br />
If such a fault occurs, contact our Customer Care Centre immediately; the fault alarm sound will<br />
help the service person find <strong>and</strong> remedy the cause of failure.<br />
Important!<br />
Your CoolDrawer is designed to operate for many years without the need for service checks.<br />
However, if your CoolDrawer is malfunctioning contact our Customer Care Centre, details of<br />
Customer Care can be found in the back of this Guide. All electrical repairs must be carried out by<br />
an adequately trained service technician or qualified electrician.<br />
Control panel beeps<br />
The control panel beeps can easily be silenced, if you prefer quiet operation.<br />
Drawer alarms<br />
To turn control panel beeps on or off:<br />
General operating <strong>instructions</strong><br />
Press the LOCK button for 3 seconds to unlock the control panel.<br />
Press <strong>and</strong> hold the LOCK <strong>and</strong> COLDER buttons for 4 seconds until the beep<br />
icon turns off or on.<br />
If the drawer is left open an alarm will sound after 60 seconds.<br />
If the drawer remains open, subsequent beeps will sound every 30 seconds until the drawer<br />
is closed.<br />
After 5 minutes of the drawer being opened, the alarm will sound continuously <strong>and</strong> the<br />
compartment light will turn off.<br />
27
■■<br />
■■<br />
■■<br />
28<br />
General operating <strong>instructions</strong><br />
Customisable storage containers<br />
The CoolDrawer allows you to adjust the storage space, to meet your needs.<br />
Remove bins to provide open flexible storage space.<br />
Multi-level storage provides segregation of food items. The compact upper storage tray provides<br />
safe storage for delicate items or segregation for small items.<br />
Fig. 6 Mix <strong>and</strong> match storage containers to customise the drawer
Normal operating sounds<br />
The CoolDrawer with its excellent energy ratings <strong>and</strong> cooling performance, can produce sounds<br />
that may be different to your old refrigerator.<br />
Normal operational sounds include:<br />
■ ■ Fan, airflow sound. The CoolDrawer has a fan which circulates air around the drawer to provide<br />
cooling. This produces some air flow sound. This is quite normal.<br />
The CoolDrawer also has a condenser fan to discharge heat through the condenser. This also<br />
produces some airflow sound. This is normal.<br />
■ ■ Cracking or popping which may sound like ice breaking or falling. This occurs when the defrost<br />
function is operating.<br />
■ ■ Running water sound. This is the liquid refrigerant in the system, <strong>and</strong> can be heard as a boiling<br />
or gurgling noise.<br />
■ ■ An audible hissing sound after closing the drawer. This is due to the pressure difference<br />
between the warm air that has entered the drawer <strong>and</strong> suddenly cooled, <strong>and</strong> the outside<br />
air pressure.<br />
■ ■ A humming sound. This is normal as the motor operates for long periods of time. This appliance<br />
uses an energy efficient, variable speed compressor that saves energy by running for long periods<br />
of time on a low speed. This is more energy efficient than the conventional on/off method.<br />
■■<br />
Other sounds may be heard for the following reasons:<br />
– Floor or cabinetry uneven or weak.<br />
– Bottles or jars rattling.<br />
– Appliance not installed correctly.<br />
General operating <strong>instructions</strong><br />
29
■■<br />
■■<br />
■■<br />
■■<br />
30<br />
Food storage tips<br />
Never before have we had better food available or a wider choice than we have today. We are<br />
more aware of food quality <strong>and</strong> we are more aware of our health.<br />
We are rediscovering the anti-aging properties of food, their ability to lower cholesterol, increase<br />
lifespan, <strong>and</strong> improve general well being. We pay h<strong>and</strong>somely for exotic flavours <strong>and</strong> speciality<br />
foods. All these valuable food qualities can be damaged if subjected to temperatures <strong>and</strong><br />
conditions which are not ideal.<br />
These sensitive, fresh foods need to be treated with care if they are to retain their storage life,<br />
flavour, nutrients <strong>and</strong> quality beyond our expectations.<br />
We are passionate about food <strong>and</strong> want to ensure you are able<br />
to enjoy all the flavour <strong>and</strong> goodness your food has to offer. The<br />
following pages have been included to offer you some helpful<br />
advice on how to keep your food fresher, tastier, nutritious <strong>and</strong><br />
safer for longer, <strong>and</strong> how to get the best out of your CoolDrawer<br />
food care system.<br />
Why do foods spoil?<br />
The essence of optimum food storage is excellent food care.<br />
The fundamental principle of improving food care is minimising the quality losses associated<br />
with storage, including physical, chemical <strong>and</strong> microbiological changes, eg. moisture loss,<br />
bacterial growth, quality deterioration; <strong>and</strong> reducing the effects of undesirable factors, eg. dry<br />
air, light, unwanted moisture, odours, vibration <strong>and</strong> temperature fluctuations.<br />
Foods spoil or deteriorate in quality for one or more of the following reasons:<br />
The growth of bacteria, moulds or yeasts<br />
Chemical or biochemical reactions<br />
Moisture loss<br />
Absorption of foreign odours or flavours
How can you slow down food spoilage?<br />
Food storage tips<br />
Temperature control<br />
Cold temperatures will slow down bacteria, mould <strong>and</strong> yeast growth. Remember the faster you<br />
chill or freeze your food the safer it will be from microbial growth <strong>and</strong> the better quality it will<br />
retain for longer. Once chilled to below 4°C / 39°F or frozen to -18°C / 0°F the temperature must<br />
be kept constant <strong>and</strong> accurate without large temperature fluctuations.<br />
Chemical <strong>and</strong> biochemical reactions<br />
Such reactions occur naturally in fresh produce <strong>and</strong> are what<br />
cause foods to ripen <strong>and</strong> eventually to decay. Chemical reactions<br />
are slowed down at colder temperatures. This means your fruit<br />
<strong>and</strong> vegetables will ripen slowly, therefore last longer when<br />
stored at refrigerator temperatures. The colder the temperature<br />
the slower this reaction will occur.<br />
Moisture loss<br />
Most food contains at least 60% moisture. The air in a refrigerator is very cold <strong>and</strong> therefore<br />
will dry out foods over a period of time. It is recommended that food is covered or wrapped to<br />
prevent unnecessary moisture loss. Moisture loss of fruit <strong>and</strong> vegetables is reduced when stored<br />
in the humidity controlled bins. Fruit <strong>and</strong> vegetables do not need to be covered when stored in<br />
the bins.<br />
Absorption of foreign odours <strong>and</strong> flavours<br />
Exchange of odours can occur in many foods. Food such as eggs, butter <strong>and</strong> milk will absorb<br />
odours readily from fish. Fruit <strong>and</strong> eggs will also absorb flavour from onions. It is important to<br />
wrap odorous food to prevent this flavour transfer.<br />
Your CoolDrawer has constant <strong>and</strong> accurate temperature control, providing a stable environment<br />
for your food. This combined with rapid cooling <strong>and</strong> freezing rates reduces the rate at which<br />
food will deteriorate.<br />
31
■■<br />
■■<br />
■■<br />
■■<br />
■■<br />
■■<br />
■■<br />
■■<br />
■■<br />
■■<br />
■■<br />
■■<br />
■■<br />
32 Food storage tips – fresh food<br />
Keeping food fresh<br />
The quality of food before it is placed in the CoolDrawer is critical to successful storage.<br />
For best results:<br />
Select foods that are very fresh <strong>and</strong> of good quality.<br />
Buy only the amount that you will use within the recommended storage time. If you buy extra,<br />
plan to freeze it.<br />
Cover<br />
Ensure that food is well wrapped or covered before it is stored. This will prevent food from<br />
dehydrating, deteriorating in colour or losing taste <strong>and</strong> will help maintain freshness. It will also<br />
prevent odour transfer. Vegetables <strong>and</strong> fruit need not be wrapped provided they are stored in<br />
the vegetable bins of the CoolDrawer.<br />
Make sure that strong smelling foods are wrapped or covered <strong>and</strong> stored away from foods such<br />
as butter, milk <strong>and</strong> cream which can be tainted by strong odours.<br />
Separate<br />
Store raw <strong>and</strong> cooked food in separate containers or packaging to prevent cross contamination.<br />
Store fruit <strong>and</strong> vegetables separately.<br />
Chill<br />
Refrigerate fresh, perishable foods as soon as possible after purchase. If left at room temperature<br />
for any length of time the rate of deterioration will be accelerated.<br />
Make sure that there is enough room for air to circulate freely around food items. Cold air needs<br />
to circulate to maintain safe food storage.<br />
Avoid opening the drawer unnecessarily.<br />
Cool hot foods down before placing them in the drawer. This should be done quickly. It can be<br />
aided by placing the container of food in a bowl of ice <strong>and</strong> water; renew the ice as necessary.<br />
(Note also that hot containers may damage storage bins or trays in the appliance).<br />
In addition<br />
Keep the drawer clean. Wipe the inside walls, bins <strong>and</strong> tray frequently <strong>and</strong> place only clean<br />
containers in the drawer.<br />
Check the quality of the food in your appliance regularly. Discard any food that shows signs of<br />
spoilage. Pay particular attention to meat, fish <strong>and</strong> poultry, as these foods are highly perishable.<br />
Use food within the recommended storage times.
■■<br />
■■<br />
■■<br />
■■<br />
■■<br />
■■<br />
■■<br />
■■<br />
■■<br />
■■<br />
■■<br />
■■<br />
■■<br />
■■<br />
■■<br />
■■<br />
Dairy foods <strong>and</strong> eggs<br />
Food storage tips – fresh food<br />
Most pre-packed dairy foods have a recommended use by / best before<br />
/ best by date stamped on them. Store them using Fridge mode <strong>and</strong><br />
use within the recommended time.<br />
Vacuum packed cheese should be kept unopened in the original<br />
packaging. Once opened, place in a sealed plastic bag, or wrap in foil<br />
to prevent drying out.<br />
Butter can become tainted by strong smelling foods so it is best stored<br />
in a sealed container.<br />
Eggs should be stored using Fridge mode. For best results, especially<br />
when baking, remove the eggs from the drawer two hours before they<br />
are to be used.<br />
Red meat<br />
Place fresh red meat in a covered container or loosely cover with waxed<br />
paper, plastic wrap or foil.<br />
Store cooked <strong>and</strong> raw meat separately. This will prevent any juices from<br />
the raw meat contaminating the cooked product.<br />
Delicatessen meats should be used within the recommended storage time.<br />
For best results, store fresh red meat using Chill mode.<br />
Poultry<br />
Fresh whole birds should be rinsed inside <strong>and</strong> out with cold running<br />
water. Dry <strong>and</strong> place on a plate. Cover loosely with plastic wrap or foil.<br />
Poultry pieces should also be stored this way. Whole poultry should never<br />
be stuffed until just before cooking, otherwise food poisoning may result.<br />
Cool <strong>and</strong> refrigerate cooked poultry quickly. Remove stuffing from<br />
poultry <strong>and</strong> store separately.<br />
For best results, store fresh poultry using Chill mode.<br />
Fish <strong>and</strong> seafood<br />
Whole fish <strong>and</strong> fillets should be used on the day of purchase. Until<br />
required, refrigerate covered with plastic wrap, waxed paper or foil.<br />
If storing overnight or longer, take particular care to select very<br />
fresh fish. Whole fish should be rinsed in cold water to remove loose<br />
scales <strong>and</strong> dirt <strong>and</strong> then patted dry with paper towels. Place whole<br />
fish or fillets in a sealed plastic bag.<br />
Keep shellfish chilled at all times. Use within 1 – 2 days.<br />
For best results, store fresh seafood using Chill mode.<br />
Important!<br />
Always store raw meat, poultry, fish separately in the CoolDrawer to stop them dripping on or<br />
touching other foods.<br />
33
■■<br />
■■<br />
■■<br />
■■<br />
■■<br />
■■<br />
■■<br />
■■<br />
■■<br />
■■<br />
■■<br />
■■<br />
■■<br />
■■<br />
■■<br />
■■<br />
■■<br />
■■<br />
34 Food storage tips – fresh food<br />
Precooked foods <strong>and</strong> leftovers<br />
These should be stored in suitable, covered containers so that the<br />
food will not dry out.<br />
Storage containers should be shallow to assist in rapid cooling.<br />
Keep for only 1 – 2 days.<br />
Reheat leftovers only once <strong>and</strong> until steaming hot.<br />
How should cooked meats be stored?<br />
Cover all cooked meats to prevent drying <strong>and</strong> contamination from raw foods.<br />
Do not put piping hot meats in the CoolDrawer. Cool left-over cooked meat quickly after<br />
cooking, then chill.<br />
Well cooked roasts will keep longer than very rare roasts.<br />
Leave a roast whole, loosely covered with foil, in a cool place until it has partly cooled. Then wrap<br />
securely with foil <strong>and</strong> place in the CoolDrawer.<br />
Leaving pieces whole prevents meat drying out.<br />
To limit contamination <strong>and</strong> bacterial growth, do not slice meat until just before use.<br />
Cured <strong>and</strong> smoked meats are less perishable than fresh meats. Leave pre-packaged items in their<br />
original wrappings or vacuum packs <strong>and</strong> chill promptly. Once opened, keep tightly covered in<br />
the CoolDrawer set on Fridge mode <strong>and</strong> use before the expiry date.<br />
Herbs <strong>and</strong> spices<br />
Fresh herbs should be stored using Fridge mode.<br />
Dried herbs <strong>and</strong> spices, which gradually lose their strength <strong>and</strong> flavour when exposed to heat,<br />
light <strong>and</strong> air can be stored using Pantry mode.<br />
You can also seal fresh herbs in a freezer bag <strong>and</strong> keep them frozen for several months.<br />
Salad dressings <strong>and</strong> sauces<br />
Store opened jars of commercial mayonnaises on Fridge mode – make sure they are tightly<br />
sealed <strong>and</strong> they will keep for a number of months.<br />
Products such as mayonnaise, mustard <strong>and</strong> tomato sauce may develop brown or black crusts<br />
around the rim of the bottle as a result of oxidation. It’s not harmful <strong>and</strong> doesn’t mean the food is<br />
going off. Just wipe it off before use.<br />
Dried goods<br />
Seal packaging well before placing it into the CoolDrawer.<br />
Store dried goods, eg. flour, rice, cereal in Pantry mode in the warm months to reduce risk of<br />
insect infestation.
Fruit <strong>and</strong> vegetable care<br />
Food storage tips – fresh food<br />
The consumption of fresh vegetables <strong>and</strong> fruit continues to rise.<br />
Busy lifestyles mean we shop less often <strong>and</strong> buy a greater range of<br />
fresh foods. It is important that these fresh foods, including fruit <strong>and</strong><br />
vegetables, retain their flavour, texture <strong>and</strong> nutrients <strong>and</strong> stay safe<br />
to eat for as long as possible.<br />
There are three main reasons why fruit <strong>and</strong> vegetables deteriorate:<br />
Respiration<br />
Fruit <strong>and</strong> vegetables are highly perishable food products. They continue to ripen <strong>and</strong> respire<br />
after harvest. They use oxygen from the air to convert their natural sugars to heat energy, carbon<br />
dioxide <strong>and</strong> water. Once produce is ripe, the respiration process causes produce to lose quality<br />
<strong>and</strong> food value. Refrigeration temperatures are the best method to slow down this natural<br />
respiration process. The colder the temperature the slower most fruit <strong>and</strong> vegetables will ripen.<br />
Micro-organism growth<br />
Fruit <strong>and</strong> vegetables are usually covered with micro-organisms which will cause decay given the<br />
right conditions. When fruits <strong>and</strong> vegetables are bruised, or the skin is broken, decay organisms<br />
enter the product. Decay <strong>and</strong> rotting will then occur if it is exposed to warm temperatures.<br />
Adequate refrigeration is the best method of controlling decay because low temperatures slow<br />
down the growth of most micro-organisms.<br />
Moisture loss<br />
Another reason why fruit <strong>and</strong> vegetables deteriorate is loss of moisture which causes them<br />
to wilt <strong>and</strong> shrivel. Fruits <strong>and</strong> vegetables contain approximately 90% water <strong>and</strong> water loss is a<br />
major cause of deterioration. If fruits <strong>and</strong> vegetables are exposed to dry, refrigerator air, they will<br />
quickly dry out.<br />
A high humidity, cold air environment is therefore necessary to extend the storage life of fruit<br />
<strong>and</strong> vegetables. This type of environment can be achieved by sealing the bins from the dry air in<br />
the CoolDrawer. This significantly increases the storage life of fruit <strong>and</strong> vegetables, ensuring they<br />
retain their crispness <strong>and</strong> remain a good source of essential vitamins, minerals <strong>and</strong> dietary fibre.<br />
35
■■<br />
■■<br />
■■<br />
■■<br />
■■<br />
■■<br />
■■<br />
■■<br />
36 Food storage tips – fresh food<br />
How the Humidity Control System (HCS) extends the storage life of fruit <strong>and</strong> vegetables<br />
A specially designed lid seals the storage bins to create a controlled micro-climate. The lid has<br />
the following unique features:<br />
It completely seals off the bins from the rest of the drawer. The respiration of fruit <strong>and</strong> vegetables<br />
create a high humidity environment in the bin <strong>and</strong> the lid traps most of this moisture in the bin,<br />
preventing them from drying out.<br />
It allows the temperatures in the bin to remain between 0 – 4°C / 32 – 39°F. These temperatures<br />
are required to slow down respiration <strong>and</strong> the growth of micro-organisms.<br />
It has long narrow grooves on the underside to capture <strong>and</strong> retain moisture given off from<br />
the stored produce. This prevents the moisture from dripping back down onto the fruit <strong>and</strong><br />
vegetables which would cause them to rot.<br />
The storage life of fruit <strong>and</strong> vegetables varies enormously, being influenced by the maturity <strong>and</strong><br />
quality of the produce at purchase <strong>and</strong> also the particular variety.<br />
You can change the environment your fruit <strong>and</strong> vegetables are stored in simply by pressing the<br />
humidity control button.<br />
Temperature sensitive fruit <strong>and</strong> vegetables<br />
Not all fruit <strong>and</strong> vegetables enjoy the same temperature. For some, temperatures that are too<br />
cold can actually cause damage to flavour, texture <strong>and</strong> freshness. For example chill injury can<br />
result in watery, tasteless tomatoes, stringy avocados <strong>and</strong> discoloured bananas.<br />
It is important to care for these food items <strong>and</strong> Pantry mode does just that. It provides a cool<br />
(12°C / 54°F) environment ideal for temperature sensitive foods. This temperature also allows<br />
fruit to ripen slowly under controlled conditions.<br />
Some examples of temperature sensitive produce best stored<br />
using Pantry mode:<br />
Tomatoes<br />
Cucumber<br />
Avocado<br />
Bananas<br />
For more examples refer to page 16.<br />
Points to remember:<br />
Fruits <strong>and</strong> vegetables not fully ripe when purchased will have a longer storage life especially<br />
when stored on Fridge or Pantry mode.<br />
Root vegetables should be kept in the dark. Light slowly turns their surface green, which makes<br />
them taste bitter <strong>and</strong> means they contain solanine, a chemical which is toxic in large doses. You<br />
can peel off small green patches, but if they are green all over, throw them away.<br />
Store root vegetables in brown paper bags on Pantry mode.<br />
Store soft, small fruit in the compact storage tray.
Food storage tips – fresh food<br />
Ethylene gas<br />
Ethylene is an odourless, colourless, gas produced naturally by fruit <strong>and</strong> vegetables. This gas<br />
plays an important role in accelerating the ripening process. Some fruit <strong>and</strong> vegetables produce<br />
large amounts of ethylene, while others are very sensitive to the gas. You may have noticed that<br />
when you place an apple into the fruit bowl with bananas, the bananas will ripen more quickly.<br />
This is due to the ethylene gas given off by the apple.<br />
By separating those items that produce high levels of ethylene from those that are most<br />
sensitive, you can prevent food from spoiling too quickly. As a general rule, separating fruit <strong>and</strong><br />
vegetables will help reduce the effects of ethylene.<br />
Examples:<br />
Food sensitive to ethylene Foods that produce high levels of ethylene<br />
Avocados (unripe) Apples<br />
Brussel sprouts Apricots<br />
Broccoli Avocados (ripe)<br />
Cabbage Cantaloupe<br />
Carrots Cherimoya (custard apple)<br />
Cucumber Passionfruit<br />
Eggplant Peaches<br />
Kiwifruit Pears<br />
Lettuce Tomatoes (ripe)<br />
Persimmons<br />
Quince<br />
Spinach<br />
Tomatoes (unripe)<br />
Watermelon<br />
37
■■<br />
■■<br />
■■<br />
■■<br />
38<br />
Food storage tips – frozen food<br />
Frozen food care<br />
Freezing temperatures allow food to be kept for longer periods<br />
than when refrigeration temperatures are used. This is because:<br />
The growth of bacteria, moulds <strong>and</strong> yeasts is stopped<br />
Chemical <strong>and</strong> biochemical reactions are severely restricted.<br />
Fast freezing of food<br />
The faster you freeze your fresh food, the better the quality of the end product. During the<br />
freezing process ice crystals form within fresh food cells. These crystals can exp<strong>and</strong> to a point<br />
where they break down the cell walls. This can cause ‘drip loss’ on thawing. Freezing food rapidly<br />
ensures that these ice crystals are kept as small as possible to retain the quality of frozen foods.<br />
Less drip loss means a more moist, tender <strong>and</strong> nutritionally rich product on thawing.<br />
Important!<br />
Freezer storage times are dependent not only on temperature but also on the quality of food<br />
being stored <strong>and</strong> the use of the correct moisture <strong>and</strong> vapour-proof packaging.<br />
For best results:<br />
Choose only high quality foods that freeze well.<br />
For optimum freezing results we recommend removing storage bins from the drawer <strong>and</strong><br />
placing food directly on the trays.
■■<br />
■■<br />
■■<br />
■■<br />
■■<br />
■■<br />
■■<br />
■■<br />
■■<br />
■■<br />
■■<br />
■■<br />
■■<br />
■■<br />
Temperature<br />
Food storage tips – frozen food<br />
Store at -18°C / 0°F or colder. Take care to maintain this low storage temperature, eg. try to avoid<br />
opening the drawer unnecessarily.<br />
If your ice cream is soft you are running Freezer mode too warm.<br />
For general freezer storage select Freezer mode.<br />
For longer term storage select the Deep Freeze function. The lower temperature will preserve<br />
food for longer.<br />
Packaging<br />
Use good quality freezer proof packaging to maintain food quality. If food is only covered in<br />
plastic film, place inside a freezer-proof plastic bag.<br />
Leave space at the top of containers, glass jars or plastic bags containing liquids or semi-solid<br />
foods. These exp<strong>and</strong> as they freeze. Usually 1 – 2 inches (20 – 50 mm) head space is recommended.<br />
Remove all the air from the packaging <strong>and</strong> seal tightly before freezing.<br />
When using the Deep Freeze function, ensure that freezer packaging is thick <strong>and</strong> airtight to<br />
reduce risk of freezer burn.<br />
Time<br />
Freeze immediately or as quickly as possible. For best results activate the Fast Freeze function.<br />
Keep a constant turnover of food. Use older items of food first. Do not exceed recommended<br />
storage times.<br />
Keeping food frozen past the recommended time will not affect food safety but will adversely<br />
affect the quality of the food.<br />
Amount<br />
Freeze only small quantities of food at any one time. For best results we recommend that only<br />
1 kg (2.2 lb) food per 25 L (0.9 cu.ft) of storage volume capacity.<br />
Do not pile frozen food around the air delivery vents at the rear of the drawer. It can prevent<br />
adequate air circulation.<br />
Thawing<br />
Thaw foods preferably in a refrigerator, or using a microwave oven or multifunction oven.<br />
39
■■<br />
■■<br />
■■<br />
■■<br />
■■<br />
■■<br />
■■<br />
■■<br />
■■<br />
■■<br />
■■<br />
■ ■<br />
■■<br />
■■<br />
■■<br />
■■<br />
■■<br />
40 Food storage tips – frozen food<br />
Meat, poultry <strong>and</strong> game<br />
Meat must be frozen quickly in order to maintain its texture.<br />
Do not stuff poultry before freezing.<br />
Red meat can be cooked from frozen, or from the partly or completely<br />
thawed states. Remember to allow extra cooking time if cooking from frozen.<br />
Always thaw poultry completely before cooking.<br />
Fish<br />
Fish is best frozen commercially. If however you do want to freeze<br />
fish at home, make sure the fish is very fresh <strong>and</strong> of high quality.<br />
Clean, scale <strong>and</strong> preferably leave whole. All fish should be wrapped<br />
in two layers of packaging as depending on the type of fish, odours<br />
<strong>and</strong> flavours can be readily transferred either to or from it. Seal<br />
packaging well.<br />
For best results, cook from either the frozen or partly thawed state.<br />
Vegetables<br />
Most vegetables freeze well, although salad vegetables are not<br />
recommended as they will lose their crispness.<br />
Other vegetables, eg. celery, onion <strong>and</strong> tomatoes should only be<br />
used in cooked dishes as they soften on freezing.<br />
Freeze only high quality, mature, ready-to-eat vegetables.<br />
Sort <strong>and</strong> discard any that are damaged.<br />
It is necessary to blanch most raw vegetables prior to freezing.<br />
Blanching involves a short cooking period during which vegetable<br />
enzymes are destroyed. If these enzymes are not destroyed they cause<br />
undesirable physical <strong>and</strong> chemical changes during freezer storage.<br />
Vegetables can be blanched in boiling water, steam or in a microwave<br />
oven. If using boiling water, boil vegetables for 2 – 4 minutes <strong>and</strong><br />
cool quickly.<br />
In general, frozen vegetables are best cooked from their frozen state.<br />
Prepared <strong>and</strong> cooked foods<br />
Most cooked foods can be frozen but it is not recommended to freeze<br />
the following:<br />
Cooked egg white, custards, cream fillings <strong>and</strong> milk puddings, gelatine<br />
or jelly-like dishes, mayonnaise <strong>and</strong> similar salad dressings, meringue<br />
toppings. These tend to separate on thawing.<br />
Fruit<br />
Choose high quality, mature, <strong>and</strong> ready to eat fruit. Preferably select<br />
varieties recommended for freezing.<br />
Avoid unripe <strong>and</strong> over-ripe fruit.<br />
The way fruit is packed depends on how it is to be used. Fruits packed in<br />
syrup are ideal for desserts, whereas fruits packed without sugar are better<br />
used for cooking. Most fruits can be stored for 8 – 12 months.
Keeping food safe<br />
Boiling point 100°C (212°F)<br />
Food storage tips – food safety<br />
Important!<br />
If highly perishable fresh food is not chilled or frozen quickly, harmful bacteria can grow <strong>and</strong> may<br />
cause food poisoning – anything from stomach upset to serious illness.<br />
Suitable for temperature<br />
sensitive foods that are<br />
not highly perishable,<br />
eg. bread, tropical fruit<br />
70°C (158°F)<br />
12°C (53°F)<br />
10°C (50°F)<br />
4°C (39°F)<br />
SAFE STORAGE ZONE<br />
Freezing point 0°C (32°F)<br />
-12°C (10°F)<br />
-18°C (0°F)<br />
unsafe food<br />
storage zone<br />
Bacteria gradually killed above<br />
Rapid growth of food poisoning organisms<br />
Slow growth of food<br />
poisoning organisms<br />
Fig. 7 Identifying safe storage temperatures<br />
for highly perishable fresh food<br />
(4 to 10°C)<br />
No growth of food spoilage organisms,<br />
ie. slow quality spoilage without danger<br />
to health<br />
41<br />
No growth of food spoilage organisms but<br />
some texture, flavour <strong>and</strong> odour changes (-12 to -18°C)<br />
Ideal food freezing temperature<br />
158°F<br />
(-12 to 0°C)
■■<br />
■■<br />
■■<br />
■■<br />
■■<br />
■■<br />
■■<br />
■■<br />
■■<br />
■■<br />
■■<br />
■■<br />
■■<br />
42 Food storage tips – food safety<br />
The bacteria that cause foodborne illness like Campylobacter <strong>and</strong> Salmonella multiply rapidly in<br />
warm, moist conditions. Fortunately the illnesses these bacteria cause are avoidable. By simply<br />
following the easy food h<strong>and</strong>ling tips below you could be helping to keep your family <strong>and</strong><br />
friends safe from illnesses caused by foodborne bacteria.<br />
Clean<br />
Thoroughly wash <strong>and</strong> dry h<strong>and</strong>s <strong>and</strong> work surfaces before preparing food.<br />
Keep cooked <strong>and</strong> raw food separate during preparation <strong>and</strong> storage, <strong>and</strong> use separate chopping<br />
boards <strong>and</strong> utensils to avoid cross contamination.<br />
After preparing food, clean all surfaces that have come into contact with food.<br />
Cook<br />
Defrost frozen foods in the refrigerator thoroughly before cooking.<br />
Minced meat <strong>and</strong> sausages should be cooked right through, <strong>and</strong> pork <strong>and</strong> poultry juices should<br />
run clear – use a meat thermometer to check temperatures.<br />
Pre-cook ground/minced meat, sausages <strong>and</strong> poultry before barbecuing.<br />
Chill leftovers as soon as they’re cool.<br />
Reheat leftovers until steaming hot throughout <strong>and</strong> do not reheat more than once.<br />
Do not put cooked meat back on the same plate that held raw meat.<br />
Cover<br />
Always cover stored food – even in the CoolDrawer or cupboard.<br />
Keep raw meat <strong>and</strong> poultry covered in the bottom of the drawer <strong>and</strong> away from ready-to-eat<br />
food, fruit <strong>and</strong> vegetables to avoid dripping juices.<br />
When cooking or eating out doors, ensure that all food remains covered <strong>and</strong> cool until ready to<br />
cook or eat.<br />
Remember – the only time your food should be uncovered is when you’re eating it!<br />
Chill<br />
■■<br />
Bacteria that cause foodborne illness thrive at room temperature – keep food very cold or very hot.<br />
■■<br />
Use shallow containers to chill food quickly.<br />
■■<br />
Chill all perishable foods until you are ready to use them.<br />
■■<br />
A chiller bag is a good way of keeping chilled <strong>and</strong> frozen products cold when taking them home<br />
from the supermarket.<br />
■■<br />
While picnicking, keep food cool by using a frozen chilly pad or drink bottle.<br />
■■ Defrost frozen foods in your CoolDrawer, refrigerator or microwave, <strong>and</strong> marinate food in the<br />
fridge, not on the bench.
■■<br />
■■<br />
■■<br />
■■<br />
■■<br />
■■<br />
■■<br />
■■<br />
■■<br />
■■<br />
■■<br />
Cleaning<br />
Important!<br />
Many commercially available cleaning products contain solvents that may attack the plastic<br />
components of your appliance <strong>and</strong> cause them to crack <strong>and</strong> may cause rusting of metal<br />
components (antibacterial <strong>and</strong> citrus cleaners are especially harsh). It is important to use only<br />
warm water <strong>and</strong> a small amount of liquid dishwashing detergent on any components inside or<br />
outside your appliance.<br />
It is important to keep the interior of the drawer clean to help prevent food from becoming<br />
contaminated during storage.<br />
The amount <strong>and</strong> types of food stored determines how often cleaning should be carried out<br />
(ideally once every 1 to 2 weeks).<br />
Do not use harsh, abrasive cloths or cleaner, or highly perfumed, strong smelling cleaners or<br />
solvents on any part of your appliance.<br />
Interior<br />
Remove the storage bins from the drawer <strong>and</strong> wash in a<br />
solution of warm water <strong>and</strong> liquid dishwashing detergent.<br />
Rinse the bins with clean water <strong>and</strong> dry before replacing in<br />
the drawer.<br />
The main storage tray can also be removed for cleaning. To<br />
remove the tray, slide the clips, located on the back sides of<br />
the tray, into the centre of the tray (refer to fig 6). Ensure that<br />
the clips are pushed back to the sides once the tray is placed<br />
back into the drawer.<br />
Wipe the control panel with a soft, damp, lint-free cloth.<br />
Wipe trays <strong>and</strong> interior surfaces with a soft, damp cloth <strong>and</strong> a<br />
solution of baking soda dissolved in warm water (1 teaspoon<br />
of baking soda to each pint 500 mls (one pint) of water).<br />
To help remove any lingering smells add a few drops of<br />
vanilla essence or vinegar to the water before cleaning.<br />
Exterior<br />
Clean exterior surfaces with warm water <strong>and</strong> detergent.<br />
Use a toothbrush for the magnetic door gasket.<br />
The air inlet duct located on the bottom (refer to fig 7), left h<strong>and</strong><br />
side of the product (accessed from the toe-kick area) should be<br />
cleaned at least once every 6 months with a cloth or vacuum<br />
cleaner. This will help prevent dirt or dust from blocking the<br />
inlet duct <strong>and</strong> reducing the efficiency of the product.<br />
Vacation time<br />
We recommend you leave your appliance operating while you<br />
are on vacation. Remove all perishable food from the drawer.<br />
Caring for your appliance<br />
43<br />
Slide the clips<br />
to the middle, to<br />
unlock the tray<br />
Fig. 8 Removal of storage tray<br />
Fig. 9 Air inlet duct
44<br />
Before you call for service<br />
If there is a problem with your appliance, please check the following points before contacting<br />
your local <strong>Fisher</strong> & <strong>Paykel</strong> Authorised Service Centre Dealer or Customer Care Centre.<br />
Solving operating problems<br />
Problem Possible causes What to do<br />
Appliance does<br />
not operate.<br />
Interior light <strong>and</strong>/<br />
or control panel<br />
not working.<br />
Motor operates<br />
for long periods<br />
No electricity at power outlet. Check that the plug is correctly connected<br />
to outlet <strong>and</strong> that power is switched on.<br />
Could the household supply be at fault?<br />
Try plugging in another appliance at the<br />
same outlet.<br />
Power cord not attached at rear<br />
of appliance.<br />
Has the appliance just been installed?<br />
Check your installation <strong>instructions</strong> to<br />
ensure the installer signed saying the<br />
product was working after installation<br />
then call an authorised service agent.<br />
No electricity at power outlet. Check that appliance is connected to<br />
power <strong>and</strong> power is switched on.<br />
Sabbath mode may be<br />
activated.<br />
Press <strong>and</strong> hold the Lock <strong>and</strong> Mode Select<br />
buttons together for 4 seconds, until<br />
c<strong>and</strong>le icon disappears.<br />
Light not functioning. The light cannot be serviced by the user.<br />
Contact your <strong>Fisher</strong> & <strong>Paykel</strong> Dealer or<br />
Authorised Service Agent.<br />
Key Lock mode may be<br />
activated.<br />
Is the Lock light on? If so, press <strong>and</strong> hold<br />
the Lock button for 3 seconds until the<br />
Lock light goes out.<br />
Note: This is normal. This appliance uses an energy efficient variable speed<br />
compressor that saves energy by running for long periods of time on a low<br />
speed. This is more energy efficient than the conventional on/off method.
Solving operating problems<br />
Before you call for service<br />
Problem Possible causes What to do<br />
Unfamiliar noises Freezer is defrosting. This is normal.<br />
coming from<br />
appliance.<br />
Refrigerant noises, eg. cracking,<br />
popping, hissing, running water,<br />
humming.<br />
This is normal. Refer to Operating Sounds<br />
section.<br />
Condensation Frequent or long drawer<br />
Minimise drawer openings.<br />
inside the drawer. openings.<br />
Drawer not sealing or closing Move items around so drawer can<br />
properly.<br />
close tightly.<br />
Check that seal is sitting flat <strong>and</strong><br />
sealing tightly.<br />
Check that drawer skin is not clashing with<br />
surrounding cabinetry.<br />
High humidity environment. May occur during periods of high<br />
humidity. Wipe dry.<br />
Drawer hard to Appliance may not be level. Refer to installation <strong>instructions</strong>.<br />
open or close.<br />
Tray or bin hard<br />
to pull out.<br />
Slides not extending fully. Hold onto sides of drawer or tray, extend<br />
the slides fully <strong>and</strong> evenly by using a<br />
firm pull on both sides. This will reset the<br />
slides.<br />
Food or packaging trapped. Move items around so drawer can<br />
close tightly.<br />
Drawer not sealing or closing Check that seal is sitting flat <strong>and</strong> sealing<br />
properly.<br />
tightly.<br />
Slides not<br />
Note: When drawer is set to Freezer mode slides will not move as freely as<br />
they will when set to the Fridge modes due to the lower temperatures.<br />
Hold onto sides of drawer or tray, extend<br />
extending fully.<br />
the slides fully <strong>and</strong> evenly by using a<br />
firm pull on both sides. This will reset<br />
the slides.<br />
45
46<br />
Before you call for service<br />
Solving operating problems<br />
Problem Possible causes What to do<br />
Drawer skin not<br />
sitting flush with<br />
cabinetry.<br />
Storage area too<br />
warm or too cold.<br />
Food freezing<br />
when set to<br />
Fridge mode.<br />
Food freezing<br />
when set to Chill<br />
mode.<br />
Ice buildup<br />
inside freezer<br />
compartment.<br />
Drawer skin not fitted or<br />
adjusted correctly.<br />
Adjust drawer skin. Refer to <strong>Installation</strong><br />
<strong>instructions</strong>.<br />
Temperature setting not correct. Refer to Temperature adjustment section.<br />
Frequent drawer openings. Minimise drawer openings to allow<br />
temperature to stabilise.<br />
Warm, humid weather. Minimise drawer openings to allow<br />
temperature to stabilise.<br />
Drawer not sealing or<br />
closing properly.<br />
Large amount of food<br />
recently added.<br />
The storage mode of the drawer<br />
has recently been changed.<br />
Move items around so drawer can<br />
close tightly.<br />
Check that seal is sitting flat <strong>and</strong><br />
sealing tightly.<br />
Check that drawer skin is not clashing with<br />
surrounding cabinetry.<br />
Minimise drawer openings to allow<br />
temperature to stabilise.<br />
Wait for the storage mode icon on control<br />
panel to stop flashing <strong>and</strong> recheck<br />
temperature.<br />
Temperature setting not correct. Refer to Temperature adjustment section.<br />
Food placed directly in front of<br />
air outlets.<br />
Move chill sensitive foods away from the<br />
back wall of the appliance.<br />
Temperature setting not correct. Refer to Temperature adjustment section.<br />
Items with high water content Select Fridge storage mode.<br />
may freeze.<br />
Drawer not sealing correctly. Move items around so drawer can<br />
close tightly.<br />
Check that drawer seal (gasket) is sitting<br />
flat <strong>and</strong> sealing tightly.<br />
Frequent drawer openings. Minimise drawer openings.<br />
High humidity environment. Not unusual during periods of high<br />
humidity. Wipe out.
Solving operating problems<br />
Before you call for service<br />
Problem Possible causes What to do<br />
Small amount<br />
of frost on the<br />
inside, bottom<br />
left-h<strong>and</strong> side of<br />
the compartment.<br />
This is normal.<br />
Water in the Condensation is formed from A small amount of condensation is<br />
storage bins. the water vapour produced by beneficial for fruit <strong>and</strong> vegetable storage.<br />
fruit <strong>and</strong> vegetables.<br />
If there is too much water, set humidity<br />
control button to fruit setting or store<br />
Odour coming Initial ‘new’ smell from<br />
fruit <strong>and</strong> vegetables loosely wrapped in<br />
plastic bags.<br />
Wipe out water with a cloth.<br />
This is normal <strong>and</strong> will disappear once the<br />
from appliance. manufacturing.<br />
drawer is in operation.<br />
Strong smelling food that have Cover all strong smelling <strong>and</strong> odorous<br />
not been covered or contained. foods carefully with food wrap or place<br />
food into sealed containers.<br />
Wipe drawer out with a mix of water <strong>and</strong><br />
vanilla essence to reduce residual odour.<br />
Expired food. Clear out old food from the drawer. If in<br />
doubt, throw it out.<br />
Spills. Clean up all spills as soon as they occur.<br />
Clean drawer with a mix of warm water<br />
<strong>and</strong> liquid dishwashing detergent.<br />
If a spill has escaped from large bottom<br />
tray <strong>and</strong> into the drawer, mop up as much<br />
of the spill as you can. If odour persists call<br />
an authorised service agent.<br />
If your appliance beeps for help <strong>and</strong> the service light (spanner) is flashing:<br />
1 Turn your appliance off at the wall.<br />
2 Wait 5 minutes <strong>and</strong> turn it back on.<br />
3 Check your appliance is level <strong>and</strong> installed correctly (refer to installation<br />
<strong>instructions</strong>).<br />
4 If the fault re-occurs call your <strong>Fisher</strong> & <strong>Paykel</strong> Dealer<br />
If problems persist, please contact your local <strong>Fisher</strong> & <strong>Paykel</strong> Appliances Authorised Service Centre<br />
Dealer or Customer Care Centre.<br />
47
48 Customer care<br />
Before you call for service or assistance…<br />
Check the things you can do yourself.<br />
Refer to your <strong>User</strong> Guide <strong>and</strong> check:<br />
1 Your appliance is correctly installed.<br />
2 You are familiar with its normal operation.<br />
3 You have read the problem solving at the back of the book (refer to pages 44 – 47).<br />
If after checking these points you still need assistance please refer to the following:<br />
Europe<br />
www.fisherpaykel.eu<br />
*If you call, write or contact our website please provide: your name <strong>and</strong> address, model number,<br />
serial number, date of purchase <strong>and</strong> a complete description of the problem. This information is<br />
needed in order to better respond to your request for assistance.<br />
Product details<br />
<strong>Fisher</strong> & <strong>Paykel</strong> Appliances Ltd<br />
Model/Serial No.<br />
Date of Purchase Purchaser<br />
Dealer Suburb<br />
Town Country
European directive 2002/96/EC on<br />
Waste Electrical <strong>and</strong> Electronic Equipment (WEEE)<br />
GB This appliance is marked according to the European directive 2002/96/EC on Waste<br />
Electrical <strong>and</strong> Electronic Equipment (WEEE). By ensuring this product is disposed of correctly,<br />
you will help prevent potential negative consequences for the environment <strong>and</strong> human health,<br />
which could otherwise be caused by inappropriate waste h<strong>and</strong>ling of this product.<br />
The symbol on the product, or on the documents accompanying the product, indicates<br />
that this appliance may not be treated as household waste. Instead it shall be h<strong>and</strong>ed over to<br />
the applicable collection point for the recycling of electrical <strong>and</strong> electronic equipment. Disposal<br />
must be carried out in accordance with local environmental regulations for waste disposal.<br />
For more detailed information about treatment, recovery <strong>and</strong> recycling of this product, please<br />
contact your local city office, your household waste disposal service or the shop where you<br />
purchased the product.<br />
49
www.fisherpaykel.eu<br />
50<br />
Copyright © <strong>Fisher</strong> & <strong>Paykel</strong> 2010. All rights reserved.<br />
The product specifications in this booklet apply to the specific products<br />
<strong>and</strong> models described at the date of issue. Under our policy of continuous<br />
product improvement, these specifications may change at any time. You<br />
should therefore check with your Dealer to ensure this booklet correctly<br />
describes the product currently available.<br />
EU F&P PN - 840717<br />
06.2010