Lunos f-go installation manual - Four Seven Five, High Performance ...
Lunos f-go installation manual - Four Seven Five, High Performance ...
Lunos f-go installation manual - Four Seven Five, High Performance ...

You also want an ePaper? Increase the reach of your titles
YUMPU automatically turns print PDFs into web optimized ePapers that Google loves.
Installation Instructions<br />
Window Ventilators<br />
- Please forward to the user-<br />
Contents Page:<br />
About these instructions, Safety Instructions 1<br />
Technical Data, Disposal 1<br />
Dimensional Drawings 2<br />
Installation Position 2<br />
Dispatch Units 3<br />
Assembly: 4<br />
Filter Replacement, Cleaning 8<br />
Accessories/Spare Parts 8<br />
About these instructions<br />
Before assembling, read these instructions carefully and completely! Make sure you read the<br />
general Safety Instructions and the Safety Symbols with notes in the text.<br />
These instructions are to be passed on to the user (tenant, owner, property management, etc.)<br />
after assembly has been completed.<br />
Signs used in these instructions<br />
This sign warns of risk of injury.<br />
This sign warns of risk of injury from electricity.<br />
Safety Instructions<br />
Caution! All assembly work for the ventilation system must be executed with the power supply<br />
deactivated! The ventilation unit is insulated pursuant to Protection Class II, protective earth<br />
connection is not required!<br />
Attention! Electrical connections must be executed by authorized, qualified staff in accordance<br />
with applicable VDE 0100!<br />
Attention! This unit must not be operated (filter replacement/cleaning) by children and persons<br />
not able to operate it safely due to their physical, sensoric or mental condition or due to their<br />
inexperience or lack of knowledge. Children should be supervised in order to ensure that they<br />
do not play with the unit.<br />
Technical Data<br />
Power supply: 100-240 VAC 50-60 Hz<br />
Unit voltage (ventilator) : 12 VDC SELV<br />
Protection type: IP 22<br />
Volumetric flow: 3.5 - 15 m³/h - 2- 9 CFM<br />
Sound power level: 28-52 dB<br />
Sound level difference: 33 dB (open)<br />
47 dB (closed)<br />
Power consumption: 3 - 6.8 W<br />
Disposal<br />
Dispose of packaging correctly sorted. If you wish to dispose of the unit, dispose of it in accordance<br />
with applicable requirements. Information issued by municipality.<br />
1
2<br />
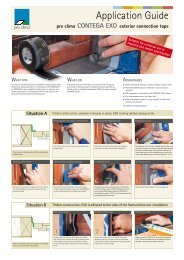
Dimensional Drawings (all dimensions in mm) and Installation Positions<br />
Ventilation unit<br />
Switch<br />
Internal Side view<br />
External<br />
Top view<br />
Top view section view<br />
⃞82 -3.2" 25 -1"<br />
Power cable<br />
External<br />
Internal<br />
1012 mm - 39.8"<br />
Installation position a<br />
Window<br />
Interior view<br />
b c<br />
Installation over (a), next to (b and c) or below (d)<br />
the window possible. Only assemble one element<br />
per window!<br />
d<br />
92 mm - 3.6"<br />
86 mm- 3.4"
Dispatch Units<br />
Check delivery for completeness and perfect condition!<br />
Ventilation unit<br />
Type<br />
+ accessories kit including expanding rivet<br />
Outer grilles (2 pieces per unit)<br />
Type …...for horizontal <strong>installation</strong><br />
Type….. for vertical <strong>installation</strong><br />
Filter frame with inner panel Switch<br />
+ accessorieskit<br />
Filter frame<br />
Filter<br />
Interior cover plate<br />
3
4<br />
Assembly<br />
The assembly of the window ventilation unit is done together with the<br />
window!<br />
Attention! Only the openings of the screw sleeve may be used in the<br />
marked area “Technical“ for fastening purposes; the area is marked with<br />
labels.<br />
The power cable is to be led out below the profile at the side and must be<br />
laid concealed in a cable guide track.<br />
Be careful when assembling not to damage the power cable!<br />
Internal External<br />
Screw sleeves<br />
1046 mm - 41.2"<br />
Assembly example: side assembly<br />
Technical area:<br />
Only use the screw<br />
sleeves for fastening<br />
here!<br />
Power cable<br />
Window
Assembly– Electrical Installation and Electrical Connection<br />
Safety Instructions:<br />
Caution! Power supply must be completely deactivated for all assembly work for the ventilation<br />
unit!<br />
De-energize all connection lines before connecting the ventilation unit to the power supply!<br />
(Separation from power supply at least 3 mm contact opening, e.g. electr. circuit-breaker separating<br />
all phases).<br />
Each circuit of this ventilation system must be equipped with residual current protection (e.g.<br />
RCD device)!<br />
Electrical connections must be executed by qualified electrician!<br />
Other <strong>installation</strong>s and electrical components in this ventilation unit are not admissible!<br />
Connect the circuit and switch in accordance with one of the connection diagrams below.<br />
Circuit diagram 1: ventilation unit can be turned off, operation at three levels<br />
Rocker R1 and<br />
Rocker R2 Off,<br />
then ventilator<br />
OFF<br />
Rocker R1 On<br />
and Rocker R2<br />
Off, then Level I<br />
ON<br />
Rocker R1 Off<br />
and Rocker R2<br />
On, then Level II<br />
ON<br />
Rocker R1 and<br />
Rocker R2 On,<br />
then Level III ON<br />
Circuit diagram 2: Continuous operation in Level I, switchable to Levels II and III<br />
Rocker R1 and<br />
Rocker R2 Off,<br />
continuous operation<br />
to Lev 1<br />
Rocker R1 On<br />
and Rocker R2<br />
Off, continuous<br />
operation to Lev 1<br />
Rocker R1 Off<br />
and Rocker R2<br />
On, then Level II<br />
ON<br />
Rocker R1 and<br />
Rocker R2 On,<br />
the Lev III ON<br />
L<br />
N<br />
L<br />
N<br />
R1 R2<br />
Series switch<br />
Front view<br />
R1 R2<br />
grey<br />
brown<br />
black<br />
blue<br />
Toggle switch<br />
Front view<br />
grey<br />
brown<br />
black<br />
blue<br />
I III II<br />
I III II<br />
5
6<br />
Final Assembly<br />
1 External:<br />
Right: Wrong:<br />
2<br />
External External<br />
Internal:<br />
Filter<br />
Window<br />
Insert the outer grille!<br />
Make sure the grille blades are pointing<br />
downwards!<br />
Window<br />
Filter<br />
Assembly the filter frame with the help of the expanding<br />
rivet! Insert the filter!
3<br />
Internal:<br />
Lockable Features<br />
Magnet<br />
Interior cover plate turned by 180 °.<br />
Filter replacement display<br />
Window<br />
Filter Filter<br />
Mount the interior cover plate! The ventilation unit only works with a mounted interior<br />
cover plate. The interior cover plate contains a magnet that switches off the ventilation<br />
unit when the interior cover plate is removed.<br />
Window<br />
The unit is automatically turned off in the closed position of the interior cover plate!<br />
7
Replacing the Filter<br />
The filter replacement display is<br />
behind the interior cover plate and<br />
glows permanently red if the filter is<br />
dirty.<br />
Remove the interior cover plate,<br />
remove filter, insert new or cleaned<br />
filter (cleaning of the filter can be<br />
done, e.g. in the dishwasher),<br />
Place interior cover back on.<br />
To reset the filter replacement<br />
display press the rocker switch I or<br />
II 3 times in 3 s – the red indicator<br />
display <strong>go</strong>es off.<br />
The ventilation openings may not<br />
be obstructed or covered.<br />
Please make a note of the filter replacements you have made here:<br />
Date of filter replacement<br />
Cleaning<br />
Filter type used<br />
When required, wipe the interior cover and cover frame with a dry, soft cloth.<br />
Filter replacements and cleaning must not be executed by children and persons unable to carry<br />
out such work safely due to their physical, sensoric or mental condition or due to inexperience or<br />
lack of knowledge.<br />
Accessories/Spare Parts<br />
Filter replacement display<br />
Planned filter replacement<br />
Germany<br />
LUNOS Lüftungstechnik GmbH Tel.: 0 30 / 36 20 01 - 0<br />
für Raumluftsysteme Fax: 0 30 / 36 20 01 - 89<br />
Wilhelmstr. 31 E-Mail: info@lunos.de<br />
13593 Berlin Internet: http://www.lunos.de