Programmatore GW30411 - Gewiss
Programmatore GW30411 - Gewiss
Programmatore GW30411 - Gewiss

Create successful ePaper yourself
Turn your PDF publications into a flip-book with our unique Google optimized e-Paper software.
Serie<br />
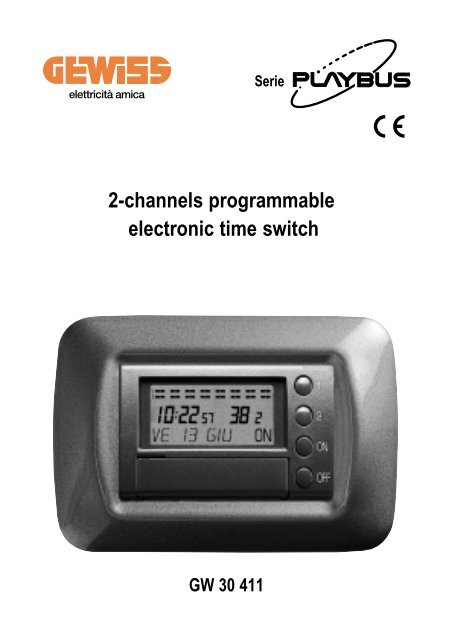
2-channels programmable<br />
electronic time switch<br />
GW 30 411
ATTENTION - IMPORTANT<br />
• Congratulations for having choosing a <strong>Gewiss</strong> product. <strong>Gewiss</strong><br />
products are constructed with careful attention to detail, using only<br />
high quality materials. <strong>Gewiss</strong> products assure you of peak performance<br />
over time.<br />
• The products of the Playbus and System range my be installed to<br />
complly with HD 384 - IEC364 standard governing equipment to be<br />
used in dust-free, domestic and similar environments where there is<br />
no need for special protections against the ingress of water.<br />
• Read these instructions carefully. They contain important information<br />
on how to install and operate the system.<br />
• The installer must hand these over to the user and should stress that<br />
the user become fully familiar with these.<br />
• The installer must perform the wiring operation with extreme care so<br />
as to avoid the risk of damaging the products in case of or inversion<br />
and/or wire exchange.<br />
• The decoder, configured as a burglar alarm, does not satisfy the CEI<br />
79-2 Lev. 1 Standard in that: it does not signal an alarm indicating<br />
power failure or tampering.<br />
• In case of a breakdown or malfunctioning, please contact an authorized<br />
technician or GEWISS’ SAT helpdesk.<br />
2
INDEX<br />
pag.<br />
• GENERAL PRODUCT DESCRIPTION<br />
- Functions ................................................................................. 4<br />
• INSTALLATION INSTRUCTIONS<br />
- Location advice ....................................................................... 5<br />
- Description of terminals .......................................................... 7<br />
- Assembly.................................................................................. 8<br />
• OPERATING INSTRUCTIONS<br />
- Description of controls ............................................................ 9<br />
- Calendar setting ...................................................................... 10<br />
- Programming channels 1- 2 .................................................... 13<br />
- Forcing a single ON-OFF device ............................................ 17<br />
- Daily ON-OFF forcing ............................................................. 18<br />
- Total ON-OFF forcing .............................................................. 19<br />
- Reset ....................................................................................... 20<br />
- Displaying operating status ..................................................... 21<br />
- Diagnostics .............................................................................. 22<br />
3
GENERAL PRODUCT DESCRIPTION<br />
FUNCTIONS<br />
TECHNICAL FEATURES AND PERFORMANCE<br />
• 2 programmable channels.<br />
• Daily/weekly programming.<br />
• Maximum number of cycles for daily setting per channel: 8.<br />
• Minimum interval between 2 programming cycles: 1 minute.<br />
• Manual forcing option available on both channels.<br />
• 30 day (non-rechargeable) battery.<br />
• N° 3 Mod. Playbus<br />
4
INSTALLATION INSTRUCTIONS<br />
LOCATION ADVICE<br />
Outdoor lighting<br />
Pump control and<br />
acquarium lighting<br />
5
INSTALLATION INSTRUCTIONS<br />
LOCATION ADVICE<br />
Shop lighting<br />
Garden watering<br />
Programming of power<br />
supply of socket-outlets<br />
6
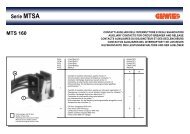
INSTALLATION INSTRUCTIONS<br />
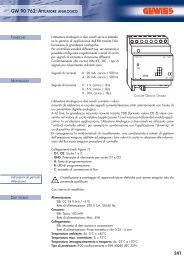
DESCRIPTION OF TERMINALS<br />
L<br />
N<br />
230V - 50Hz<br />
L<br />
5<br />
6<br />
3<br />
4<br />
1<br />
2<br />
N<br />
CH1<br />
CH2<br />
1<br />
2<br />
3<br />
4<br />
5<br />
6<br />
Output contacts<br />
5(2)A - 250V~<br />
7
INSTALLATION INSTRUCTIONS<br />
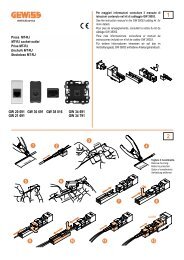
ASSEMBLY<br />
1<br />
2<br />
ON<br />
OFF<br />
8
OPERATING INSTRUCTIONS<br />
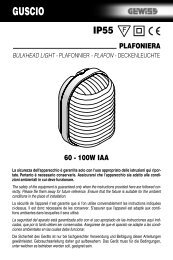
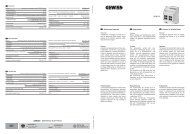
DESCRIPTION OF CONTROLS<br />
B C D<br />
A<br />
G<br />
H<br />
I<br />
F<br />
E<br />
L<br />
M<br />
A Clock and calendar<br />
B Segmented bar chart showing the programmed daily cycles<br />
C Indication of time remaining in current cycle<br />
D “ON” program operational - “ ” program not active<br />
E Confirm key<br />
F Function key<br />
G Channel selection keys<br />
H Channel enabling key<br />
I Channel disabling key<br />
L Adjustment key<br />
M Reset key<br />
9
OPERATING INSTRUCTIONS<br />
CALENDAR SETTING<br />
1<br />
2<br />
Press key F .<br />
1<br />
2<br />
Select the hour using key E within 15<br />
seconds, otherwise the appliance returns<br />
to executive mode.<br />
1<br />
Adjust the hour using keys – and + .<br />
2<br />
1<br />
2<br />
Press key E within 2 minutes to confirm<br />
the hour and select the minutes, otherwise<br />
the appliance returns to executive mode.<br />
1<br />
2<br />
Set the minutes using keys – and + .<br />
10
OPERATING INSTRUCTIONS<br />
CALENDAR SETTING<br />
1<br />
2<br />
Press key E within 2 minutes to confirm<br />
the minutes and select the day, otherwise the<br />
appliance returns to executive mode.<br />
1<br />
2<br />
Adjust the day using keys – and + .<br />
1<br />
2<br />
Press key E within 2 minutes to confirm<br />
the day and select the month, otherwise the<br />
appliance returns to executive mode.<br />
1<br />
2<br />
Adjust the month using keys – and + .<br />
1<br />
2<br />
Press E within 2 minutes to confirm the<br />
month and select the date, otherwise the<br />
appliance returns to executive mode.<br />
11
OPERATING INSTRUCTIONS<br />
CALENDAR SETTING<br />
1<br />
2<br />
Adjust the date using keys – and + .<br />
1 Press key E within 2 minutes to confirm<br />
2<br />
the date and select the year, otherwise the<br />
appliance returns to executive mode.<br />
1<br />
2<br />
Adjust the year using keys – and + .<br />
1<br />
2<br />
Press key E within 2 minutes to confirm<br />
the year and so complete the “calendar settings”<br />
cycle, otherwise the appliance returns<br />
to executive mode and the data are automatically<br />
saved.<br />
12
OPERATING INSTRUCTIONS<br />
PROGRAMMING CHANNELS 1-2<br />
1 Press key F twice.<br />
2<br />
1<br />
2<br />
Select the day of the week “Monday” using<br />
key E within 15 seconds, otherwise the<br />
appliance returns to executive mode.<br />
1 IIf necessary, alter the day of the week using<br />
2<br />
keys – and + .<br />
1<br />
2<br />
Press key E within 2 minutes to confirm<br />
the day of the week and select the number of<br />
the cycles, otherwise the appliance returns to<br />
executive mode.<br />
13
OPERATING INSTRUCTIONS<br />
PROGRAMMING CHANNELS 1-2<br />
1<br />
2<br />
Adjust the number of cycles using keys<br />
– and + (max. 8 cycles).<br />
1<br />
Press key E within 2 minutes to confirm<br />
the number of cycles and select the hour the<br />
first cycle is due to start, otherwise the appliance<br />
returns to executive mode.<br />
1<br />
Adjust the hour using keys – and + .<br />
1<br />
Press key E within 2 minutes to confirm<br />
the hour and select the minutes, otherwise<br />
the appliance returns to executive mode.<br />
14
OPERATING INSTRUCTIONS<br />
PROGRAMMING CHANNELS 1-2<br />
1 Adjust the minutes using keys – and + .<br />
1<br />
Press key E within 2 minutes to confirm<br />
the minutes and select the hour the first cycle<br />
is due to end, otherwise the appliance returns<br />
to executive mode.<br />
1<br />
Adjust the hour using keys – and + .<br />
1<br />
Press key E within 2 minutes to confirm<br />
the hour and select the minutes, otherwise<br />
the appliance returns to executive mode.<br />
15
OPERATING INSTRUCTIONS<br />
PROGRAMMING CHANNELS 1-2<br />
1 Adjust the minutes using keys – and + .<br />
1<br />
Press key E within 2 minutes to confirm<br />
the minutes and select the hour the second<br />
cycle is due to start, otherwise the appliance<br />
returns to executive mode.<br />
Continue programming the cycles as shown<br />
on page ....<br />
1<br />
2<br />
Press key E within 2 minutes to confirm<br />
the last cycle of the day being programmed<br />
and then program the cycles for the following<br />
days, otherwise the appliance returns to executive<br />
mode.<br />
On programming a day, press key + for 5”<br />
to copy the program automatically for the<br />
following days, until Sunday.<br />
1<br />
2<br />
Press key F three times to access the<br />
channel 2 programming mode.<br />
Program this as for channel 1.<br />
16
FORCING A SINGLE ON-OFF CYCLE<br />
Manual activation of the single cycle. Press the<br />
key and the required channel<br />
key ( 1 2 ). (The segmented bars on the display flash to indicate activation.) The<br />
start of the next cycle at the indicated hour is anticipated and the contact is forced to<br />
switch. The program is automatically reset at the first automatic operation or by manual<br />
deactivation.<br />
ON<br />
Manual deactivation of the single cycle. Press the OFF key and the required channel<br />
key during the cycle. ( 1 2 ). (The segmented bars on the display flash to<br />
indicate de-activation.) The end of the current cycle is anticipated and the contact is<br />
forced to switch. The program is automatically reset at the first automatic operation or<br />
by manual deactivation.<br />
17
OPERATING INSTRUCTIONS<br />
DAILY ON-OFF FORCING<br />
Daily manual activation. Press the<br />
ON<br />
key and the required channel key for 5 seconds<br />
( 1 2 ). The segmented bars on the display flash to indicate activation.<br />
The selected channel will start up from 00.00 to 24.00 for that day and the forced contact<br />
switches. The program is automatically reset at midnight or with a manual reset:<br />
press OFF and the selected channel key ( 1 2 ).<br />
Daily manual deactivation. Press the OFF key and the required channel key for 5<br />
seconds ( 1 2 ). (The segmented bars on the display flash to indicate de-activation.)<br />
The selected channel will disabled from 00.00 to 24.00 for that day and the forced<br />
contact switches. The program is automatically reset at midnight or with a manual<br />
reset: press ON and the selected channel key ( 1 2 ).<br />
18
OPERATING INSTRUCTIONS<br />
TOTAL ON-OFF FORCING<br />
1 If, during operation, you press and hold OFF<br />
2<br />
o 5 seconds, the programmer is disabled.<br />
The cycles remain memorized but inactive<br />
and the word ON disappears.<br />
Press ON to restart and the programmer returns<br />
to operating mode, retriggering the<br />
channels which have a cycle underway at the<br />
time.<br />
19
OPERATING INSTRUCTIONS<br />
RESET<br />
Press RESET for 5 seconds and the previously entered program and calendar setting<br />
are cancelled.<br />
Before cutting off the programmer power supply for long periods, press RE-<br />
SET key.<br />
20
OPERATING INSTRUCTIONS<br />
DISPLAYING OPERATING STATUS<br />
1<br />
2<br />
Press the channel pushbutton during<br />
( 1 - 2 ) the cycle to view the hour at<br />
which the cycle was started.<br />
1<br />
2<br />
Press the button again within 5" to see the<br />
time at which the cycle will be disabled.<br />
1<br />
2<br />
Press again within 5" to return to the operating<br />
status display. If the time left to the end of<br />
the cycle is less than an hour, the display indicates<br />
the time in minutes. If the time remaining<br />
before the end of a cycle is longer than<br />
an hour, the display shows the time left in<br />
hours (up to 9), not minutes. If the cycle concerned<br />
lasts longer than 9 hours, the display<br />
shows hh. If the channels are active simultaneously,<br />
the running times to the end of the<br />
cycles are displayed one after the other (15").<br />
El funcionamiento del ciclo en curso se indica en el display mediante el parpadeo de<br />
las barras segmentadas.<br />
1<br />
2<br />
Cycle beginning<br />
Cycle end<br />
21
OPERATING INSTRUCTIONS<br />
DIAGNOSTICS<br />
Display not ON<br />
Check presence of voltage<br />
Check electrical connections (page 29)<br />
No power/switching off connected<br />
appliances<br />
Check electrical connections (page 29)<br />
Programmer malfunction<br />
Check programming<br />
procedure (page 35)<br />
In the event of a malfunction not caused by any of the above points, contact an authorized<br />
technician or contact SAT.<br />
22
TO BE FILLED OUT BY THE INSTALLER<br />
ITEM CODE<br />
......................................................................................................................................<br />
DATE OF INSTALLATION<br />
......................................................................................................................................<br />
ROOM IN WHICH INSTALLED<br />
......................................................................................................................................<br />
INSTALLER'S STAMP AND SIGNATURE<br />
......................................................................................................................................<br />
SAT<br />
035/946111<br />
8.30-12.30 / 14.00-18.00<br />
035/945222<br />
24h<br />
INTERNET: http://www.gewiss.com<br />
E-MAIL: gewiss@gewiss.com
ULTIMA REVISIONE 06/2000<br />
COD. 7004.039.9<br />
GEWISS SPA - PRODUZIONE MATERIALE ELETTRICO<br />
I - 24069 CENATE SOTTO - Via A. Volta, 1 (Bergamo) - Italia<br />
Telefax +39 035 945222 - Telefono +39 035 946111<br />
E-mail: gewiss@gewiss.com - http://www.gewiss.com