
Create successful ePaper yourself
Turn your PDF publications into a flip-book with our unique Google optimized e-Paper software.
DOUBLE-DUTY SHED<br />
ANATOMY<br />
1<br />
2<br />
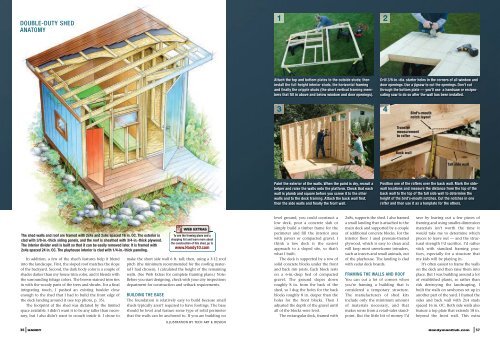
Attach the top and bottom plates to the outside studs; then<br />
install the full-height interior studs, the horizontal framing<br />
and finally the cripple studs (the short vertical framing members<br />
that fill in above and below window and door openings).<br />
Drill 3/8-in.-dia. starter holes in the corners <strong>of</strong> all window and<br />
door openings. Use a jigsaw to cut the openings. Don’t cut<br />
through the bottom plate — you’ll use a handsaw or reciprocating<br />
saw to do so after the wall has been installed.<br />
3 4<br />
Bird’s-mouth<br />
notch layout<br />
Transfer<br />
measurement<br />
to rafter<br />
Back wall<br />
Tall side wall<br />
Paint the exterior <strong>of</strong> the walls. When the paint is dry, recruit a<br />
helper and raise the walls onto the platform. Check that each<br />
wall is plumb and square before you screw it to the other<br />
walls and to the deck framing. Attach the back wall first,<br />
then the side walls and finally the front wall.<br />
Position one <strong>of</strong> the rafters over the back wall. Mark the sidewall<br />
locations and measure the distance from the top <strong>of</strong> the<br />
back wall to the top <strong>of</strong> the tall side wall to determine the<br />
height <strong>of</strong> the bird’s-mouth notches. Cut the notches in one<br />
rafter and then use it as a template for the others.<br />
The shed walls and ro<strong>of</strong> are framed with 2x4s and 2x6s spaced 16 in. OC. The exterior is<br />
clad with 3/8-in.-thick siding panels, and the ro<strong>of</strong> is sheathed with 3/4-in.-thick plywood.<br />
The interior divider wall is built so that it can be easily removed later. It is framed with<br />
2x4s spaced 24 in. OC. The playhouse interior is clad with 1/4-in.-thick paneling.<br />
In addition, a few <strong>of</strong> the shed’s features help it blend<br />
into the landscape. First, the sloped ro<strong>of</strong> matches the slope<br />
<strong>of</strong> the backyard. Second, the dark body color is a couple <strong>of</strong><br />
shades darker than my house trim color, and it blends with<br />
the surrounding foliage colors. The brown-stained trim ties<br />
in with the woody parts <strong>of</strong> the trees and shrubs. For a final<br />
integrating touch, I pushed an existing boulder close<br />
enough to the shed that I had to build the front edge <strong>of</strong><br />
the deck landing around it (see top photo, p. 35).<br />
The footprint <strong>of</strong> the shed was dictated by the limited<br />
space available. I didn’t want it to be any taller than necessary,<br />
but I also didn’t want to crouch inside it. I chose to<br />
To see the framing plans and a<br />
shopping list and learn more about<br />
the construction <strong>of</strong> this shed, go to<br />
www.Handy10.com<br />
make the short side wall 6 ft. tall; then, using a 3:12 ro<strong>of</strong><br />
pitch (the minimum recommended for the ro<strong>of</strong>ing material<br />
I had chosen), I calculated the height <strong>of</strong> the remaining<br />
walls. (See Web Extras for complete framing plans.) Note:<br />
Before you start designing, check with your city inspections<br />
department for construction and setback requirements.<br />
BUILDING THE BASE<br />
The foundation is relatively easy to build because small<br />
sheds typically aren’t required to have footings. The base<br />
should be level and feature some type <strong>of</strong> solid perimeter<br />
that the walls can be anchored to. If you are building on<br />
level ground, you could construct a<br />
low deck, pour a concrete slab or<br />
simply build a timber frame for the<br />
perimeter and fill the interior area<br />
with pavers or compacted gravel. I<br />
think a low deck is the easiest<br />
approach to a sloped site, so that’s<br />
what I built.<br />
The deck is supported by a row <strong>of</strong><br />
solid concrete blocks under the front<br />
and back rim joists. Each block rests<br />
on a 6-in.-deep bed <strong>of</strong> compacted<br />
gravel. The ground slopes down<br />
roughly 8 in. from the back <strong>of</strong> the<br />
shed, so I dug the holes for the back<br />
blocks roughly 8 in. deeper than the<br />
holes for the front blocks. Then I<br />
adjusted the depth <strong>of</strong> the gravel until<br />
all <strong>of</strong> the blocks were level.<br />
The rectangular deck, framed with<br />
2x8s, supports the shed. I also framed<br />
a small landing that is attached to the<br />
main deck and supported by a couple<br />
<strong>of</strong> additional concrete blocks. For the<br />
interior floor I used pressure-treated<br />
plywood, which is easy to clean and<br />
will keep most unwelcome intruders,<br />
such as insects and small animals, out<br />
<strong>of</strong> the playhouse. The landing is clad<br />
with cedar deck boards.<br />
FRAMING THE WALLS AND ROOF<br />
You can cut a lot <strong>of</strong> corners when<br />
you’re framing a building that is<br />
considered a temporary structure.<br />
The manufacturers <strong>of</strong> shed kits<br />
include only the minimum amount<br />
<strong>of</strong> materials necessary, and that<br />
makes sense from a retail-sales standpoint.<br />
But the little bit <strong>of</strong> money I’d<br />
save by leaving out a few pieces <strong>of</strong><br />
framing and using smaller-dimension<br />
materials isn’t worth the time it<br />
would take me to determine which<br />
pieces to leave out — and the structural<br />
strength I’d sacrifice. I’d rather<br />
stick with standard framing practices,<br />
especially for a structure that<br />
my kids will be playing in.<br />
It’s <strong>of</strong>ten easiest to frame the walls<br />
on the deck and then raise them into<br />
place. But I was building around a lot<br />
<strong>of</strong> established plants, so rather than<br />
risk destroying the landscaping, I<br />
built the walls on sawhorses set up in<br />
another part <strong>of</strong> the yard. I framed the<br />
sides and back wall with 2x4 studs<br />
spaced 16 in. OC. Both side walls also<br />
feature a top plate that extends 18 in.<br />
beyond the front wall. This extra<br />
ILLUSTRATION BY TECH ART & DESIGN<br />
36 HANDY<br />
<strong>Handyman</strong><strong>Club</strong>.com 37