Jiffy Niche™ Series Niches - Owner's Manual - Hayward
Jiffy Niche™ Series Niches - Owner's Manual - Hayward
Jiffy Niche™ Series Niches - Owner's Manual - Hayward

You also want an ePaper? Increase the reach of your titles
YUMPU automatically turns print PDFs into web optimized ePapers that Google loves.
IS0608UA_Rev B<br />
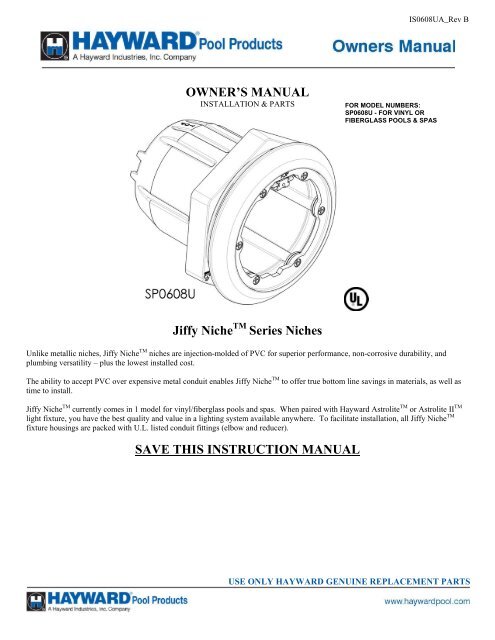
OWNER’S MANUAL<br />
INSTALLATION & PARTS<br />
FOR MODEL NUMBERS:<br />
SP0608U - FOR VINYL OR<br />
FIBERGLASS POOLS & SPAS<br />
<strong>Jiffy</strong> Niche TM <strong>Series</strong> <strong>Niches</strong><br />
Unlike metallic niches, <strong>Jiffy</strong> Niche TM niches are injection-molded of PVC for superior performance, non-corrosive durability, and<br />
plumbing versatility – plus the lowest installed cost.<br />
The ability to accept PVC over expensive metal conduit enables <strong>Jiffy</strong> Niche TM to offer true bottom line savings in materials, as well as<br />
time to install.<br />
<strong>Jiffy</strong> Niche TM currently comes in 1 model for vinyl/fiberglass pools and spas. When paired with <strong>Hayward</strong> Astrolite TM or Astrolite II TM<br />
light fixture, you have the best quality and value in a lighting system available anywhere. To facilitate installation, all <strong>Jiffy</strong> Niche TM<br />
fixture housings are packed with U.L. listed conduit fittings (elbow and reducer).<br />
SAVE THIS INSTRUCTION MANUAL<br />
USE ONLY HAYWARD GENUINE REPLACEMENT PARTS
Page 2 of 8 <strong>Jiffy</strong> Niche TM SERIES NICHES IS0608UA_Rev B<br />
IMPORTANT SAFETY INSTRUCTIONS<br />
Before installing or servicing this electrical equipment, turn power supply OFF.<br />
Basic safety precautions should always be followed, including the following: Failure to follow instructions may result in injury.<br />
This is the safety-alert symbol. When you see this symbol in this manual, look for one of the following signal words. And,<br />
be alert to the potential for personal injury.<br />
WARNING warns about hazards that could cause serious personal injury, death or major property damage and, if<br />
ignored, presents a potential hazard.<br />
CAUTION warns about hazards that will or can cause minor or moderate personal injury and/or property damage<br />
and, if ignored, presents a potential hazard. It can also make consumers aware of actions that are unpredictable and unsafe.<br />
The NOTICE label indicates special instructions that are important but not related to hazards.<br />
WARNING – Read and follow all instructions in this<br />
owner’s manual and on the equipment. Failure to follow<br />
instructions can cause severe injury and/or death.<br />
WARNING – This product should be installed and serviced only by a qualified professional.<br />
CAUTION – All electrical wiring MUST be in conformance with all applicable local codes, regulations, and the<br />
National Electric Code (NEC).<br />
Use of non-<strong>Hayward</strong> replacement parts voids warranty.<br />
ATTENTION INSTALLER – THIS MANUAL CONTAINS IMPORTANT INFORMATION ABOUT THE INSTALLATION,<br />
OPERATION, AND SAFE USE OF THIS NICHE, THAT MUST BE FURNISHED TO THE END USER OF THIS<br />
PRODUCT. FAILURE TO READ AND FOLLOW ALL INSTRUCTIONS COULD RESULT IN SERIOUS INJURY.<br />
WARNING – Risk of Electric Shock. Hazardous voltage can shock, burn, and cause<br />
severe injury and/or death. All electrical wiring MUST be in conformance with all applicable local codes,<br />
regulations, and the National Electric Code (NEC).<br />
WARNING – To reduce the risk of electric shock replace damaged wiring immediately.<br />
Locate conduit to prevent abuse from lawn mowers, hedge trimmers and other equipment.<br />
WARNING – It is recommended to install a Ground Fault Circuit Interrupter (GFCI) in the<br />
circuit, however, all electrical wiring MUST be in conformance with all applicable local codes, regulations, and the National Electric<br />
Code (NEC).<br />
WARNING – All electrical wiring MUST be in conformance with all applicable local codes, regulations, and the<br />
National Electric Code (NEC). Ground and bond ALL niches before connecting lighting to electrical power supply. Failure to ground<br />
and bond niches can cause serious or fatal electrical shock hazard. Do NOT ground to a gas supply line.<br />
USE ONLY HAYWARD GENUINE REPLACEMENT PARTS
Page 3 of 8 <strong>Jiffy</strong> Niche TM SERIES NICHES IS0608UA_Rev B<br />
GENERAL INFORMATION:<br />
Introduction:<br />
This manual contains information for the proper installation and operation of the <strong>Hayward</strong> <strong>Jiffy</strong> Niche TM series niches. A qualified<br />
professional should do installation of the <strong>Hayward</strong> <strong>Jiffy</strong> Niche TM . Failure to install according to the instructions will void the warranty.<br />
Features:<br />
1. Attractive, injection molded Duralon TM face rim assembly, for corrosion-free performance.<br />
2. Fast and simple installation. Minimal tools required.<br />
3. Specially designed wire sealing system, for sealing pool water from conduit pipe.<br />
Important Information Regarding All Models:<br />
1. <strong>Jiffy</strong> Niche TM underwater lighting fixture housings (Niche) are Underwriters Laboratories (UL) Listed under File E 39338-<br />
Category WBDT. These niches are New York City (NYC) Bureau of Electrical Control approved for use with low voltage (12<br />
volt) lighting fixtures. U.L. Listed for fresh water, which includes salt pools with a maximum of 3700ppm salt content, and<br />
complies with 1999 National Electrical Code (NEC).<br />
2. <strong>Jiffy</strong> Niche TM model SP0608U underwater fixture housings (Niche) are UL Listed only for use with <strong>Hayward</strong> Submersible Light<br />
Fixtures: SP0590SL, SP0590HSL, SP0591SL, SP0591HSL, SP0592HSL, SP0532(S)LED, SP0533(S)LED, SP0534(S)LED,<br />
SP0535(S)LED.<br />
INSTALLATION INSTRUCTIONS:<br />
GENERAL INSTRUCTIONS COMMON FOR ALL MODELS:<br />
1. The National Electrical Code (NEC) requires that the top of the light lens be at least 18” below the water level. Be sure to<br />
position the niche so that it is in compliance with this requirement. Some installers position the niche 24” below the<br />
anticipated water level to avoid any inspection authority issues with this requirement.<br />
SP0608U<br />
A. For Vinyl Lined Metal Wall, Vinyl Lined Fiberglass Panel, Or Non-Lined<br />
Fiberglass Pools:<br />
1. If not pre-punched by the factory, drill & cut out the wall panel sections as per dimensions below:<br />
a. CIRCULAR PANEL CUTOUT: 6” minimum to 6-1/8“ maximum diameter hole.<br />
2. After unpacking the niche carton, remove the large lock ring on the backside of the housing assembly.<br />
3. For non-lined pools only, install the flange gasket to the backside of the flange on the housing<br />
assembly by peeling off the paper exposing the adhesive, and pressing it firmly onto the flange.<br />
4. If desired, caulk the backside of the housing flange (lined pool) or housing flange gasket (non-lined<br />
pool) with silicone or other suitable sealing compound.<br />
5. Insert the housing assembly through the wall panel section from the interior of the pool.<br />
6. Position the grounding bracket towards the TOP (12 O’clock). (Fig.1)<br />
7. Install the large lock ring from the exterior of the pool, with the six (6) holes facing away from<br />
the pool wall (outward).<br />
8. Snug the lock ring by hand while being careful to keep the word “TOP” on the outside of the<br />
housing towards the TOP (12 O’clock).<br />
9. Insert the posts of the installation tool (<strong>Hayward</strong> P/N SP0608UT) into any two (2) adjacent<br />
holes on the lock ring. (Fig.2)<br />
10. Insert a screwdriver (or similar tool) into either of the two (2) pry-bar slots. This will be used<br />
to prevent the housing assembly from rotating during final tightening. (Fig.2)<br />
11. While firmly holding the screwdriver in the previous step, use a small<br />
rubber mallet to strike the tab of the installation tool, rotating the lock<br />
ring in the clockwise direction to tighten.<br />
12. Install conduit fittings as needed. All <strong>Jiffy</strong> Niche TM niches are provided<br />
with two (2) UL Listed Conduit Fittings. A 1” trade size, 45° sweep<br />
elbow is provided for the purpose of directing the conduit pipe towards<br />
the SP0680/SP0681 Listed Junction Box location. A 1” x ¾” reducer<br />
USE ONLY HAYWARD GENUINE REPLACEMENT PARTS
Page 4 of 8 <strong>Jiffy</strong> Niche TM SERIES NICHES IS0608UA_Rev B<br />
bushing is provided to permit the use of ¾” conduit pipe. These conduit fittings must be cemented to the fixture housing<br />
(Niche), field supplied conduit pipe, and to other conduit fittings using approved PVC primer and cement. (Fig.3)<br />
13. The <strong>Jiffy</strong> Niche TM housing is equipped with a combination bonding/grounding connector. The outside connection is the<br />
bonding connector as required by Article 680-22 of the NEC. Bond the <strong>Jiffy</strong> Niche TM to the pool structure. Using a solid<br />
copper conductor size #8 AWG or larger, connect the bonding connector to all of the metal parts of the swimming pool, spa, or<br />
hot tub; and to all electrical equipment, metal piping (except gas piping), and conduit within 5 ft. (1.5m) of the inside walls of<br />
the swimming pool, spa, or hot tub. Bonding connects all metal parts within and around the swimming pool, spa, or hot tub<br />
with a continuous wire. Bonding reduces the risk of a current passing between bonded metal objects, which could potentially<br />
cause electrical shock if grounded or shorted. Reference the NEC codes for all wiring standards including, but not limited to,<br />
grounding, bonding, and general wiring procedures.<br />
14. The inside connection is the grounding connector as required by Article 680-20(b) of the NEC. The NEC requires that where a<br />
non-metallic conduit is used, a #8 AWG insulated copper conductor be installed in this conduit. Pull this conductor into the<br />
niche housing at least 6-8 inches.<br />
15. Insert the ground conductor through the small hole in the cord seal. To do this, you must first pierce the<br />
small hole all the way through the cord seal with a small Philips screwdriver, or similar tool (Fig.4).<br />
From the conduit, the ground conductor must be fed through the cord seal from the small to the large end<br />
of the taper.<br />
16. Connect the ground conductor to the niche grounding connector. The connector and wire termination<br />
must be encapsulated in 3M Inc. Scotch Cast Wet Niche Potting Compound No. 2135 (UL File<br />
E130394) or equivalent, to protect the connection from the possible deterioration effects of pool water.<br />
17. For vinyl liner pools only. Before proceeding to the next step:<br />
a. Backfill pool walls as needed.<br />
b. Install the liner per the manufacturers instructions.<br />
c. Smooth out any liner wrinkles on the front of the niche flange gasket.<br />
18. Align the face ring assembly to the front of the housing assembly, with the word “TOP” on the front of the face ring towards<br />
the TOP (12 O’clock). For vinyl-lined pools, the housing assembly should be tightly covered by the liner, and not visible. DO<br />
NOT CUT THE LINER AT THIS POINT. Instead, align the face ring assembly to the protrusion in the liner formed from the<br />
niche housing.<br />
19. Use a #2 Philips screwdriver to secure the face ring assembly tightly to the housing assembly with the six (6) #10 x 1" Philips<br />
flat head, type B tapping screws provided.<br />
20. For vinyl liner pools, with a sharp blade, cut out the liner along the inside edge of the faceplate.<br />
21. Install the light fixture per the light fixture instructions.<br />
CORD SEALING:<br />
22. With the light fixture electrical cord, and all electrical wiring in place, slip the<br />
electrical cord through the slit, and into the large hole in the cord seal (Fig.4). From<br />
the conduit, the cord must enter the cord seal on the small end of the taper, and exit<br />
on the large end of the taper (Fig.5).<br />
23. Holding the light fixture electrical cord (and grounding conductor if applicable)<br />
firmly in one hand, slide the cord seal toward the back of the niche housing, and into<br />
the tapered hole. Appropriate cord lubrication may be required to do this.<br />
24. Slip the cord seal bearing over the light fixture electrical cord (and grounding<br />
conductor if applicable) by flexing it over the cord at the split.<br />
25. Install the cord seal nut by folding and snapping it around the light fixture electrical<br />
cord (and grounding conductor if applicable).<br />
26. Push the cord seal bearing into the cord seal nut until it snaps into place.<br />
27. Slide the cord seal nut on the wires toward the back of the niche housing, and thread<br />
it into the niche housing threads.<br />
28. Tighten snug (hand tight) as needed.<br />
CAUTION - When installing any one of the <strong>Hayward</strong> approved light fixtures into the<br />
SP0608U niche, remove all spacers from the back of the light fixture mounting screw by removing<br />
the retainer, removing the spacer(s), and re-installing the retainer, as shown in Fig.6. This ONLY<br />
applies when inserting a light fixture into this specific niche model. For light fixtures being<br />
installed into other niche models, please follow the light fixture instructions.<br />
USE ONLY HAYWARD GENUINE REPLACEMENT PARTS
Page 5 of 8 <strong>Jiffy</strong> Niche TM SERIES NICHES IS0608UA_Rev B<br />
Product Specifications:<br />
Replacement Parts:<br />
SP0608U Parts Diagram:<br />
Parts Listing<br />
Ref. No. Part No. Description CTN. QTY.<br />
1 SPX0608C FACE RING ASSEMBLY 10<br />
2 SPX0608G GASKET 10<br />
3 SPX0608CP CORD SEAL KIT 10<br />
© <strong>Hayward</strong> Pool Products, 2008<br />
All rights reserved.<br />
USE ONLY HAYWARD GENUINE REPLACEMENT PARTS
Page 6 of 8 <strong>Jiffy</strong> Niche TM SERIES NICHES IS0608UA_Rev B<br />
USE ONLY HAYWARD GENUINE REPLACEMENT PARTS
Page 7 of 8 <strong>Jiffy</strong> Niche TM SERIES NICHES IS0608UA_Rev B<br />
HAYWARD ® LIMITED WARRANTY<br />
This niche was inspected before shipment from our plant. To original purchasers of this niche, <strong>Hayward</strong> Pool Products, 620 Division Street, Elizabeth,<br />
New Jersey, warrants its products free from defects in materials and workmanship for a period of ONE (1) year from the date of purchase.<br />
Parts which fail or become defective during the warranty period, except as a result of freezing; negligence; improper installation, use, or care, shall be<br />
repaired or replaced, at our option, without charge, within 90 days of the receipt of defective product, barring unforeseen delays.<br />
To obtain warranty replacements or repair, defective components or parts should be returned, transportation paid, to the place of purchase, or to the<br />
nearest authorized <strong>Hayward</strong> service center. For further <strong>Hayward</strong> dealer or service center information, contact <strong>Hayward</strong> customer service department.<br />
No returns may be made directly to the factory without the express written authorization of <strong>Hayward</strong> Pool Products.<br />
To original purchasers of this niche, <strong>Hayward</strong> Pool Products warrants its niche housing to be free from defects in materials and workmanship for a period<br />
of ONE (1) year from the date of purchase.<br />
Niche housing which become defective during the warranty period, except as a result of freezing; negligence; improper installation, use, or care, shall be<br />
repaired, at our option, without charge.<br />
All other conditions and terms of the standard warranty apply.<br />
<strong>Hayward</strong> shall not be responsible for cartage, removal and/or reinstallation labor, or any other such costs incurred in obtaining warranty replacements.<br />
The <strong>Hayward</strong> Pool Products warranty does not apply to components manufactured by others. For such products, the warranty established by the<br />
respective manufacturer will apply.<br />
Some states do not allow a limitation on how long an implied warranty lasts, or the exclusion or limitation of incidental or consequential damages, so<br />
the above limitation or exclusion may not apply to you.<br />
This warranty gives you specific legal rights, and you may also have other rights, which vary from state to state.<br />
<strong>Hayward</strong> Pool Products<br />
620 Division Street<br />
*Supersedes all previous publications. Elizabeth, NJ 07207<br />
▲Retain this Warranty Certificate (upper portion) in a safe and convenient location for your records.<br />
▼DETACH HERE: Fill out bottom portion completely and mail within 10 days of purchase/installation, or REGISTER ONLINE AT<br />
WWW.HAYWARDPOOL.COM.<br />
USE ONLY HAYWARD GENUINE REPLACEMENT PARTS
Page 8 of 8 <strong>Jiffy</strong> Niche TM SERIES NICHES IS0608UA_Rev B<br />
USE ONLY HAYWARD GENUINE REPLACEMENT PARTS