BUDDIPOLE IN THE FIELD
BUDDIPOLE IN THE FIELD
BUDDIPOLE IN THE FIELD

You also want an ePaper? Increase the reach of your titles
YUMPU automatically turns print PDFs into web optimized ePapers that Google loves.
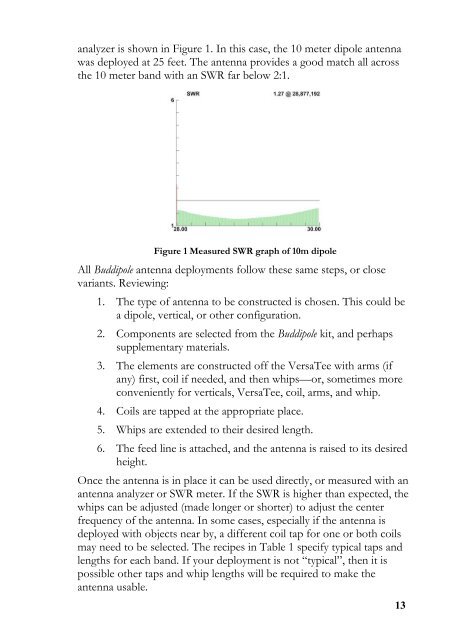
analyzer is shown in Figure 1. In this case, the 10 meter dipole antenna<br />
was deployed at 25 feet. The antenna provides a good match all across<br />
the 10 meter band with an SWR far below 2:1.<br />
Figure 1 Measured SWR graph of 10m dipole<br />
All Buddipole antenna deployments follow these same steps, or close<br />
variants. Reviewing:<br />
1. The type of antenna to be constructed is chosen. This could be<br />
a dipole, vertical, or other configuration.<br />
2. Components are selected from the Buddipole kit, and perhaps<br />
supplementary materials.<br />
3. The elements are constructed off the VersaTee with arms (if<br />
any) first, coil if needed, and then whips—or, sometimes more<br />
conveniently for verticals, VersaTee, coil, arms, and whip.<br />
4. Coils are tapped at the appropriate place.<br />
5. Whips are extended to their desired length.<br />
6. The feed line is attached, and the antenna is raised to its desired<br />
height.<br />
Once the antenna is in place it can be used directly, or measured with an<br />
antenna analyzer or SWR meter. If the SWR is higher than expected, the<br />
whips can be adjusted (made longer or shorter) to adjust the center<br />
frequency of the antenna. In some cases, especially if the antenna is<br />
deployed with objects near by, a different coil tap for one or both coils<br />
may need to be selected. The recipes in Table 1 specify typical taps and<br />
lengths for each band. If your deployment is not “typical”, then it is<br />
possible other taps and whip lengths will be required to make the<br />
antenna usable.<br />
13