Purchase Order Entry - Staffcentral
Purchase Order Entry - Staffcentral
Purchase Order Entry - Staffcentral

You also want an ePaper? Increase the reach of your titles
YUMPU automatically turns print PDFs into web optimized ePapers that Google loves.
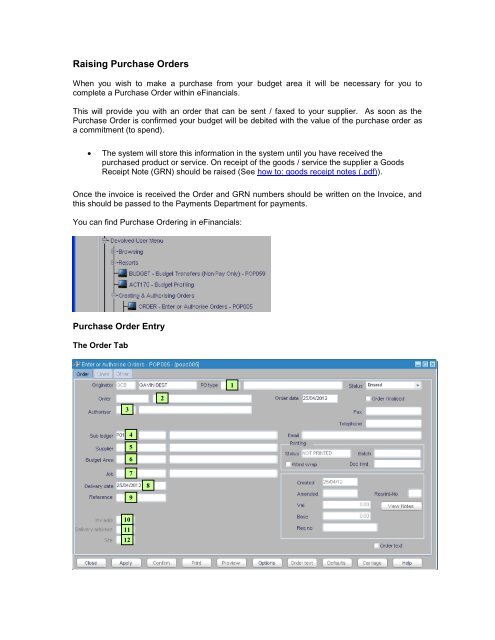
Raising <strong>Purchase</strong> <strong>Order</strong>s<br />
When you wish to make a purchase from your budget area it will be necessary for you to<br />
complete a <strong>Purchase</strong> <strong>Order</strong> within eFinancials.<br />
This will provide you with an order that can be sent / faxed to your supplier. As soon as the<br />
<strong>Purchase</strong> <strong>Order</strong> is confirmed your budget will be debited with the value of the purchase order as<br />
a commitment (to spend).<br />
<br />
The system will store this information in the system until you have received the<br />
purchased product or service. On receipt of the goods / service the supplier a Goods<br />
Receipt Note (GRN) should be raised (See how to: goods receipt notes (.pdf)).<br />
Once the invoice is received the <strong>Order</strong> and GRN numbers should be written on the Invoice, and<br />
this should be passed to the Payments Department for payments.<br />
You can find <strong>Purchase</strong> <strong>Order</strong>ing in eFinancials:<br />
<strong>Purchase</strong> <strong>Order</strong> <strong>Entry</strong><br />
The <strong>Order</strong> Tab<br />
1<br />
3<br />
2<br />
4<br />
5<br />
6<br />
7<br />
8<br />
9<br />
10<br />
11<br />
12
1) PO Type. This is a 2-digit code in the form AB, which relates to the area of the University<br />
that you are creating the <strong>Purchase</strong> <strong>Order</strong> for. (example BS = Business Services, LR =<br />
Learning Resources)<br />
2) Description. This field requires you to put in some information regarding the order. This is<br />
normally what or who the order is for (example Train tickets for Steve, Speakers for<br />
Conference)<br />
3) Authoriser. This is the staff code in the form AB12, who is the person that you will be getting<br />
to authorise the <strong>Purchase</strong> <strong>Order</strong> when completed.<br />
4) Sub-Ledger. This is the ledger in which the order will be recorded. This is automatically<br />
populated with P01.<br />
5) Supplier. This is where you input the code in the form ABC123 for your chosen supplier. In<br />
this field it may help to use the Fastfind button and search for the supplier. Should you be<br />
unable to find the code it may need to be added by emailing the eFin Helpdesk.<br />
6) Budget Area. This is the area that you wish to charge the <strong>Purchase</strong> <strong>Order</strong> to. Each area<br />
has a different code. You will only be able to access the specific area(s) designated to you<br />
by your manager. (example B10U = Finance, C20U = Student Services)<br />
7) Job. This is the specific Job Code that the <strong>Purchase</strong> <strong>Order</strong> relates to. This will be in the form<br />
A1234.<br />
8) Delivery date. This defaults to today’s date but you can change this to the expected delivery<br />
date if needed.<br />
9) Reference. This is a compulsory field. We recommend that you add the Originator and<br />
Authoriser codes in this field.<br />
10) Invoice Address. Leaving this blank will give you the default address associated with your<br />
budget area. If a different invoicing address is required this field is used, you can use Fastfind<br />
to give you a list of all the possibilities.<br />
11) Del add. Leaving this blank will give you the default address associated with your budget<br />
area. Delivery Address field is only used when you wish the goods to be delivered to a<br />
different address than would be set up as standard, you can use Fastfind to give you a list of<br />
all the possibilities.<br />
12) Site. This field is used if the Supplier has more than one address. A large company such as<br />
British Telecom or the BBC may have many different addresses. Should the standard<br />
address be incorrect but the right supplier you may need to input a site code here. You can<br />
use the Fastfind button to help search for possible addresses.<br />
These are the basic fields that can be entered on an order. Once you are happy with the<br />
information added click on APPLY and the <strong>Order</strong> field will show your new order number.<br />
There are additional details that can be added, which are found in different guides, being:<br />
<br />
<br />
Sending an <strong>Order</strong> Electronically<br />
Adding <strong>Order</strong> or Line Text
The Lines Tab<br />
13<br />
14 15<br />
16<br />
17<br />
18 19<br />
13) Product. This is a code that describes exactly what the line on the purchase order is for. A<br />
list of all available codes can be found on StaffCentral. Codes are in the form AB123. You<br />
can use the Fastfind button the help search for the most appropriate code. ( example TC001<br />
= Staff Ferry Travel, MM001 = Wood)<br />
14) Budget Area. This code relates to the budget area supplied on the <strong>Order</strong> front-page (6). It<br />
should not be changed unless adding an additional line that is not to be allocated to the<br />
Budget Area on the order front page.<br />
15) Account. This field is automatically populated and related to the Product Code used.<br />
16) Job. This field will again filter from the order front-page (7). It should not be changed unless<br />
adding an additional line that is not to be allocated to the Job Code on the order front page.<br />
17) The Lines. This is where the information regarding what you want to purchase finally gets<br />
input. You can put in as many lines as you wish, once a line is complete you can use the<br />
down arrow on the keyboard to move you to the next line.<br />
The sections are as follows:<br />
Product & Description These fills in automatically from the above product box (13).<br />
Quantity<br />
This is how many items in total you want to purchase.<br />
Cost<br />
This is the Nett cost (before tax) of the product.<br />
Disc<br />
This is the % discount (if any) that you receive from the<br />
supplier. (example 15.00 = 15% discount)<br />
Nett Value<br />
Gives value after any discounts are applied.<br />
Vat<br />
This need be filled in by a code representing the tax status of<br />
the item to be purchased (normally PT = Standard 20%, PX =<br />
Exempt 0%, PZ = Zero Rated 0%)
18) Apply. Pressing this button will apply all the information you have entered in the lines. You<br />
need to do this before you can add…..<br />
19) Line Text. Each line should have some text accompanying the order describing exactly what<br />
it is that you wish to purchase. This information will be printed on the <strong>Purchase</strong> <strong>Order</strong>. See<br />
Adding <strong>Order</strong> or Line Text for further information.<br />
The order is now complete. Review your entries to ensure that the information is correct then click<br />
on the ORDER tab to return to the front screen.<br />
The final step is to add the order into the Authorisers Workflow. This is a list of outstanding<br />
actions allocated to a member of staff within eFinancials that they can review and deal with<br />
accordingly:<br />
i. Click on the Workflow Button on the Toolbar:<br />
ii.<br />
Ensure the ‘A new <strong>Purchase</strong> <strong>Order</strong> for confirmation’ is highlighted, then click on OK.<br />
The authoriser will automatically receive an email stating that he / she has an outstanding<br />
purchase order to be confirmed, as well as receiving a notification in their Workflow Events<br />
screen.<br />
Once the order has been confirmed you can press the print button on the <strong>Purchase</strong> <strong>Order</strong> screen<br />
and print the <strong>Order</strong> ready to send to the company in question (you can send the order<br />
electronically, for information on how to do this refer to Sending an <strong>Order</strong> Electronically.