95x Appendix J - Svantek
95x Appendix J - Svantek
95x Appendix J - Svantek

You also want an ePaper? Increase the reach of your titles
YUMPU automatically turns print PDFs into web optimized ePapers that Google loves.
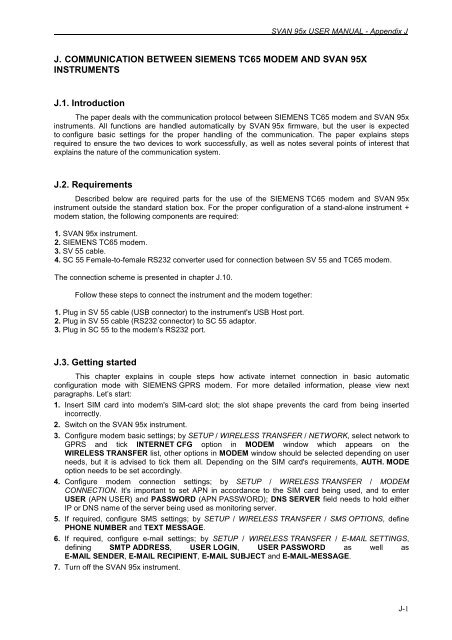
SVAN <strong>95x</strong> USER MANUAL - <strong>Appendix</strong> J<br />
J. COMMUNICATION BETWEEN SIEMENS TC65 MODEM AND SVAN 95X<br />
INSTRUMENTS<br />
J.1. Introduction<br />
The paper deals with the communication protocol between SIEMENS TC65 modem and SVAN <strong>95x</strong><br />
instruments. All functions are handled automatically by SVAN <strong>95x</strong> firmware, but the user is expected<br />
to configure basic settings for the proper handling of the communication. The paper explains steps<br />
required to ensure the two devices to work successfully, as well as notes several points of interest that<br />
explains the nature of the communication system.<br />
J.2. Requirements<br />
Described below are required parts for the use of the SIEMENS TC65 modem and SVAN <strong>95x</strong><br />
instrument outside the standard station box. For the proper configuration of a stand-alone instrument +<br />
modem station, the following components are required:<br />
1. SVAN <strong>95x</strong> instrument.<br />
2. SIEMENS TC65 modem.<br />
3. SV 55 cable.<br />
4. SC 55 Female-to-female RS232 converter used for connection between SV 55 and TC65 modem.<br />
The connection scheme is presented in chapter J.10.<br />
Follow these steps to connect the instrument and the modem together:<br />
1. Plug in SV 55 cable (USB connector) to the instrument's USB Host port.<br />
2. Plug in SV 55 cable (RS232 connector) to SC 55 adaptor.<br />
3. Plug in SC 55 to the modem's RS232 port.<br />
J.3. Getting started<br />
This chapter explains in couple steps how activate internet connection in basic automatic<br />
configuration mode with SIEMENS GPRS modem. For more detailed information, please view next<br />
paragraphs. Let’s start:<br />
1. Insert SIM card into modem's SIM-card slot; the slot shape prevents the card from being inserted<br />
incorrectly.<br />
2. Switch on the SVAN <strong>95x</strong> instrument.<br />
3. Configure modem basic settings; by SETUP / WIRELESS TRANSFER / NETWORK, select network to<br />
GPRS and tick INTERNET CFG option in MODEM window which appears on the<br />
WIRELESS TRANSFER list, other options in MODEM window should be selected depending on user<br />
needs, but it is advised to tick them all. Depending on the SIM card's requirements, AUTH. MODE<br />
option needs to be set accordingly.<br />
4. Configure modem connection settings; by SETUP / WIRELESS TRANSFER / MODEM<br />
CONNECTION. It's important to set APN in accordance to the SIM card being used, and to enter<br />
USER (APN USER) and PASSWORD (APN PASSWORD); DNS SERVER field needs to hold either<br />
IP or DNS name of the server being used as monitoring server.<br />
5. If required, configure SMS settings; by SETUP / WIRELESS TRANSFER / SMS OPTIONS, define<br />
PHONE NUMBER and TEXT MESSAGE.<br />
6. If required, configure e-mail settings; by SETUP / WIRELESS TRANSFER / E-MAIL SETTINGS,<br />
defining SMTP ADDRESS, USER LOGIN, USER PASSWORD as well as<br />
E-MAIL SENDER, E-MAIL RECIPIENT, E-MAIL SUBJECT and E-MAIL-MESSAGE.<br />
7. Turn off the SVAN <strong>95x</strong> instrument.<br />
J-1
SVAN <strong>95x</strong> USER MANUAL - <strong>Appendix</strong> J<br />
.<br />
8. Turn on the modem and wait until it completes initialization procedures; it is indicated by change<br />
of LED blinking speed.<br />
9. Turn on the measurement device; modem's LED will start blinking with double pulses - indicating that<br />
connection is active.<br />
10. Run SvanPC+ application to collect data and control stations.<br />
Notice: If registration procedure is being used, it is important to run SvanPC+ software<br />
before turning on the measurement device.<br />
J.4 Connecting<br />
The devices communicate through RS232 serial protocol. The modem's default baud rate is<br />
115200 bits per second and it is important to ensure that SVAN <strong>95x</strong> device has the same baud rate<br />
defined in SETUP / RS232 / BAUD RATE setting tab.<br />
To activate successfully the system, it is important to turn on the modem first and wait until it will<br />
finish the initialization procedures (it is easy to notice as the modem's LED changes the frequency<br />
of blinking, from fast to slow). Once the modem is ready, the user may turn on SVAN <strong>95x</strong> device and,<br />
provided proper options are set in SETUP tab, it will attempt to configure the modem and establish<br />
the connection capable of receiving and transmitting data.<br />
Once the modem is configured and connection with the internet established, the modem's LED will<br />
start blinking with double pulses, denoting an active connection. Any additional steps, including station's<br />
registration will commence now and it is now possible to connect to the modem from remote host<br />
to exchange data through standard #1, #2, #3 and #4 commands.<br />
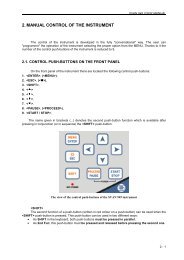
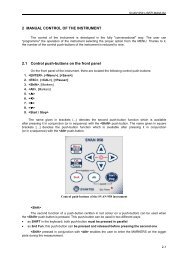
J.5 Menu options<br />
There are four tabs in SETUP / WIRELESS TRANSFER section (when in NETWORK window<br />
GPRS has been selected) that contain options for configuring SIEMENS connection:<br />
MODEM tab permits to configure basic modem options, such as modem type and connection types.<br />
It contains the following options:<br />
o INTERNET CFG – ticking this option makes that the device is set to automatically configure the<br />
modem to connect to the internet. When the device is turned off with this option set, it will attempt<br />
to configure the modem after next turn on. With this option ticked off, the modem will only be<br />
configured for handling SMSes. More about this option is written in J.5 (Configuration and<br />
Registration).<br />
o AUTO REGISTER – ticking this option makes that the device instantly attempts<br />
to register the station provided the modem is already configured. More about the registration<br />
is written in J.5 (Configuration and Registration).<br />
o DATA PROTOCOL – defines connection type for data exchange. Available types<br />
are TCP S (server mode), TCP C (client mode) and UDP.<br />
o SIM AUTH MODE – defines the way of user verification by SIM card. Depending on the SIM card,<br />
several options are possible, some of them are recognized by the modem:<br />
• none – no verification required.<br />
• PAP<br />
• CHAP<br />
• MsChap1 – denotes MsChap in version 1.<br />
o SEND SMS (SIEMENS only) – ticking this option will enable SMS alarm notification.<br />
o SEND E-MAIL (SIEMENS only) – ticking this option will enable e-mail alarm notification.<br />
o AUTO RECONN – ticking this option will make the device attempt to reconnect<br />
the modem in the case of errors or sudden disconnection. More about this option is written<br />
in J.6 (Error handling).<br />
J-2
SVAN <strong>95x</strong> USER MANUAL - <strong>Appendix</strong> J<br />
o RECONN. DELAY – defines delay between each reconnection attempts. Also determines delay<br />
between each registration packets being sent.<br />
o TCP IRT – Tcp Initial Retransmission Timeout – defines initial timeout for sending packets in TCP<br />
mode.<br />
o TCP MAX RET. – defines maximum amount of packet retransmissions during TCP connection.<br />
MODEM CONNECTION tab – allows configuring several supporting options required to configure<br />
successfully SIEMENS modem to establish internet connection. It contains the following options:<br />
o SERVER ADDRESS – allows one to enter up to 32 characters of either IP or domain address,<br />
where the registration data will be sent during the registration process. More about this option is<br />
written in J.5 (Configuration and Registration).<br />
o DATA PORT – allows entering up to 5 characters of port number. This number denotes a port<br />
on which a communication socket will be configured for data exchange between remote host<br />
and the station.<br />
o REGISTRATION PORT – allows entering up to 5 characters of port number. This number denotes<br />
a port on which a communication socket will be configured to transmit registration packet.<br />
o APN – allows entering up to 20 characters of APN name of the SIM card used with the modem.<br />
o APN USER – allows entering up to 20 characters of user name used for verification by the SIM<br />
card used with the modem.<br />
o APN PASSWORD – allows entering up to 20 characters of password used for verification<br />
by the SIM card used with the modem.<br />
o DNS SERVER – allows one to enter up to 15 characters of IP address of DNS server used<br />
for establishing connection with the internet. In the most cases, leaving the default value<br />
of “0.0.0.0” will be sufficient, but some SIM cards may require a specific address to be entered.<br />
SMS OPTIONS – allows one to configure SMS service used for alarm notification. For more<br />
information about alarm notification see J.6 (Alarm notification). It contains the following options:<br />
o PHONE NUMBER – allows one to enter up to 20 characters of phone number where the text<br />
messages will be sent.<br />
o TEXT MESSAGE – allows one to enter up to 20 characters of additional text which will be<br />
appended into a standard alarm message template.<br />
E-MAIL SETTINGS tab – allows one to configure e-mail service used for alarm notification. For more<br />
information about alarm notification see J.6 (Alarm notification). It contains the following options:<br />
o SMTP ADDRESS – allows one to enter up to 32 characters of SMTP server address which will be<br />
used to send e-mail messages.<br />
o USER LOGIN – allows one to enter up to 20 characters of user login used to establish verified<br />
connection with SMTP server.<br />
o USER PASSWORD – allows one to enter up to 20 characters of user password used to establish<br />
verified connection with SMPT server.<br />
o SENDER E-MAIL – allows one to enter up to 48 characters of e-mail address from which<br />
the e-mail message will be sent.<br />
o RECIPIENT E-MAIL – allows one to enter up to 48 characters of e-mail address to which<br />
the e-mail message will be sent.<br />
o E-MAIL SUBJECT – allows one to enter up to 20 characters of the message's subject.<br />
o E-MAIL MESSAGE – allows one to enter up to 20 characters of additional text which will be<br />
appended to standard e-mail message template used for alarm notification.<br />
You may see the current state of modem connection and GPRS connectivity by selecting DISPLAY<br />
/ MODEM STATUS. Note that without GPRS option selected in WIRELESS CONNECTION / NETWORK<br />
tab modem status will always be OFF.<br />
J-3
SVAN <strong>95x</strong> USER MANUAL - <strong>Appendix</strong> J<br />
.<br />
J.6 Configuration and Registration<br />
In order to configure and establish the internet connection the SVAN <strong>95x</strong> device,<br />
in the configuration process, sends the series of commands recognized by the modem. Right after ticking<br />
AUTO CONFIG option (or turning on the device with this option on), the system will perform the following<br />
steps:<br />
The steps taken by the SVAN <strong>95x</strong> device for configuring SIEMENS modem are as follows:<br />
• Configure handshake lines<br />
• Configure SMS service<br />
• Configure internet connection<br />
• Configure data exchange service<br />
• Configure e-mail service<br />
• Configure registration service (if AUTO REGISTER is ticked and DATA PROTOCOL is either TCP S<br />
or UDP)<br />
• Attempt to establish connection (if DATA PROTOCOL is set to TCP C)<br />
• Send registration packet (if AUTO REGISTER is ticked and DATA PROTOCOL is either TCP S or<br />
UDP)<br />
It is important to configure the most options from MODEM CONNECTION tab for successful<br />
establishment of the connection for data exchange. REGISTRATION port is optional if registration is not<br />
demanded (AUTO REGISTER option). Steps 5 and 6 are optional if corresponding options are ticked off<br />
as well.<br />
The system configures connection depending on DATA PROTOCOL and DATA PORT settings.<br />
In TCP S mode, it establishes a listening socket, ready to accept any incoming connection and establish<br />
transmit/receive connection with a remote host. In TCP C mode, it attempts to connect to remote address<br />
defined in SERVER ADDRESS using TCP/IP connection to exchange data. In UDP mode, it establishes<br />
a listening socket and transmitting socket, which is capable of sending data to remote address defined in<br />
SERVER ADDRESS. All sockets are bound to port defined in DATA PORT setting.<br />
Upon configuring main connection and data exchange service, the system attempts to establish<br />
connection with the internet (it takes place when first service is being opened). If successful, the modem's<br />
LED will start blinking in double pulses, acknowledging active internet connection.<br />
After configuring main connection and configuring data exchange service, the device will configure<br />
SMS and e-mail services for future use.<br />
If AUTO REGISTER option is ticked, the device will attempt to register the station by configuring<br />
another service and sending a registration packets to address defined in SERVER ADDRESS. During<br />
this process, the service will be configured depending on the REGISTRATION PORT option.<br />
Notice: In TCP/IP mode, the service will require the remote host to accept the connection.<br />
If there is no such response or the connection fails, the system will attempt to reconfigure and start<br />
the process again.<br />
After the configuration and successful starting of the service, the device will send the following<br />
registration packet:<br />
#1,Uaaaa,Nbbbbb,CTccc,PTddddd;<br />
where:<br />
aaaa –<br />
bbbbb –<br />
ccc –<br />
ddddd –<br />
device type<br />
device serial number<br />
station's data exchange connection type<br />
data port number<br />
The device will continue on sending these packages in regular intervals determined by<br />
RECONN. TIME until a remote peer connects to the station (if DATA PROTOCOL is set to TCP S)<br />
or the station receives data first time after being configured (if DATA PROTOCOL is set to UDP). Please<br />
J-4
SVAN <strong>95x</strong> USER MANUAL - <strong>Appendix</strong> J<br />
note that in TCP S mode, the device will resume sending registration packets as soon as remote peer<br />
disconnects from the device. In UDP mode, however, the packets will not be sent again until the station is<br />
reconfigured.<br />
Notice: at any given time you may restart the modem to force the device to reconfigure the<br />
station from start.<br />
J.7 Alarm notification<br />
Using SIEMENS modem and SVAN <strong>95x</strong> device allows one to utilise SMS messages and e-mail<br />
to send out the alarm notification. Such service is accessible by ticking the corresponding options –<br />
setting options SEND SMS and/or SEND E-MAIL in EXTERNAL I/O SETUP tab for DIGITAL OUT mode<br />
with ALARM PULSE FUNCTION. These options are also accessible in WIRELESS TRANSFER /<br />
MODEM tab.<br />
Setting these options will, upon an occurring alarm, send messages through selected service(s)<br />
using the following template:<br />
UNIT SVANaaaaa #bbbbb: cccccccccc dddd(1)=eeeeedB(>=fffffdB)<br />
where:<br />
aaaaa –<br />
bbbbb –<br />
cccccccccc –<br />
dddd –<br />
eeeee –<br />
fffff –<br />
device type<br />
device serial number<br />
text message defined in TEXT MESSAGE in SETUP / SMS OPTIONS tab or<br />
SETUP / WIRELESS TRANSFER / E-MAIL SETTINGS tab<br />
name of the parameter / result which triggers the alarm (SPL, PEAK or LEQ)<br />
parameter's level in decibels when alarm occurs<br />
parameter’s level defined for the alarm<br />
Notice: to send an SMS for alarm notification, the instrument does not need to have a<br />
ready internet connection. To use SMS feature only, the modem needs only to be turned on, without<br />
the need of any additional configuration.<br />
J.8 Extra features<br />
As mentioned before, the modem's current state can be viewed from DISPLAY / MODEM STATUS<br />
tab. In this tab, the following information is displayed:<br />
−<br />
−<br />
−<br />
−<br />
Signal quality – described GPRS signal quality measured in dBm.<br />
GPRS availability – can be either Detached, Attached or Not available.<br />
Connection state – describes whether the modem is connected to host application. Note that for UDP<br />
the connection state is always NOT CONNECTED as UDP protocol never establishes a firm<br />
connection between host and client.<br />
Service IP – the current IP of the modem. Note that for SIM cards with dynamic IP this value might be<br />
different with each start up.<br />
The station can be reset remotely through SMS. The reset will turn off and turn on the modem<br />
shortly after, forcing the station to reset whatever connection configuration it currently employing or<br />
whatever modem state it is in.<br />
J-5
SVAN <strong>95x</strong> USER MANUAL - <strong>Appendix</strong> J<br />
.<br />
To do this, a simple sending of SMS with text „Reset” is required. Note that it is case sensitive,<br />
therefore the SMS may only contain this single word with exact spelling as described here.<br />
J.9 Error handling<br />
The firmware has several error handlers, allowing the system to operate despite connection or<br />
transmission errors that might occur during its use. All reactions are independent from other<br />
measurement device's activities – all measurements will continue proceeding, only the communication<br />
system will be affected. Particular behaviour depends on the nature of the error occurring:<br />
Configuration error – if an error occurs during the configuration process (SIEMENS modem transmits<br />
“ERROR” string in such case), the system will attempt to reset all configuration made so far and<br />
configure it again. In the case of such error is occurring during the attempt to establish internet<br />
connection, the system will wait a number of seconds defined by RECONN. TIME option and attempt<br />
to connect again, provided the AUTO RECONN option is ticked.<br />
Random disconnect – if an error occurs and modem will report internet connection failing, the system<br />
will reset all configuration settings, wait a number of seconds defined by RECONN. TIME option and<br />
attempt to connect again, provided the AUTO RECONN option is ticked.<br />
Unexpected disconnect from remote host – such error will be handled by closing the particular<br />
connection and clearing configuration in regard to it. Other system activities will be resumed.<br />
Broken transmission or interrupted configuration procedure – such error usually results in device<br />
waiting for reaction from the modem (during, for example data exchange) and not receiving any data<br />
that would progress its functions further regardless of reasons. In such circumstances,<br />
the communication system will wait 5 minutes before resetting the modem. Reset of the modem is<br />
done by turning it off and turning it on automatically. After a fixed period of 20 seconds, the modem will<br />
be configured again.<br />
TCP inactivity timeout – while using GPRS connection for TCP communication, a connection between<br />
the instrument and the server may break after a period of inactivity (as in no messages being<br />
exchanged). To counter this problem, a small packet of data (a single '#' character) is being sent to the<br />
server by the instrument every one minute if during this time no messages are being exchanged.<br />
To handle incorrect configuration, the modem will be automatically reset whenever any option from<br />
MODEM, MODEM CONNECTION or E-MAIL OPTIONS is changed.<br />
J-6
SVAN <strong>95x</strong> USER MANUAL - <strong>Appendix</strong> J<br />
J.10 Communication diagrams<br />
J-7
SVAN <strong>95x</strong> USER MANUAL - <strong>Appendix</strong> J<br />
.<br />
J-8
SVAN <strong>95x</strong> USER MANUAL - <strong>Appendix</strong> J<br />
J.10 Monitoring station/instrument side - GPRS/INTERNET remote communication<br />
modes<br />
Connection<br />
mode<br />
UDP<br />
TCP S<br />
(TCP/IP Server<br />
)<br />
TCP C<br />
(TCP/IP Client)<br />
Description<br />
User Datagram Protocol. UDP does not guarantee<br />
reliability or ordering of transmitted packets in the way as<br />
the TCP does. Datagrams may arrived out of order,<br />
appear duplicated, or went missing without notice.<br />
Avoiding the overhead of checking whether every packet<br />
actually arrived makes UDP faster and more efficient.<br />
SvanPC+_RC application has a built-in mechanism which<br />
behaves speed and efficiency of the UDP protocol and<br />
improves its functionality: ensures delivering and order of<br />
transmitted packets.<br />
In this connection mode station/instrument is ready to<br />
receive commands from a computer just after making a<br />
connection to the internet. A registration packet is sent to<br />
the computer at the beginning of the internet session.<br />
Registration packet contains: serial number of the<br />
station/instrument, IP address, UDP port etc.<br />
Transmission Control<br />
Protocol. TCP is a<br />
reliable stream delivery<br />
service that guarantees to<br />
deliver a stream of data<br />
sent from one host to<br />
another without<br />
duplication or losing data.<br />
However, because TCP<br />
is optimized for accurate<br />
delivery rather than timely<br />
delivery, TCP sometimes<br />
incurs long delays while<br />
waiting for out-of-order<br />
messages<br />
or<br />
retransmissions of lost<br />
messages, that it is why it<br />
is slower than UDP.<br />
TCP/IP connection is a<br />
peer-to-peer system, with<br />
client-server architecture.<br />
TCP server listens for<br />
incoming connection(s)<br />
and TCP client initiates<br />
this connection (s).<br />
In this connection mode<br />
station/instrument sends a<br />
registration packet and waits<br />
for the computer to make a<br />
TCP connection. Computer<br />
must be configured as a TCP<br />
client. Station/instrument is<br />
ready to receive commands<br />
from the computer just after<br />
establishing a TCP<br />
connection.<br />
In this connection mode<br />
station/instrument does not<br />
send any registration packets<br />
but tries to establish a TCP<br />
connection to the computer<br />
directly. This time computer is<br />
a TCP server.<br />
Station/instrument is ready to<br />
receive commands from the<br />
computer just after<br />
establishing a TCP<br />
connection.<br />
Usage<br />
Use it when IP address of<br />
your modem is public<br />
(depend on your SIM<br />
card).<br />
In case of private IP<br />
address:<br />
- one way communication<br />
“Receive Only” mode is<br />
available – from<br />
station/instrument to the<br />
computer,<br />
- system cannot work in<br />
“Transmit-Receive” mode<br />
and it’s not possible to<br />
setup station/instrument<br />
remotely.<br />
Use it when IP address of<br />
your modem is public<br />
(depend on your SIM<br />
card).<br />
This connection type is<br />
the most preferred<br />
because of its reliability<br />
and small amount of data<br />
needed to make a<br />
connection with the<br />
computer.<br />
This mode is not<br />
suitable for private IP<br />
addresses – system will<br />
not transmit any data!<br />
There are no limitations<br />
on using this mode of<br />
communication. The<br />
modem’s IP can be<br />
private, public, static or<br />
dynamic.<br />
Computer side - GPRS/INTERNET remote communication modes<br />
Internet IP address<br />
of the computer<br />
public & static<br />
public & dynamic<br />
System configuration<br />
Configuration of the system is very simple – just write your computer’s IP as a<br />
“Server Address” in every station/instrument of the system (e.g.<br />
192.168.1.100).<br />
Use one of the Dynamic DNS services such as DynDNS and correlate dynamic<br />
J-9
SVAN <strong>95x</strong> USER MANUAL - <strong>Appendix</strong> J<br />
.<br />
private static or<br />
dynamic<br />
IP of your computer with a name e.g. “svantek.dyndns.org” (see<br />
www.dyndns.com for more details). Write your computer’s internet name<br />
e.g. “svantek.dydns.org” instead of IP address as a “Server Address” in every<br />
station/instrument of the system.<br />
Use the same configuration as for public & dynamic IP address. Pay attention<br />
to proper configuration of your internet gateway (router and firewall) to<br />
retransmit packets from the stations/instruments to your computer in the Local<br />
Area Network.<br />
J.10. Scheme of RS232 modem-to-SV 55 converter<br />
1 2 3 4 5<br />
6 7 8 9<br />
The picture to the left represents the scheme of the RS232 gender converter<br />
required for correct connection between the SV 55 cable and the SIEMENS<br />
modem. For maximum performance of the system it is required that all connections<br />
match and the converter is plugged accordingly with the picture's instructions.<br />
1 2 3 4 5<br />
6 7 8 9<br />
Notice for advanced users: the scheme represents the standard crossed gender changer.<br />
The only difference are the crossed 4 and 7 pins on the to-modem connector, while the other has no 4th<br />
pin wire. This is essential mechanism for automatic modem restart feature that is part of the software<br />
J-