Automap 3 User Guide - American Musical Supply
Automap 3 User Guide - American Musical Supply
Automap 3 User Guide - American Musical Supply

Create successful ePaper yourself
Turn your PDF publications into a flip-book with our unique Google optimized e-Paper software.
AUTOMAP MIDI<br />
<strong>Automap</strong> MIDI is a way to use your <strong>Automap</strong> Hardware as you would any non-<strong>Automap</strong> ‘standard’ MIDI controller.<br />
<strong>Automap</strong> MIDI will send or receive MIDI CC, MIDI Notes and Pitchbend messages.<br />
Before using the <strong>Automap</strong> MIDI client you must select a MIDI Output Port and MIDI Input Port from the <strong>Automap</strong> settings<br />
menu. These are the ports that the <strong>Automap</strong> MIDI client will send and receive MIDI data on.<br />
The available Output and Input MIDI Ports include all MIDI interfaces connected to your computer and a virtual port called<br />
‘<strong>Automap</strong> MIDI’.<br />
When MIDI interface ports are selected you can control any hardware device connected to the corresponding<br />
MIDI interface.<br />
When ‘<strong>Automap</strong> MIDI’ is selected you can control any software using this virtual MIDI port. Consequently you will also see<br />
‘<strong>Automap</strong> MIDI’ appear as an available MIDI input and output port in your software.<br />
<strong>Automap</strong> MIDI can be used to control software applications that do not directly support <strong>Automap</strong>. A few examples would<br />
be using MIDI learn in Ableton Live, controlling Native Instruments Traktor DJ, or assigning Quick Controls in Cubase.<br />
The virtual <strong>Automap</strong> MIDI port will only be available when the <strong>Automap</strong> Server is running. You must launch the <strong>Automap</strong><br />
Server before launching your DAW so that your DAW can establish a connection to it as it launches. If you quit the<br />
<strong>Automap</strong> Server whilst your music software is running you must quit your music software, re-launch the <strong>Automap</strong> Server<br />
and then re-launch your music software to re-establish the connection.<br />
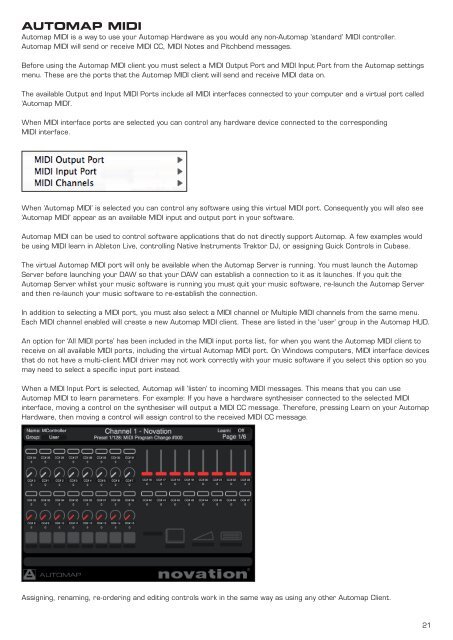
In addition to selecting a MIDI port, you must also select a MIDI channel or Multiple MIDI channels from the same menu.<br />
Each MIDI channel enabled will create a new <strong>Automap</strong> MIDI client. These are listed in the ‘user’ group in the <strong>Automap</strong> HUD.<br />
An option for ‘All MIDI ports’ has been included in the MIDI input ports list, for when you want the <strong>Automap</strong> MIDI client to<br />
receive on all available MIDI ports, including the virtual <strong>Automap</strong> MIDI port. On Windows computers, MIDI interface devices<br />
that do not have a multi-client MIDI driver may not work correctly with your music software if you select this option so you<br />
may need to select a specific input port instead.<br />
When a MIDI Input Port is selected, <strong>Automap</strong> will ‘listen’ to incoming MIDI messages. This means that you can use<br />
<strong>Automap</strong> MIDI to learn parameters. For example: If you have a hardware synthesiser connected to the selected MIDI<br />
interface, moving a control on the synthesiser will output a MIDI CC message. Therefore, pressing Learn on your <strong>Automap</strong><br />
Hardware, then moving a control will assign control to the received MIDI CC message.<br />
Assigning, renaming, re-ordering and editing controls work in the same way as using any other <strong>Automap</strong> Client.<br />
21