
You also want an ePaper? Increase the reach of your titles
YUMPU automatically turns print PDFs into web optimized ePapers that Google loves.
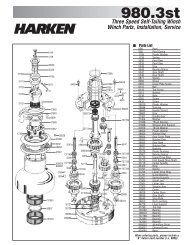
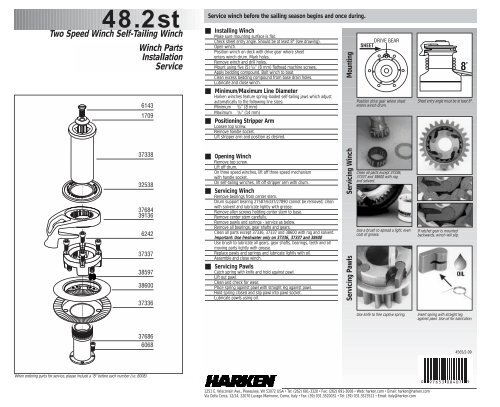
48.2st<br />
Two Speed Winch Self-Tailing Winch<br />
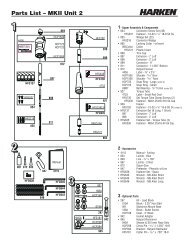
Winch Parts<br />
Installation<br />
Service<br />
Service winch before the sailing season begins and once during.<br />
■ Installing Winch<br />
Make sure mounting surface is flat.<br />
Check sheet entry angle. Should be at least 8° (see drawing).<br />
Open winch.<br />
Position winch on deck with drive gear where sheet<br />
enters winch drum. Mark holes.<br />
Remove winch and drill holes.<br />
Mount using five (5) 5 /16” (8 mm) flathead machine screws.<br />
Apply bedding compound. Bolt winch to boat.<br />
Clean excess bedding compound from base drain holes.<br />
Lubricate and close winch.<br />
■ Minimum/Maximum Line Diameter<br />
Harken winches feature spring-loaded self-tailing jaws which adjust<br />
automatically to the following line sizes:<br />
Minimum<br />
5 /16” (8 mm)<br />
Maximum<br />
9 /16” (14 mm)<br />
■ Positioning Stripper Arm<br />
Loosen top screw.<br />
Remove handle socket.<br />
Lift stripper arm and position as desired.<br />
Mounting<br />
Position drive gear where sheet<br />
enters winch drum.<br />
Sheet entry angle must be at least 8°.<br />
■ Opening Winch<br />
Remove top screw.<br />
Lift off drum.<br />
On three speed winches, lift off three speed mechanism<br />
with handle socket.<br />
On self-tailing winches, lift off stripper arm with drum.<br />
■ Servicing Winch<br />
Remove bearings from center stem.<br />
Drum support bearing 27587/6337/27890 cannot be removed; clean<br />
with solvent and lubricate lightly with grease.<br />
Remove allen screws holding center stem to base.<br />
Remove center stem carefully.<br />
Remove pawls and springs - service as below.<br />
Remove all bearings, gear shafts and gears.<br />
Clean all parts except 37336, 37337 and 38600 with rag and solvent.<br />
Important: Use freshwater only on 37336, 37337 and 38600<br />
Use brush to lubricate all gears, gear shafts, bearings, teeth and all<br />
moving parts lightly with grease.<br />
Replace pawls and springs and lubricate lightly with oil.<br />
Assemble and close winch.<br />
■ Servicing Pawls<br />
Catch spring with knife and hold against pawl.<br />
Lift out pawl.<br />
Clean and check for wear.<br />
Place spring against pawl with straight leg against pawl.<br />
Hold spring closed and slip pawl into pawl socket.<br />
Lubricate pawls using oil.<br />
Servicing Winch<br />
Servicing Pawls<br />
Clean all parts except 37336,<br />
37337 and 38600 with rag<br />
and solvent.<br />
Use a brush to spread a light, even<br />
coat of grease.<br />
If ratchet gear is mounted<br />
backwards, winch will slip.<br />
Use knife to free captive spring.<br />
Insert spring with straight leg<br />
against pawl. Use oil for lubrication.<br />
4565/2-99<br />
When ordering parts for service, please include a “B” before each number (i.e. B008)<br />
1251 E. Wisconsin Ave., Pewaukee, WI 53072 USA • Tel: (262) 691-3320 • Fax: (262) 691-3008 • Web: harken.com • Email: harken@harken.com<br />
Via Della Cerca, 12/14, 22070 Lurago Marinone, Como, Italy • Fax: (39) 031.3520031 • Tel: (39) 031.3523511 • Email: italy@harken.com