ASL Filter Series (Models C85075XES, C125080X5S ... - Hayward
ASL Filter Series (Models C85075XES, C125080X5S ... - Hayward
ASL Filter Series (Models C85075XES, C125080X5S ... - Hayward

Create successful ePaper yourself
Turn your PDF publications into a flip-book with our unique Google optimized e-Paper software.
ISC85075-98<br />
MODELS<br />
<strong>C85075XES</strong>, <strong>C125080X5S</strong><br />
A. FEATURES<br />
• New glass reinforced, non-corrosive PermaGlassXL filter tank will<br />
provide years of trouble-free operation.<br />
• Easy-Lok ring design allows quick access to all internal<br />
components.<br />
• Unique safety latch prevents unwanted entry into the tank.<br />
• Self-venting design automatically purges any air present in the<br />
system.<br />
B. SYSTEM LOCATION<br />
1.<br />
2.<br />
The <strong>ASL</strong> models <strong>C85075XES</strong><br />
and <strong>C125080X5S</strong> are high<br />
performance swimming pool<br />
filters with a maximum flow<br />
rating of 70 gallons per<br />
minute. Manufactured from<br />
<strong>Hayward</strong>’s exclusive<br />
PermaGlassXL material,<br />
<strong>ASL</strong> is designed to provide<br />
years of trouble-free operation.<br />
Though the filter is designed for outdoor use, it is advisable to<br />
protect electrical components from the weather. Select a<br />
well-drained area, one that will not flood when it rains.<br />
For best pump performance, place the system below the swimming<br />
pool water line.<br />
C. PLUMBING<br />
1.<br />
2.<br />
3.<br />
4.<br />
5.<br />
6.<br />
7.<br />
8.<br />
9.<br />
Use 1-1/4” or 1-1/2” I.D. flexible plastic pipe, or hose, joined with<br />
insert fittings and stainless steel clamps. If rigid PVC is used, be<br />
sure to provide unions for easy servicing.<br />
All plumbing connections on the <strong>ASL</strong> filter are 1-1/2” N.P.T. When<br />
making connections, use plastic male-end adapters. Apply three<br />
turns of Teflon tape or plastic pipe sealant to the male threads.<br />
Screw the fitting into the threads hand tight; then, using a wrench,<br />
tighten one more full turn if necessary. Adapters have varying<br />
tolerances and overtightening with a wrench may only cause<br />
damage to the filter.<br />
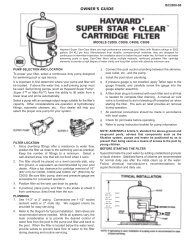
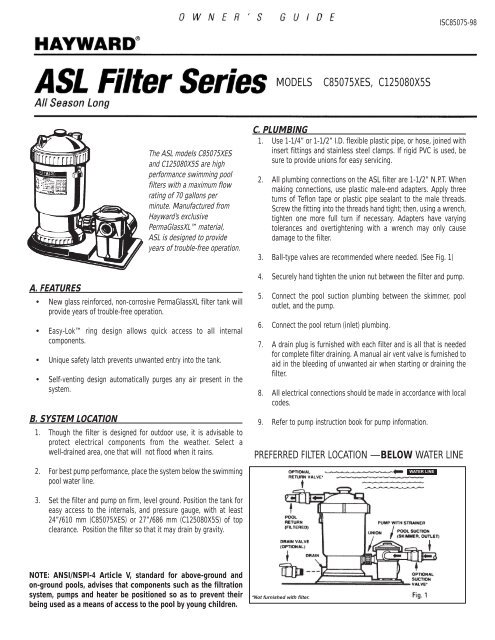
Ball-type valves are recommended where needed. (See Fig. 1)<br />
Securely hand tighten the union nut between the filter and pump.<br />
Connect the pool suction plumbing between the skimmer, pool<br />
outlet, and the pump.<br />
Connect the pool return (inlet) plumbing.<br />
A drain plug is furnished with each filter and is all that is needed<br />
for complete filter draining. A manual air vent valve is furnished to<br />
aid in the bleeding of unwanted air when starting or draining the<br />
filter.<br />
All electrical connections should be made in accordance with local<br />
codes.<br />
Refer to pump instruction book for pump information.<br />
PREFERRED FILTER LOCATION —BELOW WATER LINE<br />
WATER LINE<br />
3.<br />
Set the filter and pump on firm, level ground. Position the tank for<br />
easy access to the internals, and pressure gauge, with at least<br />
24”/610 mm (<strong>C85075XES</strong>) or 27”/686 mm (<strong>C125080X5S</strong>) of top<br />
clearance. Position the filter so that it may drain by gravity.<br />
NOTE: ANSI/NSPI-4 Article V, standard for above-ground and<br />
on-ground pools, advises that components such as the filtration<br />
system, pumps and heater be positioned so as to prevent their<br />
being used as a means of access to the pool by young children.<br />
*Not furnished with filter.
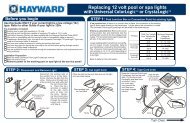
D. PARTS<br />
MODELS <strong>C85075XES</strong>, <strong>C125080X5S</strong><br />
S E R I E S F I L T E R<br />
REF.<br />
NO.<br />
PART<br />
NO.<br />
DESCRIPTION<br />
NO.<br />
REQ’D.<br />
1a<br />
SCX45BC<br />
C850 <strong>Filter</strong> Head with Locking Ring<br />
1<br />
1b<br />
SCX70BC<br />
C1250 <strong>Filter</strong> Head with Locking Ring<br />
1<br />
2<br />
ECX27091<br />
Pressure Gauge<br />
1<br />
3<br />
ECX1322A<br />
Air Relief<br />
1<br />
4<br />
RGX45G<br />
<strong>Filter</strong> Head O-Ring<br />
1<br />
5a<br />
CX850RE<br />
C850 Cartridge Element<br />
1<br />
5b<br />
CX1250RE<br />
C1250 Cartridge Element<br />
1<br />
6<br />
RGX45D<br />
Diffuser<br />
1<br />
7<br />
RGX45Z1<br />
Diffuser Screws<br />
3<br />
8<br />
RGX45AA<br />
<strong>Filter</strong> Body<br />
1<br />
9<br />
RGX45L<br />
Logo Cap<br />
1<br />
10<br />
ECX4077B1<br />
Check Valve<br />
1<br />
—<br />
ECX1005A<br />
Snap Ring for Check Valve<br />
1<br />
11<br />
SPO723<br />
Ball Valve<br />
1<br />
12<br />
SP1480<br />
1-1/2” Male Union<br />
1<br />
13<br />
SPX1425Z6<br />
O-Ring<br />
1<br />
14<br />
—<br />
Power-Flo LX Pump<br />
1<br />
15a<br />
SPX1500WA<br />
6 ft. Cord Set<br />
1<br />
15b<br />
SPX1550WA1<br />
3 ft. Twist Lock Cord Set (Not Shown)<br />
1<br />
16a<br />
ECX1108<br />
Pump Mounting Screw<br />
2<br />
16b<br />
ECX1306<br />
Pump Mounting Screw<br />
4<br />
17<br />
ECX1109<br />
Washer<br />
2<br />
18a<br />
ECX1161<br />
Platform Base (Not Shown)<br />
1<br />
18b<br />
ECX1169<br />
3-Tier Base<br />
1<br />
19<br />
CX400D<br />
Locking Ring Latch<br />
1<br />
<strong>ASL</strong> SPECIFICATIONS<br />
Model No.<br />
C-850 C-1250<br />
Effective Filtration Area<br />
85 FT 2<br />
7.9 M 2<br />
120 FT 2<br />
11.2 M 2<br />
Design Flow Rate<br />
70 GPM<br />
265 LPM<br />
85 GPM<br />
322 LPM<br />
Pressure Loss at Design Flow Rate<br />
1 PSI<br />
.07 BAR<br />
1 PSI<br />
.07 BAR<br />
Maximum Working Pressure<br />
50 PSI<br />
3.45 BAR<br />
50 PSI<br />
3.45 BAR<br />
Required Clearance<br />
Side<br />
18 IN<br />
457 MM<br />
18 IN<br />
457 MM<br />
Above<br />
20 IN<br />
508 MM<br />
27 IN<br />
686 MM
E. BEFORE STARTING THE FILTER<br />
Superchlorinate the pool water by adding unstabilized granular<br />
or liquid chlorine. Stabilized forms of chlorine are recommended<br />
for normal use after the initial clean-up of the water. Follow<br />
chemical manufacturer’s recommendations for superchlorination<br />
and daily use.<br />
H. CLEANING/REPLACING CARTRIDGE ELEMENT<br />
F. STARTING THE FILTER<br />
CAUTION: All suction and discharge valves must be open<br />
before operating the filter system. Failure to do so could cause<br />
severe personal injury and/or property damage.<br />
1.<br />
2.<br />
3.<br />
Follow steps 1-4 in cleaning.<br />
Depress safety latch and<br />
unscrew in a counterclockwise<br />
direction.<br />
Lift out filter element and clean<br />
as instructed in PREVENTATIVE<br />
MAINTENANCE SECTION.<br />
G. FILTERING I. REINSTALLING ELEMENT<br />
Filtration starts as soon as flow is steady through the filter.<br />
Clean cartridge when pressure rises 7-10 psi (.49-.69 BAR) from<br />
starting pressure.<br />
1.<br />
2.<br />
3.<br />
4.<br />
Clean debris from bottom tank.<br />
Replace element evenly on the collector hub in bottom<br />
of the filter body.<br />
Place Easy-Lok lid evenly on filter body and turn clockwise<br />
until the notch on the locking ring engages securely to the<br />
safety latch directly over the drain. (see Fig. 2)<br />
Proceed as in STARTING THE FILTER.
J. PREVENTATIVE MAINTENANCE M. SERVICE AND REPAIRS<br />
1.<br />
Pressure wash cartridge inside and<br />
out with <strong>Hayward</strong>’s Jet-Action<br />
Cleaning Wand (EC2024) or a<br />
garden hose.<br />
Consult your local authorized <strong>Hayward</strong> dealer or service center. No<br />
returns may be made directly to the factory without the expressed<br />
written authorization of <strong>Hayward</strong> Pool Products, Inc.<br />
2.<br />
3.<br />
4.<br />
Allow to dry and brush pleated<br />
surface areas.<br />
To remove algae, suntan oil and<br />
body oils, soak for one hour in a<br />
solution of filter element cleaner.<br />
(See your local pool dealer)<br />
To remove calcium or mineral<br />
deposits, soak in muriatic acid<br />
solution. *Caution: Use a plastic<br />
container and take extreme<br />
care—harmful to eyes, skin and<br />
clothing.<br />
After cleaning, flush with water.<br />
K. VACUUMING<br />
Vacuuming can be performed directly into the filter whenever needed.<br />
For fastest results, clean the filter before and after each vacuuming<br />
period. For heavy spring clean-ups, we recommend using a <strong>Hayward</strong><br />
SPO727 diverter valve to bypass the filter and accelerate the clean-up<br />
process. Consult your local <strong>Hayward</strong> dealer for a detailed explanation.<br />
L. WINTERIZING<br />
In areas where sub-freezing temperatures can be expected, the filter<br />
should be drained and/or removed from its operating location and stored<br />
indoors. Clean the element at the end of the pool season by using your<br />
garden hose with a high pressure nozzle or the <strong>Hayward</strong> EC2024<br />
Jet-Action Cleaning Wand. You will then be prepared to enjoy your pool<br />
the next spring.<br />
N. ALGAE CONTROL<br />
Algae is a form of plant life which can vary in size from a few<br />
thousandths of an inch to the size of a small tree. Of the many forms of<br />
algae, those most frequently found in swimming pool water are<br />
microscopic in size and green in color.<br />
Algae readily grows in sunlight and can, under favorable conditions,<br />
quickly overgrow a swimming pool turning it completely green in just a<br />
few hours. On the other hand, swimming pool water can be kept<br />
unfavorable to algae growth simply by maintaining a free chlorine<br />
level of at least 1.0 ppm in the water at all times. The chlorine level<br />
should be checked at least once a day using a suitable test kit.<br />
If an algae condition develops and the pool water “blooms” green,<br />
superchlorination of the pool will be necessary to clear it. Add<br />
unstabilized granular chlorine, or liquid chlorine. Follow chemical<br />
manufacturer’s recommendation for superchlorination. The algae will<br />
quickly become inactive and can then be removed by the filter. Live<br />
algae, on the other hand, multiplies so fast that the filter cannot keep<br />
up with its growth rate.<br />
When correctly used, commercial algaecides are effective against<br />
algae, though algaecides should be used in conjunction with, and not as<br />
a substitute for, regular chlorination or superchlorination.<br />
Maintaining a free chlorine level of at least 1.0 ppm in the pool water<br />
at all times is the most effective way to prevent algae growth in<br />
swimming pools.<br />
POOL CHEMISTRY GUIDELINES<br />
pH<br />
SUGGESTED POOL CHEMISTRY LEVELS<br />
TOTAL ALKALINITY<br />
FREE CHLORINE<br />
BROMINE<br />
CHLORINE STABILIZER<br />
(Cyanuric Acid)<br />
7.2 to 7.6<br />
100 to 130 ppm<br />
1.0 to 3.0 ppm<br />
2 to 4 ppm<br />
40 to 70 ppm<br />
ACTION REQUIRED TO CORRECT POOL CHEMISTRY<br />
TO RAISE<br />
Add Soda Ash<br />
Add Sodium Bicarbonate<br />
Add Chlorine Chemical<br />
Add Bromine<br />
Add Stabilizer<br />
TO LOWER<br />
Add Muriatic Acid or Sodium Bisulphate<br />
Add Muriatic Acid<br />
No action - chlorine will naturally dissipate<br />
No action - bromine will naturally dissipate<br />
Dilution - partially drain & refill pool with water<br />
that has not been treated with Cyanuric Acid.<br />
Rev. 10/98<br />
© 1998 <strong>Hayward</strong>