AQL-CHEM2 - Hayward
AQL-CHEM2 - Hayward
AQL-CHEM2 - Hayward

Create successful ePaper yourself
Turn your PDF publications into a flip-book with our unique Google optimized e-Paper software.
end to the solenoid valve as shown in the diagram above.<br />
n pool pump and check for water leaks.<br />
CO 2<br />
tank valve and use soapy water to check for CO 2<br />
leaks at regulator<br />
.<br />
orarily apply power to the solenoid and use soapy water to check for<br />
aks at tubing ends and fittings. Remove power when finished.<br />
<strong>AQL</strong>-<strong>CHEM2</strong> or <strong>AQL</strong>-<strong>CHEM2</strong>-240<br />
EM2(-240) is supplied with a 6' power cord and is designed to plug into<br />
r 240VAC Goldline pH Dispense Pigtail that is included with the <strong>AQL</strong>e<br />
pigtail must be wired directly to the pH output on the Aqua Rite Pro or<br />
operating with software version 4.00 or later. For Pro Logics using<br />
on less than 4.00, the pigtail must be connected to an internal relay in<br />
. Installation instructions for the pigtail are provided with the <strong>AQL</strong>-<br />
HEM2 into the 120VAC pigtail or the <strong>AQL</strong>-<strong>CHEM2</strong>-240 into the 240VAC<br />
roper configuration, the Aqua Rite Pro or Pro Logic will automatically<br />
L-<strong>CHEM2</strong>(-240) when the pool’s pH level requires adjustment.<br />
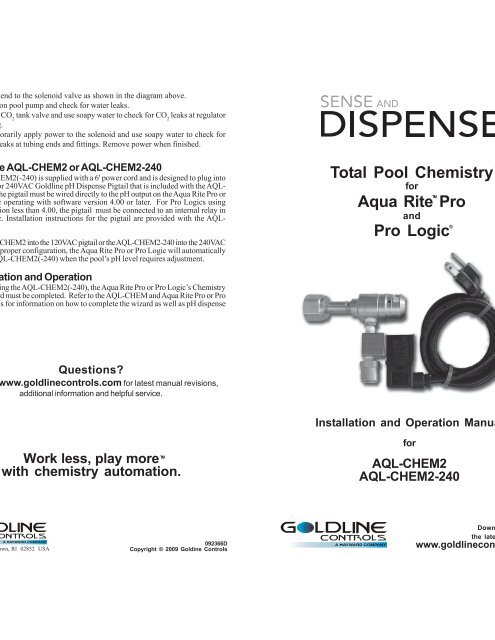
Total Pool Chemistry<br />
for<br />
TM<br />
Aqua Rite Pro<br />
and<br />
Pro Logic<br />
®<br />
T<br />
tion and Operation<br />
ng the <strong>AQL</strong>-<strong>CHEM2</strong>(-240), the Aqua Rite Pro or Pro Logic’s Chemistry<br />
d must be completed. Refer to the <strong>AQL</strong>-CHEM and Aqua Rite Pro or Pro<br />
s for information on how to complete the wizard as well as pH dispense<br />
Questions?<br />
ww.goldlinecontrols.com for latest manual revisions,<br />
additional information and helpful service.<br />
Installation and Operation Manua<br />
Work less, play more TM<br />
with chemistry automation.<br />
for<br />
<strong>AQL</strong>-<strong>CHEM2</strong><br />
<strong>AQL</strong>-<strong>CHEM2</strong>-240<br />
LINE<br />
N TROLS<br />
wn, RI 02852 USA<br />
092366D<br />
Copyright © 2009 Goldine Controls<br />
G<br />
LDLINE<br />
CON TROLS<br />
Down<br />
the late<br />
www.goldlinecon
n<br />
2 is a 120VAC CO 2<br />
dispense kit designed for use with a Goldline Aqua<br />
tor or Pro Logic pool control. The <strong>AQL</strong>-<strong>CHEM2</strong>-240 is identical to<br />
2, but uses 240VAC. When used with the <strong>AQL</strong>-CHEM sensing kit, the<br />
240) solves the problem of how to provide low cost pH control for<br />
ithout having to handle acid. The <strong>AQL</strong>-<strong>CHEM2</strong>(-240) is designed to<br />
dard CO 2<br />
tank and wire directly to the Aqua Rite Pro or Pro Logic.<br />
CHEM sensing kit, the Aqua Rite Pro or Pro Logic will sense the pH<br />
d, the <strong>AQL</strong>-<strong>CHEM2</strong>(-240) will inject CO 2<br />
into the pool water. CO 2<br />
is<br />
en dissolved in water and will lower the pool's pH slowly without the<br />
concerns normally associated with harsher acids.<br />
uded<br />
2 and <strong>AQL</strong>-<strong>CHEM2</strong>-240 includes the following:<br />
ng regulator preset at 50 psi output<br />
<strong>CHEM2</strong>) or 240VAC (<strong>AQL</strong>-<strong>CHEM2</strong>-240) solenoid valve with 6' power<br />
nd spare (only use one)<br />
resistant flexible tubing<br />
e injector<br />
tion and availability<br />
2(-240) kit requires the use of CO 2<br />
which is supplied in cylinders that<br />
able from various sources. CO 2<br />
cylinders are offered in a variety of<br />
ecommends the use of 20 pound cylinders for most residential pool<br />
e <strong>AQL</strong>-<strong>CHEM2</strong>(-240) uses a standard fitting for these tanks. CO 2<br />
can<br />
t local and national welding supply or beverage companies. A quick<br />
b with the keywords “CO 2<br />
supply” will yield many companies, some<br />
f branch/store locations nationwide.<br />
Installation<br />
L-<strong>CHEM2</strong> or <strong>AQL</strong>-<strong>CHEM2</strong>-240 requires the following steps:<br />
using commercially available straps<br />
noid valve to the CO 2<br />
tank<br />
check valve injector to the pool's return plumbing<br />
id valve into the pigtail of the Aqua Rite Pro or Pro Logic pool control<br />
qua Rite Pro or Pro Logic to control the <strong>AQL</strong>-<strong>CHEM2</strong>(-240)<br />
umes that the Goldline <strong>AQL</strong>-CHEM Chemistry Kit and the pH Disluded<br />
with <strong>AQL</strong>-CHEM) have already been installed. If not, this will<br />
med prior to installation. Refer to the <strong>AQL</strong>-CHEM manual for instalns.<br />
tank<br />
ank in an easily accessible location. Straps or brackets can be purtank<br />
supplier and must be used for a secure installation.<br />
Attaching the solenoid valve<br />
The solenoid valve attaches to the CO 2<br />
tank much like an outdoor gas<br />
a propane tank. With the tank valve off, insert the included nylon wa<br />
the fitting of the <strong>AQL</strong>-<strong>CHEM2</strong>(-240) solenoid valve on to the CO 2<br />
ta<br />
washer is lost or destroyed, a spare is provided. Keep the tank's va<br />
entire installation is complete.<br />
Installing the PVC check valve<br />
When installing the PVC check valve, refer to the plumbing overvie<br />
CHEM and <strong>AQL</strong>-<strong>CHEM2</strong>(-240) shown below. The PVC check valve m<br />
at the pool's return line DOWNSTREAM of the electrolytic cell an<br />
Because mild acid will be dispensed at this location, it should be the<br />
installed in the return line before water is allowed to flow back to the<br />
the injection point must be free of air pockets and should be located<br />
(or close to the underside) of the pipe.<br />
FROM SPA<br />
FROM POOL<br />
POOL<br />
To install the check valve, perform the following steps:<br />
Insert nylon wa<br />
before attachin<br />
pH dispe<br />
RET<br />
TO<br />
1. Turn off pool filter pump.<br />
2. Drain water from the return line.<br />
3. Drill a 7/16" hole in the bottom side of the return line AFTER<br />
cell and flow switch.<br />
4. Tap the hole for a 1/4" NPT. Use caution not to tap tapered thr<br />
5. Apply plumber's tape to check valve threads and screw into ta<br />
NOT OVERTIGHTEN.<br />
7. Connect one end of the provided 3/8" flexible hose to the che<br />
R<br />
T