ECK-3699GF Embedded System User Manual - ICP America
ECK-3699GF Embedded System User Manual - ICP America
ECK-3699GF Embedded System User Manual - ICP America

Create successful ePaper yourself
Turn your PDF publications into a flip-book with our unique Google optimized e-Paper software.
<strong>ECK</strong>-<strong>3699GF</strong> <strong>Embedded</strong> <strong>System</strong><br />
<strong>ECK</strong>-<strong>3699GF</strong> <strong>User</strong> <strong>Manual</strong><br />
1
<strong>ECK</strong>-<strong>3699GF</strong> <strong>Embedded</strong> <strong>System</strong><br />
REVISION HISTORY<br />
Title<br />
<strong>ECK</strong>-<strong>3699GF</strong> Intel Core Duo/Solo <strong>Embedded</strong> <strong>System</strong><br />
Revision Number Description Date of Issue<br />
1.0 Initial release January 2007<br />
COPYRIGHT NOTICE<br />
The information in this document is subject to change without prior notice in order to<br />
improve reliability, design and function and does not represent a commitment on the part<br />
of the manufacturer.<br />
In no event is the manufacturer liable for direct, indirect, special, incidental, or<br />
consequential damages arising out of the use or inability to use the product or<br />
documentation, even if advised of the possibility of such damages.<br />
This document contains proprietary information protected by copyright. All rights are<br />
reserved. No part of this manual may be reproduced by any mechanical, electronic, or<br />
other means in any form without prior written permission of the manufacturer.<br />
TRADEMARKS<br />
Product names mentioned herein are used for identification purposes only and may be<br />
trademarks and/or registered trademarks of their respective owners.<br />
2<br />
IEI ® Technology, Corp.
<strong>ECK</strong>-<strong>3699GF</strong> <strong>Embedded</strong> <strong>System</strong><br />
Table of Contents<br />
1 INTRODUCTION................................................................................................... 13<br />
1.1 <strong>ECK</strong>-<strong>3699GF</strong> EMBEDDED SYSTEM OVERVIEW ....................................................... 14<br />
1.1.1 <strong>ECK</strong>-<strong>3699GF</strong> Benefits ..................................................................................... 14<br />
1.1.2 <strong>ECK</strong>-<strong>3699GF</strong> Features .................................................................................... 14<br />
1.2 TECHNICAL SPECIFICATIONS .................................................................................... 15<br />
1.3 POWER MODULE SPECIFICATIONS............................................................................ 16<br />
1.4 POWER ADAPTER ..................................................................................................... 16<br />
2 MECHANICAL DESCRIPTION.......................................................................... 19<br />
2.1 <strong>ECK</strong>-<strong>3699GF</strong> MECHANICAL OVERVIEW ................................................................. 20<br />
2.2 PHYSICAL DIMENSIONS............................................................................................ 20<br />
2.2.1 <strong>ECK</strong>-<strong>3699GF</strong> Dimensions ............................................................................... 20<br />
2.2.2 Motherboard Dimensions ................................................................................ 21<br />
2.2.3 Power Module Dimensions.............................................................................. 21<br />
2.3 EXTERNAL OVERVIEW ............................................................................................. 22<br />
2.3.1 Front Panel ...................................................................................................... 22<br />
2.3.1.1 Front Panel Overview ............................................................................... 22<br />
2.3.1.2 Front Panel Buttons and Indicators........................................................... 22<br />
2.3.2 Rear Panel ....................................................................................................... 23<br />
2.3.2.1 Rear Panel Overview ................................................................................ 23<br />
2.3.2.2 Rear Panel Connectors.............................................................................. 23<br />
2.3.3 Top Cover......................................................................................................... 24<br />
2.3.4 Bottom Surface................................................................................................. 25<br />
2.4 INTERNAL OVERVIEW............................................................................................... 25<br />
2.5 COOLING FANS......................................................................................................... 26<br />
3 SYSTEM COMPONENTS .................................................................................... 29<br />
3.1 <strong>ECK</strong>-<strong>3699GF</strong> EMBEDDED SYSTEM MOTHERBOARD ............................................... 30<br />
3.1.1 <strong>ECK</strong>-<strong>3699GF</strong> <strong>Embedded</strong> <strong>System</strong> Motherboard............................................... 30<br />
3.1.2 KINO-9452 Motherboard Overview ................................................................ 30<br />
3.1.3 Onboard Connectors and Jumpers .................................................................. 31<br />
3.1.4 External Interface Connectors......................................................................... 31<br />
3
<strong>ECK</strong>-<strong>3699GF</strong> <strong>Embedded</strong> <strong>System</strong><br />
3.1.5 Onboard Jumpers............................................................................................. 32<br />
3.2 KINO-9452 ON-BOARD CONNECTOR PINOUTS ....................................................... 32<br />
3.2.1 Fan Connectors................................................................................................ 32<br />
3.2.2 Front Panel Connector .................................................................................... 33<br />
3.2.3 IDE Connector................................................................................................. 35<br />
3.2.4 Power Connector ............................................................................................. 37<br />
3.2.5 SATA Drive Connectors ................................................................................... 38<br />
3.2.6 Internal USB Connectors................................................................................. 39<br />
3.3 EXTERNAL INTERFACE CONNECTORS....................................................................... 41<br />
3.3.1 External Interface Connector Overview .......................................................... 41<br />
3.3.2 Audio Connectors............................................................................................. 41<br />
3.3.3 CRT Connector ................................................................................................ 42<br />
3.3.4 Ethernet Connectors ........................................................................................ 43<br />
3.3.5 Keyboard/Mouse Connector ............................................................................ 44<br />
3.3.6 Serial Port Connectors .................................................................................... 45<br />
3.3.7 TV-Out Connector............................................................................................ 46<br />
3.3.8 USB Connector ................................................................................................ 47<br />
3.4 KINO-9452 MOTHERBOARD ON-BOARD JUMPERS.................................................. 48<br />
3.4.1 Clear CMOS Jumper........................................................................................ 49<br />
3.4.2 COM2 Mode Selection..................................................................................... 50<br />
3.4.3 LVDS LCD Voltage Selection........................................................................... 51<br />
3.5 POWER MODULE CONNECTORS AND JUMPERS ......................................................... 51<br />
3.5.1 Input Power Connector.................................................................................... 52<br />
3.5.2 Output Power Connector [Motherboard]........................................................ 52<br />
3.5.3 Output Power Connector ................................................................................. 53<br />
4 INSTALLATION .................................................................................................... 55<br />
4.1 ANTI-STATIC PRECAUTIONS...................................................................................... 56<br />
4.2 INSTALLATION PROCEDURE...................................................................................... 56<br />
4.2.1 Installation Procedure Overview ..................................................................... 56<br />
4.2.2 Unpacking........................................................................................................ 57<br />
4.2.3 Opening the <strong>ECK</strong>-<strong>3699GF</strong> .............................................................................. 57<br />
4.2.3.1 Top Cover Removal .................................................................................. 57<br />
4.2.4 Socket 479 CPU Installation............................................................................ 58<br />
4.2.5 Cooling Kit (CF-479B-RS) Installation........................................................... 62<br />
4.2.6 Configure the Jumper Settings......................................................................... 64<br />
4<br />
IEI ® Technology, Corp.
<strong>ECK</strong>-<strong>3699GF</strong> <strong>Embedded</strong> <strong>System</strong><br />
4.2.7 DIMM Module Installation.............................................................................. 64<br />
4.2.7.1 Purchasing the Memory Module............................................................... 64<br />
4.2.7.2 DIMM Module Installation....................................................................... 64<br />
4.2.8 Install the HDD and CD Drive ........................................................................ 66<br />
4.2.9 Cable Connections........................................................................................... 67<br />
4.3 POWER-ON PROCEDURE .......................................................................................... 67<br />
4.3.1 Installation Checklist ....................................................................................... 67<br />
4.3.2 Power-on Procedure ........................................................................................ 68<br />
5 BIOS SETTINGS.................................................................................................... 69<br />
5.1 INTRODUCTION ........................................................................................................ 70<br />
5.1.1 Starting Setup................................................................................................... 70<br />
5.1.2 Using Setup ...................................................................................................... 70<br />
5.1.3 Getting Help..................................................................................................... 71<br />
5.1.4 Unable to Reboot after Configuration Changes .............................................. 71<br />
5.1.5 BIOS Menu Bar................................................................................................ 71<br />
5.2 MAIN ....................................................................................................................... 71<br />
5.3 ADVANCED............................................................................................................... 73<br />
5.3.1 CPU Configuration.......................................................................................... 74<br />
5.3.2 IDE Configuration ........................................................................................... 75<br />
5.3.2.1 IDE Master, IDE Slave ............................................................................. 77<br />
5.3.3 Super IO Configuration.................................................................................... 81<br />
5.3.4 Hardware Health Configuration...................................................................... 84<br />
5.3.5 ACPI Configuration ......................................................................................... 86<br />
5.3.5.1 General ACPI Configuration..................................................................... 87<br />
5.3.6 APM Configuration.......................................................................................... 88<br />
5.3.7 MPS Configuration .......................................................................................... 90<br />
5.3.8 Remote Access Configuration .......................................................................... 91<br />
5.3.9 USB Configuration........................................................................................... 93<br />
5.3.9.1 USB Mass Storage Device Configuration................................................. 95<br />
5.4 PCI/PNP .................................................................................................................. 97<br />
5.5 BOOT ..................................................................................................................... 103<br />
5.5.1 Boot Settings Configuration........................................................................... 103<br />
5.5.2 Boot Device Priority ...................................................................................... 106<br />
5.5.3 Removable Drives .......................................................................................... 107<br />
5.6 SECURITY............................................................................................................... 108<br />
5
<strong>ECK</strong>-<strong>3699GF</strong> <strong>Embedded</strong> <strong>System</strong><br />
5.7 CHIPSET ..................................................................................................................110<br />
5.7.1 North Bridge Configuration............................................................................110<br />
5.7.1.1 Video Function Configuration .................................................................113<br />
5.7.2 South Bridge Configuration............................................................................116<br />
5.8 EXIT........................................................................................................................117<br />
6 SOFTWARE DRIVERS ........................................................................................119<br />
6.1 AVAILABLE SOFTWARE DRIVERS ............................................................................ 120<br />
6.2 CHIPSET DRIVER INSTALLATION............................................................................. 120<br />
6.3 VGA DRIVER......................................................................................................... 123<br />
6.4 BROADCOM LAN DRIVER (FOR GBE LAN) INSTALLATION .................................. 127<br />
6.5 REALTEK HD AUDIO DRIVER (ALC883) INSTALLATION....................................... 131<br />
6.6 INTEL MATRIX STORAGE MANAGER INSTALLATION............................................... 135<br />
7 TROUBLESHOOTING AND MAINTENANCE .............................................. 139<br />
7.1 <strong>ECK</strong>-<strong>3699GF</strong> SYSTEM MAINTENANCE OVERVIEW ............................................... 140<br />
7.2 SYSTEM TROUBLESHOOTING.................................................................................. 140<br />
7.2.1 The <strong>System</strong> Doesn’t Turn On.......................................................................... 140<br />
7.2.2 The <strong>System</strong> Doesn’t Boot Up.......................................................................... 141<br />
7.2.3 More Troubleshooting .................................................................................... 141<br />
7.3 COMPONENT REPLACEMENT PROCEDURE.............................................................. 142<br />
7.3.1 DIMM Module Replacement.......................................................................... 142<br />
7.3.2 Motherboard Replacement............................................................................. 142<br />
7.3.2.1 Motherboard Removal ............................................................................ 142<br />
7.3.2.2 Motherboard Installation......................................................................... 145<br />
7.3.3 Power Module Replacement .......................................................................... 145<br />
7.3.3.1 Power Module Removal ......................................................................... 146<br />
7.3.3.2 Power Module Installation...................................................................... 147<br />
7.3.4 Cooling Fan Replacement.............................................................................. 148<br />
A IEI EMBEDDED SYSTEM SERIES.................................................................. 151<br />
A.1 EI EMBEDDED SYSTEM SERIES ............................................................................. 152<br />
A.1.1 Overview........................................................................................................ 152<br />
A.1.2 IEI <strong>Embedded</strong> <strong>System</strong> Series ......................................................................... 152<br />
A.1.3 IEI <strong>Embedded</strong> <strong>System</strong> Series Variations........................................................ 152<br />
A.2 EMBEDDED SYSTEM SOLUTIONS........................................................................... 153<br />
A.2.1 AMD ® Geode ® LX800 500MHz Solutions..................................................... 153<br />
6<br />
IEI ® Technology, Corp.
<strong>ECK</strong>-<strong>3699GF</strong> <strong>Embedded</strong> <strong>System</strong><br />
A.2.2 AMD ® Geode ® GX466 333MHz Solutions.................................................... 154<br />
A.2.3 VIA ® LUKE ® 1GHz Solutions ....................................................................... 154<br />
A.2.4 VIA ® MARK ® 800MHz Solutions .................................................................. 155<br />
A.2.5 Intel ® Celeron ® M 1.5GHz Solutions ............................................................ 155<br />
A.2.6 Intel ® Socket 479 Pentium ® /Celeron ® M 2GHz Solutions ............................ 156<br />
A.2.7 LGA 775 Intel ® Pentium ® 4/ Pentium ® D Solutions ..................................... 156<br />
A.2.8 Intel ® Socket 479 Core Duo/Solo Solutions .................................................. 157<br />
A.2.9 Intel ® Pentium-M Solutions........................................................................... 157<br />
B BIOS MENU OPTIONS....................................................................................... 159<br />
B.1 BIOS CONFIGURATION OPTIONS........................................................................... 160<br />
C WATCHDOG TIMER .......................................................................................... 165<br />
D ADDRESS MAPPING.......................................................................................... 169<br />
D.1 IO ADDRESS MAP ................................................................................................. 170<br />
D.2 1ST MB MEMORY ADDRESS MAP ......................................................................... 171<br />
D.3 IRQ MAPPING TABLE............................................................................................ 171<br />
D.4 DMA CHANNEL ASSIGNMENTS............................................................................. 171<br />
8 INDEX.................................................................................................................... 173<br />
7
<strong>ECK</strong>-<strong>3699GF</strong> <strong>Embedded</strong> <strong>System</strong><br />
List of Figures<br />
Figure 1-1: <strong>ECK</strong>-<strong>3699GF</strong> KINO Series <strong>Embedded</strong> <strong>System</strong>......................................14<br />
Figure 1-2: Power Adapter .........................................................................................17<br />
Figure 2-1: <strong>ECK</strong>-<strong>3699GF</strong> Dimensions (mm)..............................................................20<br />
Figure 2-2: KINO SBC Dimensions (mm)..................................................................21<br />
Figure 2-3: Power Module Dimensions (mm) ...........................................................21<br />
Figure 2-4: <strong>ECK</strong>-<strong>3699GF</strong> Front Panel ........................................................................22<br />
Figure 2-5: <strong>ECK</strong>-<strong>3699GF</strong> Rear Panel .........................................................................23<br />
Figure 2-6: <strong>ECK</strong>-<strong>3699GF</strong> Top Cover ..........................................................................24<br />
Figure 2-7: Bottom Surface ........................................................................................25<br />
Figure 2-8: <strong>ECK</strong>-<strong>3699GF</strong> Internal Overview..............................................................26<br />
Figure 2-9: Cooling Fan Dimensions (mm)...............................................................27<br />
Figure 3-1: KINO-9452 Jumper and Connector Locations......................................30<br />
Figure 3-2: Fan Connector Locations .......................................................................33<br />
Figure 3-3: Front Panel Connector Location............................................................34<br />
Figure 3-4: IDE Device Connector Location .............................................................36<br />
Figure 3-5: Power Connector Location.....................................................................37<br />
Figure 3-6: SATA Drive Connector Locations..........................................................39<br />
Figure 3-7: Internal USB Connector Locations ........................................................40<br />
Figure 3-8: KINO-9452 On-board External Interface Connectors...........................41<br />
Figure 3-9: Audio Connectors....................................................................................42<br />
Figure 3-10: VGA Connector ......................................................................................42<br />
Figure 3-11: RJ-45 Ethernet Connector ....................................................................44<br />
Figure 3-12: PS/2 Pinouts...........................................................................................45<br />
Figure 3-13: External Serial Port Connector ............................................................46<br />
Figure 3-14: TV-Out Connector..................................................................................47<br />
Figure 3-15: Jumpers..................................................................................................48<br />
Figure 3-16: Jumper Locations..................................................................................49<br />
Figure 3-17: Power Module Connector Locations ...................................................52<br />
Figure 4-1: Top Cover Retention Screws..................................................................58<br />
8<br />
IEI ® Technology, Corp.
<strong>ECK</strong>-<strong>3699GF</strong> <strong>Embedded</strong> <strong>System</strong><br />
Figure 4-2: Motherboard Connectors........................................................................59<br />
Figure 4-3: Motherboard Retention Screws .............................................................60<br />
Figure 4-4: Make sure the CPU socket retention screw is unlocked .....................60<br />
Figure 4-5: Lock the CPU Socket Retention Screw .................................................61<br />
Figure 4-6: IEI CF-479B-RS Cooling Kit ....................................................................62<br />
Figure 4-7: Securing the Cooling Kit.........................................................................63<br />
Figure 4-8: Connect the cooling fan cable ...............................................................63<br />
Figure 4-9: Installing the DIMM Module ....................................................................65<br />
Figure 4-10: Locking the DIMM Module ....................................................................65<br />
Figure 4-11: HDD and CD Drive Installation .............................................................66<br />
Figure 4-12: Power Button and Power LED..............................................................68<br />
Figure 6-1: InstallShield Wizard Preparation Screen............................................ 121<br />
Figure 6-2: Welcome Screen ................................................................................... 121<br />
Figure 6-3: License Agreement............................................................................... 122<br />
Figure 6-4: Readme Information ............................................................................. 122<br />
Figure 6-5: Restart the Computer........................................................................... 123<br />
Figure 6-6: Starting Install Shield Wizard Screen ................................................. 124<br />
Figure 6-7: Preparing Setup Screen....................................................................... 124<br />
Figure 6-8: VGA Driver Installation Welcome Screen........................................... 125<br />
Figure 6-9: VGA Driver License Agreement .......................................................... 125<br />
Figure 6-10: VGA Driver Installing Notice.............................................................. 126<br />
Figure 6-11: VGA Driver Installation Complete ..................................................... 126<br />
Figure 6-12: Access Windows Control Panel........................................................ 127<br />
Figure 6-13: Double Click the <strong>System</strong> Icon ........................................................... 128<br />
Figure 6-14: Double Click the Device Manager Tab.............................................. 128<br />
Figure 6-15: Device Manager List........................................................................... 129<br />
Figure 6-16: Search for Suitable Driver.................................................................. 129<br />
Figure 6-17: Locate Driver Files.............................................................................. 130<br />
Figure 6-18: Location Browsing Window............................................................... 130<br />
Figure 6-19: Access Windows Control Panel........................................................ 131<br />
Figure 6-20: Double Click the <strong>System</strong> Icon ........................................................... 132<br />
Figure 6-21: Double Click the Device Manager Tab.............................................. 132<br />
9
<strong>ECK</strong>-<strong>3699GF</strong> <strong>Embedded</strong> <strong>System</strong><br />
Figure 6-22: Device Manager List........................................................................... 133<br />
Figure 6-23: Search for Suitable Driver.................................................................. 134<br />
Figure 6-24: Locate Driver Files.............................................................................. 135<br />
Figure 6-25: Preparing Setup Screen..................................................................... 136<br />
Figure 7-1: HDD Bracket Retention Screws .......................................................... 143<br />
Figure 7-2: Motherboard Connectors..................................................................... 144<br />
Figure 7-3: Motherboard Retention Screws .......................................................... 144<br />
Figure 7-4: Power Module Internal Connectors .................................................... 146<br />
Figure 7-5: Power Module Retention Screws ........................................................ 147<br />
Figure 7-6: Cooling Fan Retention Screws on the <strong>System</strong>.................................. 148<br />
Figure 7-7: Cooling Fan Retention Screws on the Fan Bracket .......................... 148<br />
10<br />
IEI ® Technology, Corp.
<strong>ECK</strong>-<strong>3699GF</strong> <strong>Embedded</strong> <strong>System</strong><br />
List of Tables<br />
Table 1-1: Technical Specifications ..........................................................................16<br />
Table 1-2: Power Module Specifications...................................................................16<br />
Table 1-3: Power Adapter Specifications..................................................................18<br />
Table 2-1: Cooling Fan Specifications ......................................................................28<br />
Table 3-1: Peripheral Interface Connectors..............................................................31<br />
Table 3-2: Peripheral Interface Connectors..............................................................32<br />
Table 3-3: Onboard Jumpers .....................................................................................32<br />
Table 3-4: Fan Connector Pinouts.............................................................................33<br />
Table 3-5: Front Panel Connector Pinouts ...............................................................35<br />
Table 3-6: IDE Connector Pinouts .............................................................................37<br />
Table 3-7: Power Connector Pinouts ........................................................................38<br />
Table 3-8: SATA Drive Connector Pinouts ...............................................................39<br />
Table 3-9: USB3 and USB4 Pinouts...........................................................................40<br />
Table 3-10: VGA Connector Pinouts .........................................................................43<br />
Table 3-11: LAN1 and LAN2 Pinouts.........................................................................43<br />
Table 3-12: RJ-45 Ethernet Connector LEDs............................................................44<br />
Table 3-13: PS/2 Connector Pinouts .........................................................................45<br />
Table 3-14: External Serial Port Pinouts...................................................................46<br />
Table 3-15: TV-Out Pinouts ........................................................................................47<br />
Table 3-16: External USB Connector Pinouts ..........................................................48<br />
Table 3-17: Clear CMOS Jumper Settings ................................................................50<br />
Table 3-18: JP1 Jumper Settings...............................................................................50<br />
Table 3-19: JP2 Jumper Settings...............................................................................51<br />
Table 3-20: Power Module Connector Pinouts.........................................................52<br />
Table 3-21: Input Power Connector Pinouts ............................................................52<br />
Table 3-22: Output Power Connector Pinouts (Motherboard)................................53<br />
Table 3-23: Output Power Connector Pinouts .........................................................53<br />
Table 5-1: BIOS Navigation Keys...............................................................................71<br />
11
<strong>ECK</strong>-<strong>3699GF</strong> <strong>Embedded</strong> <strong>System</strong><br />
List of BIOS Menus<br />
BIOS Menu 1: Main......................................................................................................72<br />
BIOS Menu 2: Advanced.............................................................................................74<br />
BIOS Menu 3: CPU Configuration..............................................................................75<br />
BIOS Menu 4: IDE Configuration ...............................................................................76<br />
BIOS Menu 5: IDE Master and IDE Slave Configuration..........................................78<br />
BIOS Menu 6: Super IO Configuration ......................................................................81<br />
BIOS Menu 7: Hardware Health Configuration.........................................................84<br />
BIOS Menu 8: ACPI Configuration.............................................................................86<br />
BIOS Menu 9: General ACPI Configuration [Advanced\ ACPI Configuration]......87<br />
BIOS Menu 10: APM Configuration ...........................................................................88<br />
BIOS Menu 11: MPS Configuration ...........................................................................91<br />
BIOS Menu 12: Remote Access Configuration [Advanced] ...................................92<br />
BIOS Menu 13: USB Configuration............................................................................93<br />
BIOS Menu 14: USB Mass Storage Device Configuration.......................................96<br />
BIOS Menu 15: PCI/PnP Configuration .....................................................................98<br />
BIOS Menu 16: Boot................................................................................................. 103<br />
BIOS Menu 17: Boot Settings Configuration......................................................... 104<br />
BIOS Menu 18: Boot Device Priority Settings ....................................................... 107<br />
BIOS Menu 19: Removable Drives.......................................................................... 108<br />
BIOS Menu 20: Security........................................................................................... 109<br />
BIOS Menu 21: Chipset............................................................................................ 110<br />
BIOS Menu 22: North Bridge Chipset Configuration............................................ 111<br />
BIOS Menu 23:South Bridge Chipset Configuration ............................................ 116<br />
BIOS Menu 24:Exit ................................................................................................... 117<br />
12<br />
IEI ® Technology, Corp.
<strong>ECK</strong>-<strong>3699GF</strong> <strong>Embedded</strong> <strong>System</strong><br />
Chapter<br />
1<br />
1 Introduction<br />
13
<strong>ECK</strong>-<strong>3699GF</strong> <strong>Embedded</strong> <strong>System</strong><br />
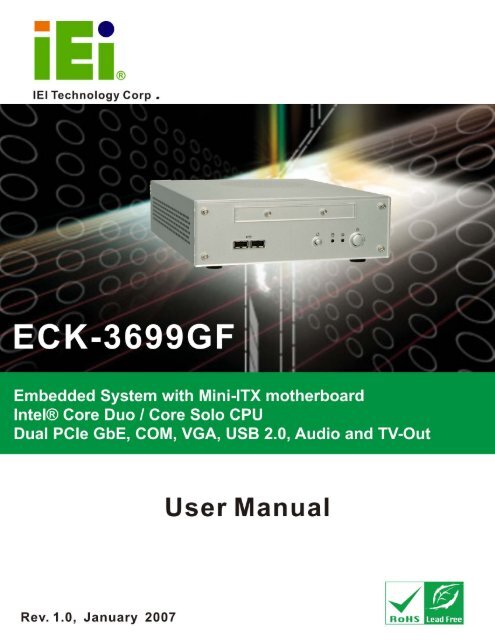
1.1 <strong>ECK</strong>-<strong>3699GF</strong> <strong>Embedded</strong> <strong>System</strong> Overview<br />
Figure 1-1: <strong>ECK</strong>-<strong>3699GF</strong> KINO Series <strong>Embedded</strong> <strong>System</strong><br />
There are three KINO series based embedded solutions in the <strong>ECK</strong>-3699G series. All<br />
motherboards have been optimized for multimedia applications that require minimum<br />
installation space. The KINO series boards support a full range of functions for an<br />
ATX-compatible industrial computer.<br />
1.1.1 <strong>ECK</strong>-<strong>3699GF</strong> Benefits<br />
The <strong>ECK</strong>-<strong>3699GF</strong> embedded system has the following benefits:<br />
• Easy installation saves installation time<br />
• Complete integration saves solution development time and cost<br />
• Compact size saves space<br />
• Powerful preinstalled Intel Core Duo / Core Solo CPU and motherboard<br />
ensures rigorous processing needs can be met<br />
1.1.2 <strong>ECK</strong>-<strong>3699GF</strong> Features<br />
The <strong>ECK</strong>-<strong>3699GF</strong> has the following feature:<br />
• RoHS compliant design<br />
• Built-in DC-to-DC power converter<br />
• Intel® Core Duo / Core Solo CPU support<br />
• Two 6cm ball bearing system fan<br />
• Supports one 2.5” HDD<br />
• Supports one slim type CD-ROM<br />
14<br />
IEI ® Technology, Corp.
<strong>ECK</strong>-<strong>3699GF</strong> <strong>Embedded</strong> <strong>System</strong><br />
1.2 Technical Specifications<br />
The specifications for the <strong>ECK</strong>-<strong>3699GF</strong> embedded systems are listed below.<br />
<strong>ECK</strong>-<strong>3699GF</strong><br />
CPU<br />
<strong>System</strong> Chipset<br />
<strong>System</strong> Memory Speed<br />
<strong>System</strong> Memory Type<br />
Ethernet<br />
Display<br />
USB<br />
Storage<br />
Audio<br />
Chassis Construction<br />
Intel ® Core ® Duo / Core ® Solo with 667MHz FSB<br />
Intel ® 945GM + ICH7-M<br />
DDR2 667MHz, 533MHz or 400MHz<br />
2 x 240-pin DIMM socket supports up to 2GB<br />
Dual Broadcom BCM5787 PCIe GbE<br />
Support composite, S-Video, RCA, HDTV-out and CRT<br />
6 x USB 2.0 supported<br />
Optional 2.5” HDD and slim CD-ROM module<br />
Mic-in / Line-in / 7.1 channel Line-out<br />
Front bezel: acrylic<br />
Chassis: heavy duty metal<br />
<strong>System</strong> Cooling<br />
Power Supply<br />
2 x 6010 ball bearing fan<br />
Internal DC-to-DC power converter, input voltage: 19V DC<br />
External power adapter, input voltage: 100V AC ~ 240V AC @<br />
50Hz ~ 60Hz, 150W<br />
Operating Shock<br />
IEC68-2-27 Testing Procedures<br />
Operating Shock Half-Sine Wave Shock:<br />
a) 3G: 11ms: 3 shocks per axis: Vertical / Transverse /<br />
Longitudinal.<br />
Non-Operation Shock Half-Sine Wave Shock:<br />
10G: 11ms: 3 shocks per axis: Vertical/Transverse/Longitudinal.<br />
15
<strong>ECK</strong>-<strong>3699GF</strong> <strong>Embedded</strong> <strong>System</strong><br />
Operating Vibration<br />
MIL-STD-810F 514.5C-1<br />
Operating Random Vibration Mode:<br />
a) Axes: 3 axes / Vertical / Transverse / Longitudinal.<br />
b) 10-500 Hz, 60min/axis.<br />
c) Equivalent to Z:1.04 Grms X:0.204 Grms Y:0.74 Grms<br />
Non-Operating Sine Mode:<br />
a) Axes: 3 axes / Vertical / Transverse / Longitudinal.<br />
b) 0.1in. p-p, 5-17Hz, 1.5g peak, 17-640Hz Swept Sine, 3 Swept<br />
per axis.<br />
c) 60 min/axis<br />
Operating Temperature 0ºC ~ 45ºC<br />
Operation Humidity 10% ~ 90%<br />
Weight (Net/Gross)<br />
Dimensions (D x W x H)<br />
EMC<br />
2.8Kg/4.2Kg<br />
258mm x 210mm x 65mm<br />
FCC Class A, CE<br />
Table 1-1: Technical Specifications<br />
1.3 Power Module Specifications<br />
The specifications for the QT-16045 are shown in Table 1-2<br />
Model Name:<br />
Input<br />
Output<br />
QT-16045<br />
16VDC~19VDC<br />
Voltage<br />
Current<br />
Min. Typ. Max. Max.<br />
12V 11.4V 12V 12.6V 8A<br />
5V 4.75V 5.00V 5.25V 8A<br />
3.3V 3.135V 3.3V 3.465V 5A<br />
-12V 11.16V 12V 12.84V 0.2A<br />
5VSB 4.75V 5.00V 5.25V 3A<br />
16<br />
IEI ® Technology, Corp.
<strong>ECK</strong>-<strong>3699GF</strong> <strong>Embedded</strong> <strong>System</strong><br />
Dimensions:<br />
45mm x 160mm<br />
Temperature: 80°C<br />
Table 1-2: Power Module Specifications<br />
1.4 Power Adapter<br />
The <strong>ECK</strong>-<strong>3699GF</strong> models are shipped with a 150W power adapter.<br />
Figure 1-2: Power Adapter<br />
The specifications for the adapter are listed in Table 1-3:<br />
Nominal 19.0V<br />
Regulation 18.5V to 19.9V<br />
Output<br />
Ripple/Noise<br />
200mV<br />
Min. 0.0A<br />
Max. 7.9A<br />
Protection<br />
Short Circuit<br />
Over-Voltage<br />
The power supply is protected from short<br />
circuit at any outputs with no damage.<br />
25VDC<br />
Time Hold Up 8ms<br />
17
<strong>ECK</strong>-<strong>3699GF</strong> <strong>Embedded</strong> <strong>System</strong><br />
Input<br />
Min.<br />
Max.<br />
Frequency<br />
Inrush Current<br />
Max. AC Current<br />
90V<br />
264V<br />
47Hz ~ 63Hz<br />
No damage (cold start)<br />
2A@100VAC<br />
Efficiency 83%<br />
Environment<br />
Temperature<br />
Relative Humidity<br />
Operating 10ºC ~ 40ºC<br />
Storage 0ºC ~ 85ºC<br />
Storage<br />
5% ~ 95%<br />
(non-condensing)<br />
Reliability<br />
MTBF<br />
100,000 hours per MIL-HDBK-217 at 25<br />
DegC and 100 % of rated load.<br />
Table 1-3: Power Adapter Specifications<br />
18<br />
IEI ® Technology, Corp.
<strong>ECK</strong>-<strong>3699GF</strong> <strong>Embedded</strong> <strong>System</strong><br />
Chapter<br />
2<br />
2 Mechanical<br />
Description<br />
19
<strong>ECK</strong>-<strong>3699GF</strong> <strong>Embedded</strong> <strong>System</strong><br />
2.1 <strong>ECK</strong>-<strong>3699GF</strong> Mechanical Overview<br />
The <strong>ECK</strong>-<strong>3699GF</strong> is made of a metal chassis. The chassis is covered with a top cover and<br />
comprises multiple air vents to allow for the free flow of cooling air through the system.<br />
The front panel of the chassis covered with acrylic front bezel contains buttons, indicators,<br />
CD drive bay and USB ports. The rear panel of the chassis connects to all the external<br />
interface connectors on a preinstalled IEI KINO series motherboard. The motherboard is<br />
directly connected to the DC-to-DC power module converter. Two cooling fans are<br />
preinstalled in the side of the chassis.<br />
2.2 Physical Dimensions<br />
The physical dimensions of the <strong>ECK</strong>-<strong>3699GF</strong> embedded systems are listed below.<br />
2.2.1 <strong>ECK</strong>-<strong>3699GF</strong> Dimensions<br />
The dimensions of the <strong>ECK</strong>-<strong>3699GF</strong> are listed below and shown in Figure 2-1.<br />
• Height: 65.00mm<br />
• Width: 258.20mm<br />
• Length: 210.00mm<br />
Figure 2-1: <strong>ECK</strong>-<strong>3699GF</strong> Dimensions (mm)<br />
20<br />
IEI ® Technology, Corp.
<strong>ECK</strong>-<strong>3699GF</strong> <strong>Embedded</strong> <strong>System</strong><br />
2.2.2 Motherboard Dimensions<br />
The KINO series dimension are listed below and shown in Figure 2-2.<br />
• Length: 170.00mm<br />
• Width: 170.00mm<br />
Figure 2-2: KINO SBC Dimensions (mm)<br />
2.2.3 Power Module Dimensions<br />
The power module dimensions are listed below and shown in Figure 2-3.<br />
• Length: 160.00mm<br />
• Width: 45.00mm<br />
Figure 2-3: Power Module Dimensions (mm)<br />
21
<strong>ECK</strong>-<strong>3699GF</strong> <strong>Embedded</strong> <strong>System</strong><br />
2.3 External Overview<br />
2.3.1 Front Panel<br />
2.3.1.1 Front Panel Overview<br />
The front panel of the <strong>ECK</strong>-<strong>3699GF</strong> contains indicators, buttons, USB ports and CD drive<br />
bay. See Figure 2-4.<br />
Figure 2-4: <strong>ECK</strong>-<strong>3699GF</strong> Front Panel<br />
2.3.1.2 Front Panel Buttons and Indicators<br />
The connectors, indicators and buttons listed in this section are shown in Figure 2-4<br />
above. The front panel I/O connectors are listed below:<br />
• 2 x USB port connectors<br />
The front panel also contains the following buttons:<br />
• 1 x Power Button<br />
• 1 x Reset Button<br />
Status indicator LEDs on the front panel include:<br />
• 1 x Power LED<br />
• 1 x HDD LED<br />
22<br />
IEI ® Technology, Corp.
<strong>ECK</strong>-<strong>3699GF</strong> <strong>Embedded</strong> <strong>System</strong><br />
The front panel also contains the following drive bay:<br />
• 1 x CD drive bay<br />
All the front panel items listed above are shown in Figure 2-4 above.<br />
2.3.2 Rear Panel<br />
2.3.2.1 Rear Panel Overview<br />
The <strong>ECK</strong>-<strong>3699GF</strong> contains all the external I/O interface connectors, power connectors<br />
and audio jacks. An overview of the rear panel is shown in Figure 2-5 below.<br />
Figure 2-5: <strong>ECK</strong>-<strong>3699GF</strong> Rear Panel<br />
2.3.2.2 Rear Panel Connectors<br />
The connectors, indicators and switches listed in this section are shown in Figure 2-5<br />
above. The rear panel I/O connectors are listed below:<br />
• 1 x Power adapter connector<br />
• 6 x Audio jacks<br />
• 4 x USB port connectors<br />
• 2 x RJ-45 Ethernet connectors<br />
• 1 x TV-out connector<br />
• 1 x RS-232 serial ports connector<br />
• 1 x VGA connector<br />
23
<strong>ECK</strong>-<strong>3699GF</strong> <strong>Embedded</strong> <strong>System</strong><br />
• 1 x Mouse connector<br />
• 1 x Keyboard connector<br />
All the rear panel items listed above are shown in Figure 2-5 above.<br />
2.3.3 Top Cover<br />
WARNING:<br />
Never remove the top cover from the chassis while power is still being fed<br />
into the system. Before removing the top cover, make sure the system has<br />
been turned off and all power connectors unplugged.<br />
The top cover of the <strong>ECK</strong>-<strong>3699GF</strong> covers the top and both sides of the <strong>ECK</strong>-<strong>3699GF</strong>. The<br />
top cover is secured to the <strong>ECK</strong>-<strong>3699GF</strong> with three retention screws on the rear panel.<br />
Each side of the top cover all contains air vents.<br />
Figure 2-6: <strong>ECK</strong>-<strong>3699GF</strong> Top Cover<br />
24<br />
IEI ® Technology, Corp.
<strong>ECK</strong>-<strong>3699GF</strong> <strong>Embedded</strong> <strong>System</strong><br />
2.3.4 Bottom Surface<br />
The bottom surface of the <strong>ECK</strong>-<strong>3699GF</strong> contains one air vent.<br />
Figure 2-7: Bottom Surface<br />
2.4 Internal Overview<br />
The <strong>ECK</strong>-<strong>3699GF</strong> internal components are listed below:<br />
• 1 x IEI KINO motherboard<br />
• 1 x Power module<br />
• 2 x <strong>System</strong> cooling fans<br />
• 1 x USB board<br />
• 1 x Switch/LED board<br />
• 2 x DIMM modules (optional)<br />
• 1 x 2.5” HDD (optional)<br />
• 1 x Slim type CD-ROM (optional)<br />
All the components are accessed by removing the top cover.<br />
25
<strong>ECK</strong>-<strong>3699GF</strong> <strong>Embedded</strong> <strong>System</strong><br />
Figure 2-8: <strong>ECK</strong>-<strong>3699GF</strong> Internal Overview<br />
2.5 Cooling Fans<br />
The embedded system has two internal cooling fans mounted at the right side of the<br />
chassis and connected directly to the power module. The cooling fan dimensions are<br />
shown in Figure 2-9 and the specifications are shown in Table 2-1.<br />
26<br />
IEI ® Technology, Corp.
<strong>ECK</strong>-<strong>3699GF</strong> <strong>Embedded</strong> <strong>System</strong><br />
Figure 2-9: Cooling Fan Dimensions (mm)<br />
Specification Units Details<br />
Dimensions mm 60 x 60 x 11 (L x W x Thickness)<br />
Bearing <strong>System</strong><br />
Dual Ball Bearing, NMB or ISC<br />
Rated Voltage VDC 12.0<br />
Operating Voltage<br />
VDC 11.0~15.0 at 25 °C<br />
Range<br />
Start-up Voltage VDC 10.8 at 25 °C, power On/Off<br />
Rated Current Amp 0.15 (Max.) in free air rated<br />
Operating Current Amp 0.07 (Fan alone)<br />
Rated Input Power Watt 1.8 (Max.) in rated voltage<br />
Rated Speed RPM 2800±10% after 10 min. rotating<br />
Air Flow CFM (CMM) 10.1955(0.289) at zero static pressure<br />
27
<strong>ECK</strong>-<strong>3699GF</strong> <strong>Embedded</strong> <strong>System</strong><br />
and 25 °C, rated speed<br />
Static Air Pressure mmH 2 O 1.18 at zero air flow and 25 °C<br />
Operating Temperature<br />
Storage Temperature<br />
-10°C,~+70°C, /66%(RH)<br />
-40°C,~+70°C, /66%(RH)<br />
Noise Level dBA 22.0 at rated voltage<br />
Environment Humidity<br />
Less than 85%(RH)<br />
Life Expectancy hours 40,000<br />
Table 2-1: Cooling Fan Specifications<br />
28<br />
IEI ® Technology, Corp.
<strong>ECK</strong>-<strong>3699GF</strong> <strong>Embedded</strong> <strong>System</strong><br />
Chapter<br />
3<br />
3 <strong>System</strong> Components<br />
29
<strong>ECK</strong>-<strong>3699GF</strong> <strong>Embedded</strong> <strong>System</strong><br />
3.1 <strong>ECK</strong>-<strong>3699GF</strong> <strong>Embedded</strong> <strong>System</strong> Motherboard<br />
3.1.1 <strong>ECK</strong>-<strong>3699GF</strong> <strong>Embedded</strong> <strong>System</strong> Motherboard<br />
NOTE:<br />
The jumpers and connectors shown in the section below are those jumpers<br />
and connectors that are relevant to the configuration and installation of the<br />
embedded system. For a complete list of jumpers and connectors on the<br />
KINO-9452 motherboard, please refer to the KINO-9452 user manual.<br />
The <strong>ECK</strong>-<strong>3699GF</strong> models have a KINO-9452 motherboard installed in the system. The<br />
following sections describe the relevant connectors and jumpers on the motherboard.<br />
3.1.2 KINO-9452 Motherboard Overview<br />
The locations of the KINO-9452 jumpers and connectors used on the <strong>ECK</strong>-<strong>3699GF</strong> are<br />
shown in Figure 3-1 below.<br />
Figure 3-1: KINO-9452 Jumper and Connector Locations<br />
30<br />
IEI ® Technology, Corp.
<strong>ECK</strong>-<strong>3699GF</strong> <strong>Embedded</strong> <strong>System</strong><br />
3.1.3 Onboard Connectors and Jumpers<br />
The connectors listed in Table 3-1 on the KINO-9452 motherboard are connected to fans,<br />
front panel components, storage devices and the power module as specified later in this<br />
chapter. Detailed descriptions of these connectors can be found in Section 3.2. For a<br />
more comprehensive list of jumpers and connectors, please refer to KINO-9452 user<br />
manual.<br />
Connector Type Label<br />
Front panel connector 14-pin header F_PANEL1<br />
IDE Interface connector 40-pin box header IDE1<br />
<strong>System</strong> fan connector 3-pin wafer connector SYS_FAN1<br />
CPU fan connector 3-pin wafer connector CPU_FAN1<br />
Northbridge fan connector 3-pin wafer connector NB_FAN1<br />
Power connector 20-pin connector PWR1<br />
SATA II connector 7-pin SATA connector SATA1<br />
SATA II connector 7-pin SATA connector SATA2<br />
USB connector (1) 8-pin header USB4<br />
USB connector (2) 8-pin header USB5<br />
Table 3-1: Peripheral Interface Connectors<br />
3.1.4 External Interface Connectors<br />
Table 3-2 lists the external interface connectors on the KINO-9452 motherboard. Detailed<br />
descriptions of the connectors can be found in Section 3.3.<br />
Connector Type Label<br />
Audio connectors Audio Jack AUDIO1<br />
Ethernet connector RJ-45 LAN/USB1<br />
31
<strong>ECK</strong>-<strong>3699GF</strong> <strong>Embedded</strong> <strong>System</strong><br />
Ethernet connector RJ-45 LAN/USB2<br />
Keyboard/Mouse connector 6-pin mini din connector KBMS1<br />
Serial port connectors DB-9 male connector CRT_COM1<br />
USB port USB port LAN/USB1<br />
USB port USB port LAN/USB2<br />
TV-Out connector 7-pin TV port TV<br />
VGA port connector 15-pin female connector CRT_COM1<br />
Table 3-2: Peripheral Interface Connectors<br />
3.1.5 Onboard Jumpers<br />
Table 3-3 lists the onboard jumpers. Detailed descriptions of these jumpers can be found<br />
in Section 3.3.2. For a more comprehensive list of jumpers and connectors, please refer<br />
to KINO-9452 user manual.<br />
Description Label Type<br />
Clear CMOS JP3 3-pin header<br />
COM2 mode selection JP1 3-pin header<br />
LVDS LCD voltage selection JP2 6-pin header<br />
Table 3-3: Onboard Jumpers<br />
3.2 KINO-9452 On-board Connector Pinouts<br />
The following sections describe the motherboard pinouts and the embedded system<br />
components to which they have been connected.<br />
3.2.1 Fan Connectors<br />
CN Label:<br />
CN Type:<br />
CPU_FAN1, SYS_FAN1 and NB_FAN1<br />
3-pin wafer connector<br />
32<br />
IEI ® Technology, Corp.
<strong>ECK</strong>-<strong>3699GF</strong> <strong>Embedded</strong> <strong>System</strong><br />
CN Location: See Figure 3-2<br />
CN Pinouts: See Table 3-4<br />
The cooling fan connectors on the KINO-9452 provide a 12V, 500mA current to one CPU<br />
cooling fan, one system cooling fan and one Northbridge cooling fan. There is a “sense”<br />
pin in the fan connector, which transfers the fan’s sense signal to the system BIOS in<br />
order to recognize the fan speed. Please note that only some specific types of fans offer a<br />
rotation signal.<br />
Figure 3-2: Fan Connector Locations<br />
PIN NO.<br />
DESCRIPTION<br />
1 GND<br />
2 +12V<br />
3 Sense<br />
Table 3-4: Fan Connector Pinouts<br />
3.2.2 Front Panel Connector<br />
CN Label:<br />
F_PANEL1<br />
33
<strong>ECK</strong>-<strong>3699GF</strong> <strong>Embedded</strong> <strong>System</strong><br />
CN Type:<br />
14-pin header (2x7)<br />
CN Location: See Figure 3-3<br />
CN Pinouts: See Table 3-5<br />
The front panel connector connects to several external switches and indicators on the<br />
front panel to monitor and control the motherboard. These indicators and switches include:<br />
• Power<br />
• Power button<br />
• Reset button<br />
• Speaker<br />
• HDD<br />
Figure 3-3: Front Panel Connector Location<br />
34<br />
IEI ® Technology, Corp.
<strong>ECK</strong>-<strong>3699GF</strong> <strong>Embedded</strong> <strong>System</strong><br />
PIN NO. DESCRIPTION PIN NO. DESCRIPTION<br />
1 Power LED+ 2 Speaker+<br />
3 NC 4 NC<br />
5 Power LED- 6 NC<br />
7 Power Button# 8 Speaker-<br />
9 Power Button 10 NC<br />
11 IDE LED+ 12 Reset Button<br />
13 IDE LED- 14 Reset Button#<br />
Table 3-5: Front Panel Connector Pinouts<br />
3.2.3 IDE Connector<br />
CN Label:<br />
CN Type:<br />
IDE1<br />
40-pin box header (2x20)<br />
CN Location: See Figure 3-4<br />
CN Pinouts: See Table 3-6<br />
One primary 40-pin IDE device connector on the KINO-9452 motherboard supports<br />
connectivity to ATA 100 IDE devices with data transfer rates up to 100MB/s.<br />
35
<strong>ECK</strong>-<strong>3699GF</strong> <strong>Embedded</strong> <strong>System</strong><br />
Figure 3-4: IDE Device Connector Location<br />
PIN NO. DESCRIPTION PIN NO. DESCRIPTION<br />
1 RESET# 2 GND<br />
3 DATA 7 4 DATA 8<br />
5 DATA 6 6 DATA 9<br />
7 DATA 5 8 DATA 10<br />
9 DATA 4 10 DATA 11<br />
11 DATA 3 12 DATA 12<br />
13 DATA 2 14 DATA 13<br />
15 DATA 1 16 DATA 14<br />
17 DATA 0 18 DATA 15<br />
19 GND 20 (KEY)<br />
21 DRQ 22 GND<br />
23 IOW# 24 GND<br />
25 IOR# 26 GND<br />
27 CHRDY 28 GND<br />
29 DACK 30 GND<br />
31 INTERRUPT 32 N/C<br />
33 SA1 34 P66DET<br />
36<br />
IEI ® Technology, Corp.
<strong>ECK</strong>-<strong>3699GF</strong> <strong>Embedded</strong> <strong>System</strong><br />
PIN NO. DESCRIPTION PIN NO. DESCRIPTION<br />
35 SA0 36 SA2<br />
37 HDC CS0# 38 HDC CS1#<br />
39 HDD ACTIVE# 40 GND<br />
Table 3-6: IDE Connector Pinouts<br />
3.2.4 Power Connector<br />
CN Label:<br />
CN Type:<br />
PWR1<br />
20-pin connector<br />
CN Location: See Figure 3-5<br />
CN Pinouts: See Table 3-7<br />
This 20-pin power connector connects to the power module in the system.<br />
Figure 3-5: Power Connector Location<br />
37
<strong>ECK</strong>-<strong>3699GF</strong> <strong>Embedded</strong> <strong>System</strong><br />
PIN NO. DESCRIPTION PIN NO. DESCRIPTION<br />
1 3.3V 11 3.3V<br />
2 3.3V 12 -12V<br />
3 GND 13 GND<br />
4 +5V 14 PS_ON<br />
5 GND 15 GND<br />
6 +5V 16 GND<br />
7 GND 17 GND<br />
8 Power good 18 -5V<br />
9 5VSB 19 +5V<br />
10 +12V 20 +5V<br />
Table 3-7: Power Connector Pinouts<br />
3.2.5 SATA Drive Connectors<br />
CN Label:<br />
CN Type:<br />
SATA1 and SATA2<br />
7-pin SATA drive connector<br />
CN Location: See Figure 3-6<br />
CN Pinouts: See Table 3-8<br />
The two SATA drive connectors are connected to four SATA II drives. SATA II drives<br />
transfer data at speeds as high as 3.0Gb/s.<br />
38<br />
IEI ® Technology, Corp.
<strong>ECK</strong>-<strong>3699GF</strong> <strong>Embedded</strong> <strong>System</strong><br />
Figure 3-6: SATA Drive Connector Locations<br />
PIN NO.<br />
DESCRIPTION<br />
1 GND<br />
2 TXP<br />
3 TXN<br />
4 GND<br />
5 RXN<br />
6 RXP<br />
7 GND<br />
Table 3-8: SATA Drive Connector Pinouts<br />
3.2.6 Internal USB Connectors<br />
39
<strong>ECK</strong>-<strong>3699GF</strong> <strong>Embedded</strong> <strong>System</strong><br />
CN Label:<br />
CN Type:<br />
USB4 and USB5<br />
8-pin header (2x4)<br />
CN Location: See Figure 3-7<br />
CN Pinouts: See Table 3-9<br />
One 2x4 pin connector provides connectivity to two USB 2.0 ports. The USB connector<br />
supports the USB ports on the front panel.<br />
Figure 3-7: Internal USB Connector Locations<br />
PIN NO. DESCRIPTION PIN NO. DESCRIPTION<br />
1 VCC 2 GND<br />
3 DATA0- 4 DATA1+<br />
5 DATA0+ 6 DATA1-<br />
7 GND 8 VCC<br />
Table 3-9: USB3 and USB4 Pinouts<br />
40<br />
IEI ® Technology, Corp.
<strong>ECK</strong>-<strong>3699GF</strong> <strong>Embedded</strong> <strong>System</strong><br />
3.3 External Interface Connectors<br />
3.3.1 External Interface Connector Overview<br />
Figure 3-8 shows the KINO-9452 motherboard external interface connectors. These<br />
external interface connectors can connect to external peripheral devices and are seen on<br />
the rear panel (Figure 2-4) of the <strong>ECK</strong>-<strong>3699GF</strong> embedded system. The KINO-9452<br />
on-board external interface connectors are listed below and shown in Figure 3-8:<br />
• 6 x Audio jacks<br />
• 2 x Ethernet connector<br />
• 1 x Keyboard connector<br />
• 1 x Mouse connector<br />
• 1 x Serial port<br />
• 1 x TV-Out port<br />
• 4 x USB ports<br />
• 1 x VGA port<br />
Figure 3-8: KINO-9452 On-board External Interface Connectors<br />
3.3.2 Audio Connectors<br />
CN Label:<br />
CN Type:<br />
AUDIO1<br />
Audio jack<br />
CN Location: See Figure 3-8<br />
CN Pinouts: See Figure 3-9<br />
• Center/Subwoofer port (Yellow): Connects the center/subwoofer speakers.<br />
• Line In port (Light Blue): Connects a CD-ROM, DVD player, or other audio<br />
41
<strong>ECK</strong>-<strong>3699GF</strong> <strong>Embedded</strong> <strong>System</strong><br />
devices.<br />
• Rear Speaker Out port (Black): Connects the rear speakers in a<br />
4/6/8-channel audio configuration.<br />
• Line Out port (Lime): Connects a headphone or a speaker. In 4,6,8-channel<br />
configuration, the function of this port becomes Front Speaker Out.<br />
• Side Speaker Out port (Gray): Connectors the side speakers in an<br />
8-channel audio configuration.<br />
• Microphone (Pink): Connects a microphone.<br />
•<br />
Figure 3-9: Audio Connectors<br />
3.3.3 CRT Connector<br />
CN Label:<br />
CN Type:<br />
CRT_COM1<br />
15-pin female connector<br />
CN Location: See Figure 3-8<br />
CN Pinouts: See Table 3-10<br />
The standard 15-pin VGA connector connects to a CRT or LCD display monitor.<br />
Figure 3-10: VGA Connector<br />
PIN NO. DESCRIPTION PIN NO. DESCRIPTION<br />
42<br />
IEI ® Technology, Corp.
<strong>ECK</strong>-<strong>3699GF</strong> <strong>Embedded</strong> <strong>System</strong><br />
1 RED 2 GREEN<br />
3 BLUE 4 N/C<br />
5 GND 6 GND<br />
7 GND 8 GND<br />
9 VCC 10 GND<br />
11 N/C 12 DDC DAT<br />
13 HSYNC 14 VSYNC<br />
15 DDC CLK<br />
Table 3-10: VGA Connector Pinouts<br />
3.3.4 Ethernet Connectors<br />
CN Label:<br />
CN Type:<br />
LAN/USB1A and LAN/USB2A<br />
RJ-45<br />
CN Location: See Figure 3-8<br />
CN Pinouts: See Table 3-11<br />
The KINO-9452 is equipped with two built-in GbE Ethernet controllers. The controllers can<br />
connect to the LAN through two RJ-45 LAN connectors. There are two LEDs on the<br />
connector indicating the status of LAN. The pin assignments are listed in the following<br />
table:<br />
PIN DESCRIPTION PIN DESCRIPTION<br />
1 MDX0+ 5 MDX2-<br />
2 MDX0- 6 MDX1-<br />
3 MDX1+ 7 MDX3+<br />
4 MDX2+ 8 MDX3-<br />
Table 3-11: LAN1 and LAN2 Pinouts<br />
43
<strong>ECK</strong>-<strong>3699GF</strong> <strong>Embedded</strong> <strong>System</strong><br />
Figure 3-11: RJ-45 Ethernet Connector<br />
The RJ-45 Ethernet connector has two status LEDs, one green and one yellow. The green<br />
LED indicates activity on the port and the yellow LED indicates the port is linked. See<br />
Table 3-12.<br />
SPEED LED<br />
ACT/LINK LED<br />
STATUS DESCRIPTION STATUS DESCRIPTION<br />
OFF 10Mbps connection OFF No link<br />
ORANGE 100Mbps connection YELLOW Linked<br />
GREEN 1Gbps connection BLINKING Data Activity<br />
Table 3-12: RJ-45 Ethernet Connector LEDs<br />
3.3.5 Keyboard/Mouse Connector<br />
CN Label:<br />
CN Type:<br />
KBMS1<br />
PS/2 connector<br />
CN Location: See Figure 3-8<br />
CN Pinouts: See Table 3-13<br />
The KINO-9452 keyboard and mouse connectors are standard PS/2 connectors.<br />
44<br />
IEI ® Technology, Corp.
<strong>ECK</strong>-<strong>3699GF</strong> <strong>Embedded</strong> <strong>System</strong><br />
Figure 3-12: PS/2 Pinouts<br />
PIN DESCRIPTION PIN DESCRIPTION<br />
1 L_KDAT 7 L_MDAT<br />
2 NC 8 NC<br />
3 GND 9 GND<br />
4 5V 10 5V<br />
5 L_KCLK 11 L_MCLK<br />
6 NC 12 NC<br />
Table 3-13: PS/2 Connector Pinouts<br />
3.3.6 Serial Port Connectors<br />
CN Label:<br />
CN Type:<br />
CRT_COM1<br />
DB-9<br />
CN Location: See Figure 3-8<br />
CN Pinouts: See Table 3-14<br />
The serial ports can be connected to a serial communications device directly.<br />
45
<strong>ECK</strong>-<strong>3699GF</strong> <strong>Embedded</strong> <strong>System</strong><br />
Figure 3-13: External Serial Port Connector<br />
PIN<br />
Description<br />
1 DATA CARRIER DETECT (DCD)<br />
2 RECEIVE DATA (RXD)<br />
3 TRANSMIT DATA (TXD)<br />
4 DATA TERMINAL READY (DTR)<br />
5 GROUND (GND)<br />
6 DATA SET READY (DSR)<br />
7 REQUEST TO SEND (RTS)<br />
8 CLEAR TO SEND (CTS)<br />
9 RING INDICATOR (RI)<br />
Table 3-14: External Serial Port Pinouts<br />
3.3.7 TV-Out Connector<br />
CN Label:<br />
CN Type:<br />
TV<br />
7-pin TV port<br />
CN Location: See Figure 3-8<br />
CN Pinouts: See Table 3-15<br />
The TV-Out port connects to a TV.<br />
46<br />
IEI ® Technology, Corp.
<strong>ECK</strong>-<strong>3699GF</strong> <strong>Embedded</strong> <strong>System</strong><br />
Figure 3-14: TV-Out Connector<br />
PIN<br />
Description<br />
1 Ground<br />
2 Ground<br />
3 S-Vidio Luminance<br />
Component:Luminance (Y)<br />
4 S-Vidio:Chrominance<br />
Component:Chrominance (Pr)<br />
5 NC<br />
6 Ground<br />
7 Composite:CVBS<br />
Component:Chrominance (Pb)<br />
Table 3-15: TV-Out Pinouts<br />
3.3.8 USB Connector<br />
CN Label:<br />
CN Type:<br />
LAN/USB1B and LAN/USB2B<br />
USB port<br />
CN Location: See Figure 3-8<br />
CN Pinouts: See Table 3-16<br />
USB devices can be connected directly to the USB connectors on the rear panel.<br />
PIN NO. DESCRIPTION PIN NO. DESCRIPTION<br />
1 VCC 5 VCC<br />
47
<strong>ECK</strong>-<strong>3699GF</strong> <strong>Embedded</strong> <strong>System</strong><br />
2 USBD0- 6 USBD1-<br />
3 USBD0+ 7 USBD1+<br />
4 GND 8 GND<br />
Table 3-16: External USB Connector Pinouts<br />
3.4 KINO-9452 Motherboard On-board Jumpers<br />
NOTE:<br />
A jumper is a metal bridge used to close<br />
an electrical circuit. It consists of two or<br />
three metal pins and a small metal clip<br />
(often protected by a plastic cover) that<br />
slides over the pins to connect them. To<br />
CLOSE/SHORT a jumper means<br />
connecting the pins of the jumper with<br />
the plastic clip and to OPEN a jumper<br />
means removing the plastic clip from a<br />
jumper.<br />
Figure 3-15: Jumpers<br />
The KINO-9452 motherboard has several onboard jumpers (Figure 3-16).<br />
48<br />
IEI ® Technology, Corp.
<strong>ECK</strong>-<strong>3699GF</strong> <strong>Embedded</strong> <strong>System</strong><br />
Figure 3-16: Jumper Locations<br />
3.4.1 Clear CMOS Jumper<br />
Jumper Label:<br />
Jumper Type:<br />
JP3<br />
3-pin header<br />
Jumper Settings: See Table 3-17<br />
Jumper Location: See Figure 3-16<br />
If the KINO-9452 fails to boot due to improper BIOS settings, use this jumper to clear the<br />
CMOS data and reset the system BIOS information. To do this, use the jumper cap to<br />
close pins 2 and 3 for a few seconds then reinstall the jumper clip back to pins 1 and 2.<br />
49
<strong>ECK</strong>-<strong>3699GF</strong> <strong>Embedded</strong> <strong>System</strong><br />
If the “CMOS Settings Wrong” message is displayed during the boot up process, the fault<br />
may be corrected by pressing the F1 to enter the CMOS Setup menu. Do one of the<br />
following:<br />
• Enter the correct CMOS setting<br />
• Load Optimal Defaults<br />
• Load Failsafe Defaults.<br />
After having done one of the above, save the changes and exit the CMOS Setup menu.<br />
Clear CMOS<br />
Short 1-2<br />
Short 2-3<br />
DESCRIPTION<br />
Normal Operation (Default)<br />
Clear CMOS Setup<br />
Table 3-17: Clear CMOS Jumper Settings<br />
The clear CMOS jumper is located in Figure 3-16.<br />
3.4.2 COM2 Mode Selection<br />
Jumper Label:<br />
Jumper Type:<br />
JP1<br />
3-pin header<br />
Jumper Settings: See Table 3-18<br />
Jumper Location: See Figure 3-16<br />
This jumper configures the COM2 connector as an RS-232 serial port or an<br />
RS-422/RS-485 serial port. The selection options are shown in Table 3-18.<br />
JP1<br />
Short 1-2<br />
Short 2-3<br />
DESCRIPTION<br />
RS-232 (Default)<br />
RS-422/RS-485<br />
Table 3-18: JP1 Jumper Settings<br />
50<br />
IEI ® Technology, Corp.
<strong>ECK</strong>-<strong>3699GF</strong> <strong>Embedded</strong> <strong>System</strong><br />
3.4.3 LVDS LCD Voltage Selection<br />
WARNING:<br />
Making the wrong setting on this jumper may cause irreparable damage to<br />
both the motherboard and the LCD screen connected to the onboard<br />
connector.<br />
Jumper Label:<br />
Jumper Type:<br />
JP2<br />
6-pin header<br />
Jumper Settings: See Table 3-19<br />
Jumper Location: See Figure 3-16<br />
This jumper allows the user to set the voltage for the LCD panel. Before setting this jumper<br />
please refer to the LCD panel user guide to determine the required voltage. After the<br />
required voltage is known, make the necessary jumper setting in accordance with the<br />
settings shown in Table 3-19.<br />
JP2<br />
DESCRIPTION<br />
1-2 +3V<br />
3-4 +5V<br />
5-6 +12V<br />
Table 3-19: JP2 Jumper Settings<br />
3.5 Power Module Connectors and Jumpers<br />
The connectors listed in and shown in are on the QT-16045 DC-to-DC power converters.<br />
Connector Type Label<br />
Input Power 3-pin header CN1<br />
Output Power 20-pin header PW2<br />
51
<strong>ECK</strong>-<strong>3699GF</strong> <strong>Embedded</strong> <strong>System</strong><br />
Output Power 4-pin header PW1<br />
Table 3-20: Power Module Connector Pinouts<br />
Figure 3-17: Power Module Connector Locations<br />
The pin outs for these connectors are listed in the sections below.<br />
3.5.1 Input Power Connector<br />
The input power connector, CN1, is connected directly to the rear panel power socket.<br />
Power is received in this connector from an external power source and fed into the<br />
system.<br />
PIN NO.<br />
Description<br />
1 Vin<br />
2 Vin<br />
3 GND<br />
Table 3-21: Input Power Connector Pinouts<br />
3.5.2 Output Power Connector [Motherboard]<br />
The 20-pin output power connector, PW2, is connected directly to the main power<br />
connector on the KINO series motherboard.<br />
52<br />
IEI ® Technology, Corp.
<strong>ECK</strong>-<strong>3699GF</strong> <strong>Embedded</strong> <strong>System</strong><br />
PIN NO. DESCRIPTION PIN NO. DESCRIPTION<br />
1 3.3V 11 3.3V<br />
2 3.3V 12 -12V<br />
3 GND 13 GND<br />
4 5V 14 PS_ON<br />
5 GND 15 GND<br />
6 5V 16 GND<br />
7 GND 17 GND<br />
8 PW_OK 18 NC<br />
9 5V_SB 19 5V<br />
10 +12V 20 5V<br />
Table 3-22: Output Power Connector Pinouts (Motherboard)<br />
3.5.3 Output Power Connector<br />
The output power connector, PW1, pinouts are listed in the following table.<br />
PIN NO.<br />
Description<br />
1 +12V<br />
2 GND<br />
3 GND<br />
4 +12V<br />
Table 3-23: Output Power Connector Pinouts<br />
53
<strong>ECK</strong>-<strong>3699GF</strong> <strong>Embedded</strong> <strong>System</strong><br />
THIS PAGE IS INTENTIONALLY LEFT BLANK<br />
54<br />
IEI ® Technology, Corp.
<strong>ECK</strong>-<strong>3699GF</strong> <strong>Embedded</strong> <strong>System</strong><br />
Chapter<br />
4<br />
4 Installation<br />
55
<strong>ECK</strong>-<strong>3699GF</strong> <strong>Embedded</strong> <strong>System</strong><br />
4.1 Anti-static Precautions<br />
WARNING:<br />
If the following anti-static precautions are not followed, a user may be<br />
injured and the system irreparably damaged.<br />
Electrostatic discharge (ESD) can cause serious damage to electronic components,<br />
including the KINO series motherboard and the power module. (Dry climates are<br />
especially susceptible to ESD.) It is therefore critical that whenever the <strong>ECK</strong>-<strong>3699GF</strong> is<br />
opened and any electrical component handled, the following anti-static precautions are<br />
strictly adhered to.<br />
• Wear an anti-static wristband: - Wearing a simple anti-static wristband can<br />
help to prevent ESD from damaging the board.<br />
• Self-grounding:- Before handling the board, touch any grounded conducting<br />
material. During the time the board is handled, frequently touch any<br />
conducting materials that are connected to the ground.<br />
4.2 Installation Procedure<br />
4.2.1 Installation Procedure Overview<br />
To properly install the <strong>ECK</strong>-<strong>3699GF</strong>, the following steps must be followed. Detailed<br />
descriptions of these instructions are listed in the sections that follow.<br />
Step 1: Unpacking<br />
Step 2: Configure the jumper settings<br />
Step 3: Install the DIMM memory module.<br />
Step 4: Install the HDD and CD drive<br />
Step 5: Connect the front panel peripheral connectors<br />
Step 6: Power the system upStep 0:<br />
56<br />
IEI ® Technology, Corp.
<strong>ECK</strong>-<strong>3699GF</strong> <strong>Embedded</strong> <strong>System</strong><br />
4.2.2 Unpacking<br />
After the <strong>ECK</strong>-<strong>3699GF</strong> is received make sure the following components are included in<br />
the package. If any of these components are missing, please contact the <strong>ECK</strong>-<strong>3699GF</strong><br />
reseller or vendor where it was purchased or contact an IEI sales representative<br />
immediately.<br />
• 1 x <strong>Embedded</strong> system<br />
• 1 x KINO series motherboard (pre-installed)<br />
• 1 x DC-to-DC power converter (pre-installed)<br />
• 2 x Cooling fans (pre-installed)<br />
Other items that should have come with the system are listed below:<br />
• 1 x CPU cooler<br />
• 1 x Screw set<br />
• 1 x SATA cable<br />
• 1 x 44-pin IDE cable<br />
• 1 x 40-pin IDE cable<br />
• 1 x (20+4)-pin power cable<br />
• 1 x Optical drive converter module<br />
• 1 x Power adapter<br />
• 1 x Power cord<br />
• 1 x Driver CD<br />
• 1 x <strong>User</strong> <strong>Manual</strong> CD<br />
• 1 x QIG<br />
4.2.3 Opening the <strong>ECK</strong>-<strong>3699GF</strong><br />
Before the jumper settings can be configured and the DIMM memory module and 2.5”<br />
HDD can be installed, the top cover or the bottom surface access panel must be removed.<br />
4.2.3.1 Top Cover Removal<br />
To remove the top cover, please follow the steps below:<br />
Step 1: Remove the three top cover retention screws. The top cover is secured to the<br />
chassis with three retention screws at the rear panel of the chassis.<br />
57
<strong>ECK</strong>-<strong>3699GF</strong> <strong>Embedded</strong> <strong>System</strong><br />
Figure 4-1: Top Cover Retention Screws<br />
Step 2: Slide the top cover toward the rear panel and gently lift the cover off the chassis<br />
Step 0:<br />
4.2.4 Socket 479 CPU Installation<br />
WARNING!<br />
CPUs are expensive and sensitive components. When installing the CPU please be<br />
careful not to damage it in anyway. Make sure the CPU is installed properly and<br />
ensure that a heatsink and CPU cooling fan are properly installed before the<br />
motherboard is run.<br />
If a heatsink and cooling fan are not properly installed both the CPU and the board<br />
may be damaged.<br />
To install Socket 479-pin CPU onto the KINO-9452, follow the steps below:<br />
58<br />
IEI ® Technology, Corp.
<strong>ECK</strong>-<strong>3699GF</strong> <strong>Embedded</strong> <strong>System</strong><br />
WARNING:<br />
When handling the CPU, only hold it on the sides. DO NOT touch the pins at<br />
the bottom of the CPU.<br />
Step 1: Remove the top cover. See Section 4.2.3.1.<br />
Step 2: Remove the following connector cables (Figure 4-2):<br />
• Fan connectors<br />
• Front panel connector<br />
• Power connector<br />
• USB connector<br />
Figure 4-2: Motherboard Connectors<br />
Step 3: Remove the KINO-9452 retention screws. The motherboard is secured to the<br />
chassis with four retention screws. Remove the four retention screws. See<br />
Figure 4-3.<br />
59
<strong>ECK</strong>-<strong>3699GF</strong> <strong>Embedded</strong> <strong>System</strong><br />
Figure 4-3: Motherboard Retention Screws<br />
Step 4: Unlock the CPU retention screw. When shipped, the retention screw of the<br />
CPU socket should be in the unlocked position. If it is not in the unlocked<br />
position, use a screwdriver to reposition the screw in an unlocked position<br />
(Figure 4-4).<br />
Figure 4-4: Make sure the CPU socket retention screw is unlocked<br />
60<br />
IEI ® Technology, Corp.
<strong>ECK</strong>-<strong>3699GF</strong> <strong>Embedded</strong> <strong>System</strong><br />
Step 5: Inspect the CPU socket Make sure there are no bent pins and make sure the<br />
socket contacts are free of foreign material. If any debris is found, remove it with<br />
compressed air.<br />
Step 6: Orientate the CPU properly. Make sure the IHS (Integrated Heat Sink) side is<br />
facing upward.<br />
Step 7: Correctly position the CPU. Match the Pin 1 mark with the cut edge on the<br />
CPU socket.<br />
Step 8: Align the CPU pins. Carefully align the CPU pins with the holes in the CPU<br />
socket.<br />
Step 9: Insert the CPU. Gently insert the CPU into the socket. If the CPU pins are<br />
properly aligned, the CPU should slide into the CPU socket smoothly<br />
Step 10: Lock the retention screw. Rotate the retention screw into the locked position.<br />
(See Figure 4-5) Step 0:<br />
Figure 4-5: Lock the CPU Socket Retention Screw<br />
61
<strong>ECK</strong>-<strong>3699GF</strong> <strong>Embedded</strong> <strong>System</strong><br />
4.2.5 Cooling Kit (CF-479B-RS) Installation<br />
Figure 4-6: IEI CF-479B-RS Cooling Kit<br />
IEI provides a cooling kit designed for socket 479 CPUs. (See Figure 4-6) The<br />
cooling kit is comprised of a CPU heat sink and a cooling fan.<br />
NOTE:<br />
The CF-479B-RS heat sink comes with a sprayed layer of thermal paste.<br />
Make sure the paste is not accidentally wiped during the unpacking or<br />
installation of the heat sink. Thermal paste between the CPU and the heat<br />
sink is important for optimum heat dissipation.<br />
To install the CF-479B-RS cooling kit, please follow the steps below.<br />
Step 1: Place the cooling kit onto the CPU. Make sure the CPU cable can be<br />
properly routed when the cooling kit is installed.<br />
Step 2: Properly align the cooling kit. Make sure its four spring screw fasteners can<br />
pass through the pre-drilled holes on the PCB.<br />
Step 3: Secure the cooling kit. From the solder side of the PCB, align the support<br />
bracket to the screw threads on heat sink that were inserted through the PCB<br />
holes. (See Figure 4-7)<br />
62<br />
IEI ® Technology, Corp.
<strong>ECK</strong>-<strong>3699GF</strong> <strong>Embedded</strong> <strong>System</strong><br />
Figure 4-7: Securing the Cooling Kit<br />
Step 4: Tighten the screws. Use a screwdriver to tighten the four screws. Tighten each<br />
nut a few turns at a time and do not over-tighten the screws.<br />
Step 5: Connect the fan cable. Connect the cooling kit fan cable to the fan connector<br />
on the motherboard. Carefully route the cable and avoid heat generating chips<br />
and fan blades. (See Figure 4-8) Step 0:<br />
Figure 4-8: Connect the cooling fan cable<br />
63
<strong>ECK</strong>-<strong>3699GF</strong> <strong>Embedded</strong> <strong>System</strong><br />
4.2.6 Configure the Jumper Settings<br />
To configure the jumper settings, please follow the steps below.<br />
Step 1: Remove the top cover. See Section 4.2.3.1.<br />
Step 2: Locate the jumper settings on the embedded motherboard. See Chapter 3.<br />
Step 3: Make the jumper settings in accordance with the settings described and defined<br />
in Chapter 3.Step 0:<br />
4.2.7 DIMM Module Installation<br />
4.2.7.1 Purchasing the Memory Module<br />
WARNING!<br />
When purchasing the DIMM modules, make sure the modules are<br />
compatible with the DIMM slot specified in Section 1.2.<br />
WARNING!<br />
The board supports DDR2 DIMM modules only. DDR1 and DDR2 are<br />
not compatible. If a DDR1 DIMM module is installed, the system may<br />
be damaged and become inaccessible. Please only use DDR2 DIMM<br />
modules.<br />
4.2.7.2 DIMM Module Installation<br />
The <strong>ECK</strong>-<strong>3699GF</strong> has two DDR2 DIMM sockets. Follow the steps below to install the<br />
DIMM module.<br />
Step 1: Make sure the two handles of the DIMM socket are in the "open" position,<br />
leaning outward (Figure 4-9).<br />
64<br />
IEI ® Technology, Corp.
<strong>ECK</strong>-<strong>3699GF</strong> <strong>Embedded</strong> <strong>System</strong><br />
Figure 4-9: Installing the DIMM Module<br />
Step 2: Slowly slide the DIMM module along the plastic guides on both ends of the<br />
socket. Press the DIMM module down into the socket until it clicks into position<br />
and the two handles have automatically locked the memory module into place<br />
(Figure 4-10).<br />
Figure 4-10: Locking the DIMM Module<br />
Step 3: To remove the memory module, push both handles outward, and the memory<br />
65
<strong>ECK</strong>-<strong>3699GF</strong> <strong>Embedded</strong> <strong>System</strong><br />
module is ejected by the mechanism in the socket.Step 0:<br />
4.2.8 Install the HDD and CD Drive<br />
To install the HDD and CD drive, please follow the steps below:<br />
Step 1: Remove the top cover. See Section 4.2.3.1 above.<br />
Step 2: The HDD/CD bracket is attached to the chassis by four retention screws.<br />
Remove the four retention screws from the chassis.<br />
Step 3: Attach the HDD to the HDD/CD bracket. To do this, align the four retention screw<br />
holes in the bottom of HDD/CD bracket with the retention screw holes on the<br />
bottom of the HDD. Insert four retention screws from the topside of the bracket<br />
into the bottom of the HDD.<br />
Step 4: Attach the CD drive to the HDD/CD bracket. To do this, align the four retention<br />
screw holes in the both sides of HDD/CD bracket with the retention screw holes<br />
on the sides of the CD drive. Insert four retention screws into the sides of the CD<br />
drive.<br />
Figure 4-11: HDD and CD Drive Installation<br />
Step 5: Remove the CD drive bay from the front panel of the <strong>ECK</strong>-<strong>3699GF</strong>.<br />
66<br />
IEI ® Technology, Corp.
<strong>ECK</strong>-<strong>3699GF</strong> <strong>Embedded</strong> <strong>System</strong><br />
Step 6: Install the HDD/CD bracket into the <strong>ECK</strong>-<strong>3699GF</strong>.<br />
Step 7: Connect the IDE/SATA cable from the IDE/SATA connector on the motherboard<br />
to the rear of HDD and CD drive.<br />
4.2.9 Cable Connections<br />
The following cables can be connected to the rear panel of the system.<br />
• VGA cable connector<br />
• Serial port connector<br />
• RJ-45 connectors<br />
• TV-out connector<br />
• USB devices can be connected to the system<br />
• Audio devices can be connected to the system<br />
The cable connection locations are shown in Figure 2-4.<br />
4.3 Power-On Procedure<br />
4.3.1 Installation Checklist<br />
WARNING:<br />
Make sure a power supply with the correct input voltage is being fed into<br />
the system. Incorrect voltages applied to the system may cause damage to<br />
the internal electronic components and may also cause injury to the user.<br />
To power on the embedded system please make sure of the following:<br />
• The memory module is installed<br />
• The fans are properly connected<br />
• The top cover is properly installed<br />
• All peripheral devices (VGA monitor, serial communications devices etc.) are<br />
67
<strong>ECK</strong>-<strong>3699GF</strong> <strong>Embedded</strong> <strong>System</strong><br />
connected<br />
• The power cables are plugged in<br />
4.3.2 Power-on Procedure<br />
To power-on the <strong>ECK</strong>-<strong>3699GF</strong> please follow the steps below:<br />
Step 1: Push the power button.<br />
Step 2: Once turned on, the green power LED should be turned on. See Figure 4-12.<br />
Step 0:(<br />
Figure 4-12: Power Button and Power LED<br />
68<br />
IEI ® Technology, Corp.
<strong>ECK</strong>-<strong>3699GF</strong> <strong>Embedded</strong> <strong>System</strong><br />
Chapter<br />
5<br />
5 BIOS Settings<br />
69
<strong>ECK</strong>-<strong>3699GF</strong> <strong>Embedded</strong> <strong>System</strong><br />
5.1 Introduction<br />
A licensed copy of AMI BIOS is preprogrammed into the ROM BIOS. The BIOS setup<br />
program allows users to modify the basic system configuration. This chapter describes<br />
how to access the BIOS setup program and the configuration options that may be<br />
changed.<br />
5.1.1 Starting Setup<br />
The AMI BIOS is activated when the computer is turned on. The setup program can be<br />
activated in one of two ways.<br />
1. Press the DELETE key as soon as the system is turned on or<br />
2. Press the DELETE key when the “Press Del to enter SETUP” message<br />
appears on the screen. 0.<br />
If the message disappears before, restart the computer and try again.<br />
5.1.2 Using Setup<br />
Use the arrow keys to highlight items, press ENTER to select, use the “+” and “-“ keys to<br />
change entries, press F1 for help and press ESC to quit. Navigation keys are shown in.<br />
Key<br />
Function<br />
Up arrow Move to previous item<br />
Down arrow Move to next item<br />
Left arrow Move to the item on the left hand side<br />
Right arrow Move to the item on the right hand side<br />
Esc key Main Menu – Quit and not save changes into CMOS<br />
Status Page Setup Menu and Option Page Setup Menu --<br />
Exit current page and return to Main Menu<br />
“+” key Increase the numeric value or make changes<br />
“-“ key Decrease the numeric value or make changes<br />
F1 key General help, only for Status Page Setup Menu and Option<br />
Page Setup Menu<br />
70<br />
IEI ® Technology, Corp.
<strong>ECK</strong>-<strong>3699GF</strong> <strong>Embedded</strong> <strong>System</strong><br />
F2 /F3 key<br />
F10 key<br />
Change color from total 16 colors. F2 to select color<br />
forward.<br />
Save all the CMOS changes, only for Main Menu<br />
Table 5-1: BIOS Navigation Keys<br />
5.1.3 Getting Help<br />
When F1 is pressed a small help window describing the appropriate keys to use and the<br />
possible selections for the highlighted item appears. To exit the Help Window press ESC or<br />
the F1 key again.<br />
5.1.4 Unable to Reboot after Configuration Changes<br />
If the computer cannot boot after changes to the system configuration is made, CMOS<br />
defaults. Use the jumper described in Chapter 3, Section 3.4.1.<br />
5.1.5 BIOS Menu Bar<br />
The menu bar on top of the BIOS screen has the following main items:<br />
• Main Changes the basic system configuration.<br />
• Advanced Changes the advanced system settings.<br />
• PCIPnP Changes the advanced PCI/PnP Settings<br />
• Boot Changes the system boot configuration.<br />
• Security Sets <strong>User</strong> and Supervisor Passwords.<br />
• Chipset Changes the chipset settings.<br />
• Exit Selects exit options and loads default settings<br />
5.2 Main<br />
The following sections completely describe the configuration options found in the menu<br />
items at the top of the BIOS screen and listed above.<br />
When the BIOS Setup program is entered, the Main menu (BIOS Menu 1) appears. The<br />
Main menu gives an overview of the basic system information.<br />
71
<strong>ECK</strong>-<strong>3699GF</strong> <strong>Embedded</strong> <strong>System</strong><br />
BIOS Menu 1: Main<br />
<br />
<strong>System</strong> Overview<br />
The <strong>System</strong> Overview lists a brief summary of different system components. The fields in<br />
<strong>System</strong> Overview cannot be changed. The items shown in the system overview include:<br />
• AMI BIOS: Displays auto-detected BIOS information<br />
o Version: Current BIOS version<br />
o Build Date: Date the current BIOS version was made<br />
o ID: Installed BIOS ID<br />
• Processor: Displays auto-detected CPU specifications<br />
o Type: Names the currently installed processor<br />
o Speed: Lists the processor speed<br />
o Count: The number of CPUs on the motherboard<br />
• <strong>System</strong> Memory: Displays the auto-detected system memory.<br />
o Size: Lists memory size<br />
The <strong>System</strong> Overview field also has two user configurable fields:<br />
72<br />
IEI ® Technology, Corp.
<strong>ECK</strong>-<strong>3699GF</strong> <strong>Embedded</strong> <strong>System</strong><br />
5.3 Advanced<br />
• <strong>System</strong> Time [xx:xx:xx]: The system time is set here.<br />
• <strong>System</strong> Date [Day xx/xx/xxxx]: The system date is set here.<br />
The Advanced menu (BIOS Menu 2) allows access to the CPU and peripheral device<br />
configuration options through the following sub-menus:<br />
WARNING:<br />
Setting the wrong values in the sections below may cause the system to<br />
malfunction. Make sure that the settings made are compatible with the<br />
hardware.<br />
• CPU Configuration (see Section 5.3.1)<br />
• IDE Configuration (see Section 5.3.2)<br />
• SuperIO Configuration (see Section 5.3.3)<br />
• Hardware Health Configuration (see Section 5.3.4)<br />
• ACPI Configuration (see Section 5.3.5)<br />
• APM Configuration (see Section 5.3.6)<br />
• MPS Configuration (see Section 5.3.7)<br />
• Remote Access Configuration (see Section 5.3.8)<br />
• USB Configuration (see Section 5.3.9)<br />
73
<strong>ECK</strong>-<strong>3699GF</strong> <strong>Embedded</strong> <strong>System</strong><br />
BIOS Menu 2: Advanced<br />
5.3.1 CPU Configuration<br />
The CPU Configuration menu (BIOS Menu 3) shows detailed CPU specifications and<br />
CPU configuration options.<br />
74<br />
IEI ® Technology, Corp.
<strong>ECK</strong>-<strong>3699GF</strong> <strong>Embedded</strong> <strong>System</strong><br />
BIOS Menu 3: CPU Configuration<br />
The CPU Configuration menu (BIOS Menu 3) lists the following CPU details:<br />
• Manufacturer: Lists the name of the CPU manufacturer<br />
• Brand String: Lists the brand name of the CPU being used<br />
• Frequency: Lists the CPU processing speed<br />
• FSB Speed: Lists the FSB speed<br />
• Cache L1: Lists the CPU L1 cache size<br />
• Cache L2: Lists the CPU L2 cache size<br />
5.3.2 IDE Configuration<br />
The IDE Configuration menu (BIOS Menu 4) allows changes to the configurations for the<br />
IDE devices installed in the system.<br />
75
<strong>ECK</strong>-<strong>3699GF</strong> <strong>Embedded</strong> <strong>System</strong><br />
BIOS Menu 4: IDE Configuration<br />
<br />
ATA/IDE Configuration [Compatible]<br />
The ATA/IDE Configuration BIOS option allows the user to configure the ATA/IDE device<br />
mode.<br />
Disabled Disable all ATA/IDE ports. No Primary/Secondary IDE<br />
mode is presented for configuration<br />
Compatible DEFAULT Up to 4 HDDs can be used, two for SATA and the other<br />
for PATA IDE. If this option is selected, “Legacy IDE<br />
Channels” option is presented for configuration.<br />
Enhanced If this option is selected, “Configure SATA as” and<br />
“Configure SATA channels” options are presented for<br />
configuration.<br />
76<br />
IEI ® Technology, Corp.
<strong>ECK</strong>-<strong>3699GF</strong> <strong>Embedded</strong> <strong>System</strong><br />
<br />
Legacy IDE Channels [SATA Pri, PATA Sec]<br />
Use the Legacy IDE Channels option configures PATA and SATA resources for operating<br />
systems that require legacy IDE operation.<br />
SATA Only Enable up to two SATA devices<br />
Reserved The legacy IDE channels are reserved<br />
SATA Pri,<br />
PATA Sec<br />
DEFAULT<br />
This option allows the system to access the SATA<br />
devices before the primary IDE devices<br />
PATA Only Enable the two primary IDE devices. Select this option<br />
only when the two primary IDE devices are available<br />
<br />
IDE Master and IDE Slave<br />
When entering setup, BIOS auto detects the presence of IDE devices. This displays the<br />
status of the auto detected IDE devices. The following IDE devices are detected and are<br />
shown in the IDE Configuration menu:<br />
• Primary IDE Master<br />
• Primary IDE Slave<br />
• Secondary IDE Master<br />
• Secondary IDE Slave<br />
The IDE Configuration menu (BIOS Menu 4) allows changes to the configurations for the<br />
IDE devices installed in the system. If an IDE device is detected, and one of the above<br />
listed four BIOS configuration options are selected, the IDE configuration options shown in<br />
Section 5.3.2.1 appear.<br />
5.3.2.1 IDE Master, IDE Slave<br />
IDE Master and IDE Slave configuration options for both primary and secondary IDE<br />
devices are shown in the BIOS menu below.<br />
77
<strong>ECK</strong>-<strong>3699GF</strong> <strong>Embedded</strong> <strong>System</strong><br />
BIOS Menu 5: IDE Master and IDE Slave Configuration<br />
<br />
Type [Auto]<br />
The Type BIOS option determines the type of device that the AMIBIOS attempts to boot<br />
from after the Power-On Self-Test (POST) has completed.<br />
Not Installed Selecting this value prevents the BIOS from searching<br />
for an IDE disk drive on the specified channel.<br />
Auto DEFAULT This selection enables the BIOS to auto detect the<br />
IDE disk drive type attached to the specified channel.<br />
This setting should be used if an IDE hard disk drive is<br />
attached to the specified channel.<br />
CD/DVD The CD/DVD option specifies that an IDE CD-ROM<br />
drive is attached to the specified IDE channel. The<br />
BIOS does not attempt to search for other types of<br />
IDE disk drives on the specified channel.<br />
78<br />
IEI ® Technology, Corp.
<strong>ECK</strong>-<strong>3699GF</strong> <strong>Embedded</strong> <strong>System</strong><br />
ARMD This option specifies an ATAPI Removable Media<br />
Device. These include, but are not limited to:<br />
<br />
ZIP<br />
<br />
LS-120<br />
<br />
LBA/Large Mode [Auto]<br />
The LBA/Large Mode BIOS option disables or auto detects LBA (Logical Block<br />
Addressing). LBA is a method of addressing data on a disk drive. In LBA mode, the<br />
maximum drive capacity is 137 GB.<br />
Disabled This selection prevents the BIOS from using the LBA<br />
mode control on the specified channel.<br />
Auto DEFAULT This option allows the BIOS to auto detect the LBA mode<br />
control on the specified channel.<br />
<br />
Block (Multi Sector Transfer) [Auto]<br />
Disabled Selecting this option prevents the BIOS from using<br />
Multi-Sector Transfer on the specified channel. The data<br />
to and from the device occurs one sector at a time.<br />
Auto DEFAULT Selecting this value to allows the BIOS to auto detect the<br />
device support for Multi-Sector Transfers on the specified<br />
channel. If supported. Select this value to allow the BIOS<br />
to auto detect the number of sectors per block for transfer<br />
from the hard disk drive to the memory. The data transfer<br />
to and from the device occurs multiple sectors at a time.<br />
79
<strong>ECK</strong>-<strong>3699GF</strong> <strong>Embedded</strong> <strong>System</strong><br />
<br />
PIO Mode [Auto]<br />
The PIO Mode option selects the IDE PIO (Programmable I/O) mode program timing<br />
cycles between the IDE drive and the programmable IDE controller. As the PIO mode<br />
increases, the cycle time decreases.<br />
Auto DEFAULT This setting allows the BIOS to auto detect the PIO mode. Use<br />
this value if the IDE disk drive support cannot be determined.<br />
0 PIO mode 0 selected with a maximum transfer rate of 3.3MBps<br />
1 PIO mode 1 selected with a maximum transfer rate of 5.2MBps<br />
2 PIO mode 2 selected with a maximum transfer rate of 8.3MBps<br />
3 PIO mode 3 selected with a maximum transfer rate of 11.1MBps<br />
4 PIO mode 4 selected with a maximum transfer rate of 16.6MBps<br />
(This setting generally works with all hard disk drives<br />
manufactured after 1999. For other disk drives, such as IDE<br />
CD-ROM drives, check the specifications of the drive.)<br />
<br />
DMA Mode [Auto]<br />
The DMA Mode BIOS selection adjusts the DMA mode options.<br />
Auto DEFAULT The BIOS auto detects the DMA mode. Use this value if the<br />
IDE disk drive support cannot be determined.<br />
<br />
S.M.A.R.T [Auto]<br />
Self-Monitoring Analysis and Reporting Technology (SMART) feature can help predict<br />
impending drive failures. The S.M.A.R.T BIOS option enables or disables this function.<br />
Auto DEFAULT BIOS to auto detects if the hard disk drive supports<br />
S.M.A.R.T. Use this setting if the IDE disk drive support<br />
cannot be determined.<br />
80<br />
IEI ® Technology, Corp.
<strong>ECK</strong>-<strong>3699GF</strong> <strong>Embedded</strong> <strong>System</strong><br />
Disabled Select this value to prevent the BIOS from using the<br />
SMART feature.<br />
Enabled Select this value to allow the BIOS to use the SMART<br />
feature on support hard disk drives.<br />
<br />
32Bit Data Transfer [Enabled]<br />
The 32Bit Data Transfer BIOS option enables or disables 32-bit data transfers.<br />
Disabled Prevents the BIOS from using 32-bit data transfers.<br />
Enabled DEFAULT Allows BIOS to use 32-bit data transfers on support hard<br />
disk drives.<br />
5.3.3 Super IO Configuration<br />
The Super IO Configuration menu (BIOS Menu 6) sets or changes the configurations for<br />
the FDD controllers, parallel ports and serial ports.<br />
BIOS Menu 6: Super IO Configuration<br />
81
<strong>ECK</strong>-<strong>3699GF</strong> <strong>Embedded</strong> <strong>System</strong><br />
<br />
Serial Port1 Address [3F8/IRQ4]<br />
The Serial Port1 Address option allows BIOS to select the Serial Port 1 base address.<br />
Disabled No base address is assigned to Serial Port 1<br />
3F8/IRQ4 DEFAULT Serial Port 1 I/O port address is 3F8 and the interrupt<br />
address is IRQ4<br />
3E8/IRQ4<br />
Serial Port 1 I/O port address is 3E8 and the interrupt<br />
address is IRQ4<br />
2E8/IRQ3<br />
Serial Port 1 I/O port address is 2E8 and the interrupt<br />
address is IRQ3<br />
<br />
Serial Port1 Mode [Normal]<br />
Allows BIOS to select the mode for Serial Port 1<br />
Normal DEFAULT Serial Port 1 mode is normal<br />
IrDA<br />
ASK IR<br />
Serial Port 1 mode is IrDA<br />
Serial Port 1 mode is ASK IR<br />
<br />
Serial Port2 Address [2F8/IRQ3]<br />
The Serial Port2 Address option allows BIOS to select the Serial Port 2 base address.<br />
Disabled No base address is assigned to Serial Port 2<br />
2F8/IRQ3 DEFAULT Serial Port 2 I/O port address is 3F8 and the interrupt<br />
address is IRQ3<br />
3E8/IRQ4<br />
Serial Port 2 I/O port address is 3E8 and the interrupt<br />
address is IRQ4<br />
2E8/IRQ3<br />
Serial Port 2 I/O port address is 2E8 and the interrupt<br />
address is IRQ3<br />
82<br />
IEI ® Technology, Corp.
<strong>ECK</strong>-<strong>3699GF</strong> <strong>Embedded</strong> <strong>System</strong><br />
<br />
Serial Port2 Mode [Normal]<br />
Allows BIOS to select the mode for Serial Port 2<br />
Normal DEFAULT Serial Port 2 mode is normal<br />
IrDA<br />
ASK IR<br />
Serial Port 2 mode is IrDA<br />
Serial Port 2 mode is ASK IR<br />
<br />
Serial Port3 Address [3E8]<br />
This option allows BIOS to select the base addresses for serial port 3<br />
Disabled No base address is assigned to serial port 3<br />
3E8 DEFAULT Serial port 3 I/O port address is 3E8<br />
2E8<br />
2F0<br />
2E0<br />
Serial port 3 I/O port address is 2E8<br />
Serial port 3 I/O port address is 2F0<br />
Serial port 3 I/O port address is 2E0<br />
Serial Port3 IRQ [11]<br />
The Serial Port3 IRQ selection sets the interrupt address for serial port 3.<br />
10 Serial port 3 IRQ address is 10<br />
11 DEFAULT Serial port 3 IRQ address is 11<br />
<br />
Serial Port4 Address [2E8]<br />
This option allows BIOS to select the base addresses for serial port 4.<br />
Disabled No base address is assigned to serial port 4<br />
3E8<br />
Serial port 4 I/O port address is 3E8<br />
2E8 DEFAULT Serial port 4 I/O port address is 2E8<br />
83
<strong>ECK</strong>-<strong>3699GF</strong> <strong>Embedded</strong> <strong>System</strong><br />
2F0<br />
2E0<br />
Serial port 4 I/O port address is 2F0<br />
Serial port 4 I/O port address is 2E0<br />
Serial Port4 IRQ [10]<br />
The Serial Port4 IRQ selection sets the interrupt address for serial port 4.<br />
10 DEFAULT Serial port 4 IRQ address is 10<br />
11 Serial port 4 IRQ address is 11<br />
5.3.4 Hardware Health Configuration<br />
The Hardware Health Configuration menu (BIOS Menu 7) shows the operating<br />
temperature, fan speeds and system voltages.<br />
BIOS Menu 7: Hardware Health Configuration<br />
84<br />
IEI ® Technology, Corp.
<strong>ECK</strong>-<strong>3699GF</strong> <strong>Embedded</strong> <strong>System</strong><br />
<br />
CPU FAN Mode Setting: [Full On mode]<br />
The CPU FAN Mode Setting has the following options:<br />
Full On mode DEFAULT If selected, there are no additional configurable<br />
options.<br />
Automatic<br />
Mode<br />
If selected, the following options will appear with<br />
values that can be configured:<br />
<br />
CPU Temp. Limit of OFF<br />
<br />
CPU Temp. Limit of Start<br />
<br />
CPU Temp. Limit of Full<br />
<br />
CPU Fan Start PWM<br />
Slop PWM 1: 0 PWM, 1 PWM (Default), 2<br />
PWM, 4 PWM, 8 PWM, 16 PWM, 32 PWM<br />
or 64 PWM<br />
PWM <strong>Manual</strong>ly<br />
mode<br />
If selected, the following option will appear with<br />
values that can be configured:<br />
<br />
CPU Fan PWM Control<br />
The following system parameters and values are shown. The system parameters that are<br />
monitored are:<br />
• <strong>System</strong> Temperatures: The following system temperatures are monitored<br />
o CPU Temperature<br />
o <strong>System</strong> Temperature<br />
• Fan Speeds: The CPU cooling fan speed is monitored.<br />
o CPU Fan Speed<br />
o <strong>System</strong> Fan Speed<br />
• Voltages: The following system voltages are monitored<br />
o CPU Core<br />
o +2.5V<br />
85
<strong>ECK</strong>-<strong>3699GF</strong> <strong>Embedded</strong> <strong>System</strong><br />
o +3.30V<br />
o +5.00V<br />
o +12.0V<br />
o GMCH (1.5V)<br />
o 1.05V<br />
o 5VSB<br />
o VBAT<br />
5.3.5 ACPI Configuration<br />
The ACPI Configuration menu (BIOS Menu 8) configures the Advanced Configuration<br />
and Power Interface (ACPI) and Power Management (APM) options.<br />
BIOS Menu 8: ACPI Configuration<br />
<br />
ACPI Aware O/S [Yes]<br />
Use the ACPI Aware O/S option to enable the system to configure ACPI power saving<br />
options. ACPI can only be implemented if the system OS complies with the ACPI standard.<br />
Windows 98, Windows 2000, and Windows XP all comply with ACPI.<br />
86<br />
IEI ® Technology, Corp.
<strong>ECK</strong>-<strong>3699GF</strong> <strong>Embedded</strong> <strong>System</strong><br />
No Disables the ACPI support for the OS. This selection should<br />
be disabled if the OS does not support ACPI<br />
Yes DEFAULT Enables the ACPI support for the operating system. This<br />
selection should be enabled if the OS does support ACPI<br />
5.3.5.1 General ACPI Configuration<br />
Use the General ACPI Configuration menu (BIOS Menu 9) to select the ACPI state<br />
when the system is suspended.<br />
BIOS Menu 9: General ACPI Configuration [Advanced\ ACPI Configuration]<br />
<br />
Suspend mode [S3 (STR)]<br />
Use the Suspend Mode option to specify the sleep state the system enters when it is not<br />
being used.<br />
S1 (POS) The system enters S1(POS) sleep state. The system<br />
87
<strong>ECK</strong>-<strong>3699GF</strong> <strong>Embedded</strong> <strong>System</strong><br />
appears off. The CPU is stopped; RAM is refreshed; the<br />
system is running in a low power mode.<br />
S3 (STR) DEFAULT The system enters a S3(STR) sleep state. The CPU has<br />
no power; RAM is in slow refresh; the power supply is in a<br />
reduced power mode.<br />
5.3.6 APM Configuration<br />
Use the APM Configuration menu (BIOS Menu 10) to select the advanced power<br />
management.<br />
BIOS Menu 10: APM Configuration<br />
<br />
Power Management/APM [Enabled]<br />
The Power Management/APM BIOS option accesses the advanced power management<br />
features.<br />
Disabled Disables the Advanced Power Management (APM)<br />
88<br />
IEI ® Technology, Corp.
<strong>ECK</strong>-<strong>3699GF</strong> <strong>Embedded</strong> <strong>System</strong><br />
feature<br />
Enabled DEFAULT Enables the APM feature<br />
<br />
Restore on AC Power Loss by IO [Power Off]<br />
The Restore on AC Power Loss by IO BIOS option specifies what state the system<br />
returns to if there is a sudden loss of power to the system.<br />
Power Off DEFAULT The system remains turned off<br />
Power On The system turns on<br />
<br />
Power Button Mode [On/Off]<br />
The Power Button Mode BIOS specifies how the power button functions.<br />
On/Off DEFAULT When the power button is pressed the system is either<br />
turned on or off<br />
<br />
Resume on Ring [Disabled]<br />
The Resume on Ring BIOS option specifies if the system will be roused from a<br />
suspended or standby state when there is activity on the RI (ring in) modem line. That is,<br />
the system will be roused by an incoming call on a modem.<br />
Disabled DEFAULT Wake event not generated by an incoming call<br />
Enabled Wake event generated by an incoming call<br />
<br />
Resume on PME# [Disabled]<br />
The Resume on PME# BIOS option specifies if the system will be roused from a<br />
suspended or standby state when there is activity on the PCI PME (power management<br />
event) controller.<br />
Disabled DEFAULT Wake event not generated by PCI PME controller<br />
89
<strong>ECK</strong>-<strong>3699GF</strong> <strong>Embedded</strong> <strong>System</strong><br />
activity<br />
Enabled Wake event generated by PCI PME controller activity<br />
<br />
Resume On RTC Alarm [Disabled]<br />
The Resume On RTC Alarm determines when the computer will be roused from a<br />
suspended state.<br />
Disabled DEFAULT The real time clock (RTC) cannot generate a wake<br />
event<br />
Enabled If selected, the following will appear with values that<br />
can be selected:<br />
<br />
RTC Alarm Date (Days)<br />
<br />
RTC Alarm Time<br />
After setting the alarm, the computer will turn itself on<br />
from a suspend state when the alarm goes off.<br />
<br />
Resume On PCI-Express WAKE# [Enabled]<br />
The Resume On PCI-Express WAKE# BIOS option specifies if the system will be roused<br />
from a suspended or standby state when there is activity on the PCI-Express controller.<br />
Disabled Wake event not generated by PCI-Express controller<br />
activity<br />
Enabled DEFAULT Wake event generated by PCI-Express controller<br />
activity<br />
5.3.7 MPS Configuration<br />
Use the MPS Configuration menu (BIOS Menu 11) to select `he multi-processor table.<br />
90<br />
IEI ® Technology, Corp.
<strong>ECK</strong>-<strong>3699GF</strong> <strong>Embedded</strong> <strong>System</strong><br />
BIOS Menu 11: MPS Configuration<br />
MPS Revision [1.4]<br />
Use the Multiprocessor Specification (MPS) Revision option to specify the MPS<br />
version to be used.<br />
1.1<br />
MPS version 1.1 is used<br />
1.4 DEFAULT MPS version 1.4 is used<br />
5.3.8 Remote Access Configuration<br />
Use the Remote Access Configuration menu (BIOS Menu 12) to configure remote<br />
access parameters. The Remote Access Configuration is an AMIBIOS feature and<br />
allows a remote host running a terminal program to display and configure the BIOS<br />
settings.<br />
91
<strong>ECK</strong>-<strong>3699GF</strong> <strong>Embedded</strong> <strong>System</strong><br />
BIOS Menu 12: Remote Access Configuration [Advanced]<br />
<br />
Remote Access [Disabled]<br />
Use the Remote Access option to enable or disable access to the remote functionalities<br />
of the system.<br />
Disabled DEFAULT Remote access is disabled.<br />
Enabled Remote access configuration options shown below<br />
appear:<br />
<br />
Serial Port Number<br />
<br />
Serial Port Mode<br />
<br />
Flow Control<br />
<br />
Redirection after BIOS POST<br />
92<br />
IEI ® Technology, Corp.
<strong>ECK</strong>-<strong>3699GF</strong> <strong>Embedded</strong> <strong>System</strong><br />
<br />
Terminal Type<br />
<br />
VT-UTF8 Combo Key Support<br />
<br />
Sredir Memory Display Delay<br />
These configuration options are discussed below.<br />
5.3.9 USB Configuration<br />
Use the USB Configuration menu (BIOS Menu 13) to read USB configuration<br />
information and configure the USB settings.<br />
BIOS Menu 13: USB Configuration<br />
<br />
USB Configuration<br />
The USB Configuration field shows the system USB configuration. The items listed are:<br />
93
<strong>ECK</strong>-<strong>3699GF</strong> <strong>Embedded</strong> <strong>System</strong><br />
• Module Version: x.xxxxx.xxxxx<br />
<br />
USB Devices Enabled<br />
The USB Devices Enabled field lists the USB devices that are enabled on the system<br />
<br />
USB Function [8 USB Ports]<br />
Use the USB Function BIOS option to disable USB function support or to set the number<br />
of USB ports to activate.<br />
Disabled USB function support disabled<br />
2 USB Ports Two USB ports are activated.<br />
4 USB Ports Four USB ports are activated.<br />
6 USB Ports Six USB ports are activated.<br />
8 USB Ports DEFAULT Eight USB ports are activated.<br />
<br />
USB 2.0 Controller [Enabled]<br />
Use the USB 2.0 Controller BIOS option to enable or disable the USB 2.0 controller<br />
Enabled DEFAULT USB 2.0 controller enabled<br />
Disabled USB 2.0 controller disabled<br />
<br />
Legacy USB Support [Enabled]<br />
Use the Legacy USB Support BIOS option to enable USB mouse and USB keyboard<br />
support.<br />
Normally if this option is not enabled, any attached USB mouse or USB keyboard does not<br />
become available until a USB compatible operating system is fully booted with all USB<br />
drivers loaded. When this option is enabled, any attached USB mouse or USB keyboard<br />
can control the system even when there is no USB driver loaded onto the system.<br />
94<br />
IEI ® Technology, Corp.
<strong>ECK</strong>-<strong>3699GF</strong> <strong>Embedded</strong> <strong>System</strong><br />
Disabled Legacy USB support disabled<br />
Enabled DEFAULT Legacy USB support enabled<br />
Auto Legacy USB support disabled if no USB devices are<br />
connected<br />
<br />
USB2.0 Controller Mode [HiSpeed]<br />
Use the USB2.0 Controller Mode option to set the speed of the USB2.0 controller.<br />
FullSpeed The controller is capable of operating at 12Mb/s<br />
HiSpeed DEFAULT The controller is capable of operating at 480Mb/s<br />
<br />
BIOS EHCI Handoff [Enabled]<br />
Use the BIOS EHCI Handoff option for systems running OSes that do not have EHCI<br />
hand-off support. The EHCI ownership change is managed by the EHCI driver.<br />
Disabled <strong>System</strong>s with OSes that do not support EHCI can<br />
use the EHCI handoff functionality.<br />
Enabled DEFAULT <strong>System</strong>s with OSes that do not support EHCI cannot<br />
use the EHCI handoff functionality.<br />
5.3.9.1 USB Mass Storage Device Configuration<br />
Use the USB Mass Storage Device Configuration menu (BIOS Menu 14) to configure<br />
USB mass storage class devices.<br />
95
<strong>ECK</strong>-<strong>3699GF</strong> <strong>Embedded</strong> <strong>System</strong><br />
BIOS Menu 14: USB Mass Storage Device Configuration<br />
Device ##<br />
The Device## field lists the USB devices that are connected to the system.<br />
<br />
Emulation Type [Auto]<br />
Use the Emulation Type BIOS option to specify the type of emulation BIOS has to<br />
provide for the USB device.<br />
NOTE:<br />
Please note that the device’s formatted type and the emulation type<br />
provided by the BIOS must match for a device to boot properly. If both<br />
types do not match then device’s behavior is undefined. To make sure both<br />
types match, format the device using BIOS INT13h calls after selecting the<br />
96<br />
IEI ® Technology, Corp.
<strong>ECK</strong>-<strong>3699GF</strong> <strong>Embedded</strong> <strong>System</strong><br />
proper emulation option in BIOS setup. The FORMAT utility provided by<br />
Microsoft® MS-DOS®, Microsoft® Windows® 95, and Microsoft®<br />
Windows® 98 can be used for this purpose.<br />
Auto DEFAULT BIOS auto-detects the current USB.<br />
Floppy The USB device will be emulated as a floppy drive.<br />
The device can be either A: or B: responding to<br />
INT13h calls that return DL = 0 or DL = 1<br />
respectively.<br />
Forced FDD Allows a hard disk image to be connected as a<br />
floppy image. This option works only for drives<br />
formatted with FAT12, FAT16 or FAT32.<br />
Hard Disk Allows the USB device to be emulated as hard disk<br />
responding to INT13h calls that return DL values of<br />
80h or above.<br />
CDROM Assumes the CD-ROM is formatted as bootable<br />
media. All the devices that support block sizes<br />
greater than 512 bytes can only be booted using this<br />
option.<br />
5.4 PCI/PnP<br />
Use the PCI/PnP menu (BIOS Menu 15) to configure advanced PCI and PnP settings.<br />
WARNING!<br />
Setting wrong values for the BIOS selections in the PCIPnP BIOS menu<br />
may cause the system to malfunction.<br />
97
<strong>ECK</strong>-<strong>3699GF</strong> <strong>Embedded</strong> <strong>System</strong><br />
BIOS Menu 15: PCI/PnP Configuration<br />
<br />
Clear NVRAM [No]<br />
Use the Clear NVRAM option to specify if the NVRAM (Non-Volatile RAM) is cleared<br />
when the power is turned off.<br />
No DEFAULT <strong>System</strong> does not clear NVRAM during system boot<br />
Yes <strong>System</strong> clears NVRAM during system boot<br />
<br />
Plug & Play O/S [No]<br />
Use the Plug & Play O/S BIOS option to specify whether system plug and play devices<br />
are configured by the operating system or the BIOS.<br />
No DEFAULT If the operating system does not meet the Plug and Play<br />
98<br />
IEI ® Technology, Corp.
<strong>ECK</strong>-<strong>3699GF</strong> <strong>Embedded</strong> <strong>System</strong><br />
specifications, this option allows the BIOS to configure all the<br />
devices in the system.<br />
Yes This setting allows the operating system to change the<br />
interrupt, I/O, and DMA settings. Set this option if the system<br />
is running Plug and Play aware operating systems.<br />
PCI Latency Timer [64]<br />
Use the PCI Latency Timer option to specify the PCI latency time. The latency time is<br />
measured in units of PCI clock cycles for the PCI device latency timer register.<br />
Configuration options are:<br />
• 32<br />
• 64 Default<br />
• 96<br />
• 128<br />
• 160<br />
• 192<br />
• 224<br />
• 248<br />
<br />
Allocate IRQ to PCI VGA [Yes]<br />
Use the Allocate IRQ to PCI VGA option to restrict the system from giving the VGA<br />
adapter card an interrupt address.<br />
Yes DEFAULT Assigns an IRQ to a PCI VGA card if card requests IRQ<br />
No Does not assign IRQ to a PCI VGA card even if the card<br />
requests an IRQ<br />
<br />
Palette Snooping [Disabled]<br />
Use the Palette Snooping option to enable or disable the palette snooping function.<br />
Disabled DEFAULT Unless the VGA card manufacturer requires palette<br />
99
<strong>ECK</strong>-<strong>3699GF</strong> <strong>Embedded</strong> <strong>System</strong><br />
snooping to be enabled, this option should be disabled.<br />
Enabled PCI devices are informed that an ISA based Graphics<br />
device is installed in the system so the ISA based<br />
Graphics card functions correctly. This does not<br />
necessarily indicate a physical ISA adapter card. The<br />
graphics chipset can be mounted on a PCI card. Always<br />
check with the adapter card manual first, before<br />
modifying the default settings in the BIOS.<br />
<br />
PCI IDE BusMaster [Enabled]<br />
Use the PCI IDE BusMaster BIOS option to enable or prevent PCI IDE busmastering.<br />
Disabled Busmastering is prevented<br />
Enabled DEFAULT IDE controller on the PCI local bus has mastering<br />
capabilities<br />
<br />
OffBoard PCI/ISA IDE Card [Auto]<br />
Use the OffBoard PCI/ISA IDE Card BIOS option to select the OffBoard PCI/ISA IDE<br />
Card.<br />
Auto DEFAULT The location of the Off Board PCI IDE adapter card is<br />
automatically detected by the AMIBIOS.<br />
PCI Slot 1 PCI Slot 1 is selected as the location of the OffBoard<br />
PCI IDE adapter card. Only select this slot if the<br />
adapter card is installed in PCI Slot 1.<br />
PCI Slot 2 PCI Slot 2 is selected as the location of the OffBoard<br />
PCI IDE adapter card. Only select this slot if the<br />
adapter card is installed in PCI Slot 2.<br />
PCI Slot 3 PCI Slot 3 is selected as the location of the OffBoard<br />
100<br />
IEI ® Technology, Corp.
<strong>ECK</strong>-<strong>3699GF</strong> <strong>Embedded</strong> <strong>System</strong><br />
PCI IDE adapter card. Only select this slot if the<br />
adapter card is installed in PCI Slot 3.<br />
PCI Slot 4 PCI Slot 4 is selected as the location of the OffBoard<br />
PCI IDE adapter card. Only select this slot if the<br />
adapter card is installed in PCI Slot 4.<br />
PCI Slot 5 PCI Slot 5 is selected as the location of the OffBoard<br />
PCI IDE adapter card. Only select this slot if the<br />
adapter card is installed in PCI Slot 5.<br />
PCI Slot 6 PCI Slot 6 is selected as the location of the OffBoard<br />
PCI IDE adapter card. Only select this slot if the<br />
adapter card is installed in PCI Slot 6.<br />
<br />
IRQ# [Available]<br />
Use the IRQ# address to specify what IRQs can be assigned to a particular peripheral<br />
device.<br />
Available DEFAULT The specified IRQ is available to be used by<br />
PCI/PnP devices<br />
Reserved The specified IRQ is reserved for use by Legacy ISA<br />
devices<br />
Available IRQ addresses are:<br />
• IRQ3<br />
• IRQ4<br />
• IRQ5<br />
• IRQ7<br />
• IRQ9<br />
• IRQ10<br />
• IRQ 11<br />
• IRQ 14<br />
101
<strong>ECK</strong>-<strong>3699GF</strong> <strong>Embedded</strong> <strong>System</strong><br />
• IRQ 15<br />
<br />
DMA Channel# [Available]<br />
Use the DMA Channel# option to assign a specific DMA channel to a particular PCI/PnP<br />
device.<br />
Available DEFAULT The specified DMA is available to be used by<br />
PCI/PnP devices<br />
Reserved The specified DMA is reserved for use by Legacy<br />
ISA devices<br />
Available DMA Channels are:<br />
• DM Channel 0<br />
• DM Channel 1<br />
• DM Channel 3<br />
• DM Channel 5<br />
• DM Channel 6<br />
• DM Channel 7<br />
<br />
Reserved Memory Size [Disabled]<br />
Use the Reserved Memory Size BIOS option to specify the amount of memory that<br />
should be reserved for legacy ISA devices.<br />
Disabled DEFAULT No memory block reserved for legacy ISA devices<br />
16K 16KB reserved for legacy ISA devices<br />
32K 32KB reserved for legacy ISA devices<br />
64K 54KB reserved for legacy ISA devices<br />
102<br />
IEI ® Technology, Corp.
<strong>ECK</strong>-<strong>3699GF</strong> <strong>Embedded</strong> <strong>System</strong><br />
5.5 Boot<br />
Use the Boot menu (BIOS Menu 16) to configure system boot options.<br />
BIOS Menu 16: Boot<br />
5.5.1 Boot Settings Configuration<br />
Use the Boot Settings Configuration menu (BIOS Menu 17) to configure advanced<br />
system boot options.<br />
103
<strong>ECK</strong>-<strong>3699GF</strong> <strong>Embedded</strong> <strong>System</strong><br />
BIOS Menu 17: Boot Settings Configuration<br />
<br />
Quick Boot [Enabled]<br />
Use the Quick Boot BIOS option to make the computer speed up the boot process.<br />
Disabled No POST procedures are skipped<br />
Enabled DEFAULT Some POST procedures are skipped to decrease<br />
the system boot time<br />
<br />
Quiet Boot [Disabled]<br />
Use the Quiet Boot BIOS option to select the screen display when the system boots.<br />
Disabled DEFAULT Normal POST messages displayed<br />
Enabled OEM Logo displayed instead of POST messages<br />
104<br />
IEI ® Technology, Corp.
<strong>ECK</strong>-<strong>3699GF</strong> <strong>Embedded</strong> <strong>System</strong><br />
<br />
AddOn ROM Display Mode [Force BIOS]<br />
Use the AddOn ROM Display Mode option to allow add-on ROM (read-only memory)<br />
messages to be displayed.<br />
Force BIOS DEFAULT The system forces third party BIOS to display<br />
during system boot.<br />
Keep Current The system displays normal information during<br />
system boot.<br />
<br />
Bootup Num-Lock [On]<br />
Use the Bootup Num-Lock BIOS option to specify if the number lock setting must be<br />
modified during boot up.<br />
Off Does not enable the keyboard Number Lock automatically. To<br />
use the 10-keys on the keyboard, press the Number Lock key<br />
located on the upper left-hand corner of the 10-key pad. The<br />
Number Lock LED on the keyboard lights up when the Number<br />
Lock is engaged.<br />
On DEFAULT Allows the Number Lock on the keyboard to be enabled<br />
automatically when the computer system boots up. This allows<br />
the immediate use of the 10-key numeric keypad located on<br />
the right side of the keyboard. To confirm this, the Number<br />
Lock LED light on the keyboard is lit.<br />
<br />
PS/2 Mouse Support [Auto]<br />
Use the PS/2 Mouse Support option adjusts PS/2 mouse support capabilities.<br />
Disabled PS/2 mouse support is disabled and prevented from<br />
using system resources.<br />
Enabled Allows the system to use a PS/2 mouse.<br />
105
<strong>ECK</strong>-<strong>3699GF</strong> <strong>Embedded</strong> <strong>System</strong><br />
Auto DEFAULT The system auto-adjusts PS/2 mouse support.<br />
<br />
Boot From LAN Support [Disabled]<br />
The BOOT From LAN Support option enables the system to be booted from a remote<br />
system.<br />
Disabled DEFAULT Cannot be booted from a remote system through the<br />
LAN<br />
Enabled Can be booted from a remote system through the<br />
LAN<br />
5.5.2 Boot Device Priority<br />
Use the Boot Device Priority menu (BIOS Menu 18) to specify the boot sequence from<br />
the available devices. Possible boot devices may include:<br />
• 1 st FLOPPY DRIVE<br />
• HDD<br />
• CD/DVD<br />
106<br />
IEI ® Technology, Corp.
<strong>ECK</strong>-<strong>3699GF</strong> <strong>Embedded</strong> <strong>System</strong><br />
BIOS Menu 18: Boot Device Priority Settings<br />
5.5.3 Removable Drives<br />
Use the Removable Drives menu (BIOS Menu 19) to specify the boot sequence of the<br />
available FDDs. When the menu is opened, the FDDs connected to the system are listed<br />
as shown below:<br />
• 1st Drive<br />
NOTE:<br />
Only the drives connected to the system are shown. For example, if only<br />
one FDD is connected only “1st Drive” is listed.<br />
107
<strong>ECK</strong>-<strong>3699GF</strong> <strong>Embedded</strong> <strong>System</strong><br />
The boot sequence from the available devices is selected. If the “1st Drive” option is<br />
selected a list of available removable drives is shown. Select the first drive the system<br />
boots from. If the “1st Drive” is not used for booting this option may be disabled.<br />
BIOS Menu 19: Removable Drives<br />
5.6 Security<br />
Use the Security menu (BIOS Menu 20) to set system and user passwords.<br />
108<br />
IEI ® Technology, Corp.
<strong>ECK</strong>-<strong>3699GF</strong> <strong>Embedded</strong> <strong>System</strong><br />
BIOS Menu 20: Security<br />
<br />
Change Supervisor Password<br />
Use the Change Supervisor Password to set or change a supervisor password. The<br />
default for this option is Not Installed. If a supervisor password must be installed, select<br />
this field and enter the password. After the password has been added, Install appears<br />
next to Change Supervisor Password.<br />
<br />
Change <strong>User</strong> Password<br />
Use the Change <strong>User</strong> Password to set or change a user password. The default for this<br />
option is Not Installed. If a user password must be installed, select this field and enter the<br />
password. After the password has been added, Install appears next to Change <strong>User</strong><br />
Password.<br />
109
<strong>ECK</strong>-<strong>3699GF</strong> <strong>Embedded</strong> <strong>System</strong><br />
5.7 Chipset<br />
Use the Chipset menu (BIOS Menu 21) to access the NorthBridge and SouthBridge<br />
configuration menus<br />
WARNING!<br />
Setting the wrong values for the Chipset BIOS selections in the Chipset<br />
BIOS menu may cause the system to malfunction.<br />
BIOS Menu 21: Chipset<br />
5.7.1 North Bridge Configuration<br />
Use the North Bridge Configuration menu (BIOS Menu 22) to configure the northbridge<br />
chipset.<br />
110<br />
IEI ® Technology, Corp.
<strong>ECK</strong>-<strong>3699GF</strong> <strong>Embedded</strong> <strong>System</strong><br />
BIOS Menu 22: North Bridge Chipset Configuration<br />
<br />
DRAM Frequency [Auto]<br />
Use the DRAM Frequency option to specify the DRAM frequency or allow the system to<br />
automatically detect the DRAM frequency.<br />
Auto DEFAULT Automatically selects the DRAM frequency<br />
400MHz Sets the DRAM frequency to 400MHz<br />
533MHz Sets the DRAM frequency to 533MHz<br />
667MHz Sets the DRAM frequency to 667MHz<br />
<br />
Configure DRAM Timing by SPD [Enabled]<br />
Use the Configure DRAM Timing by SPD option to determine if the system uses the<br />
SPD (Serial Presence Detect) EEPROM to configure the DRAM timing. The SPD<br />
EEPROM contains all necessary DIMM specifications including the speed of the individual<br />
111
<strong>ECK</strong>-<strong>3699GF</strong> <strong>Embedded</strong> <strong>System</strong><br />
components such as CAS and bank cycle time as well as valid settings for the module and<br />
the manufacturer's code. The SPD enables the BIOS to read the spec sheet of the DIMMs<br />
on boot-up and then adjust the memory timing parameters accordingly.<br />
Disabled DRAM timing parameters are manually set using the<br />
DRAM sub-items<br />
Enabled DEFAULT DRAM timing parameter are set according to the<br />
DRAM Serial Presence Detect (SPD)<br />
If the Configure DRAM Timing by SPD option is disabled, the following configuration<br />
options appear.<br />
• DRAM CAS# Latency [3]<br />
• DRAM RAS# to CAS# Delay [5 DRAM Clocks]<br />
• DRAM RAS# Precharge [5 DRAM Clocks]<br />
• DRAM RAS# Activate to Precha [15 DRAM Clocks]<br />
<br />
Memory Hole [Disabled]<br />
Use the Memory Hole option to reserve memory space between 15MB and 16MB for ISA<br />
expansion cards that require a specified area of memory to work properly. If an older ISA<br />
expansion card is used, please refer to the documentation that came with the card to see if<br />
it is necessary to reserve the space.<br />
Disabled DEFAULT Memory is not reserved for ISA expansion cards<br />
15MB – 16MB<br />
Between 15MB and 16MB of memory is reserved for<br />
ISA expansion cards<br />
<br />
Boots Graphics Adapter Priority [PEG/PCI]<br />
Use the Boots Graphics Adapter Priority option to select the graphics controller used as<br />
the primary boot device. Select either an integrated graphics controller (IGD) or a<br />
combination of PCI graphics controller, a PCI express (PEG) controller or an IGD.<br />
Configuration options are listed below:<br />
112<br />
IEI ® Technology, Corp.
<strong>ECK</strong>-<strong>3699GF</strong> <strong>Embedded</strong> <strong>System</strong><br />
• IGD<br />
• PCI/IGD<br />
• PCI/PEG<br />
• PEG/IGD<br />
• PEG/PCI DEFAULT<br />
<br />
Internal Graphics Mode Select [Enable, 8MB]<br />
Use the Internal Graphic Mode Select option to specify the amount of system memory<br />
that can be used by the Internal graphics device.<br />
<br />
Disable<br />
Enable, 1MB 1MB of memory used by internal graphics device<br />
Enable, 8MB DEFAULT 8MB of memory used by internal graphics device<br />
<br />
PEG Port [Auto]<br />
Use the PEG Port option to enable or disable the PCI Express port.<br />
Auto DEFAULT BIOS auto detects the installed PEG cards<br />
Disabled Installed PEG cards cannot function<br />
<br />
PEG Force X1 [Disabled]<br />
Use the PEG Force x1 option to convert a PCI express X16 slot into a PCI express X1<br />
slot.<br />
Enabled PCI express X16 slot runs in PCI express X1<br />
mode<br />
Disabled DEFAULT PCI express X16 slot runs in normal mode<br />
5.7.1.1 Video Function Configuration<br />
Use the Video Function Configuration menu to configure the video device connected to<br />
the system.<br />
113
<strong>ECK</strong>-<strong>3699GF</strong> <strong>Embedded</strong> <strong>System</strong><br />
<br />
DVMT Mode Select [DVMT Mode]<br />
Use the DVMT Mode Select option to select the Intel Dynamic Video Memory Technology<br />
(DVMT) operating mode.<br />
Fixed Mode A fixed portion of graphics memory is reserved as<br />
graphics memory.<br />
DVMT Mode DEFAULT Graphics memory is dynamically allocated<br />
according to the system and graphics needs.<br />
Combo Mode A fixed portion of graphics memory is reserved as<br />
graphics memory. If more memory is needed,<br />
graphics memory is dynamically allocated<br />
according to the system and graphics needs.<br />
<br />
DVMT/FIXED Memory [128MB]<br />
Use the DVMT/FIXED Memory option to specify the maximum amount of memory that<br />
can be allocated as graphics memory. This option can only be configured for if DVMT<br />
Mode or Fixed Mode is selected in the DVMT Mode Select option. If Combo Mode is<br />
selected, the maximum amount of graphics memory is 128MB. Configuration options are<br />
listed below.<br />
• 64MB<br />
• 128MB DEFAULT<br />
• Maximum DVMT<br />
<br />
Boot Display Device [Auto]<br />
Use the Boot Display Device option to select the display device used by the system<br />
when it boots. Configuration option is listed below.<br />
• Auto Default<br />
114<br />
IEI ® Technology, Corp.
<strong>ECK</strong>-<strong>3699GF</strong> <strong>Embedded</strong> <strong>System</strong><br />
Flat Panel Type [640*480]<br />
Use the Flat Panel Type option to select the type of flat panel connected to the system.<br />
Configuration options are listed below.<br />
• 640*480 DEFAULT<br />
• 800*600<br />
• 1024*768<br />
• 1280*1024 (36bits)<br />
• 1400*1050 (36bits)<br />
• 1600*1200 (36bits)<br />
• 1280*768<br />
• 1680*1050 (36bits)<br />
• 1920*1200 (36bits)<br />
<br />
Local Flat Panel Scaling [Auto]<br />
Use the Local Flat Panel Scaling option to select the method of scaling for the flat panel<br />
screen attached to the system.<br />
Auto DEFAULT Scaling is automatic<br />
Forced Scaling Scaling is forced<br />
Disabled Scaling is disabled<br />
<br />
TV Connector [Auto]<br />
Use the TC Connector option to select the connector that is used to connect the system<br />
to the television. The configuration option is listed below.<br />
• Auto DEFAULT<br />
<br />
TV Standard [VBIOS-Default]<br />
Use the TV Standard option to select the standard of the television connected to the<br />
system. The configuration options are listed below.<br />
• VBIOS-Default DEFAULT<br />
115
<strong>ECK</strong>-<strong>3699GF</strong> <strong>Embedded</strong> <strong>System</strong><br />
• NTSC<br />
• PAL<br />
5.7.2 South Bridge Configuration<br />
The SouthBridge Configuration menu (BIOS Menu 23) the southbridge chipset to be<br />
configured.<br />
BIOS Menu 23:South Bridge Chipset Configuration<br />
<br />
Audio Controller [Azalia]<br />
The Audio Controller option enables or disables the High Definition Audio CODEC.<br />
Azalia DEFAULT The Intel High Definition Audio controller automatically<br />
detected and enabled<br />
Disabled The onboard High Definition Audio controller is disabled<br />
116<br />
IEI ® Technology, Corp.
<strong>ECK</strong>-<strong>3699GF</strong> <strong>Embedded</strong> <strong>System</strong><br />
<br />
OnBoard LAN1 (BCM5787M) [Enabled]<br />
The OnBoard LAN1 (BCM5787M) option enables or disables the onboard LAN1.<br />
Disabled Onboard LAN1 controller manually disabled<br />
Enabled DEFAULT The onboard LAN1 controller automatically detected and<br />
enabled<br />
<br />
OnBoard LAN2 (BCM5787M) [Enabled]<br />
The OnBoard LAN2 (BCM5787M) option enables or disables the onboard LAN1.<br />
Disabled Onboard LAN2 controller manually disabled<br />
Enabled DEFAULT The onboard LAN2 controller automatically detected and<br />
enabled<br />
5.8 Exit<br />
Use the Exit menu (BIOS Menu 24) to load default BIOS values, optimal failsafe values<br />
and to save configuration changes.<br />
BIOS Menu 24:Exit<br />
117
<strong>ECK</strong>-<strong>3699GF</strong> <strong>Embedded</strong> <strong>System</strong><br />
<br />
Save Changes and Exit<br />
Use the Save Changes and Exit option to save the changes made to the BIOS options<br />
and to exit the BIOS configuration setup program.<br />
<br />
Discard Changes and Exit<br />
Use the Discard Changes and Exit option to exit the BIOS configuration setup program<br />
without saving the changes made to the system.<br />
<br />
Discard Changes<br />
Use the Discard Changes option to discard the changes and remain in the BIOS<br />
configuration setup program.<br />
<br />
Load Optimal Defaults<br />
Use the Load Optimal Defaults option to load the optimal default values for each of the<br />
parameters on the Setup menus. F9 key can be used for this operation.<br />
<br />
Load Failsafe Defaults<br />
Use the Load Failsafe Defaults option to load failsafe default values for each of the<br />
parameters on the Setup menus. F8 key can be used for this operation.<br />
118<br />
IEI ® Technology, Corp.
<strong>ECK</strong>-<strong>3699GF</strong> <strong>Embedded</strong> <strong>System</strong><br />
Chapter<br />
6<br />
6 Software Drivers<br />
119
<strong>ECK</strong>-<strong>3699GF</strong> <strong>Embedded</strong> <strong>System</strong><br />
6.1 Available Software Drivers<br />
NOTE:<br />
The content of the CD may vary throughout the life cycle of the product and<br />
is subject to change without prior notice. Visit the IEI website or contact<br />
technical support for the latest updates.<br />
The KINO-9452 motherboard has the following software drivers:<br />
• Intel Chipset Driver Installation<br />
• VGA Utilities Driver<br />
• LAN Driver (for GbE LAN) Installation<br />
• RealTek Audio Driver (ALC883) Installation<br />
• SATA Driver Installation<br />
All drivers can be found on the CD that came with the motherboard. To install the drivers<br />
please follow the instructions in the sections below.<br />
6.2 Chipset Driver Installation<br />
To install the chipset driver, please follow the steps below:<br />
Step 1: Insert the CD into the system that contains the KINO-9452 board. Open the<br />
1-INF directory and locate the icon for the infinst_autol.exe installation file.<br />
Once located, use the mouse to double click the icon.<br />
Step 2: The “InstallShield Wizard Preparation Screen” in Figure 6-1 appears.<br />
120<br />
IEI ® Technology, Corp.
<strong>ECK</strong>-<strong>3699GF</strong> <strong>Embedded</strong> <strong>System</strong><br />
Figure 6-1: InstallShield Wizard Preparation Screen<br />
Step 3: The “Welcome” window in Figure 6-2 appears next.<br />
Figure 6-2: Welcome Screen<br />
Step 4: Click “NEXT” and the license agreement shown in Figure 6-3 appears.<br />
121
<strong>ECK</strong>-<strong>3699GF</strong> <strong>Embedded</strong> <strong>System</strong><br />
Figure 6-3: License Agreement<br />
Step 5: Agree to the license terms by clicking “YES”. The “Readme” in Figure 6-4<br />
appears.<br />
Figure 6-4: Readme Information<br />
Step 6: Click “YES”. The driver is installed on the computer. After the installation is<br />
complete, the installation complete screen shown in Figure 6-5 appears. Select<br />
the preferred option and click “FINISH” to complete the installation process.<br />
122<br />
IEI ® Technology, Corp.
<strong>ECK</strong>-<strong>3699GF</strong> <strong>Embedded</strong> <strong>System</strong><br />
Step 0:<br />
Figure 6-5: Restart the Computer<br />
6.3 VGA Driver<br />
To install the VGA driver, please follow the steps below:<br />
Step 1: Insert the Utility CD that came with the motherboard into the system CD drive.<br />
Step 2: Open the X:\2-VGA\WIN2K_XP directory (where X:\ is the system CD drive)<br />
and double-click the win2k_xp1420.exe installation file.<br />
Step 3: The Starting Install Shield Wizard appears (Figure 6-6).<br />
123
<strong>ECK</strong>-<strong>3699GF</strong> <strong>Embedded</strong> <strong>System</strong><br />
Figure 6-6: Starting Install Shield Wizard Screen<br />
Step 4: The Preparing Setup window appears next (Figure 6-7).<br />
Figure 6-7: Preparing Setup Screen<br />
Step 5: A Welcome screen shown in Figure 6-8 appears. Click NEXT to continue the<br />
124<br />
IEI ® Technology, Corp.
<strong>ECK</strong>-<strong>3699GF</strong> <strong>Embedded</strong> <strong>System</strong><br />
installation.<br />
Figure 6-8: VGA Driver Installation Welcome Screen<br />
Step 6: A license agreement shown in Figure 6-9 appears. Read through the license<br />
agreement.<br />
Figure 6-9: VGA Driver License Agreement<br />
Step 7: Accept the terms and conditions stipulated in the license agreement by clicking<br />
125
<strong>ECK</strong>-<strong>3699GF</strong> <strong>Embedded</strong> <strong>System</strong><br />
the “YES” button (Figure 6-9). The installation notice shown in Figure 6-10<br />
appears.<br />
Figure 6-10: VGA Driver Installing Notice<br />
Step 8: After the driver installation process is complete, a confirmation screen shown in<br />
Figure 6-11 appears.<br />
Figure 6-11: VGA Driver Installation Complete<br />
Step 9: The confirmation screen shown in Figure 6-11 allows user to restart the<br />
computer immediately after the installation is complete or to restart the computer<br />
later. For the settings to take effect the computer must be restarted. Once<br />
decided when to restart the computer, click the “FINISH” button. Step 0:<br />
126<br />
IEI ® Technology, Corp.
<strong>ECK</strong>-<strong>3699GF</strong> <strong>Embedded</strong> <strong>System</strong><br />
6.4 Broadcom LAN Driver (for GbE LAN) Installation<br />
To install the Broadcom LAN driver, please follow the steps below.<br />
Step 1: Open Windows Control Panel (Figure 6-12).<br />
Figure 6-12: Access Windows Control Panel<br />
Step 2: Double click the <strong>System</strong> icon (Figure 6-13).<br />
127
<strong>ECK</strong>-<strong>3699GF</strong> <strong>Embedded</strong> <strong>System</strong><br />
Figure 6-13: Double Click the <strong>System</strong> Icon<br />
Step 3: Double click the Device Manager tab (Figure 6-14).<br />
Figure 6-14: Double Click the Device Manager Tab<br />
Step 4: A list of system hardware devices appears (Figure 6-15).<br />
128<br />
IEI ® Technology, Corp.
<strong>ECK</strong>-<strong>3699GF</strong> <strong>Embedded</strong> <strong>System</strong><br />
Figure 6-15: Device Manager List<br />
Step 5: Double click the listed device that has question marks next to it. (This means<br />
Windows does not recognize the device).<br />
Step 6: The Device Driver Wizard appears (Figure 6-16). Click NEXT to continue.<br />
Figure 6-16: Search for Suitable Driver<br />
129
<strong>ECK</strong>-<strong>3699GF</strong> <strong>Embedded</strong> <strong>System</strong><br />
Step 7: Select “Specify a Location” in the Locate Driver Files window (Figure 6-17).<br />
Click NEXT to continue.<br />
Figure 6-17: Locate Driver Files<br />
Step 8: Select the proper OS folder under the “X:\3-LAN\BROADCOM BCM57xx<br />
Drivers” directory (Figure 6-18) in the location browsing window, where “X:\” is<br />
the system CD drive.<br />
Figure 6-18: Location Browsing Window<br />
130<br />
IEI ® Technology, Corp.
<strong>ECK</strong>-<strong>3699GF</strong> <strong>Embedded</strong> <strong>System</strong><br />
Step 9: Click OK to continue. A driver files location menu window appears. Click NEXT to<br />
continue. The driver is installed.Step 0:<br />
6.5 RealTek HD Audio Driver (ALC883) Installation<br />
To install the Realtek High Definition (HD) Audio driver, please follow the steps below.<br />
Step 1: Open Windows Control Panel (Figure 6-12).<br />
Figure 6-19: Access Windows Control Panel<br />
Step 2: Double click the <strong>System</strong> icon (Figure 6-13).<br />
131
<strong>ECK</strong>-<strong>3699GF</strong> <strong>Embedded</strong> <strong>System</strong><br />
Figure 6-20: Double Click the <strong>System</strong> Icon<br />
Step 3: Double click the Device Manager tab (Figure 6-14).<br />
Figure 6-21: Double Click the Device Manager Tab<br />
Step 4: A list of system hardware devices appears (Figure 6-15).<br />
132<br />
IEI ® Technology, Corp.
<strong>ECK</strong>-<strong>3699GF</strong> <strong>Embedded</strong> <strong>System</strong><br />
Figure 6-22: Device Manager List<br />
Step 5: Double click the listed device that has question marks next to it. (This means<br />
Windows does not recognize the device).<br />
Step 6: The Device Driver Wizard appears (Figure 6-16). Click NEXT to continue.<br />
133
<strong>ECK</strong>-<strong>3699GF</strong> <strong>Embedded</strong> <strong>System</strong><br />
Figure 6-23: Search for Suitable Driver<br />
Step 7: Select “Specify a Location” in the Locate Driver Files window (Figure 6-17).<br />
Click NEXT to continue.<br />
134<br />
IEI ® Technology, Corp.
<strong>ECK</strong>-<strong>3699GF</strong> <strong>Embedded</strong> <strong>System</strong><br />
Figure 6-24: Locate Driver Files<br />
Step 8: Select “X:\4-AUDIO\AC-KIT883HD\WIN” directory in the location browsing<br />
window, where “X:\” is the system CD drive (Figure 6-18).<br />
Step 9: Click OK to continue. The driver is installed. Step 0:<br />
Step 1: The confirmation screen offers the option of restarting the computer now or later.<br />
For the settings to take effect, the computer must be restarted. Click FINISH to<br />
restart the computer.Step 0:<br />
6.6 Intel Matrix Storage Manager Installation<br />
To install the Intel Matrix Storage Manager driver, please follow the steps below:<br />
Step 1: Insert the Utility CD that came with the motherboard into the system CD drive.<br />
Step 2: Open the X:\5-SATA\ICH7R directory and double-click the iata60_cd.exe<br />
installation file.<br />
135
<strong>ECK</strong>-<strong>3699GF</strong> <strong>Embedded</strong> <strong>System</strong><br />
Step 3: The Preparing Setup window appears (Figure 6-25).<br />
Figure 6-25: Preparing Setup Screen<br />
Step 4: A Welcome screen appears. Click NEXT to continue the installation.<br />
Step 5: A license agreement appears. Read through the license agreement.<br />
Step 6: The “Uninstallation Warning” window appears. Click on the NEXT button to<br />
continue.<br />
Step 7: Accept the terms and conditions stipulated in the license agreement by clicking<br />
the “YES” button.<br />
Step 8: The “Choose Destination Location” window appears. Click on the NEXT button to<br />
continue. By default, all installed files are copied to the following path:<br />
:\Program Files\Intel\Intel(R) Matrix Storage Manager.<br />
Step 9: The “Select Program Folder” window appears. Click on the NEXT button to<br />
continue installing the driver.<br />
Step 10: After the driver installation process is complete, a confirmation screen appears.<br />
136<br />
IEI ® Technology, Corp.
<strong>ECK</strong>-<strong>3699GF</strong> <strong>Embedded</strong> <strong>System</strong><br />
Step 11: The confirmation screen allows user to restart the computer immediately after<br />
the installation is complete or to restart the computer later. For the settings to<br />
take effect the computer must be restarted. Once decided when to restart the<br />
computer, click the “FINISH” button. Step 0:<br />
137
<strong>ECK</strong>-<strong>3699GF</strong> <strong>Embedded</strong> <strong>System</strong><br />
THIS PAGE IS INTENTIONALLY LEFT BLANK<br />
138<br />
IEI ® Technology, Corp.
<strong>ECK</strong>-<strong>3699GF</strong> <strong>Embedded</strong> <strong>System</strong><br />
Chapter<br />
7<br />
7 Troubleshooting and<br />
Maintenance<br />
139
<strong>ECK</strong>-<strong>3699GF</strong> <strong>Embedded</strong> <strong>System</strong><br />
WARNING:<br />
Take Anti-Static precautions whenever maintenance is being carried out on the<br />
system components. Failure to take anti-static precautions can cause<br />
permanent system damage. For more details on anti-static precautions, please<br />
refer to Section 4.1.<br />
7.1 <strong>ECK</strong>-<strong>3699GF</strong> <strong>System</strong> Maintenance Overview<br />
NOTE:<br />
When doing maintenance operations on the system, please follow the<br />
instructions in this chapter. Failure to follow these instructions may lead to<br />
personal injury and system damage.<br />
To preserve the working integrity of the <strong>ECK</strong>-<strong>3699GF</strong> embedded system, the system must<br />
be properly maintained. If embedded system components need replacement, the proper<br />
maintenance procedures must be followed to ensure the system can continue to operate<br />
normally.<br />
7.2 <strong>System</strong> Troubleshooting<br />
This section provides some simple troubleshooting suggestions.<br />
7.2.1 The <strong>System</strong> Doesn’t Turn On<br />
If after turning the system on, there is no power (indicated by the power LED on the front<br />
panel not turning on) please do the following:<br />
Step 1: Check that the power cable connector is properly connected to the power socket<br />
on the system rear panel.<br />
Step 2: Check that the power cable connector is properly plugged into the power source.<br />
Step 3: Make sure the power button is turned on.<br />
140<br />
IEI ® Technology, Corp.
<strong>ECK</strong>-<strong>3699GF</strong> <strong>Embedded</strong> <strong>System</strong><br />
Step 4: Plug the system into a monitor and check to see if anything appears on the<br />
screen. If the boot-up screen appears it means the power LED has become<br />
disconnected. To fix this problem, open the top cover and reconnect the power<br />
LED to the motherboard. Step 0:<br />
If the above steps have been completed and the system still doesn’t turn on, please do the<br />
following.<br />
Step 1: Open the top cover (Section 4.2.3.1.)<br />
Step 2: Check the power socket power cable connector is properly connected to the<br />
power module.<br />
Step 3: Check that the power switch cable connector is properly connected to the<br />
motherboard.<br />
Step 4: Make sure the cable connecting to the power socket are properly attached and<br />
have not become separated.<br />
Step 5: Make sure the cable connecting the power switch to the motherboard is still<br />
properly attached to the power switch and has not been separated. Step 0:<br />
7.2.2 The <strong>System</strong> Doesn’t Boot Up<br />
If the system doesn’t boot up please do the following:<br />
Step 1: Check the power is turned on. See Section 7.2.1 above.<br />
Step 2: Make sure the DIMM module is properly installed.<br />
Step 3: Reset the system using the reset CMOS jumper. Step 0:<br />
7.2.3 More Troubleshooting<br />
Some other problems that may occur are listed below:<br />
• The fan is not working: Open the system and make sure the fan cable<br />
connector is properly connected to the motherboard.<br />
• Nothing appears on the monitor after booting up the system: Make sure<br />
141
<strong>ECK</strong>-<strong>3699GF</strong> <strong>Embedded</strong> <strong>System</strong><br />
the monitor is properly connected to the system and the monitor is connected<br />
to a power supply and turned on.<br />
7.3 Component Replacement Procedure<br />
WARNING:<br />
Take Anti-Static precautions whenever maintenance is being carried out on the<br />
system components. Failure to take anti-static precautions can cause<br />
permanent system damage. For more details on anti-static precautions, please<br />
refer to Section 4.1.<br />
The embedded system components listed below can all be replaced if they fail:<br />
• KINO motherboard<br />
• CPU cooling fan<br />
• CPU<br />
• Power module<br />
• Cooling fans<br />
• DIMM module<br />
7.3.1 DIMM Module Replacement<br />
The installation procedure for the DIMM modules have already been fully described in<br />
Chapter 4. Please refer to Section 4.2.7 to see how to install/replace the DIMM module.<br />
7.3.2 Motherboard Replacement<br />
KINO motherboard replacement includes the following two procedures:<br />
Step 1: Removing the malfunction motherboard<br />
Step 2: Installing the replacement motherboardStep 0:<br />
7.3.2.1 Motherboard Removal<br />
To remove the KINO motherboard, please follow the steps below.<br />
142<br />
IEI ® Technology, Corp.
<strong>ECK</strong>-<strong>3699GF</strong> <strong>Embedded</strong> <strong>System</strong><br />
Step 1: Power down the system.<br />
Step 2: Disconnect all rear panel peripheral device connectors.<br />
Step 3: Remove the top cover. See Section 4.2.3.1.<br />
Step 4: Remove the four HDD bracket retention screws inside the chassis (Figure 7-1).<br />
Figure 7-1: HDD Bracket Retention Screws<br />
Step 5: Remove the following connector cables (See Figure 7-2):<br />
• Power connector<br />
• Front panel connector<br />
• USB connector<br />
• Fan connectors<br />
• SATA/IDE connector (if connected)<br />
143
<strong>ECK</strong>-<strong>3699GF</strong> <strong>Embedded</strong> <strong>System</strong><br />
Figure 7-2: Motherboard Connectors<br />
Step 6: Remove the four retention screws that secure the KINO motherboard to the<br />
embedded system (Figure 7-3).<br />
Figure 7-3: Motherboard Retention Screws<br />
Step 7: Remove the KINO motherboard.<br />
Step 8: Remove the DIMM<br />
Step 9: Remove the CPU heat sink. Step 0:<br />
144<br />
IEI ® Technology, Corp.
<strong>ECK</strong>-<strong>3699GF</strong> <strong>Embedded</strong> <strong>System</strong><br />
7.3.2.2 Motherboard Installation<br />
To install the new motherboard, please follow the steps below.<br />
Step 1: Install the previously removed CPU heat sink.<br />
Step 2: Install the previously removed DIMM<br />
Step 3: Install the new motherboard into the system. When installing the new<br />
motherboard make sure the external peripheral device connectors are properly<br />
aligned with the I/O shielding in the system rear panel.<br />
Step 4: Reinsert the four previously removed motherboard retention screws (Figure<br />
7-3.)<br />
Step 5: Reconnect the following cable connectors (Figure 7-2):<br />
• Power connector<br />
• Front panel connector<br />
• USB connector<br />
• Fan connectors<br />
• SATA/IDE connector (if connected)<br />
Step 6: Replace the top cover. Once replaced reinsert the three previously removed<br />
retention screws.<br />
Step 7: Reconnect the peripheral devices to the peripheral device connectors on the<br />
rear panel.<br />
Step 8: Power up the system. Step 0:<br />
7.3.3 Power Module Replacement<br />
Power module replacement includes the following two procedures:<br />
Step 1: Removing the power module<br />
Step 2: Installing the replacement power moduleStep 0:<br />
145
<strong>ECK</strong>-<strong>3699GF</strong> <strong>Embedded</strong> <strong>System</strong><br />
7.3.3.1 Power Module Removal<br />
To remove the power module, please follow the steps below.<br />
Step 1: Turn off the system.<br />
Step 2: Disconnect the rear panel power cable from the power socket.<br />
Step 3: Remove the top cover. See Section 4.2.3.1.<br />
Step 4: Remove the following connector cables (Figure 7-4):<br />
• Motherboard ATX power connector<br />
• Power socket connector<br />
Figure 7-4: Power Module Internal Connectors<br />
Step 5: Remove the two retention screws that secure the power module to the<br />
embedded system (Figure 7-5).<br />
146<br />
IEI ® Technology, Corp.
<strong>ECK</strong>-<strong>3699GF</strong> <strong>Embedded</strong> <strong>System</strong><br />
Figure 7-5: Power Module Retention Screws<br />
Step 6: Remove the power module.Step 0:<br />
7.3.3.2 Power Module Installation<br />
To install the new power module, please follow the steps below.<br />
Step 1: Install the new power module into the system.<br />
Step 2: Reinsert the two, previously removed power module retention screws.<br />
Step 3: Reconnect the following cable connectors (See Figure 7-4):<br />
• Motherboard ATX power connector<br />
• Power socket connector<br />
Step 4: Replace the top cover. Once replaced reinsert the three previously removed<br />
retention screws. (See Figure 7-5)<br />
Step 5: Reconnect the power cable to the +12V socket<br />
Step 6: Power up the system. Step 0:<br />
147
<strong>ECK</strong>-<strong>3699GF</strong> <strong>Embedded</strong> <strong>System</strong><br />
7.3.4 Cooling Fan Replacement<br />
To replace a cooling fan, please follow the steps below.<br />
Step 1: Turn off the system.<br />
Step 2: Remove the top cover. See Section 4.2.3.1.<br />
Step 3: Remove the fan connector cable from the motherboard (Figure 7-2).<br />
Step 4: Remove the four cooling fan retention screws from the system (Figure 7-6).<br />
Figure 7-6: Cooling Fan Retention Screws on the <strong>System</strong><br />
Step 5: Remove the fan from the fan bracket by removing the four retention screws<br />
shown in Figure 7-7.<br />
Figure 7-7: Cooling Fan Retention Screws on the Fan Bracket<br />
148<br />
IEI ® Technology, Corp.
<strong>ECK</strong>-<strong>3699GF</strong> <strong>Embedded</strong> <strong>System</strong><br />
Step 6: Place the new fan into the fan bracket. Make sure the fan is facing the correct<br />
way. Reinsert the four previously removed cooling fan retention screws.<br />
Step 7: Place the fan bracket with the fan installed on the system. Reinsert the four<br />
previously removed cooling fan retention screws<br />
Step 8: Connect the cooling fan cable connector to the motherboard.<br />
Step 9: Replace the top cover. Once replaced reinsert the three previously removed<br />
retention screws.<br />
Step 10: Power up the system.Step 0:<br />
149
<strong>ECK</strong>-<strong>3699GF</strong> <strong>Embedded</strong> <strong>System</strong><br />
THIS PAGE IS INTENTIONALLY LEFT BLANK<br />
150<br />
IEI ® Technology, Corp.
<strong>ECK</strong>-<strong>3699GF</strong> <strong>Embedded</strong> <strong>System</strong><br />
Appendix<br />
A<br />
A IEI <strong>Embedded</strong> <strong>System</strong><br />
Series<br />
151
<strong>ECK</strong>-<strong>3699GF</strong> <strong>Embedded</strong> <strong>System</strong><br />
A.1 EI <strong>Embedded</strong> <strong>System</strong> Series<br />
A.1.1 Overview<br />
IEI embedded industrial PC systems are ideal for manufacturing and automation<br />
environments where heavy processing demands exist. These systems are designed to<br />
operate effectively within high-stress environments that have diverse operational<br />
conditions. This appendix introduces the full range of IEI embedded systems.<br />
A.1.2 IEI <strong>Embedded</strong> <strong>System</strong> Series<br />
There are currently four embedded system series. The four series are listed below<br />
• ECW-180A<br />
• ECW-180B<br />
• ECW-181A<br />
• ECW-181B<br />
• <strong>ECK</strong>-3688G<br />
• <strong>ECK</strong>-3689G<br />
• <strong>ECK</strong>-3690GG<br />
• <strong>ECK</strong>-3699G<br />
A.1.3 IEI <strong>Embedded</strong> <strong>System</strong> Series Variations<br />
The differences between the four series are listed below.<br />
Motherboard Cooling CompactFlash Drive Bays<br />
ECW-180A WAFER Two cooling<br />
fans<br />
One CF slot<br />
None<br />
ECW-180B WAFER Fanless One CF slot None<br />
ECW-181A WAFER Two cooling<br />
fans<br />
One CF slot<br />
Two 2.5” drive<br />
bays<br />
ECW-181B WAFER Fanless One CF slot Two 2.5” drive<br />
bays<br />
<strong>ECK</strong>-3688G KINO One cooling fan None One 2.5” drive<br />
bay<br />
<strong>ECK</strong>-3690GG KINO Fanless None One 2.5” drive<br />
152<br />
IEI ® Technology, Corp.
<strong>ECK</strong>-<strong>3699GF</strong> <strong>Embedded</strong> <strong>System</strong><br />
bay (optional)<br />
<strong>ECK</strong>-3699G<br />
KINO<br />
Two cooling<br />
fans<br />
None<br />
One 2.5” drive<br />
bay (optional)<br />
Table A-1: <strong>Embedded</strong> <strong>System</strong> Series Overview<br />
A.2 <strong>Embedded</strong> <strong>System</strong> Solutions<br />
The different IEI <strong>Embedded</strong> <strong>System</strong> solutions are listed below. For further information,<br />
please contact an IEI distributor, reseller, vendor or IEI sales representative. Please also<br />
visit the IEI website (www.ieiworld.com).<br />
A.2.1 AMD ® Geode ® LX800 500MHz Solutions<br />
All the models listed in the table below support an AMD ® Geode ® LX800 500MHz CPU.<br />
Model Number<br />
<strong>System</strong><br />
Chipset<br />
DC Input Fan Drive Bays<br />
ECW-180AS1 AMD ® CS5536 12V Two None<br />
ECW-180AS1WD AMD ® CS5536 9V ~ 36V Two None<br />
ECW-180BS1 AMD ® CS5536 12V None None<br />
ECW-180BS1WD AMD ® CS5536 9V ~ 36V None None<br />
ECW-181AS1 AMD ® CS5536 12V Two Two 2.5” HDD<br />
ECW-181AS1WD AMD ® CS5536 9V ~ 36V Two Two 2.5” HDD<br />
ECW-181BS1 AMD ® CS5536 12V None Two 2.5” HDD<br />
ECW-181BS1WD AMD ® CS5536 9V ~ 36V None Two 2.5” HDD<br />
<strong>ECK</strong>-3688GA AMD ® CS5536 12V One One 2.5” HDD<br />
Table A-2: AMD ® Geode ® LX800 <strong>Embedded</strong> <strong>System</strong> Solutions<br />
153
<strong>ECK</strong>-<strong>3699GF</strong> <strong>Embedded</strong> <strong>System</strong><br />
A.2.2 AMD ® Geode ® GX466 333MHz Solutions<br />
All the models listed in the table below support an AMD ® Geode ® GX466 333MHz CPU.<br />
Model Number<br />
<strong>System</strong><br />
Chipset<br />
DC Input Fan Drive Bays<br />
ECW-180AS2 AMD ® CS5536 12V Two None<br />
ECW-180AS2WD AMD ® CS5536 9V ~ 36V Two None<br />
ECW-180BS2 AMD ® CS5536 12V None None<br />
ECW-180BS2WD AMD ® CS5536 9V ~ 36V None None<br />
ECW-181AS2 AMD ® CS5536 12V Two Two 2.5” HDD<br />
ECW-181AS2WD AMD ® CS5536 9V ~ 36V Two Two 2.5” HDD<br />
ECW-181BS2 AMD ® CS5536 12V None Two 2.5” HDD<br />
ECW-181BS2WD AMD ® CS5536 9V ~ 36V None Two 2.5” HDD<br />
Table A-3: AMD ® Geode ® LX800 <strong>Embedded</strong> <strong>System</strong> Solutions<br />
A.2.3 VIA ® LUKE ® 1GHz Solutions<br />
All the models listed in the table below support a VIA ® LUKE ® 1GHz CPU.<br />
Model Number<br />
<strong>System</strong><br />
Chipset<br />
DC Input Fan Drive Bays<br />
ECW-180AS3 VIA ® VT8237R+ 12V Two None<br />
ECW-180AS3WD VIA ® VT8237R+ 9V ~ 36V Two None<br />
ECW-180BS3 VIA ® VT8237R+ 12V None None<br />
ECW-180BS3WD VIA ® VT8237R+ 9V ~ 36V None None<br />
ECW-181AS3 VIA ® VT8237R+ 12V Two Two 2.5” HDD<br />
ECW-181AS3WD VIA ® VT8237R+ 9V ~ 36V Two Two 2.5” HDD<br />
ECW-181BS3 VIA ® VT8237R+ 12V None Two 2.5” HDD<br />
ECW-181BS3WD VIA ® VT8237R+ 9V ~ 36V None Two 2.5” HDD<br />
<strong>ECK</strong>-3688GB VIA ® VT8237R+ 12V One One 2.5” HDD<br />
Table A-4: VIA ® LUKE ® <strong>Embedded</strong> <strong>System</strong> Solutions<br />
154<br />
IEI ® Technology, Corp.
<strong>ECK</strong>-<strong>3699GF</strong> <strong>Embedded</strong> <strong>System</strong><br />
A.2.4 VIA ® MARK ® 800MHz Solutions<br />
All the models listed in the table below support a VIA ® MARK ® 800MHz CPU.<br />
Model Number <strong>System</strong> Chipset DC Input Fan Drive Bays<br />
ECW-180AS4 VIA ® VT82C686B 12V Two None<br />
ECW-180AS4WD VIA ® VT82C686B 9V ~ 36V Two None<br />
ECW-180BS4 VIA ® VT82C686B 12V None None<br />
ECW-180BS4WD VIA ® VT82C686B 9V ~ 36V None None<br />
ECW-181AS4 VIA ® VT82C686B 12V Two Two 2.5” HDD<br />
ECW-181AS4WD VIA ® VT82C686B 9V ~ 36V Two Two 2.5” HDD<br />
ECW-181BS4 VIA ® VT82C686B 12V None Two 2.5” HDD<br />
ECW-181BS4WD VIA ® VT82C686B 9V ~ 36V None Two 2.5” HDD<br />
<strong>ECK</strong>-3688GC VIA ® VT82C686B 12V One One 2.5” HDD<br />
Table A-5: VIA ® LUKE ® <strong>Embedded</strong> <strong>System</strong> Solutions<br />
A.2.5 Intel ® Celeron ® M 1.5GHz Solutions<br />
All the models listed in the table below support an Intel ® Celeron ® M 1.5GHz CPU.<br />
Model Number <strong>System</strong> Chipset DC Input Fan Drive Bays<br />
ECW-180AS1 SiS 661CX + SiS 964 12V Two None<br />
ECW-180AS1WD SiS 661CX + SiS 964 9V ~ 36V Two None<br />
ECW-181AS5 SiS 661CX + SiS 964 12V Two Two 2.5” HDD<br />
ECW-181AS5WD SiS 661CX + SiS 964 9V ~ 36V Two Two 2.5” HDD<br />
<strong>ECK</strong>-3688GDX SiS 661CX + SiS 964 12V One One 2.5” HDD<br />
Table A-6: VIA ® LUKE ® <strong>Embedded</strong> <strong>System</strong> Solutions<br />
155
<strong>ECK</strong>-<strong>3699GF</strong> <strong>Embedded</strong> <strong>System</strong><br />
A.2.6 Intel ® Socket 479 Pentium ® /Celeron ® M 2GHz Solutions<br />
All the models listed in the table below support an Intel ® Socket 479 Pentium ® /Celeron ® M<br />
2GHz CPU with a 400/533MHz FSB (front side bus).<br />
Model Number <strong>System</strong> Chipset DC Input Fan Drive Bays<br />
ECW-180AS1 SiS 661CX + SiS 964 12V Two None<br />
ECW-180AS1WD SiS 661CX + SiS 964 9V ~ 36V Two None<br />
ECW-181AS6 SiS 661CX + SiS 964 12V Two Two 2.5” HDD<br />
ECW-181AS6WD SiS 661CX + SiS 964 9V ~ 36V Two Two 2.5” HDD<br />
<strong>ECK</strong>-3688GDS SiS 661CX + SiS 964 12V One One 2.5” HDD<br />
Table A-7: VIA ® LUKE ® <strong>Embedded</strong> <strong>System</strong> Solutions<br />
A.2.7 LGA 775 Intel ® Pentium ® 4/ Pentium ® D Solutions<br />
All the models listed in the table below support a LGA 775 Intel ® Pentium ® 4/ Pentium ® D<br />
CPU.<br />
Model Number <strong>System</strong> Chipset DC Input Fan Drive Bays<br />
<strong>ECK</strong>-3699GE Intel ® 945G + ICH7 19V DC Two One 2.5” HDD<br />
(optional)<br />
<strong>ECK</strong>-3699GH SiS 661CX + SiS 966 19V DC Two One 2.5” HDD<br />
(optional)<br />
Table A-8: LGA 775 Intel ® Pentium ® 4/ Pentium ® D <strong>System</strong> Solutions<br />
156<br />
IEI ® Technology, Corp.
<strong>ECK</strong>-<strong>3699GF</strong> <strong>Embedded</strong> <strong>System</strong><br />
A.2.8 Intel ® Socket 479 Core Duo/Solo Solutions<br />
All the models listed in the table below support an Intel ® Socket 479 Core Duo/Solo CPU<br />
with a 667MHz FSB (front side bus).<br />
Model Number <strong>System</strong> Chipset DC Input Fan Drive Bays<br />
<strong>ECK</strong>-<strong>3699GF</strong> Intel ® 945GM + ICH7M 19V DC Two One 2.5” HDD<br />
One slim CD-ROM<br />
(optional)<br />
Table A-9: Intel ® Socket 479 Core Duo/Solo <strong>System</strong> Solutions<br />
A.2.9 Intel ® Pentium-M Solutions<br />
All the models listed in the table below support an Intel ® Pentium-M CPU.<br />
Model Number <strong>System</strong> Chipset DC Input Fan Drive Bays<br />
<strong>ECK</strong>-3690GG Intel ® 855GME 19V DC Two One 2.5” HDD<br />
(optional)<br />
Table A-10: Intel ® Socket 479 Core Duo/Solo <strong>System</strong> Solutions<br />
157
<strong>ECK</strong>-<strong>3699GF</strong> <strong>Embedded</strong> <strong>System</strong><br />
THIS PAGE IS INTENTIONALLY LEFT BLANK<br />
158<br />
IEI ® Technology, Corp.
<strong>ECK</strong>-<strong>3699GF</strong> <strong>Embedded</strong> <strong>System</strong><br />
Chapter<br />
B<br />
B BIOS Menu Options<br />
159
<strong>ECK</strong>-<strong>3699GF</strong> <strong>Embedded</strong> <strong>System</strong><br />
B.1 BIOS Configuration Options<br />
Below is a list of BIOS configuration options described in Chapter 5.<br />
<strong>System</strong> Overview .....................................................................................................72<br />
ATA/IDE Configuration [Compatible].....................................................................76<br />
Legacy IDE Channels [SATA Pri, PATA Sec]........................................................77<br />
IDE Master and IDE Slave .......................................................................................77<br />
Type [Auto]...............................................................................................................78<br />
ZIP ..........................................................................................................................79<br />
LS-120 .......................................................................................................................79<br />
LBA/Large Mode [Auto] ..........................................................................................79<br />
Block (Multi Sector Transfer) [Auto]......................................................................79<br />
PIO Mode [Auto].......................................................................................................80<br />
DMA Mode [Auto].....................................................................................................80<br />
S.M.A.R.T [Auto] ......................................................................................................80<br />
32Bit Data Transfer [Enabled] ................................................................................81<br />
Serial Port1 Address [3F8/IRQ4] ............................................................................82<br />
Serial Port1 Mode [Normal] ....................................................................................82<br />
Serial Port2 Address [2F8/IRQ3] ............................................................................82<br />
Serial Port2 Mode [Normal] ....................................................................................83<br />
Serial Port3 Address [3E8] .....................................................................................83<br />
Serial Port3 IRQ [11]................................................................................................83<br />
Serial Port4 Address [2E8] .....................................................................................83<br />
Serial Port4 IRQ [10]................................................................................................84<br />
CPU FAN Mode Setting: [Full On mode] ...............................................................85<br />
CPU Temp. Limit of OFF .........................................................................................85<br />
CPU Temp. Limit of Start ........................................................................................85<br />
CPU Temp. Limit of Full ..........................................................................................85<br />
CPU Fan Start PWM.................................................................................................85<br />
Slop PWM 1 ..............................................................................................................85<br />
CPU Fan PWM Control ............................................................................................85<br />
ACPI Aware O/S [Yes] .............................................................................................86<br />
Suspend mode [S3 (STR)] ......................................................................................87<br />
160<br />
IEI ® Technology, Corp.
<strong>ECK</strong>-<strong>3699GF</strong> <strong>Embedded</strong> <strong>System</strong><br />
Power Management/APM [Enabled] ......................................................................88<br />
Restore on AC Power Loss by IO [Power Off]......................................................89<br />
Power Button Mode [On/Off] ..................................................................................89<br />
Resume on Ring [Disabled]....................................................................................89<br />
Resume on PME# [Disabled] ..................................................................................89<br />
Resume On RTC Alarm [Disabled].........................................................................90<br />
RTC Alarm Date (Days) ...........................................................................................90<br />
RTC Alarm Time.......................................................................................................90<br />
Resume On PCI-Express WAKE# [Enabled].........................................................90<br />
MPS Revision [1.4]...................................................................................................91<br />
Remote Access [Disabled] .....................................................................................92<br />
Serial Port Number ..................................................................................................92<br />
Serial Port Mode ......................................................................................................92<br />
Flow Control.............................................................................................................92<br />
Redirection after BIOS POST .................................................................................92<br />
Terminal Type ..........................................................................................................93<br />
VT-UTF8 Combo Key Support................................................................................93<br />
Sredir Memory Display Delay .................................................................................93<br />
USB Configuration...................................................................................................93<br />
USB Devices Enabled .............................................................................................94<br />
USB Function [8 USB Ports]...................................................................................94<br />
USB 2.0 Controller [Enabled] .................................................................................94<br />
Legacy USB Support [Enabled] .............................................................................94<br />
USB2.0 Controller Mode [HiSpeed]........................................................................95<br />
BIOS EHCI Handoff [Enabled] ................................................................................95<br />
Device ## ..................................................................................................................96<br />
Emulation Type [Auto] ............................................................................................96<br />
Clear NVRAM [No] ...................................................................................................98<br />
Plug & Play O/S [No] ...............................................................................................98<br />
PCI Latency Timer [64]............................................................................................99<br />
Allocate IRQ to PCI VGA [Yes] ...............................................................................99<br />
Palette Snooping [Disabled]...................................................................................99<br />
161
<strong>ECK</strong>-<strong>3699GF</strong> <strong>Embedded</strong> <strong>System</strong><br />
PCI IDE BusMaster [Enabled].............................................................................. 100<br />
OffBoard PCI/ISA IDE Card [Auto] ...................................................................... 100<br />
IRQ# [Available].................................................................................................. 101<br />
DMA Channel# [Available] ................................................................................... 102<br />
Reserved Memory Size [Disabled]...................................................................... 102<br />
Quick Boot [Enabled] ........................................................................................... 104<br />
Quiet Boot [Disabled]........................................................................................... 104<br />
AddOn ROM Display Mode [Force BIOS]........................................................... 105<br />
Bootup Num-Lock [On] ........................................................................................ 105<br />
PS/2 Mouse Support [Auto] ................................................................................. 105<br />
Boot From LAN Support [Disabled].................................................................... 106<br />
Change Supervisor Password............................................................................. 109<br />
Change <strong>User</strong> Password ....................................................................................... 109<br />
DRAM Frequency [Auto] ...................................................................................... 111<br />
Configure DRAM Timing by SPD [Enabled]....................................................... 111<br />
Memory Hole [Disabled]....................................................................................... 112<br />
Boots Graphics Adapter Priority [PEG/PCI] ...................................................... 112<br />
Internal Graphics Mode Select [Enable, 8MB] ................................................... 113<br />
PEG Port [Auto] .................................................................................................... 113<br />
PEG Force X1 [Disabled] ..................................................................................... 113<br />
DVMT Mode Select [DVMT Mode] ....................................................................... 114<br />
DVMT/FIXED Memory [128MB] ............................................................................ 114<br />
Boot Display Device [Auto] ................................................................................. 114<br />
Flat Panel Type [640*480] .................................................................................... 115<br />
Local Flat Panel Scaling [Auto]........................................................................... 115<br />
TV Connector [Auto]............................................................................................. 115<br />
TV Standard [VBIOS-Default] .............................................................................. 115<br />
Audio Controller [Azalia] ..................................................................................... 116<br />
OnBoard LAN1 (BCM5787M) [Enabled].............................................................. 117<br />
OnBoard LAN2 (BCM5787M) [Enabled].............................................................. 117<br />
Save Changes and Exit ........................................................................................ 118<br />
Discard Changes and Exit ................................................................................... 118<br />
162<br />
IEI ® Technology, Corp.
<strong>ECK</strong>-<strong>3699GF</strong> <strong>Embedded</strong> <strong>System</strong><br />
Discard Changes .................................................................................................. 118<br />
Load Optimal Defaults ......................................................................................... 118<br />
Load Failsafe Defaults ......................................................................................... 118<br />
163
<strong>ECK</strong>-<strong>3699GF</strong> <strong>Embedded</strong> <strong>System</strong><br />
THIS PAGE IS INTENTIONALLY LEFT BLANK<br />
164<br />
IEI ® Technology, Corp.
<strong>ECK</strong>-<strong>3699GF</strong> <strong>Embedded</strong> <strong>System</strong><br />
Appendix<br />
B<br />
C Watchdog Timer<br />
165
<strong>ECK</strong>-<strong>3699GF</strong> <strong>Embedded</strong> <strong>System</strong><br />
NOTE:<br />
The following discussion applies to DOS environment. IEI support is<br />
contacted or the IEI website visited for specific drivers for more<br />
sophisticated operating systems, e.g., Windows and Linux.<br />
The Watchdog Timer is provided to ensure that standalone systems can always recover<br />
from catastrophic conditions that cause the CPU to crash. This condition may have<br />
occurred by external EMI or a software bug. When the CPU stops working correctly,<br />
Watchdog Timer either performs a hardware reset (cold boot) or a Non-Maskable Interrupt<br />
(NMI) to bring the system back to a known state.<br />
A BIOS function call (INT 15H) is used to control the Watchdog Timer:<br />
INT 15H:<br />
AH – 6FH Sub-function:<br />
AL – 2:<br />
BL:<br />
Sets the Watchdog Timer’s period.<br />
Time-out value (Its unit-second is dependent on the item “Watchdog<br />
Timer unit select” in CMOS setup).<br />
Table C-1: AH-6FH Sub-function<br />
Call sub-function 2 to set the time-out period of Watchdog Timer first. If the time-out value<br />
is not zero, the Watchdog Timer starts counting down. While the timer value reaches zero,<br />
the system resets. To ensure that this reset condition does not occur, calling sub-function<br />
2 must periodically refresh the Watchdog Timer. However, the Watchdog timer is disabled<br />
if the time-out value is set to zero.<br />
A tolerance of at least 10% must be maintained to avoid unknown routines within the<br />
operating system (DOS), such as disk I/O that can be very time-consuming.<br />
166<br />
IEI ® Technology, Corp.
<strong>ECK</strong>-<strong>3699GF</strong> <strong>Embedded</strong> <strong>System</strong><br />
NOTE:<br />
When exiting a program it is necessary to disable the Watchdog Timer,<br />
otherwise the system resets.<br />
Example program:<br />
; INITIAL TIMER PERIOD COUNTER<br />
;<br />
W_LOOP:<br />
MOV AX, 6F02H ;setting the time-out value<br />
MOV BL, 30 ;time-out value is 48 seconds<br />
INT 15H<br />
;<br />
; ADD THE APPLICATION PROGRAM HERE<br />
;<br />
CMP EXIT_AP, 1 ;is the application over?<br />
JNE W_LOOP ;No, restart the application<br />
MOV AX, 6F02H ;disable Watchdog Timer<br />
MOV BL, 0 ;<br />
INT 15H<br />
;<br />
; EXIT ;<br />
167
<strong>ECK</strong>-<strong>3699GF</strong> <strong>Embedded</strong> <strong>System</strong><br />
THIS PAGE IS INTENTIONALLY LEFT BLANK<br />
168<br />
IEI ® Technology, Corp.
<strong>ECK</strong>-<strong>3699GF</strong> <strong>Embedded</strong> <strong>System</strong><br />
Appendix<br />
C<br />
D Address Mapping<br />
169
<strong>ECK</strong>-<strong>3699GF</strong> <strong>Embedded</strong> <strong>System</strong><br />
D.1 IO Address Map<br />
I/O address<br />
Range<br />
Description<br />
000-01F DMA Controller<br />
020-021 Interrupt Controller<br />
040-043 <strong>System</strong> time<br />
060-06F Keyboard Controller<br />
070-07F <strong>System</strong> CMOS/Real time Clock<br />
080-09F DMA Controller<br />
0A0-0A1<br />
Interrupt Controller<br />
0C0-0DF<br />
DMA Controller<br />
0F0-0FF<br />
Numeric data processor<br />
1F0-1F7<br />
Primary IDE Channel<br />
2E8-2EF<br />
Serial Port 4 (COM4)<br />
2F8-2FF<br />
Serial Port 2 (COM2)<br />
378-37F Parallel Printer Port 1 (LPT1)<br />
3B0-3BB<br />
Intel 945GM Graphics Controller<br />
3C0-3DF<br />
Intel 945GM Graphics Controller<br />
3E8-3EF<br />
Serial Port 3 (COM3)<br />
3F6-3F6<br />
Primary IDE Channel<br />
3F7-3F7<br />
Standard floppy disk controller<br />
3F8-3FF<br />
Serial Port 1 (COM1)<br />
Table D-1: IO Address Map<br />
170<br />
IEI ® Technology, Corp.
<strong>ECK</strong>-<strong>3699GF</strong> <strong>Embedded</strong> <strong>System</strong><br />
D.2 1st MB Memory Address Map<br />
Memory address<br />
00000-9FFFF<br />
A0000-BFFFF<br />
F0000-FFFFF<br />
Description<br />
<strong>System</strong> memory<br />
VGA buffer<br />
<strong>System</strong> BIOS<br />
1000000- Extend BIOS<br />
Table D-2: 1 st MB Memory Address Map<br />
D.3 IRQ Mapping Table<br />
IRQ0 <strong>System</strong> Timer IRQ8 RTC clock<br />
IRQ0 <strong>System</strong> Timer IRQ8 RTC clock<br />
IRQ1 Keyboard IRQ9 ACPI<br />
IRQ2 Available IRQ10 COM 4<br />
IRQ3 COM2 IRQ11 COM 3<br />
IRQ4 COM1 IRQ12 PS/2 mouse<br />
IRQ5 SMBus Controller IRQ13 FPU<br />
IRQ6 FDC IRQ14 Primary IDE<br />
IRQ7 Parallel port IRQ15 Secondary IDE<br />
Table D-3: IRQ Mapping Table<br />
D.4 DMA Channel Assignments<br />
Channel<br />
Function<br />
0 Available<br />
1 Available<br />
2 Floppy disk (8-bit transfer)<br />
3 Available<br />
4 Cascade for DMA controller 1<br />
5 Available<br />
6 Available<br />
7 Available<br />
Table D-4: DMA Channel Assignments<br />
171
<strong>ECK</strong>-<strong>3699GF</strong> <strong>Embedded</strong> <strong>System</strong><br />
THIS PAGE IS INTENTIONALLY LEFT BLANK<br />
172<br />
IEI ® Technology, Corp.
<strong>ECK</strong>-<strong>3699GF</strong> <strong>Embedded</strong> <strong>System</strong><br />
8 Index<br />
173
<strong>ECK</strong>-<strong>3699GF</strong> <strong>Embedded</strong> <strong>System</strong><br />
2<br />
2.5, 14, 15, 25, 57<br />
2.5” HDD, 153, 154, 155, 156, 157<br />
7<br />
7.1 channel Line-out, 15<br />
A<br />
E<br />
embedded system, 14, 15, 20, 26, 30, 32, 41,<br />
67, 152<br />
<strong>Embedded</strong> system, 57<br />
F<br />
front panel, 20, 22, 23, 31, 34, 56, 66<br />
air vents, 20, 24<br />
ALC883, 120, 131<br />
ball bearing fan, 15<br />
B<br />
H<br />
HDD LED, 22<br />
HDD/CD bracket, 66, 67<br />
HDTV-out, 15<br />
C<br />
CD drive bay, 20, 22, 23, 66<br />
CD-ROM, 14, 15, 25, 41, 78, 80, 97<br />
center/subwoofer speakers, 41<br />
Chipset Driver, 120<br />
Clear CMOS, 32, 49, 50<br />
Component Replacement, 142<br />
cooling fan, 148<br />
Cooling fans, 57<br />
Core Duo, 14, 157<br />
Core Solo, 14<br />
D<br />
DB-9, 32, 45<br />
DC-to-DC power converter, 14, 15, 51, 57<br />
DDR2, 15, 64<br />
Dimensions, 15, 16, 20, 21, 27<br />
DIMM module, 25, 64, 65<br />
DIMM modules, 25, 64<br />
DIMM socket, 15, 64<br />
I<br />
ICH7-M, 15<br />
IDE cable, 57<br />
Input Power, 27, 51, 52<br />
input voltage, 15, 67<br />
Intel 945GM, 170<br />
J<br />
jumper settings, 56, 57, 64<br />
L<br />
LAN Driver, 120, 127<br />
LCD Voltage, 51<br />
M<br />
memory module, 56, 57, 65, 67<br />
motherboard, 14, 20, 25, 30, 31, 32, 34, 35,<br />
41, 48, 51, 52, 56, 57, 64, 67, 72<br />
motherboard replacement, 142<br />
174<br />
IEI ® Technology, Corp.
<strong>ECK</strong>-<strong>3699GF</strong> <strong>Embedded</strong> <strong>System</strong><br />
Noise Level, 28<br />
N<br />
O<br />
RJ-45, 23, 31, 32, 43, 44, 67<br />
RoHS, 14<br />
RS-232, 23, 50<br />
RS-422/RS-485, 50<br />
Output Power, 51, 52, 53<br />
output power connector, 53<br />
P<br />
PCIe GbE, 15<br />
peripheral devices, 41, 67<br />
power adapter, 15, 16<br />
Power adapter, 23, 57<br />
Power Button, 22, 35, 68, 89, 161<br />
power cable, 57, 68<br />
power cord, 57<br />
Power LED, 22, 35, 68<br />
Power module, 25<br />
power module replacement, 145<br />
PS/2, 44, 45, 105, 106, 162, 171<br />
R<br />
rear panel, 20, 23, 24, 41, 47, 52, 57, 58, 67<br />
Reset Button, 22, 35<br />
S<br />
SATA cable, 57, 67<br />
SATA II, 31, 38<br />
side speakers, 42<br />
socket 479, 62<br />
Static Air Pressure, 28<br />
S-Video, 15<br />
Switch/LED board, 25<br />
<strong>System</strong> cooling fans, 25<br />
T<br />
top cover, 20, 24, 25, 57, 58, 64, 66, 67<br />
troubleshooting, 140<br />
TV-out, 23, 67<br />
TV-Out, 32, 41, 46, 47<br />
U<br />
USB 2.0, 15, 40, 94, 161<br />
USB board, 25<br />
175