Sinar Exposure 6.2 Read Me - image2output - Support
Sinar Exposure 6.2 Read Me - image2output - Support
Sinar Exposure 6.2 Read Me - image2output - Support

Create successful ePaper yourself
Turn your PDF publications into a flip-book with our unique Google optimized e-Paper software.
<strong>image2output</strong> Limited: Unit 19, io Centre, Hearle Way, Hatfield Business Park, Hatfield, Herts, AL10 9EW<br />
<strong>Sinar</strong> eXposure TM <strong>6.2</strong><br />
<strong>Read</strong><strong>Me</strong><br />
1. Purpose of Use<br />
<strong>Sinar</strong> eXposure is a state-of-the-art application for capturing,<br />
processing and exporting images with <strong>Sinar</strong> digital<br />
camera backs. The key benefits of this newly designed<br />
application are:<br />
• Modern architecture with consistent support for<br />
multi-processor systems<br />
• Intuitive software user interface which can be customized<br />
to individual needs<br />
• <strong>Support</strong> for multiple monitors<br />
• Completely ICC-based workflow<br />
• Optionally, an individual color calibration for digital<br />
backs can be performed<br />
• No proprietary RAW data format: the raw data is<br />
stored as DNG<br />
• DNG allows for processing the raw data in third-party<br />
software packages (e.g., Adobe Lightroom, etc.)<br />
• <strong>Support</strong> for Eyelike Capture Pro 4.x RAW data (read<br />
only); support for CaptureShop 5.x RAW data (.STI) is<br />
in preparation<br />
Currently, the following back types are supported:<br />
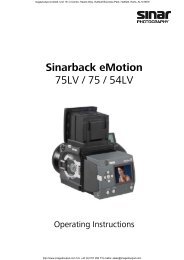
• <strong>Sinar</strong>back eMotion 75 and 75 LV<br />
• <strong>Sinar</strong>back eMotion 54 LV<br />
• <strong>Sinar</strong>back eMotion 22<br />
• <strong>Sinar</strong>back eSprit 65 LV<br />
• <strong>Sinar</strong> Hy6 65 camera system<br />
• <strong>Sinar</strong>back eVolution 75 H¹<br />
¹ Note: in order to operate the <strong>Sinar</strong>back eVolution<br />
75 H with <strong>Sinar</strong> eXposure <strong>6.2</strong> the <strong>Sinar</strong>back<br />
eVolution Firmware version 2.20 is required.<br />
The <strong>Sinar</strong>back eVolution Firmware Updater 2.20 is<br />
available for download from the <strong>Sinar</strong> website<br />
www.sinarcameras.com.<br />
<strong>Support</strong> for additional back types from <strong>Sinar</strong> will be<br />
added step by step in future releases.<br />
2. System Requirements<br />
<strong>Sinar</strong> eXposure version <strong>6.2</strong> supports Apple Macintosh<br />
computers with both PowerPC (G4/G5) and Intel ®<br />
processors² with Mac OS 10.4.11 and 10.5.x<br />
² Note: Apple MacPro computers with Intel Xeon Nehalem<br />
processors are currently not supported.<br />
Minimum System Requirements<br />
Processor: G4/G5 Processor with 1.5 GHz<br />
Physical RAM: 1 GB<br />
Hard disk space: 3 GB + space for capturing images<br />
Mac OS:<br />
10.4.11 or newer<br />
Recommended System Configuration<br />
Depending on the pixel count of the digital back in use<br />
Processor: Dual core processor with 2 x 2 GHz<br />
or faster<br />
Physical RAM: 2 to 4 GB or more<br />
Hard disk space: 20 GB + space for capturing images<br />
Mac OS:<br />
10.5.4 or newer<br />
3. Installation<br />
To install the <strong>Sinar</strong> eXposure TM software, double-click the<br />
file "<strong>Sinar</strong> eXposure <strong>6.2</strong>(217).dmg". A finder window<br />
with the file "<strong>Sinar</strong> eXposure <strong>6.2</strong>.mpkg" opens automatically.<br />
To install the software, double-click this file and<br />
follow the instructions on the screen.<br />
After the successful installation, close the installation<br />
program by clicking the button "Close". The <strong>Sinar</strong><br />
eXposure software is stored in the directory "Applications".<br />
An alias of the application is automatically added<br />
to the dock items.<br />
4. First Start<br />
After the software has been installed successfully, it can be<br />
opened by double-clicking the file "<strong>Sinar</strong> eXposure" in<br />
the folder "Applications" or by clicking on the respective<br />
icon in the dock. After the first launch of the software<br />
the user interface is divided into 4 areas (see next page).<br />
Area 1 contains the browser, the Navigator and the display<br />
of the meta data.<br />
Area 2 shows the images captured with the software<br />
that are stored in a so-called "Contact Sheet".<br />
Area 3 contains a number of tabs that contain functions<br />
for the capturing, processing and export of images.<br />
Area 4 is the toolbar. Here you can activate or deactivate<br />
various functions related to capturing and viewing<br />
images. Additionally, information about the image<br />
concerning size, color values of the pixels and the zoom<br />
factor are displayed in the upper right corner.<br />
<strong>Sinar</strong><strong>Exposure</strong>_62_<strong>Read</strong><strong>Me</strong>_EN.doc 1/5<br />
http://www.<strong>image2output</strong>.com Tel: +44 (0)1707 282 710 mailto: sales@<strong>image2output</strong>.com
<strong>image2output</strong> Limited: Unit 19, io Centre, Hearle Way, Hatfield Business Park, Hatfield, Herts, AL10 9EW<br />
<br />
<br />
<br />
<br />
For further details regarding the <strong>Sinar</strong> eXposure user interface, please refer to the online help installed with the software.<br />
5. Connecting a Digital Back with the Software<br />
If a digital back is connected with a computer, the name<br />
of the back is displayed in Area 3 under the tab "Capture".<br />
To connect the digital back, click on the checkbox in front<br />
of the name of the digital back.<br />
After the digital back has been connected, select a folder<br />
in the browser where the images are to be stored, and<br />
click on the button "Contact Sheet" to define this folder<br />
as the location for storing the images.<br />
6. Downloading Images from the Internal<br />
<strong>Me</strong>mory / CF-Card (<strong>Sinar</strong>back eMotion)<br />
If a <strong>Sinar</strong>back eMotion is connected, or if a CF-card<br />
with the data of a <strong>Sinar</strong>back eMotion is inserted in a<br />
CF-card reader, an entry with the serial number of the<br />
respective <strong>Sinar</strong>back eMotion appears in the browser.<br />
To read out the internal memory, please double-click the<br />
serial number in the browser. Area 2 (Contact sheet)<br />
now displays the content of the internal memory or the<br />
CF-card respectively. In order to copy the images to the<br />
hard drive, simply drag-and-drop the images to the<br />
desired folder of the browser.<br />
After the images are copied to the hard disk, they can be<br />
viewed by selecting the respective folder with a doubleclick.<br />
Area 2 (Contact sheet) is now showing the<br />
content of the selected folder instead of the internal<br />
memory.<br />
<strong>Sinar</strong><strong>Exposure</strong>_62_<strong>Read</strong><strong>Me</strong>_EN.doc Page 2 of 5<br />
http://www.<strong>image2output</strong>.com Tel: +44 (0)1707 282 710 mailto: sales@<strong>image2output</strong>.com
<strong>image2output</strong> Limited: Unit 19, io Centre, Hearle Way, Hatfield Business Park, Hatfield, Herts, AL10 9EW<br />
7. Downloading Images from the CF-Card<br />
(<strong>Sinar</strong>back eSprit 65 LV and <strong>Sinar</strong> Hy6 65)<br />
If a CF-card with the data of a <strong>Sinar</strong>back eSprit 65 LV<br />
or <strong>Sinar</strong> Hy6 65 is inserted in a CF-card reader, an entry<br />
with the serial number of the respective <strong>Sinar</strong>back eSprit<br />
65 LV or <strong>Sinar</strong> Hy6 65 appears in the browser.<br />
To read out the content of the CF card, please doubleclick<br />
the serial number in the browser. Area 2 (Contact<br />
sheet) now displays the content of the CF card. In order<br />
to copy the images to the hard drive, simply drag-anddrop<br />
the images to the desired folder of the browser.<br />
After the images are copied to the hard disk, they can be<br />
viewed by selecting the respective folder with a doubleclick.<br />
Area 2 (Contact sheet) is now showing the<br />
content of the selected folder instead of the internal<br />
memory.<br />
The shading intensity is selected by marking the pie chart<br />
in the upper left corner of the thumbnail. The proportions<br />
of the pie chart are visible correspond to the intensity of<br />
the brightness correction (0%, 25%, 50%, 75% or 100%).<br />
The color correction intensity is always 100%.<br />
In order to create new DNG raw files with the associated<br />
shadings applied the user can select the images in the<br />
contact sheet and drag them to the destination folder in<br />
the browser. He can also have the associated shadings<br />
applied on the fly while exporting the images in TIFF or<br />
JPEG format.<br />
8. Exporting Images<br />
To export images from <strong>Sinar</strong> eXposure, they have first<br />
to be selected in the Contact sheet. The export procedure<br />
is started via the menu "Export". If several files are<br />
selected for the export, the export tab (Area 3) shows<br />
the progress of the export procedure. Presently, TIFF and<br />
JPEG are available as file formats for the export.<br />
9. Shading Mode<br />
The <strong>Sinar</strong> eXposure <strong>6.2</strong> includes a unique Shading<br />
Mode specifically designed for architectural photography<br />
with the new <strong>Sinar</strong> arTec camera system. Thanks<br />
to the new Shading Mode, photographers can now capture<br />
images and create shading files for each individual<br />
capturing situation completely mobile. Back in the studio,<br />
the shading files can efficiently be applied to the respective<br />
images in batch mode.<br />
A shading is created using the Shading diffusor. The<br />
shadings have to be created under the same light conditions<br />
as the capture. They are saved in the image folder<br />
and are loaded and displayed with the images in the<br />
Contact sheet.<br />
To activate the shading mode, first of all, the respective<br />
icon has to be placed to the toolbar. After activating the<br />
shading mode, each image in the contact sheet shows a<br />
black check box. To select a file as a shading mark this<br />
check box. The selected shading will be applied to the<br />
subsequent images until another file is selected as shading.<br />
A gray frame marks the images to which the specific<br />
shading will be applied.<br />
10. Individual Configuration of the User Interface<br />
The user interface mentioned at the beginning can be<br />
customized according to your individual needs. For example,<br />
the various elements of the Areas 1, 2 and 3 can<br />
be freely arranged around the central image window<br />
with drag-and-drop. Furthermore, these three areas can<br />
be temporarily hidden or shown by a click on the arrow<br />
symbol at the border of the respective area.<br />
Using the functions of the menus "View" and "Dock-<br />
Widgets", the elements of these three areas can be<br />
freely arranged floating on the main window. Furthermore,<br />
they can be displayed semi-transparent. Finally,<br />
the single plug-ins of Area 3 can be freely arranged<br />
within the tabs, or they can be pulled out of Area 3 and<br />
arranged for example on a second screen.<br />
After the installation, the toolbar contains a standard<br />
range of buttons. These can be adapted to the individual<br />
requirements. In order to do so, select "View / Toolbar<br />
/ Customize toolbar" in the menu "View".<br />
A window opens offering additional icons that can be<br />
added to the toolbar using the drag-and-drop function.<br />
Additionally, the window offers several options for the<br />
display of the elements in the toolbar.<br />
When closing the software <strong>Sinar</strong> eXposure, the last<br />
active arrangement of the operational elements is saved<br />
and will be loaded at a restart of the application software.<br />
If you wish to use the default setting active at the<br />
start of the software, remove the file "<strong>Sinar</strong> eXposure<br />
layout_LastRun.ini" from the folder "Library/Preferences"<br />
in your user directory.<br />
<strong>Sinar</strong><strong>Exposure</strong>_62_<strong>Read</strong><strong>Me</strong>_EN.doc Page 2 of 5<br />
http://www.<strong>image2output</strong>.com Tel: +44 (0)1707 282 710 mailto: sales@<strong>image2output</strong>.com
<strong>image2output</strong> Limited: Unit 19, io Centre, Hearle Way, Hatfield Business Park, Hatfield, Herts, AL10 9EW<br />
11. Processing of Images from Eyelike Capture Pro<br />
and <strong>Sinar</strong> CaptureShop<br />
Basically <strong>Sinar</strong> eXposure is able to read images that<br />
have been captured with Eyelike Capture Pro. The<br />
support of images captured with <strong>Sinar</strong> CaptureShop<br />
5.x (<strong>Sinar</strong> Tagged Image, ".sti" raw data) will follow in<br />
a future release of <strong>Sinar</strong> eXposure.<br />
Changes to the image parameters that are made using<br />
<strong>Sinar</strong> eXposure to images captured with these two<br />
applications are not saved in the original raw data,<br />
therefore any possible damage of the original raw data<br />
is prevented.<br />
By dragging images originally captured with Eyelike<br />
Capture Pro into a different folder, the original raw data<br />
is converted into DNG and saved as copies to the target<br />
folder.<br />
12. Compatibility of the <strong>Sinar</strong> eXposure Raw<br />
Data with Applications of Third-party Suppliers<br />
Images that are created using <strong>Sinar</strong> eXposure are<br />
saved as DNG-files. In principle it is possible to process<br />
these images with software packages of third party<br />
suppliers that are able to interpret DNG-data. However,<br />
it has to be considered that not every application capable<br />
of interpreting DNG-data can necessarily read and process<br />
the <strong>Sinar</strong> eXposure raw data correctly as well.<br />
<strong>Sinar</strong> eXposure permits the categorization of the<br />
images using star symbols (the more stars it has, the<br />
more important is the image). This categorization and<br />
the meta data stored in the raw data can be interpreted<br />
and displayed by software packages of third party suppliers.<br />
13. Important Keyboard Short-Cuts<br />
13.1. Toolbar:<br />
Zoom Tool<br />
Crop Tool<br />
Hand Tool<br />
Neutral Picker<br />
Fit image to window<br />
“Z”-Key<br />
“C”-Key<br />
“H”-Key<br />
“N”-Key<br />
Double-click on Hand Tool<br />
13.2. General<br />
Close application<br />
Select all<br />
Call default setting<br />
Command + “Q”-Key<br />
Command + “A”-Key<br />
Command + “,”-Key<br />
13.3. Contact Sheet<br />
Enlarge thumbnails<br />
Reduce thumbnails<br />
Delete images<br />
Command + Option and “+”-Key<br />
Command + Option and “-“-Key<br />
Command + Backspace / Del.-Key<br />
13.4. Preview<br />
Switch between Zoom-in and Zoom-out<br />
Temporary switching to hand tool<br />
Develop-mode:<br />
Move single image in comparison mode<br />
Option-Key<br />
Space Bar<br />
Command-Key <br />
13.5. Renaming of images<br />
Image x of y<br />
Image x of %max<br />
Only even numbers Image x %e<br />
Only uneven numbers Image x %o<br />
Hint: For a complete list of short-cuts, please refer to the on-line help installed with <strong>Sinar</strong> eXposure.<br />
<strong>Sinar</strong><strong>Exposure</strong>_62_<strong>Read</strong><strong>Me</strong>_EN.doc Page 3 of 5<br />
http://www.<strong>image2output</strong>.com Tel: +44 (0)1707 282 710 mailto: sales@<strong>image2output</strong>.com
<strong>image2output</strong> Limited: Unit 19, io Centre, Hearle Way, Hatfield Business Park, Hatfield, Herts, AL10 9EW<br />
14. Version Log <strong>Sinar</strong> eXposure<br />
Improvements with eXposure <strong>6.2</strong> (compared to 6.1.1)<br />
a. A new user configurable Noise-reduction filter has<br />
been implemented.<br />
b. Noise-reduction profiles referring to the selected<br />
ISO settings have been implemented for the following<br />
digital backs: <strong>Sinar</strong>back eVolution 75 H, <strong>Sinar</strong>back<br />
eMotion 75/75 LV, <strong>Sinar</strong>back eMotion 54 LV,<br />
and <strong>Sinar</strong>back eSprit 65 LV.<br />
c. A "Session" tool has been implemented that allows<br />
naming a new capturing session in advance.<br />
d. The "Crop" tool has been improved and new respective<br />
features have been implemented (e.g. the color<br />
of the frame, new scaling units can be selected,).<br />
e. A new "Zoom slider" has been implemented in the<br />
toolbox allowing either a quick zooming in an<br />
opened image or, alternatively, to freely scale the<br />
size of the thumbnails of the Contact sheet.<br />
f. A new "Detail" widget has been introduced. This<br />
allows performing everything that can also be done<br />
in the full image (except selecting a crop), but quicker.<br />
The processes involved are: Zooming in and out,<br />
Moving a crop, Setting the gray balance,<br />
g. A new "Detail" tool has been implemented in the<br />
toolbox (loupe with a square). This allows selecting<br />
an area in a thumbnail or in an opened image that<br />
shall be displayed in the "Detail" widget.<br />
h. The Live image is now displayed in a separate widget<br />
and can bee moved at will.<br />
i. Images that are still either on the internal memory<br />
or on a CF-card inside of a connected <strong>Sinar</strong>back are<br />
marked with a padlock. These images cannot be<br />
edited and need to previously be imported.<br />
j. Now individual color calibrations cannot only be<br />
done with the X-rite's (former GretagMacbeth)<br />
"ColorChecker SG", "ColorChecker 240", and "Color-<br />
Checker 24" targets. Individual color calibrations can<br />
also be done with the "basICColor DCAM" target<br />
with or without the optional use of the "Light trap".<br />
k. The incompatibility issue that existed with the drivers<br />
when a <strong>Sinar</strong>back 54 MC/M was operated with <strong>Sinar</strong><br />
CaptureShop when <strong>Sinar</strong> eXposure was also installed<br />
on the same computer has been resolved.<br />
Note: This is when <strong>Sinar</strong> CaptureShop 5.6.3 or<br />
higher and <strong>Sinar</strong> eXposure <strong>6.2</strong> or higher are installed.<br />
l. Dialog boxes that were displayed behind other widgets<br />
are now visible.<br />
m. The Graphical user interface has been given a new look<br />
and some problems occurring with the current look<br />
have been solved.<br />
n. The terms and wording of the User interface have<br />
been updated (English and German only).<br />
o. The all-over performance of the <strong>Sinar</strong> eXposure<br />
application has been improved and sped-up.<br />
p. Many small improvements have been implemented<br />
q. Various minor bugs have been fixed<br />
r. A number, visible in the upper left corner on thumbnails<br />
in the Contactsheet indicates the CaptureMode<br />
in which the image was taken (1- or 4-shot)<br />
15. Known Bugs<br />
• Images originally captured with Eyelike Capture Pro<br />
may show a wrong white balance in <strong>Sinar</strong> eXposure.<br />
• Setting the white balance in thumbnails using <strong>Sinar</strong><br />
eXposure on images originally captured with<br />
Eyelike Capture Pro may produce a wrong white<br />
balance in the image overview.<br />
• The <strong>Sinar</strong>back eVolution 75 H in combination with<br />
the <strong>Sinar</strong>cam 2 and Fuji GX680 is currently not<br />
supported.<br />
• The asymmetric swing- and tilt axes of the <strong>Sinar</strong><br />
p3/p2/p view cameras are currently not displayed in<br />
the Live image or image overview.<br />
• After launching <strong>Sinar</strong> eXposure <strong>6.2</strong> and connecting<br />
a <strong>Sinar</strong>back eVolution 75 H with <strong>Sinar</strong> p3, <strong>Sinar</strong> Sliding<br />
adapter, and <strong>Sinar</strong>on Digital CMV lens, the exposure<br />
time indicated in the user interface is not properly<br />
applied. Instead, the software uses the exposure time<br />
of 1 second by default. After changing the exposure<br />
time with the respective slider the software uses the<br />
correct exposure time for all following shots.<br />
• When using the <strong>Sinar</strong> eXposure <strong>6.2</strong> software with<br />
<strong>Sinar</strong>back eVolution 75 H, a <strong>Sinar</strong> p3 view camera,<br />
and <strong>Sinar</strong> Sliding adapter, the <strong>Sinar</strong> LC shutter moves<br />
in front of the lens when sliding the ground glass<br />
into viewing position.<br />
• Using the <strong>Sinar</strong> LC Shutter with the <strong>Sinar</strong>back<br />
eVolution 75 H and the AUX socket of the Hasselblad<br />
V Generic adapter plate 552.3<strong>6.2</strong>50 is currently<br />
not supported.<br />
• Currently, the DNG files captured with a <strong>Sinar</strong>back<br />
eSprit 65 LV or <strong>Sinar</strong> Hy6 65 camera system must be<br />
downloaded with a CF-Card reader through the <strong>Sinar</strong><br />
eXposure software. DNGs that are copied via the<br />
Mac OS Finder will not be displayed in the present<br />
<strong>Sinar</strong> eXposure software.<br />
16. Removing the <strong>Sinar</strong> eXposure from Hard disk<br />
If for any reasons <strong>Sinar</strong> eXposure software is required<br />
to be completely deleted from the hard disk, the following<br />
files have to be removed:<br />
1. In the folder "Applications", the file "<strong>Sinar</strong> eXposure"<br />
2. In the folder "user/Library/Preferences",<br />
the files "<strong>Sinar</strong> eXposure.sav" and<br />
"<strong>Sinar</strong> eXposure layout_LastRun.ini"<br />
3. In the folder "User/Library/Logs",<br />
the file "<strong>Sinar</strong> eXposure.log"<br />
4. In the folder "HD/Library/Application <strong>Support</strong>",<br />
the folder "<strong>Sinar</strong> eXposure"<br />
5. In the folder "HD/Library/Frameworks",<br />
the files "JAPI1394m.framework" and<br />
"FireCamj.framework"<br />
<strong>Sinar</strong> AG, April 2009<br />
<strong>Sinar</strong><strong>Exposure</strong>_62_<strong>Read</strong><strong>Me</strong>_EN.doc 1/5<br />
http://www.<strong>image2output</strong>.com Tel: +44 (0)1707 282 710 mailto: sales@<strong>image2output</strong>.com