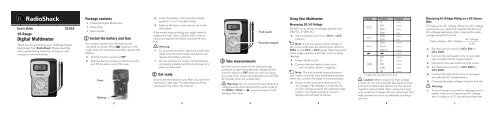
Digital Multimeter - Radio Shack
Digital Multimeter - Radio Shack
Digital Multimeter - Radio Shack

You also want an ePaper? Increase the reach of your titles
YUMPU automatically turns print PDFs into web optimized ePapers that Google loves.
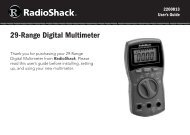
User’s Guide 22-810<br />
15-Range<br />
<strong>Digital</strong> <strong>Multimeter</strong><br />
Thank you for purchasing your 15-Range <strong>Digital</strong><br />
<strong>Multimeter</strong> from <strong>Radio</strong><strong>Shack</strong>. Please read this<br />
user’s guide before installing, setting up, and<br />
using your new multimeter.<br />
Package contents<br />
• 15-Range <strong>Digital</strong> <strong>Multimeter</strong><br />
• Quick Start<br />
• User’s Guide<br />
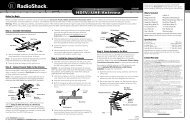
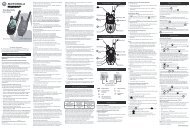
Install the battery and fuse<br />
Your meter requires one 12V battery (not<br />
included) for power. When displays or the<br />
meter does not measure accurately, replace the<br />
battery.<br />
1. Set the function switch to OFF.<br />
2. Remove the two screws on the back cover<br />
and lift the meter out of the case.<br />
Fuse<br />
Battery<br />
3. Insert the battery, matching the polarity<br />
symbols (+ and -) marked inside.<br />
4. Replace the back cover and secure it with<br />
the screws.<br />
If the meter stops working, you might need to<br />
replace the fuse. Use a 315mA, 250V, ceramic<br />
fuse and wrap the red ribbon around the new<br />
fuse.<br />
Warning:<br />
• To avoid electric shock, disconnect both test<br />
leads from the circuit under test before you<br />
replace the battery and fuse.<br />
• Do not operate the meter until the battery<br />
is properly installed and the back cover is in<br />
place and secured.<br />
Get ready<br />
Unwind the test leads to use. After use, store the<br />
test leads in the case. The test leads are firmly<br />
attached to the meter. Do not pull.<br />
Take measurements<br />
Test Leads<br />
Function Switch<br />
Set the function switch to the desired range<br />
positions to take measurements. Always set the<br />
function switch to OFF when you are not using<br />
the meter. Your meter automatically turns off after<br />
30 minutes when left unattended.<br />
Warning: Do not connect the test leads to a<br />
voltage source while the function switch is set to<br />
the OHM or DCA or range. Doing so could<br />
damage the meter.<br />
Using Your <strong>Multimeter</strong><br />
Measuring DC/AC Voltage<br />
Do NOT try to measure voltages greater than<br />
500V DC or 500V AC.<br />
1. Set the function switch to a DCV or ACV<br />
position.<br />
Note: If you are unsure of the voltage of<br />
the circuit under test, set the function switch to<br />
500V on the ACV or DCV range. Keep trying the<br />
lower range positions until the correct reading<br />
displays.<br />
2. Power off the circuit.<br />
3. Connect the test leads to the circuit:<br />
red = positive, black = negative.<br />
Note: The auto-polarity feature protects<br />
your meter and gives valid measurements even<br />
when you connect the leads in reverse polarity.<br />
4. Power on the circuit and read the DC or<br />
AC voltage. If OL displays, it indicates the<br />
circuit’s voltage exceeds the selected range<br />
position. Try higher positions. Correct<br />
displays should read as follows:<br />
Range Position Display<br />
2V<br />
x.xxx<br />
DCV<br />
20V<br />
xx.xx<br />
200V<br />
xxx.x<br />
500V<br />
xxx<br />
ACV<br />
200V<br />
xxx.x<br />
500V<br />
xxx<br />
DCA<br />
2mA<br />
20mA<br />
200mA<br />
x.xxx<br />
xx.xx<br />
xxx.x<br />
x.xxx<br />
OHM<br />
200<br />
2K<br />
20K<br />
200K<br />
2M<br />
xxx.x<br />
x.xxx<br />
xx.xx<br />
xxx.x<br />
x.xxx<br />
* x denotes any digit from 0 to 9.<br />
Caution: When measuring high-voltage<br />
circuits, do not connect both test leads at once.<br />
Connect the black test lead first to the circuit’s<br />
neutral or ground lead. Then, using one hand<br />
only, probe for voltages with the other lead. This<br />
helps prevent you from accidentally touching a<br />
hot wire.<br />
Measuring AC Voltage Riding on a DC Source<br />
Bias<br />
To measure an AC voltage riding on a DC voltage<br />
source bias, you need first measure the DC and<br />
AC voltages separately, then compute the peak<br />
voltage using this formula:<br />
AC voltage<br />
Peak voltage = DC voltage + ——————<br />
0.707<br />
1. Set the function switch to DCV 20V or<br />
DCV 200V.<br />
2. Connect the test leads to the circuit under<br />
test and take the DC measurement.<br />
3. Disconnect the test leads from the circuit.<br />
4. Set the function switch to ACV 200V or<br />
ACV 500V.<br />
5. Connect the test leads to the circuit again<br />
and take the AC measurement.<br />
6. Compute the peak voltage using the formula.<br />
Warning:<br />
• To avoid injury to yourself or damage to your<br />
meter, never try to measure an AC voltage<br />
that is riding on a DC source bias where the<br />
2 3 4 5 6 7
peak voltage exceeds 500V with respect to<br />
earth ground.<br />
• Never try to measure any voltage more than<br />
30V AC on a DC source bias.<br />
Measuring DC Current<br />
The DC current measurement is limited to<br />
200mA.<br />
1. Set the function switch to a DCA position.<br />
2. Power off the circuit under test and<br />
discharge all capacitors.<br />
3. Break the electric path of the circuit.<br />
Connect the test leads to the electric path:<br />
red = positive, black = negative.<br />
The connection must be in series with the<br />
circuit.<br />
4. Power on the circuit and read the current.<br />
Note: The DCA range is fuse-protected. If<br />
there is no display, check the fuse.<br />
Checking Diodes<br />
This meter can be used for checking standard<br />
diodes, not specialty ones, such as zener<br />
diodes. You can also check transistors and other<br />
semiconductors for opens, shorts, and normal<br />
operation, and determine the forward voltage for<br />
diodes.<br />
1. Set the function switch to .<br />
2. Power off the circuit under test.<br />
3. Connect the test leads across the circuit, or<br />
remove one of the component’s leads from<br />
its circuit and touch the test leads across the<br />
component. Observe the first reading.<br />
4. Reverse the test leads and observe the<br />
second reading. OL displays.<br />
Note: The values that display during the<br />
diode check show the actual forward voltage<br />
(max. 3.3V).<br />
Measuring Resistance<br />
1. Set the function switch to a OHM position.<br />
2. Power off the circuit under test and<br />
discharge all capacitors.<br />
3. Connect the test leads across the circuit. Or<br />
remove one of the component’s leads from<br />
its circuit and touch the test leads across the<br />
component.<br />
4. Read the measurement.<br />
Additional Information<br />
Safety Precautions<br />
• Do not use the meter if you are unfamiliar with<br />
electric circuits and testing procedures. This meter<br />
is not for commercial or industrial use.<br />
• To reduce the risk of fire or shock hazard, do not<br />
expose the meter to rain or moisture. It is for indoor<br />
use only.<br />
• Use extreme caution when working with voltages<br />
above 100V. Always power off the circuit under test<br />
before you connect the test leads to high-voltage<br />
points.<br />
• Always discharge any capacitors of the circuit under<br />
test before you attach the test leads.<br />
• Because many AC/DC sets have a potentially hot<br />
chassis, be sure the top of your workbench and the<br />
floor underneath it are made of non-conductive<br />
materials.<br />
• To avoid damage, have the meter repaired by<br />
qualified service personnel only.<br />
Battery Notes<br />
• Dispose of old batteries promptly and properly. Do<br />
not burn or bury them.<br />
• Use only fresh batteries of the required size and<br />
type.<br />
• If you do not plan to use your meter for a week<br />
or more, remove the battery. Batteries can leak<br />
chemicals that can damage electronic parts.<br />
Special Panel Markings<br />
500V MAX<br />
500V MAX<br />
200mA MAX<br />
CAT II<br />
To avoid electric shock and damage<br />
to the meter, do not connect the test<br />
leads to any source that exceeds<br />
500 volt with respect to ground.<br />
The maximum input limit for voltage<br />
measurement is 500V AC or DC, and<br />
the maximum input limit for current<br />
measurement is 200mA DC.<br />
Caution: Be extremely careful when<br />
taking high-voltage measurement.<br />
DO NOT TOUCH TERMINALS OR<br />
TEST LEAD ENDS.<br />
Caution: RISK OF ELECTRIC SHOCK!<br />
Refer to the complete operating<br />
instructions.<br />
This equipment is rated for installation<br />
category II (3600 VA max.).<br />
Specifications<br />
Power Supply ........................................... One 12V battery<br />
Power Consumption.................................. 30 mW (typical)<br />
Operating Temperature ................ 32 to 109°F (0 to 43°C)<br />
Storage Temperature ................ –4 to 140°F (–20 to 60°C)<br />
Relative Humidity...............................................80% (Max.)<br />
Input Impedance .......................................... 1M ohm (DC)<br />
Overrange Indication ............. OL (decimal point floating)<br />
Over Voltage Protection (DCV/ACV)...............600V (Max.)<br />
Dimensions (HWD) ........................4.63 × 3.25 × 0.69 inch<br />
(118 × 81 × 18 mm)<br />
Weight (with battery).....................................4.2 oz (118 g)<br />
Accuracy<br />
DC Voltage....................±0.8% of reading, ±1 in last digit<br />
AC Voltage (at 50/60Hz) ........................±1.5% of reading,<br />
±5 in last digit<br />
DC Current ....................±2.0% of reading, ±1 in last digit<br />
Resistance......................±2.0% of reading, ±3 in last digit<br />
Ranges<br />
DC Voltage............................................2V, 20V, 200V, 500V<br />
AC Voltage ......................................................... 200V, 500V<br />
DC Current ......................................... 2mA, 20mA, 200mA<br />
Resistance........................200, 2K, 20K, 200K, 2M<br />
Specifications are subject to change and improvement<br />
without notice. Actual product may vary from the images<br />
found in this document.<br />
Limited Warranty<br />
<strong>Radio</strong><strong>Shack</strong> warrants this product against defects in materials<br />
and workmanship under normal use by the original purchaser for<br />
ninety (90) days after the date of purchase from a <strong>Radio</strong><strong>Shack</strong>owned<br />
store or an authorized <strong>Radio</strong><strong>Shack</strong> franchisee or dealer.<br />
RADIOSHACK MAKES NO OTHER EXPRESS WARRANTIES.<br />
This warranty does not cover: (a) damage or failure caused by<br />
or attributable to abuse, misuse, failure to follow instructions,<br />
improper installation or maintenance, alteration, accident, Acts of<br />
God (such as floods or lightning), or excess voltage or current; (b)<br />
improper or incorrectly performed repairs by persons who are not<br />
a <strong>Radio</strong><strong>Shack</strong> Authorized Service Facility; (c) consumables such as<br />
fuses or batteries; (d) ordinary wear and tear or cosmetic damage;<br />
(e) transportation, shipping or insurance costs; (f) costs of product<br />
removal, installation, set-up service, adjustment or reinstallation;<br />
and (g) claims by persons other than the original purchaser.<br />
Should a problem occur that is covered by this warranty, take<br />
the product and the <strong>Radio</strong><strong>Shack</strong> sales receipt as proof of<br />
purchase date to any <strong>Radio</strong><strong>Shack</strong> store in the U.S. <strong>Radio</strong><strong>Shack</strong><br />
will, at its option, unless otherwise provided by law: (a) repair<br />
the product without charge for parts and labor; (b) replace the<br />
product with the same or a comparable product; or (c) refund the<br />
purchase price. All replaced parts and products, and products<br />
on which a refund is made, become the property of <strong>Radio</strong><strong>Shack</strong>.<br />
New or reconditioned parts and products may be used in the<br />
performance of warranty service. Repaired or replaced parts and<br />
products are warranted for the remainder of the original warranty<br />
period. You will be charged for repair or replacement of the<br />
product made after the expiration of the warranty period.<br />
RADIOSHACK EXPRESSLY DISCLAIMS ALL WARRANTIES AND<br />
CONDITIONS NOT STATED IN THIS LIMITED WARRANTY.<br />
ANY IMPLIED WARRANTIES THAT MAY BE IMPOSED BY LAW,<br />
INCLUDING THE IMPLIED WARRANTY OF MERCHANTABILITY<br />
AND, IF APPLICABLE, THE IMPLIED WARRANTY OF FITNESS<br />
FOR A PARTICULAR PURPOSE, SHALL EXPIRE ON THE<br />
EXPIRATION OF THE STATED WARRANTY PERIOD.<br />
EXCEPT AS DESCRIBED ABOVE, RADIOSHACK SHALL HAVE<br />
NO LIABILITY OR RESPONSIBILITY TO THE PURCHASER OF THE<br />
PRODUCT OR ANY OTHER PERSON OR ENTITY WITH RESPECT<br />
TO ANY LIABILITY, LOSS OR DAMAGE CAUSED DIRECTLY OR<br />
INDIRECTLY BY USE OR PERFORMANCE OF THE PRODUCT<br />
OR ARISING OUT OF ANY BREACH OF THIS WARRANTY,<br />
INCLUDING, BUT NOT LIMITED TO, ANY DAMAGES RESULTING<br />
FROM INCONVENIENCE AND ANY LOSS OF TIME, DATA,<br />
PROPERTY, REVENUE, OR PROFIT AND ANY INDIRECT,<br />
SPECIAL, INCIDENTAL, OR CONSEQUENTIAL DAMAGES, EVEN<br />
IF RADIOSHACK HAS BEEN ADVISED OF THE POSSIBILITY OF<br />
SUCH DAMAGES.<br />
Some States do not allow limitations on how long an implied<br />
warranty lasts or the exclusion or limitation of incidental or<br />
consequential damages, so the above limitations or exclusions<br />
may not apply to you. This warranty gives you specific legal<br />
rights, and you may also have other rights which vary from State<br />
to State. You may contact <strong>Radio</strong><strong>Shack</strong> at:<br />
<strong>Radio</strong><strong>Shack</strong> Customer Relations<br />
300 <strong>Radio</strong><strong>Shack</strong> Circle, Fort Worth, TX 76102 04/08<br />
www.<strong>Radio</strong><strong>Shack</strong>.com<br />
Protect the environment by recycling used electronics. Go<br />
to E-CyclingCentral.com to find a recycle center near you.<br />
©2009. <strong>Radio</strong><strong>Shack</strong> Corporation.<br />
All rights reserved. <strong>Radio</strong><strong>Shack</strong> and <strong>Radio</strong><strong>Shack</strong>.com are<br />
trademarks used by <strong>Radio</strong><strong>Shack</strong> Corporation.<br />
Printed<br />
in China<br />
03A09<br />
22-810<br />
8 9 10 11 12 13 14