SERVICE BULLETIN No.1147 - ABC Companies
SERVICE BULLETIN No.1147 - ABC Companies
SERVICE BULLETIN No.1147 - ABC Companies

You also want an ePaper? Increase the reach of your titles
YUMPU automatically turns print PDFs into web optimized ePapers that Google loves.
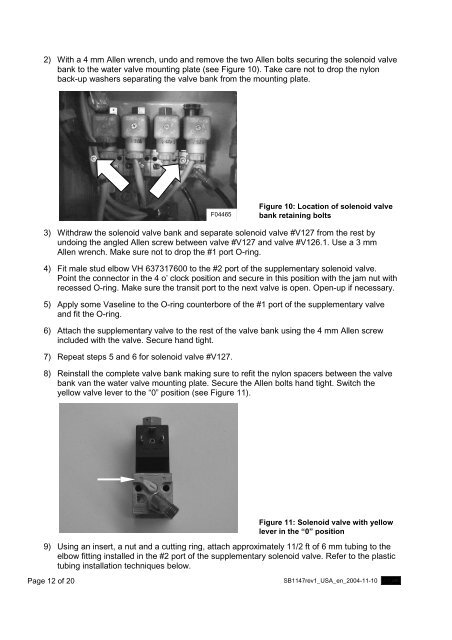
2) With a 4 mm Allen wrench, undo and remove the two Allen bolts securing the solenoid valve<br />
bank to the water valve mounting plate (see Figure 10). Take care not to drop the nylon<br />
back-up washers separating the valve bank from the mounting plate.<br />
F04465<br />
Figure 10: Location of solenoid valve<br />
bank retaining bolts<br />
3) Withdraw the solenoid valve bank and separate solenoid valve #V127 from the rest by<br />
undoing the angled Allen screw between valve #V127 and valve #V126.1. Use a 3 mm<br />
Allen wrench. Make sure not to drop the #1 port O-ring.<br />
4) Fit male stud elbow VH 637317600 to the #2 port of the supplementary solenoid valve.<br />
Point the connector in the 4 o’ clock position and secure in this position with the jam nut with<br />
recessed O-ring. Make sure the transit port to the next valve is open. Open-up if necessary.<br />
5) Apply some Vaseline to the O-ring counterbore of the #1 port of the supplementary valve<br />
and fit the O-ring.<br />
6) Attach the supplementary valve to the rest of the valve bank using the 4 mm Allen screw<br />
included with the valve. Secure hand tight.<br />
7) Repeat steps 5 and 6 for solenoid valve #V127.<br />
8) Reinstall the complete valve bank making sure to refit the nylon spacers between the valve<br />
bank van the water valve mounting plate. Secure the Allen bolts hand tight. Switch the<br />
yellow valve lever to the “0” position (see Figure 11).<br />
Figure 11: Solenoid valve with yellow<br />
lever in the “0” position<br />
9) Using an insert, a nut and a cutting ring, attach approximately 11/2 ft of 6 mm tubing to the<br />
elbow fitting installed in the #2 port of the supplementary solenoid valve. Refer to the plastic<br />
tubing installation techniques below.<br />
Page 12 of 20 SB1147rev1_USA_en_2004-11-10