
You also want an ePaper? Increase the reach of your titles
YUMPU automatically turns print PDFs into web optimized ePapers that Google loves.
<strong>EasyStart</strong><br />
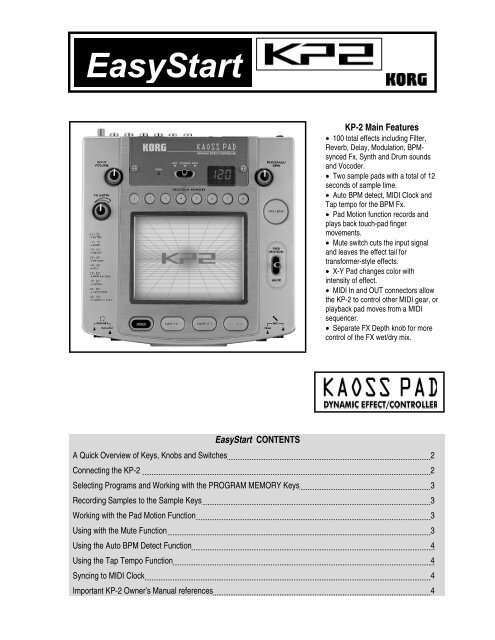
KP-2 Main Features<br />
• 100 total effects including Filter,<br />
Reverb, Delay, Modulation, BPMsynced<br />
Fx, Synth and Drum sounds<br />
and Vocoder.<br />
• Two sample pads with a total of 12<br />
seconds of sample time.<br />
• Auto BPM detect, MIDI Clock and<br />
Tap tempo for the BPM Fx.<br />
• Pad Motion function records and<br />
plays back touch-pad finger<br />
movements.<br />
• Mute switch cuts the input signal<br />
and leaves the effect tail for<br />
transformer-style effects.<br />
• X-Y Pad changes color with<br />
intensity of effect.<br />
• MIDI In and OUT connectors allow<br />
the KP-2 to control other MIDI gear, or<br />
playback pad moves from a MIDI<br />
sequencer.<br />
• Separate FX Depth knob for more<br />
control of the FX wet/dry mix.<br />
<strong>EasyStart</strong> CONTENTS<br />
A Quick Overview of Keys, Knobs and Switches 2<br />
Connecting the KP-2 2<br />
Selecting Programs and Working with the PROGRAM MEMORY Keys 3<br />
Recording Samples to the Sample Keys 3<br />
Working with the Pad Motion Function 3<br />
Using with the Mute Function 3<br />
Using the Auto BPM Detect Function 4<br />
Using the Tap Tempo Function 4<br />
Syncing to MIDI Clock 4<br />
Important KP-2 Owner’s Manual references 4
KP-2 <strong>EasyStart</strong><br />
A Quick Overview of Keys, Knobs and Switches<br />
PROGRAM MEMORY – These keys are used to store eight of your favorite programs for easy access.<br />
TAP/BPM – Tap this key to set the tempo for effects in the BPM FX/PTN bank 50-69. You can also press this key once and<br />
adjust the BPM with the PROGRAM/BPM knob.<br />
HOLD – Pressing this key with hold the last state of the X-Y Pad and any SAMPLE key that is pressed.<br />
SAMPLE 1/SAMPLE 2 – Pressing either of these keys will playback the sample that was recorded using the REC/STOP key.<br />
Holding a key down will play the sample as a loop.<br />
REC/STOP – Use this key to record samples to the SAMPLE 1/SAMPLE 2 keys.<br />
INPUT VOLUME – This knob sets the level of the input signal that is fed to the effect.<br />
PROGRAM/BPM– Use this knob to select different effect programs and to set the BPM.<br />
FX DEPTH – This knob controls the wet/dry amount of effect and on programs 50-84 it controls the overall volume.<br />
PHONES VOLUME – This knob controls the level of volume for the ¼” headphone jack.<br />
MIC TRIM – This knob sets the level for the ¼” microphone input.<br />
MIC/PHONO/LINE – This switch selects the input source for the KP-2.<br />
PAD MOTION/MUTE - Pushing this lever up triggers the PAD MOTION function, pushing it down mutes the input signal.<br />
Connecting the KP-2<br />
1. Connect the LINE OUT L,R jacks to the a line input of your DJ mixer, or line mixer. Or connect it to the FX Return of your<br />
DJ mixer if it has one.<br />
2. Set the CONNECTION switch to either DIRECT or FX LOOP depending on your setup.<br />
3. If you are using a turntable connect it to the PHONO IN L,R jacks and the ground cable to the GND terminal. If you are<br />
using a CD, FX Send or Keyboard, connect to the LINE IN L,R jacks. If you are using a microphone connect it to the ¼”<br />
jack on the front of the KP-2.<br />
4. Adjust the input level using the INPUT VOLUME knob so that the PEAK LED does not turn red.<br />
! Only set the CONNECTION switch to FX LOOP if you are using the KP-2 in an FX Send/Return configuration, otherwise leave<br />
it set to DIRECT.<br />
2
KP-2 <strong>EasyStart</strong><br />
Selecting Programs and Working with the PROGRAM MEMORY keys<br />
1. Turn the PROGRAM/BPM knob clockwise to advance the program number, turn counter-clockwise to move back.<br />
2. To store a program and the current stateof the KP-2 (including the FX/Depth knob, BPM and HOLD key settings) to one<br />
of the PROGRAM MEMORY keys, press and hold the key (1-8) for a few seconds until the display stops blinking.<br />
Recording Samples to the Sample keys<br />
1. Press the REC/STOP key to put the KP-2 into record ready mode.<br />
2. Press the SAMPLE key you wish to record a sample onto. The REC/STOP key will be blinking.<br />
3. Press the REC/STOP key to begin sampling (key will light up) and press it again to stop sampling.<br />
4. To use the AUTO REC function and record a sample as soon as audio is input, in step 2 press and hold the SAMPLE<br />
key and then press the REC/STOP key. Both keys will now blink. To stop sampling press the REC/STOP key.<br />
! To record a sample that loops properly takes a little practice; make sure that you press the REC/STOP key at the exact<br />
beginning and just before the next bar/beat!<br />
!!! You can also sample any of the KP-2 Synth or Drum programs to one of the Sample keys, including any PAD MOTION<br />
moves that you record. You can also sample through the effects of the currently selected program.<br />
Working with the PAD MOTION Function<br />
1. To record a pad move, push up and hold the PAD MOTION / MUTE lever. Recording will begin as soon as you touch the<br />
X-Y pad.<br />
2. Recording will end once you release the lever or reach the maximum recording time (approximately 3.2 seconds). This<br />
means you can record yourself tapping on the pad as well, as long as you hold the lever up while tapping.<br />
3. To playback what was recorded, push and hold the PAD MOTION / MUTE lever. The recorded moves will playback in a<br />
loop as long as the lever is held.<br />
! If you touch the X-Y pad while playing back a PAD MOTION you will erase it and start recording again. Also, PAD<br />
MOTION moves are lost when you select a new program.<br />
Using the Mute Function<br />
1. To mute the input and hear the effect tail push down on the PAD MOTION / MUTE lever. The input sound will be muted<br />
for as long as you hold the lever. You can also toggle the lever up and down to create “transformer” type effects.<br />
3
KP-2 <strong>EasyStart</strong><br />
Using the Auto BPM Detect Function<br />
1. To enable the KP-2 Auto BPM Detect function when you have selected one of the “BPM FX/PTN” programs, press and<br />
hold down the TAP/BPM key until three dots appear in the display. The <strong>KP2</strong> will now detect the BPM from the audio input<br />
signal.<br />
2. To end the Auto BPM Detect function press the TAP/BPM key again.<br />
! This function may not detect BPM from certain musical types. Typically music with a strong kick drum and backbeat<br />
pattern works best!<br />
Using the Tap Tempo Function<br />
1. To sync the BPM using the Tap Tempo function, press the TAP/BPM key two or more times in rhythm with the beat of<br />
the song. The BPM will appear in the display.<br />
Syncing to MIDI Clock<br />
1. To sync the BPM to MIDI clock from an external MIDI device which is connected to the MIDI IN of the <strong>KP2</strong>,press and hold<br />
down the TAP/BPM key and the REC/STOP key. The display will have the number 1 blinking and the<strong>KP2</strong> is now in MIDI<br />
edit mode.<br />
2. To enable MIDI clock press the SAMPLE 1 key so that it is on.<br />
3. To store this setting, press and hold the REC/STOP key for a few seconds. Now the <strong>KP2</strong> will receive MIDI clock<br />
messages for BPM sync. To exit MIDI edit mode, do not touch the <strong>KP2</strong> for a few seconds and it will return to normal<br />
operation.<br />
Important KP-2 Owner’s Manual references<br />
There are many important references to modes and applications in the KAOSS PAD <strong>KP2</strong> Owner’s Manual. Some of these<br />
references are listed below:<br />
Connection Diagrams 2,3<br />
MIDI Edit mode parameters 8,9<br />
Sampling and playing back a phrase 6<br />
4