Contents / General Description / Carter WGD 2
Contents / General Description / Carter WGD 2
Contents / General Description / Carter WGD 2

You also want an ePaper? Increase the reach of your titles
YUMPU automatically turns print PDFs into web optimized ePapers that Google loves.
6B-12 1955 PONTIAC SHOP MANUAL<br />
PUMP JET CLUSTER<br />
BODY TO FLANGE ATTACHING SCREWS<br />
VACUMETER SPRING<br />
METERING ROD JETS<br />
EXHAUST GAS PASSAGE<br />
THROTTLE SHAFT ARM<br />
BODY TO FLANGE SCREWS<br />
SCREW<br />
Fig. 6B-21<br />
Carburetor Bowl Assembly-<strong>Carter</strong><br />
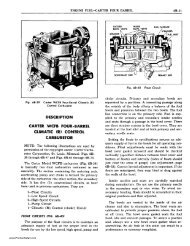
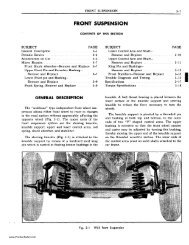
Fig. 6B-22<br />
Throttle Flange Assembly-<strong>Carter</strong><br />
DISASSEMBLY OF THROTTLE FLANGE<br />
1. Remove four throttle flange attaching screws<br />
to separate the carburetor body from flange, and remove<br />
gasket (fig. 6B-22).<br />
2. Remove idle mixture adjusting screws and<br />
springs.<br />
NOTE: Under normal service the carburetor flange<br />
may be cleaned without further disassembly. If complete<br />
disassembly is necessary, perform the remaining<br />
operations.<br />
3. Remove throttle shaft arm attaching screw,<br />
washer and throttle shaft arm (Fig. 6B-22).<br />
4. File off staked ends of throttle valve attaching<br />
screws and remove screws and throttle valves.<br />
5. Remove shaft from throttle flange.<br />
CLEANING AND INSPECTION OF PARTS<br />
Dirt, gum, water or carbon contamination in or on<br />
the exterior moving parts of a carburetor are often<br />
responsible for unsatisfactory performance. For this<br />
reason, efficient carburetion depends upon careful<br />
cleaning and inspection while servicing.<br />
1. Thoroughly clean carburetor castings and all<br />
metal parts in clean cleaning solvent. CAUTION:<br />
Composition and plastic parts such as thermostatic<br />
coil housing and pump plunger should not be immersed<br />
in solvent. DO NOT SOAK AIR HORN<br />
ASSEMBLY IN CLEANER OR SOLVENT FOR<br />
MORE THAN ONE HALF HOUR IF CHOKE<br />
PISTON HOUSING HAS NOT BEEN REMOVED.<br />
2. Blowout all passages in castings with compressed<br />
air and blow off all parts so they are free<br />
of solvent. CAUTION: Do not use drills or wire to<br />
clean out jets or parts as this may enlarge the<br />
opening and affect carburetor operation.<br />
3. Carefully inspect parts for wear and replace<br />
those which are worn. Check the following specific<br />
points:<br />
a. Carefully note the condition of slots in the<br />
choke piston cylinder. If they are found to be<br />
carbonized, remove Welch plug in the bottom of the<br />
climatic control housing by piercing center with a<br />
small pointed instrument and prying outward. Care<br />
should be exercised so that damage will not result<br />
to the casting when removing this plug. Before installing<br />
new plug, carbon present in piston cylinder<br />
slots should be removed and the Welch plug seat<br />
should be carefully cleaned.<br />
b. Remove carbon from bores of flange with sandpaper;<br />
never use emery cloth.<br />
c. Remove carbon from hot air passage in base<br />
of flange (Fig. 6B-22) and from mating holes in<br />
intake manifold.<br />
d. See if needle or seat is worn; if so, both must<br />
be replaced.<br />
www.PontiacSafari.com