ETU02-MUX/Plus User Manual - CTC Union Technologies Co.,Ltd.
ETU02-MUX/Plus User Manual - CTC Union Technologies Co.,Ltd.
ETU02-MUX/Plus User Manual - CTC Union Technologies Co.,Ltd.
You also want an ePaper? Increase the reach of your titles
YUMPU automatically turns print PDFs into web optimized ePapers that Google loves.
Chapter 4. Provisioning<br />
4.1.3 Input of the Startup Password<br />
The system displays:<br />
Please input your password:<br />
After inputting the password according to the prompt of the system, the user needs to input the password of the system<br />
and then can enter into the previous menu to make the operation of the correction, default and reconfiguration etc. of<br />
the parameters and observe the status and data activation information of the IO card at every slot. The defaulted<br />
original password of the system is 111111. The user can correct the password in the system menu after inputting the<br />
password and entering into the previous menu to make the password comply with own habit. The password must be a<br />
6-bit character combined with any letter (A-Z or a-z) and any number (0-9). If being wrongly input, the password can<br />
be input again. The system displays every input in the form of * and the input can be cancelled by pressing ESC or the<br />
key of “Backspace”.<br />
4.1.4 Display of the Previous Menu<br />
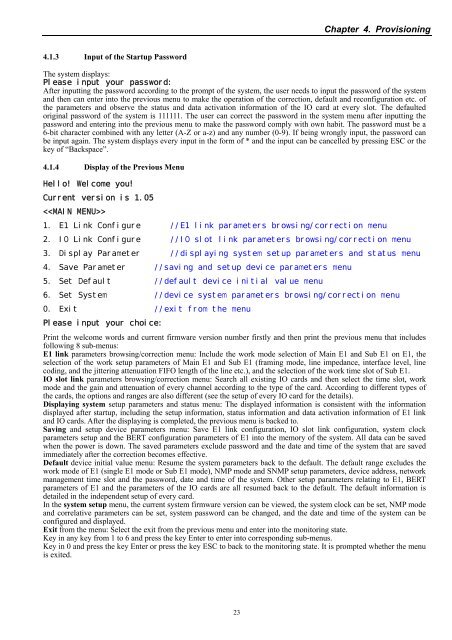
Hello! Welcome you!<br />
Current version is 1.05<br />
<br />
1. E1 Link <strong>Co</strong>nfigure //E1 link parameters browsing/correction menu<br />
2. IO Link <strong>Co</strong>nfigure //IO slot link parameters browsing/correction menu<br />
3. Display Parameter //displaying system setup parameters and status menu<br />
4. Save Parameter //saving and setup device parameters menu<br />
5. Set Default //default device initial value menu<br />
6. Set System //device system parameters browsing/correction menu<br />
0. Exit //exit from the menu<br />
Please input your choice:<br />
Print the welcome words and current firmware version number firstly and then print the previous menu that includes<br />
following 8 sub-menus:<br />
E1 link parameters browsing/correction menu: Include the work mode selection of Main E1 and Sub E1 on E1, the<br />
selection of the work setup parameters of Main E1 and Sub E1 (framing mode, line impedance, interface level, line<br />
coding, and the jittering attenuation FIFO length of the line etc.), and the selection of the work time slot of Sub E1.<br />
IO slot link parameters browsing/correction menu: Search all existing IO cards and then select the time slot, work<br />
mode and the gain and attenuation of every channel according to the type of the card. According to different types of<br />
the cards, the options and ranges are also different (see the setup of every IO card for the details).<br />
Displaying system setup parameters and status menu: The displayed information is consistent with the information<br />
displayed after startup, including the setup information, status information and data activation information of E1 link<br />
and IO cards. After the displaying is completed, the previous menu is backed to.<br />
Saving and setup device parameters menu: Save E1 link configuration, IO slot link configuration, system clock<br />
parameters setup and the BERT configuration parameters of E1 into the memory of the system. All data can be saved<br />
when the power is down. The saved parameters exclude password and the date and time of the system that are saved<br />
immediately after the correction becomes effective.<br />
Default device initial value menu: Resume the system parameters back to the default. The default range excludes the<br />
work mode of E1 (single E1 mode or Sub E1 mode), NMP mode and SNMP setup parameters, device address, network<br />
management time slot and the password, date and time of the system. Other setup parameters relating to E1, BERT<br />
parameters of E1 and the parameters of the IO cards are all resumed back to the default. The default information is<br />
detailed in the independent setup of every card.<br />
In the system setup menu, the current system firmware version can be viewed, the system clock can be set, NMP mode<br />
and correlative parameters can be set, system password can be changed, and the date and time of the system can be<br />
configured and displayed.<br />
Exit from the menu: Select the exit from the previous menu and enter into the monitoring state.<br />
Key in any key from 1 to 6 and press the key Enter to enter into corresponding sub-menus.<br />
Key in 0 and press the key Enter or press the key ESC to back to the monitoring state. It is prompted whether the menu<br />
is exited.<br />
23


