Steering Control Adapter 29–673 Steering ... - www.incartec.co.u
Steering Control Adapter 29–673 Steering ... - www.incartec.co.u
Steering Control Adapter 29–673 Steering ... - www.incartec.co.u

You also want an ePaper? Increase the reach of your titles
YUMPU automatically turns print PDFs into web optimized ePapers that Google loves.
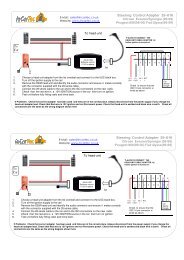
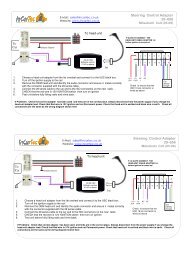
E-Mail: sales@<strong>incartec</strong>.<strong>co</strong>.uk<br />
Website: <strong>www</strong>.<strong>incartec</strong>.<strong>co</strong>.uk<br />
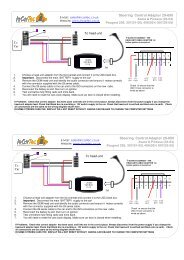
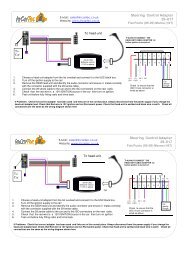
<strong>Steering</strong> <strong>Control</strong> <strong>Adapter</strong> 29–673<br />
Mazda<br />
MX5, 2,3,5, 6 & RX8<br />
To<br />
Car<br />
To head-unit<br />
1-ALWAYS CONNECT THE<br />
HEAD-UNIT CABLE ADAPTER 1st<br />
before ignition is turned on!<br />
Connect Blue/White wire to<br />
new radio remote turn-on if<br />
Mazda has BOSE Amplifier.<br />
Use in <strong>co</strong>njunction with item<br />
20-273 Bose Interface.<br />
29-00 USC<br />
Software version<br />
V1.69 or above<br />
1st<br />
1 3 5 7<br />
2 4 6 8<br />
9<br />
11<br />
10 12<br />
13<br />
14<br />
15<br />
16<br />
1. Choose a head-unit adapter from the list overleaf and <strong>co</strong>nnect it to the USC black box.<br />
2. Turn off the ignition supply to the car!<br />
3. Remove the OEM head-unit and identify the audio <strong>co</strong>nnector and ensure it mates <strong>co</strong>rrectly<br />
with the <strong>co</strong>nnector supplied with the 29 series cable.<br />
4. Connect the 29 series cable to the car and to the ISO <strong>co</strong>nnectors on the new radio.<br />
5. Check that the red wire is a 12V IGNITION source in the car then turn on ignition<br />
6. Test unit before fully fitting radio and trims back.<br />
+12v<br />
IGN<br />
-12v<br />
GND<br />
RC1<br />
+<br />
RC<br />
-<br />
Check to ensure that the<br />
USC 16 pin <strong>co</strong>nnector is<br />
wired as above<br />
Car<br />
identity<br />
Dongle<br />
If Problems: Check that <strong>co</strong>rrect adapter has been used and links are in the <strong>co</strong>rrect place. Always dis<strong>co</strong>nnect from the power supply if you change the<br />
head-unit adapter lead. Check that Red wire is 12V ignition and not Permanent power. Check that head-unit is earthed and black wire is earth. Check all<br />
<strong>co</strong>nnections are the same as the wiring diagram shown here<br />
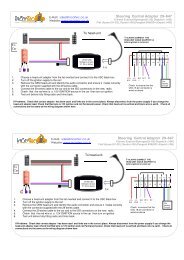
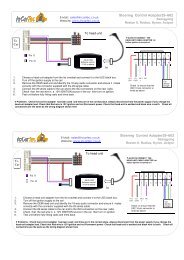
E-Mail: sales@<strong>incartec</strong>.<strong>co</strong>.uk<br />
Website: <strong>www</strong>.<strong>incartec</strong>.<strong>co</strong>.uk<br />
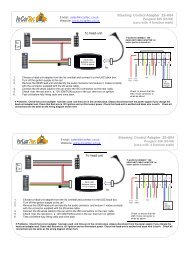
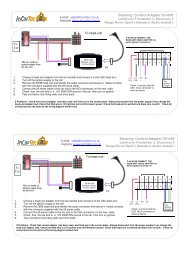
<strong>Steering</strong> <strong>Control</strong> <strong>Adapter</strong> 29–673<br />
Mazda<br />
MX5, 2,3,5, 6 & RX8<br />
To<br />
Car<br />
To head-unit<br />
1-ALWAYS CONNECT THE<br />
HEAD-UNIT CABLE ADAPTER 1st<br />
before ignition is turned on!<br />
Connect Blue/White wire to<br />
new radio remote turn-on if<br />
Mazda has BOSE Amplifier.<br />
Use in <strong>co</strong>njunction with item<br />
20-273 Bose Interface.<br />
29-00 USC<br />
Software version<br />
V1.69 or above<br />
1st<br />
1 3 5 7<br />
2 4 6 8<br />
9<br />
11<br />
10 12<br />
13<br />
14<br />
15<br />
16<br />
1. Choose a head-unit adapter from the list overleaf and <strong>co</strong>nnect it to the USC black box.<br />
2. Turn off the ignition supply to the car!<br />
3. Remove the OEM head-unit and identify the audio <strong>co</strong>nnector and ensure it mates <strong>co</strong>rrectly<br />
with the <strong>co</strong>nnector supplied with the 29 series cable.<br />
4. Connect the 29 series cable to the car and to the ISO <strong>co</strong>nnectors on the new radio.<br />
5. Check that the red wire is a 12V IGNITION source in the car then turn on ignition<br />
6. Test unit before fully fitting radio and trims back.<br />
+12v<br />
IGN<br />
-12v<br />
GND<br />
RC1<br />
+<br />
RC<br />
-<br />
Check to ensure that the<br />
USC 16 pin <strong>co</strong>nnector is<br />
wired as above<br />
Car<br />
identity<br />
Dongle<br />
If Problems: Check that <strong>co</strong>rrect adapter has been used and links are in the <strong>co</strong>rrect place. Always dis<strong>co</strong>nnect from the power supply if you change the<br />
head-unit adapter lead. Check that Red wire is 12V ignition and not Permanent power. Check that head-unit is earthed and black wire is earth. Check all<br />
<strong>co</strong>nnections are the same as the wiring diagram shown here
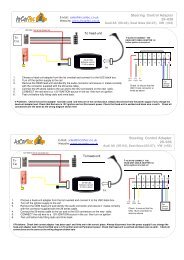
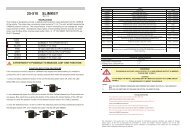
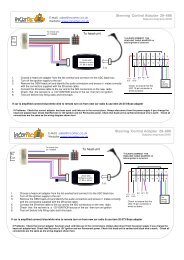
CHOOSE THE CORRECT HEAD-UNIT ADAPTER FROM THOSE BELOW<br />
29-001 Alpine 29-002 Blaupunkt 29-003 Clarion 29-004 JVC<br />
1 3 5 7<br />
9<br />
11<br />
1 3 5 7<br />
9<br />
11<br />
1 3 5 7<br />
9<br />
11<br />
1 3 5 7<br />
9<br />
11<br />
2 4 6 8<br />
10<br />
12<br />
2 4 6 8<br />
10<br />
12<br />
2 4 6 8<br />
10<br />
12<br />
2 4 6 8<br />
10<br />
12<br />
29-005 Kenwood<br />
Single wire<br />
29-005D Kenwood<br />
4 pin DIN Plug<br />
29-006 Panasonic<br />
Standard CD units<br />
29-006A Panasonic<br />
AV head-units<br />
1 3 5 7<br />
9<br />
11<br />
1 3 5 7<br />
9<br />
11<br />
1 3 5 7<br />
9<br />
11<br />
1 3 5 7<br />
9<br />
11<br />
2 4 6 8<br />
10<br />
12<br />
2 4 6 8<br />
10<br />
12<br />
2 4 6 8<br />
10<br />
12<br />
2 4 6 8<br />
10<br />
12<br />
29-009 Siemens<br />
VDO<br />
29-008 Sony<br />
3v & 5v units<br />
29-011 Zenec<br />
29-020 Pioneer &<br />
Sony<br />
1 3 5 7<br />
9<br />
11<br />
1 3 5 7<br />
9<br />
11<br />
1 3 5 7<br />
9<br />
11<br />
1 3 5 7<br />
9<br />
11<br />
2 4 6 8<br />
10<br />
12<br />
2 4 6 8<br />
10<br />
12<br />
2 4 6 8<br />
10<br />
12<br />
2 4 6 8<br />
10<br />
12<br />
Special external drive<br />
PCB version<br />
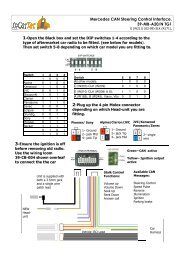
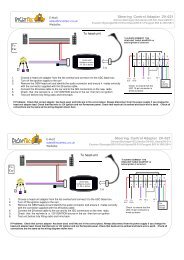
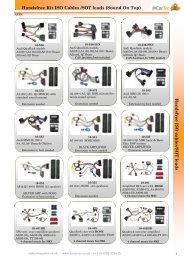
CHOOSE THE CORRECT HEAD-UNIT ADAPTER FROM THOSE BELOW<br />
29-001 Alpine 29-002 Blaupunkt 29-003 Clarion 29-004 JVC<br />
1 3 5 7<br />
9<br />
11<br />
1 3 5 7<br />
9<br />
11<br />
1 3 5 7<br />
9<br />
11<br />
1 3 5 7<br />
9<br />
11<br />
2 4 6 8<br />
10<br />
12<br />
2 4 6 8<br />
10<br />
12<br />
2 4 6 8<br />
10<br />
12<br />
2 4 6 8<br />
10<br />
12<br />
29-005 Kenwood<br />
Single wire<br />
29-005D Kenwood<br />
4 pin DIN Plug<br />
29-006 Panasonic<br />
Standard CD units<br />
29-006A Panasonic<br />
AV head-units<br />
1 3 5 7<br />
9<br />
11<br />
1 3 5 7<br />
9<br />
11<br />
1 3 5 7<br />
9<br />
11<br />
1 3 5 7<br />
9<br />
11<br />
2 4 6 8<br />
10<br />
12<br />
2 4 6 8<br />
10<br />
12<br />
2 4 6 8<br />
10<br />
12<br />
2 4 6 8<br />
10<br />
12<br />
29-009 Siemens<br />
VDO<br />
29-008 Sony<br />
3v & 5v units<br />
29-011 Zenec<br />
29-020 Pioneer &<br />
Sony<br />
1 3 5 7<br />
9<br />
11<br />
1 3 5 7<br />
9<br />
11<br />
1 3 5 7<br />
9<br />
11<br />
1 3 5 7<br />
9<br />
11<br />
2 4 6 8<br />
10<br />
12<br />
2 4 6 8<br />
10<br />
12<br />
2 4 6 8<br />
10<br />
12<br />
2 4 6 8<br />
10<br />
12<br />
Special external drive<br />
PCB version