
Create successful ePaper yourself
Turn your PDF publications into a flip-book with our unique Google optimized e-Paper software.
3: Scan<br />
The PTZ can also work on the preset scan line repeatedly.<br />
1). Scan setup<br />
Step 1: In Picture 3.10, click the Setup button, which takes you to Picture 3.14;<br />
Step 2: Click the Pattern button and input a patrol value in the pattern value<br />
blank;<br />
Step 3: Click the begin button and enter Picture 3.10, here you can set the<br />
following items: Zoom, Focus, Aperture, Direction and so on. Click Set<br />
button to go back Picture 3.14;<br />
Step 4: Click the End button to complete the setup, Click the right button of<br />
the mouse to exit.<br />
Scan value blank<br />
Scan button<br />
Picture 3.14 Scan Setup<br />
2). Scan Calls<br />
In Picture 3.10, click the Page Shift button to enter the PTZ control menu as<br />
shown in Picture 3.12.<br />
Please input the number of the scan in the value blank , then click the AutoScan<br />
button, the PTZ will begin to work on the scan line . Click the stop button to stop.<br />
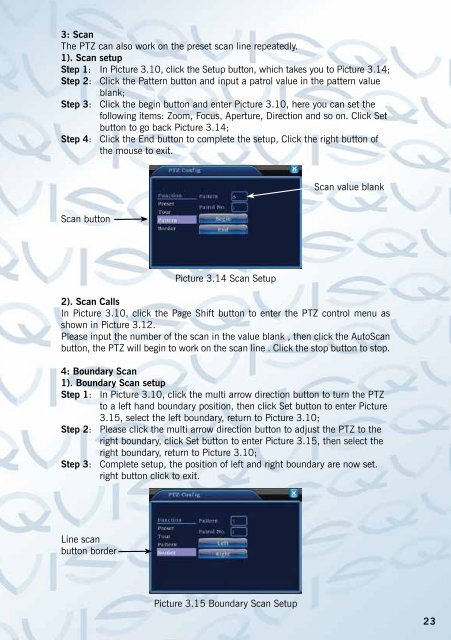
4: Boundary Scan<br />
1). Boundary Scan setup<br />
Step 1: In Picture 3.10, click the multi arrow direction button to turn the PTZ<br />
to a left hand boundary position, then click Set button to enter Picture<br />
3.15, select the left boundary, return to Picture 3.10;<br />
Step 2: Please click the multi arrow direction button to adjust the PTZ to the<br />
right boundary, click Set button to enter Picture 3.15, then select the<br />
right boundary, return to Picture 3.10;<br />
Step 3: Complete setup, the position of left and right boundary are now set.<br />
right button click to exit.<br />
Line scan<br />
button border<br />
Picture 3.15 Boundary Scan Setup<br />
23