PEIS Home Simulator - Ãrebro universitet
PEIS Home Simulator - Ãrebro universitet
PEIS Home Simulator - Ãrebro universitet

You also want an ePaper? Increase the reach of your titles
YUMPU automatically turns print PDFs into web optimized ePapers that Google loves.
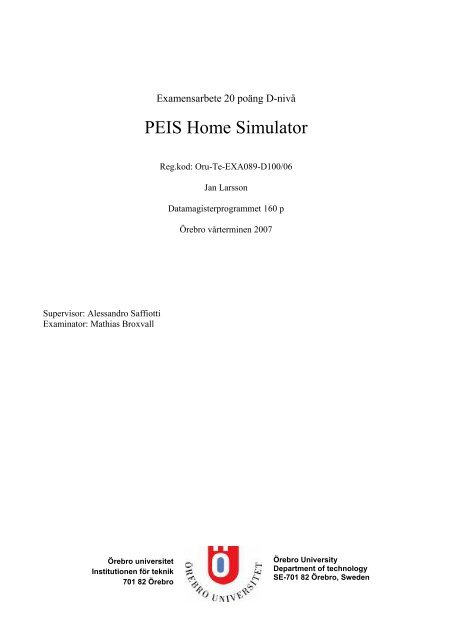
Examensarbete 20 poäng D-nivå<br />
<strong>PEIS</strong> <strong>Home</strong> <strong>Simulator</strong><br />
Reg.kod: Oru-Te-EXA089-D100/06<br />
Jan Larsson<br />
Datamagisterprogrammet 160 p<br />
Örebro vårterminen 2007<br />
Supervisor: Alessandro Saffiotti<br />
Examinator: Mathias Broxvall<br />
Örebro <strong>universitet</strong><br />
Institutionen för teknik<br />
701 82 Örebro<br />
Örebro University<br />
Department of technology<br />
SE-701 82 Örebro, Sweden
<strong>PEIS</strong> <strong>Home</strong> <strong>Simulator</strong> 26 May 2007<br />
Abstract<br />
This is a report for a project done on an assignment by the The AASS Mobile Robotics Lab at<br />
Örebro University in the spring of 2007.<br />
The intended reader should have some experience with programming.<br />
The goal of this project was to develop a 3D simulator for an apartment built by AASS called the<br />
“<strong>PEIS</strong> <strong>Home</strong>”. In the home there are robots and various other devices, sensors like cameras<br />
mounted in the ceiling.<br />
Sammanfattning<br />
Det här en rapport för ett projekt gjort på uppdrag utav AASS Mobile Robotics Lab vid Örebro<br />
Universitet våren 2007.<br />
Läsaren bör ha någon erfarenhet av programmering.<br />
Målet med det här projektet var att utveckla en 3D simulator för en lägenhet byggd av AASS kallad<br />
”<strong>PEIS</strong> <strong>Home</strong>”. I hemmet finns det robotar och diverse andra apparater, sensorer såsom kameror<br />
monterade i taket.<br />
1
Contents<br />
ABSTRACT.......................................................................................................................................................................1<br />
SAMMANFATTNING .....................................................................................................................................................1<br />
CONTENTS.......................................................................................................................................................................2<br />
ACKNOWLEDGEMENTS..............................................................................................................................................4<br />
1 INTRODUCTION.............................................................................................................................................5<br />
1.1 CONTEXT .............................................................................................................................................................5<br />
1.1.1 <strong>PEIS</strong>............................................................................................................................................................5<br />
1.1.2 <strong>PEIS</strong> Ecology..............................................................................................................................................5<br />
1.1.3 The <strong>PEIS</strong> <strong>Home</strong>...........................................................................................................................................5<br />
1.2 MOTIVATION........................................................................................................................................................6<br />
1.3 ORIGINAL OBJECTIVES .........................................................................................................................................7<br />
2 THE PLAYER PROJECT................................................................................................................................8<br />
2.1 PLAYER................................................................................................................................................................8<br />
2.2 STAGE ..................................................................................................................................................................9<br />
2.3 GAZEBO ...............................................................................................................................................................9<br />
2.3.1 World files...................................................................................................................................................9<br />
2.3.2 Models ......................................................................................................................................................10<br />
2.4 WHY GAZEBO ....................................................................................................................................................11<br />
2.4.1 Alternatives...............................................................................................................................................11<br />
3 SIMULATION ENVIRONMENT .................................................................................................................12<br />
3.1 HOME.................................................................................................................................................................12<br />
3.1.1 Floor .........................................................................................................................................................12<br />
3.1.2 Walls .........................................................................................................................................................13<br />
3.1.3 Windows....................................................................................................................................................14<br />
3.1.4 Fake window.............................................................................................................................................15<br />
3.1.5 Kitchen......................................................................................................................................................16<br />
3.2 FURNITURE ........................................................................................................................................................19<br />
3.2.1 Bed............................................................................................................................................................19<br />
3.2.2 Bookcase...................................................................................................................................................20<br />
3.2.3 Chair.........................................................................................................................................................21<br />
3.2.4 Table .........................................................................................................................................................21<br />
3.2.5 Sofa ...........................................................................................................................................................22<br />
3.2.6 Table with Shelves ....................................................................................................................................22<br />
3.2.7 Wall cabinet..............................................................................................................................................23<br />
3.3 PROBLEMS..........................................................................................................................................................23<br />
4 STATIC SENSORS.........................................................................................................................................25<br />
4.1 CEILING CAMERAS .............................................................................................................................................25<br />
4.2 STEREO CAMERA ...............................................................................................................................................27<br />
4.3 PROBLEMS..........................................................................................................................................................28<br />
5 ROBOTS ..........................................................................................................................................................29<br />
5.1 PEOPLEBOT........................................................................................................................................................29<br />
5.2 FRIDGE...............................................................................................................................................................31<br />
5.3 MANIPULATOR...................................................................................................................................................32<br />
5.4 PROBLEMS..........................................................................................................................................................34<br />
6 OVERALL VIEW ...........................................................................................................................................35<br />
7 CONCLUSIONS..............................................................................................................................................37<br />
7.1 ACHIEVED OBJECTIVES......................................................................................................................................37<br />
7.2 LIMITATIONS AND PROBLEMS ............................................................................................................................38<br />
2
7.2.1 Camera movement ....................................................................................................................................38<br />
7.2.2 Modelling..................................................................................................................................................38<br />
7.2.3 Resetting models .......................................................................................................................................38<br />
7.2.4 Attaching devices to GroundPlane ...........................................................................................................38<br />
7.2.5 Lighting model..........................................................................................................................................38<br />
7.3 FUTURE EXTENSIONS..........................................................................................................................................39<br />
7.3.1 Improvements............................................................................................................................................39<br />
7.3.2 Adding features.........................................................................................................................................39<br />
8 REFERENCES ................................................................................................................................................40<br />
3
Acknowledgements<br />
Thanks go to the following:<br />
Alessandro Saffiotti, supervisor for the exjob, for his guidance and encouragement. Mathias<br />
Broxvall for all his helpful advice during the project. Per Sporrong for his help in the <strong>PEIS</strong> <strong>Home</strong>.<br />
Thanks also to everyone else I’ve spoken with at AASS (Applied Autonomous Sensor Systems) for<br />
being helpful and nice in general.<br />
Finally, thanks to the developers of “The Player Project”, especially those creating Gazebo.<br />
4
1 Introduction<br />
1.1 Context<br />
1.1.1 <strong>PEIS</strong><br />
<strong>PEIS</strong> is an abbreviation for “Physically Embedded Intelligent System”. A <strong>PEIS</strong> is a device capable<br />
of doing some computing and communication. A <strong>PEIS</strong> may, or may not, be able to affect/sense the<br />
environment through sensors. Using some uniform communications model all <strong>PEIS</strong> sharing an<br />
environment are able to exchange information and access resources of one another. 1<br />
1.1.2 <strong>PEIS</strong> Ecology<br />
The idea of a <strong>PEIS</strong> ecology is to have an environment filled with <strong>PEIS</strong> and instead of having each<br />
individual component working by itself to perform tasks they work together to achieve goals. En<br />
example scenario:<br />
” Johanna is 76 years old, and she lives in a small house. Soon before she wakes up, her<br />
fridge realizes that there is little milk left and sends a request for a new bottle to the local<br />
store. Johanna’s autonomous trolley goes to the store and fetches the milk together with the<br />
usual newspaper. When Johanna gets out of bed, her motion is detected and the coffee<br />
machine starts to brew coffee. A team of kitchen robots bring bread, butter, jam and coffee<br />
on the table. When Johanna walks out of the bathroom, she finds her breakfast ready. She<br />
hears the cleaning robot that cleans the bathroom after her.” 1<br />
Individual <strong>PEIS</strong> in the ecology need not be complex. With cooperation complex tasks, difficult for a<br />
single <strong>PEIS</strong>, can be accomplished by the ecology as a whole.<br />
One way too look at this is that instead of having some sort of intelligent robotic system helping in<br />
an environment, the whole environment is an intelligent robotic system.<br />
1.1.3 The <strong>PEIS</strong> <strong>Home</strong><br />
The <strong>PEIS</strong> <strong>Home</strong> is a real world demonstration environment built for research of <strong>PEIS</strong> technology as<br />
part of the “<strong>PEIS</strong>-Ecology project” at the AASS Mobile Robotics Lab at Örebro Universitet. It is<br />
built to resemble part of a modern apartment home. It has a kitchen, bedroom and living area. There<br />
is an observation area on one side of the room that is not considered to be an actual part of the home<br />
(not part of the simulated environment). As part of the “<strong>PEIS</strong>-Ecology project” a uniform<br />
communication and cooperation model was developed. Called the <strong>PEIS</strong> kernel this model is a runtime<br />
library that acts as middleware for all components in the ecology.<br />
1 <strong>PEIS</strong> Ecologies: Ambient Intelligence meets Autonomous Robotics, Alessandro Saffiotti & Mathias Broxvall<br />
5
Figure 1.1 Physical Layout of the <strong>PEIS</strong> <strong>Home</strong>. Blue coloured area to the right is the observation area. Note that<br />
some measures and wall placements are not entirely correct compared to the real world <strong>PEIS</strong> <strong>Home</strong>.<br />
1.2 Motivation<br />
There are several advantages to having a simulator versus performing experiments in the real world.<br />
• It is easy to restart an experiment and try again without a lot of setup time, an initial state is<br />
easy re-established.<br />
• Time can be manipulated; the simulation can be paused or run slower, or faster, than real<br />
time.<br />
• Outside factors which might disturb a real world experiment are avoided. In the real world<br />
things outside the home might cause disturbances.<br />
• Devices and other features which you don’t actually have can be implemented and tested in<br />
the simulator without any real world commitments.<br />
• Purely mechanical errors that can cause failures and imprecise actuations do not occur in<br />
simulation.<br />
• Lighting conditions are controlled in simulation.<br />
6
1.3 Original objectives<br />
The goal of the project was to develop a 3D simulator of the <strong>PEIS</strong> <strong>Home</strong> and of all the devices in it.<br />
The simulator would use the Gazebo open-source 3D simulator for which devices and configuration<br />
files specific for the <strong>PEIS</strong> home were to be developed.<br />
The goal was to be achieved in a series of steps as follows:<br />
1. Get familiar with the Gazebo development environment.<br />
2. Create basic <strong>PEIS</strong> <strong>Home</strong> environment for Gazebo simulation (walls and furniture).<br />
3. Add a PeopleBot to the simulation, configured in a way which is as close as possible to the<br />
real PeopleBot used in the <strong>PEIS</strong>-<strong>Home</strong>.<br />
4. Add ceiling cameras to the simulation, configured in a way which is as close as possible to<br />
the real ceiling cameras mounted in the <strong>PEIS</strong>-<strong>Home</strong>.<br />
5. Add the <strong>PEIS</strong>-fridge to the simulation. This will involve creating new devices and interfaces<br />
in Gazebo for the fridge.<br />
6. Write the documentation, in the form of: (a) comments in the code, and (b) final X-job<br />
report. The documentation should be such as to allow a next student to take over and<br />
develop the simulator further.<br />
There were also a set of additional objectives defined. These objectives were to be considered and<br />
possible implemented depending on time available given the progress in meeting the main<br />
objectives.<br />
• Adding a stereo camera mounted on the ceiling to the simulation.<br />
• Adding an autonomous moving table (based on an AmigoBot 2 ) to the simulation.<br />
• Adding a manipulator to procure drinks from the fridge.<br />
• Writing a detailed "guide" to include new objects, robots and device in the simulator, to be<br />
used by the next student(s) who will develop the simulator further.<br />
2 http://www.activrobots.com/ROBOTS/amigobot.html<br />
7
2 The Player Project<br />
The Player Project 3 is a project that provides software for use of robotics/sensors and research<br />
thereof. All the software is free, distributed under the GNU General Public License.<br />
2.1 Player<br />
Player is a program for controlling robots which is in widespread use. The Player program is run as<br />
a server, on a robot for example, to which a client can connect to and communicate using TCP<br />
sockets. A client can be written using any language supporting the use of TCP sockets so there is no<br />
dependency on a particular platform. A variety of different hardware and common sensors are<br />
supported in Player.<br />
In Player there are a multitude of abstract interfaces for different devices such as sensors and robots.<br />
Player uses different drivers for different devices but a client to Player only uses the interfaces<br />
which are standardized for general types of devices. This allows great portability for client<br />
programs for different but similar devices. For example; a client program written to move around<br />
robot “A” using a “position” interface can also be used to control a different robot “B” if it supports<br />
the position interface, even if they have entirely different hardware and specs.<br />
You run a Player server with a configuration file, in this configuration file what drivers to load and<br />
the interfaces to provide are specified.<br />
Part of the Player project is two different simulators, Stage and Gazebo. One simulates in 2D the<br />
other in 3D. Simulated devices in either simulator make no use of the device drivers in Player,<br />
instead Gazebo and Stage have their own drivers which Player make use of but they use the same<br />
interfaces as real devices.<br />
This makes it easy to use client programs for real or simulated devices often without any need for<br />
changes. An illustration of how Player works with real devices compared to simulated:<br />
Figure 2.1 A comparison of how Player works with a real robot vs. a Stage/Gazebo simulated one. Image taken<br />
from the Player wiki 4 .<br />
3 http://playerstage.sourceforge.net<br />
4 http://playerstage.sourceforge.net/wiki/Player<br />
8
2.2 Stage<br />
Stage is a simulator for robots, sensors and other objects in 2D environments. It is designed to be<br />
good at simulating systems containing many devices. The simulation models used are simple but<br />
computationally inexpensive which is appropriate when simulating large populations of devices.<br />
Stage is most often used as a plugin module to Player and clients connect to simulated devices in<br />
the same way as their real world counterparts. Stage also provides a C library which can be used by<br />
itself if wished.<br />
2.3 Gazebo<br />
Gazebo is a simulator made as part of the same project as Player and Stage. Like stage it is a<br />
simulator but in 3D instead of only 2D. Gazebo provides a more accurate model of reality than<br />
stage at the price of being more computationally expensive. This makes Gazebo more suited to<br />
simulations with smaller numbers of devices and a need for more realistic behaviours.<br />
Gazebo works with Player in the same way as stage does, allowing client programs written for<br />
Player to control simulated devices. Like Stage, there is also a C library available should one wish<br />
to ignore Player and work directly with Gazebo.<br />
The code language Gazebo is written in is C++. However more advanced features of C++ compared<br />
to C are not used and it is mainly used as “C with classes”.<br />
The graphical components in Gazebo make use of OpenGL 5 . OpenGL stands for Open Graphics<br />
Library and it is an API for developing applications with 3D and/or 2D computer graphics.<br />
To simulate the physical interactions in Gazebo ODE 6 is used. ODE stands for Open Dynamics<br />
Engine that can simulate rigid body dynamics and collision detection.<br />
2.3.1 World files<br />
Gazebo (and stage) use world files to describe simulation environments. These world files are<br />
written in XML. A world file determines how a simulated world looks and what objects are in it.<br />
For everything in the simulation environment there model declarations. A model can be a robot,<br />
sensor or some static feature of the world, such as the ground or a light source.<br />
The following is a model declaration for a PeopleBot robot in XML-code:<br />
<br />
robot1<br />
0 0 0.241<br />
0 0 45<br />
<br />
5 http://opengl.org<br />
6 http://ode.org/<br />
9
The start and end tags; “” and “”, are the only parts that<br />
are strictly necessary to add the robot to the world. Everything in between these tags is attributes of<br />
the model. For example, the information given by the “” tag specifies the model’s position in<br />
the world and “” how its rotation.<br />
You can attach models to other models in Gazebo. To do this you simple add a model declaration of<br />
the model you want to attach within the model declaration of the model you want to attach to.<br />
Here’s an example were a Canon VCC4 camera is attached to a PeopleBot robot:<br />
<br />
robot1<br />
0 0 0.241<br />
0 0 45<br />
<br />
camera1<br />
0.044 0.000 0.900 <br />
<br />
<br />
2.3.2 Models<br />
Models are written in C++ code as the rest of Gazebo. There are basically two kinds of models in<br />
Gazebo; Static models and plugin models.<br />
Static models are models that are included with the source code of, and compiled with, Gazebo<br />
itself.<br />
Plugin models are shared objects that can be loaded dynamically at runtime by Gazebo. There are<br />
several advantages to working with plugin models:<br />
• They are easier to build, there’s no need to touch the Gazebo installation files (reconfigure<br />
makefiles etc).<br />
• Debugging is faster. Models can be coded, compiled and tested singularly without recompiling<br />
all of Gazebo.<br />
• Source code can be placed anywhere, there is no need to compile it in any specific place.<br />
Because of this, making models as plugins is the recommended way to make new models. 7<br />
When using a plugin model an extra attribute must be added to the model in the world file. In this<br />
attribute the path to the compiled shared object file should be specified. The tag for this is “plugin”.<br />
7 Gazebo 0.7.0 manual, HOWTO: Creating a Plugin Model<br />
10
2.4 Why Gazebo<br />
Some of the reasoning behind choosing Gazebo as the platform for the <strong>PEIS</strong> <strong>Home</strong> <strong>Simulator</strong>:<br />
• Much of the equipment was already using Player.<br />
• Player is becoming a common standard in robotics, this will make it easier to share the<br />
simulator with other researchers.<br />
• Gazebo is open source.<br />
• Compared to building a simulator from scratch it is relatively easy to develop new models<br />
for Gazebo.<br />
2.4.1 Alternatives<br />
2.4.1.1 Robocup Soccer simulator<br />
An alternative means of creating a simulator of the <strong>PEIS</strong> <strong>Home</strong> could have been the Robocup<br />
Soccer simulator. Despite the name, this simulator is intended for general simulations of robots in<br />
3D environments. This simulator could have been used as a base and built upon to provide a<br />
simulation of the <strong>PEIS</strong> <strong>Home</strong>. Player support would have had to been added, the various devices of<br />
the <strong>PEIS</strong> <strong>Home</strong> implemented and lots of general modifications made. Doing something like this<br />
would most likely have been a much more time consuming task, beyond the scope of a single<br />
student exjob.<br />
2.4.1.2 Blender<br />
Another alternative could have been to use Blender, which is a free 3D computer animation<br />
program. Blender, being a 3D animation program, has tools to model 3D objects that would have<br />
been very useful when modelling the <strong>PEIS</strong> <strong>Home</strong> environment and its various components.<br />
There is also a physics engine integrated in Blender but it is currently a bit lacking. Most likely this<br />
would’ve made simulating realistic physical interactions difficult. Blender lacks an internal absolute<br />
time count which is necessary for proper simulation of physics. There also seems to be a lack of<br />
readymade actuators and sensors which could’ve made such difficult to add.<br />
11
3 Simulation Environment<br />
3.1 <strong>Home</strong><br />
Here such features such as the walls of the home and kitchen fixtures are described. The following,<br />
except for the floor, were all modelled as separate plugin models for use with Gazebo. To keep<br />
models fixed in the environment they are attached to the floor.<br />
3.1.1 Floor<br />
For the floor of the home in the simulation there existed a suitable model in Gazebo. The name of<br />
the model is “GroundPlane” and it gives a fixed plane in the environment. Besides the attributes<br />
available to all models there are a number of others available for the “GroundPlane” model. The<br />
following are used in the <strong>PEIS</strong> <strong>Home</strong> simulator’s world file:<br />
• color: allows one the set a RGB value of the floor (one can also set an alpha value)<br />
• textureFile: takes the file path to a texture to use on the ground<br />
• textureSize: takes a number value to set what size the texture should have on the ground<br />
• surfaceFriction: adjusts the friction of the ground according to a given number, default value<br />
is 11.<br />
Model declaration in the world file:<br />
<br />
ground1<br />
1.0 1.0 1.0 <br />
11 <br />
textures/floor.jpg<br />
0.75 0.75 <br />
...<br />
<br />
12
3.1.2 Walls<br />
These are the walls, including if desired the ceiling, as they were built for the simulator.<br />
Figure 3.1 The model of the walls, seen in Gazebo from above (ceiling disabled)<br />
Figure 3.2 The walls, seen from the west, north, east and south side (left to right, top to bottom) in Gazebo.<br />
13
As can be seen in the images one wall has two holes, this is where the windows are placed.<br />
A feature that should be mentioned is that at the apparent exit is actually blocked by an invisible<br />
wall. A robot should not be able to leave the home.<br />
The ability to enable or disable the ceiling of the home was also included. This is done by having an<br />
attribute tag which accepts a true/false (0 or 1) value.<br />
The model declaration for the walls in the simulator world file:<br />
<br />
plugins/Walls/Walls.so<br />
0 0 0 <br />
0<br />
<br />
The attribute tag for disabling/enabling the ceiling is “noCeiling”.<br />
3.1.3 Windows<br />
This is the model for the windows.<br />
Figure 3.3 The model as it appears in Gazebo.<br />
It is hard to see in the image but where there should be glass there are transparent parts.<br />
There is a part of the window that divides the glass into a larger and smaller part. This division is<br />
placed on different sides of the two windows in the real <strong>PEIS</strong> <strong>Home</strong>. Too avoid having to do a<br />
separate model for this an attribute was added to the window model to allow switching sides of the<br />
division. The tag for this attribute is “” and it accepts a true/false (0/1) value.<br />
Model declaration of one of the windows in the world file:<br />
<br />
plugins/Window/Window.so<br />
1.310 4.130 0.7605<br />
14
1<br />
<br />
3.1.4 Fake window<br />
There are plans to add a fake window to one of the walls of the real <strong>PEIS</strong> <strong>Home</strong> in the future. The<br />
fake window does not yet actually exist in the real home so no facts were available for what<br />
dimensions to use for the model, some appropriate values were arrived upon during programming.<br />
Once the fake window is in the real home the model should be easy to adjust appropriately.<br />
Figure 3.4 The model as it appears in Gazebo.<br />
As seen in the images a texture is in the window. The model has been made to accept a<br />
“” attribute where one could specify a file path to use to use for a texture. In its current<br />
appearance the model more than anything resembles a framed picture<br />
The model declaration in the world file:<br />
<br />
plugins/FakeWindow/FakeWindow.so<br />
0 0 90 <br />
1.375 0.007 1.000 <br />
skyTones.jpg<br />
<br />
15
3.1.5 Kitchen<br />
There are a few models making up the kitchen fixtures. Most of it is made of a single big model<br />
making up benches, a sink and the parts in which the spaces for cabinets are built.<br />
Figure 3.5 The model as it appears in Gazebo.<br />
Worth to note is that the larger cabinet space in the model does not exist in the real home, the doors<br />
that would open to that space if it existed are just dummies made for display.<br />
Model declaration in the world file:<br />
<br />
plugins/Kitchen/Kitchen.so<br />
0.000 2.210 0 <br />
<br />
16
3.1.5.1 Cook plates<br />
This is a model intended to represent some cooking plates. They have no functionality and so are<br />
just for looks.<br />
Figure 3.6 The model as it appears in Gazebo.<br />
Model declaration in the world file:<br />
<br />
plugins/CookPlates/CookPlates.so<br />
0.285 2.485 0.895 <br />
<br />
Cabinet doors<br />
This is a model for a door of a cabinet. The model has a joint which allows the door to be pulled<br />
open from where it is positioned.<br />
Figure 3.7 The model as it appears in Gazebo.<br />
To make it possible to switch the sides of the door’s handle and joint placement an attribute has<br />
been added to the model to allow one to specify if it should have a the handle on its left hand side or<br />
not. The tag is “” and it accepts a true/false (0 or 1) value.<br />
Model declaration for one of the doors in the world file (there are three in total):<br />
<br />
plugins/CabinetDoor/CabinetDoor.so<br />
0.581 3.307 0.180 <br />
0 0 0 <br />
1<br />
<br />
17
The models together:<br />
Figure 3.8 The kitchen with all models together as it appears in Gazebo.<br />
18
3.2 Furniture<br />
The following pieces of furniture are modelled as plugin models. All the furniture models have their<br />
origin at their lowest point but otherwise centred with respect to the main parts of the model, the<br />
exception to this being the “Table with Shelves” model.<br />
3.2.1 Bed<br />
A simple bed. Loose parts such as pillows and cover are not modelled, only the basic shape.<br />
Figure 3.9 The bed model as it appears in Gazebo.<br />
Model declaration in the world file:<br />
<br />
plugins/Bed/Bed.so<br />
0.600 1.070 0<br />
0 0 90<br />
<br />
19
3.2.2 Bookcase<br />
This is a basic bookcase with five shelves.<br />
Figure 3.10 The bookcase model as it appears in Gazebo.<br />
Model declaration:<br />
<br />
plugins/Bookcase/Bookcase.so<br />
4.200 0.160 0<br />
0 0 90<br />
<br />
20
3.2.3 Chair<br />
A basic chair. It has a very rudimentary shape.<br />
Figure 3.11 The chair model as it appears in Gazebo.<br />
Model declaration for one of the chairs in the home (there are two in total):<br />
<br />
plugins/Chair/Chair.so<br />
2.000 3.300 0 <br />
0 0 0 <br />
<br />
3.2.4 Table<br />
A low table. There is a shelf space below the table piece and it has four wheels allowing it to be<br />
pushed around easily.<br />
Figure 3.12 The table model as it appears in Gazebo.<br />
The model declaration of the table in the world file:<br />
<br />
plugins/LowTable/LowTable.so<br />
3.300 1.700 0<br />
0 0 0<br />
<br />
21
3.2.5 Sofa<br />
This is a model of a sofa in the <strong>PEIS</strong> <strong>Home</strong>.<br />
Figure 3.13 The sofa model as it appears in Gazebo.<br />
Model declaration in the world file:<br />
<br />
plugins/Sofa/Sofa.so<br />
5.500 2.100 0<br />
0 0 180<br />
<br />
3.2.6 Table with Shelves<br />
This is model is a wall mounted table and shelves combined.<br />
Figure 3.14 The table/shelf as it appears in Gazebo.<br />
The table in the <strong>PEIS</strong> home has a part that can be folded down. Because of this there is an attribute,<br />
“, that allows one to specify if the table should be raised or lowered (not shown) in the<br />
simulation, it accepts a true/false (0 or 1) value. During simulation it is locked in place so the<br />
desired position needs to be set in the world file before starting the simulation.<br />
22
The model declaration in the world file:<br />
<br />
plugins/TableShelf/TableShelf.so<br />
2.362 3.814 0.7605 <br />
0 0 -90 <br />
1<br />
<br />
3.2.7 Wall cabinet<br />
This is a model of a wall mounted cabinet.<br />
Figure 3.15 The cabinet model as it appears in Gazebo.<br />
The door opens upward and has a transparent glass part in it. The greenish part inside is a shelf.<br />
Model declaration in the world file:<br />
<br />
plugins/WallCabinet/WallCabinet.so<br />
0.185 2.610 1.735<br />
0 0 0<br />
<br />
3.3 Problems<br />
Fixed models<br />
There does not seem to be any way to code a model such that it will remain fixed in the<br />
environment by itself. The walls and other fixtures needed to be fixed in one place and it was also<br />
decided that some of the furniture should not be possible to move. This was solved by attaching<br />
them to the ground plane in the simulation to which it is possible to attach models like with any<br />
other model and it is always fixed in the environment.<br />
Unnecessary Collision Detection<br />
During development it was discovered that adding the walls to the simulation environment caused<br />
the simulation to slow-down. The walls were attached to the floor and it would appear that the<br />
contact between the walls led to many calculations being performed for the collision detection<br />
between the walls and floor. This was undesired and a way to indicate what objects should perform<br />
collision detection between each other was discovered.<br />
23
To avoid unnecessary computations collisions were disabled between non-device objects that were<br />
intended to be fixed in place. This includes the floor, walls, windows, all the parts making up the<br />
kitchen area except for the cabinet doors and all furniture except for the small, wheeled table and<br />
the chairs.<br />
One drawback to this is that the models currently intended to be fixed in the environment cannot be<br />
placed by themselves but must be attached to the ground. Since collisions are disabled between<br />
these models and the floor they would fall right through it.<br />
Attaching models<br />
There is a problem with attaching models to other models that are complex in the sense that they<br />
consist of many shapes put together. Models like the walls or the main kitchen model. Attaching<br />
models to these can result in unstable physic behaviours, such as attached models seeming to<br />
vibrate or shake and can in some cases cause the simulator to crash. During development this was<br />
very clear when at first the cabinet doors were attached to the main kitchen model, the simulator<br />
would always crash when anything collided with the doors. This was solved by instead of attaching<br />
models to the walls or kitchen model directly they were instead attached to the GroundPlane.<br />
Because of this solution however there is an inconvenience in that should the kitchen or walls<br />
model moved models that should be placed on them need to be moved individually to correct<br />
positions (the cabinet doors for instance).<br />
24
4 Static Sensors<br />
These are sensors placed in environment but not attached to any robot.<br />
4.1 Ceiling cameras<br />
There are five web cameras mounted in the ceiling of <strong>PEIS</strong> <strong>Home</strong>, they are however intended to be<br />
replaced by new cameras. Currently there is one of these new cameras in the home. In the<br />
simulation five cameras have been added the first of which is placed as the new camera in the real<br />
home, the others are simply placed in a line. Once the camera placement is finalized in the real<br />
home the cameras in the simulation can be moved to appropriate positions.<br />
In the real <strong>PEIS</strong> home the cameras are not accessed through player but to keep things simple in the<br />
simulator a camera model supporting the Player camera interface was used.<br />
There is a generic camera model for a monocular camera in Gazebo, based on the source code of<br />
this model a plugin model was made instead. The modifications to the original code consisted of<br />
changing the physical shape of the camera and making the origin of the model in the middle of the<br />
“lens” part.<br />
The change in the models origin was made to make placement from real world measurements<br />
easier. In the real home it is easier to measure the position and orientation of the camera at the lens.<br />
Thus with a measure of where a camera lens is located in the real home one can easily determine<br />
coordinates for a simulated camera.<br />
Figure 4.1 The model of the camera as it appears in Gazebo.<br />
25
Images from the camera in the simulation to its real world counterpart (there was some work being<br />
done in the <strong>PEIS</strong> <strong>Home</strong> at the time the image was taken):<br />
Figure 4.2 An image comparison from the viewpoints of a real world camera and a simulated one.<br />
Model declaration of one of the cameras in the world file:<br />
<br />
plugins/SmallCam/SmallCam.so<br />
ceilingcam1<br />
6.040 2.140 2.455 <br />
0 45 180 <br />
0.100 <br />
10.000 <br />
0 <br />
1 <br />
45 <br />
320 240 <br />
<br />
Seen in the model declaration a number of attributes are available for the camera model.<br />
The attributes “nearClip/farClip” sets the near and far clipping distances of the camera view. With<br />
the above values objects nearer than 0.100 m and further away then 10 m cannot be seen.<br />
The “gravity” attribute accepts a true/false value specifying if the camera should be affected by<br />
gravity. The camera is not attached to any other model so this was set to false to keep the camera in<br />
its place. This means that the camera can still be moved by contact with some other object in the<br />
simulation but since they are placed out of reach at ceiling height this was not deemed to be a<br />
problem.<br />
“updateRate“ sets how often the camera view should be updated per simulated second, the number<br />
of frames per second. Currently this is set low, only one frame per second, because of some<br />
26
performance issues.<br />
The “hfov” attribute sets the horizontal field of view of the camera, the value is in degrees.<br />
Lastly, the “imageSize” values set the size, or resolution, of the camera image.<br />
Player Interfaces<br />
The “camera interface” in player is used to access the camera.<br />
4.2 Stereo Camera<br />
There are plans to add a stereo camera to the real <strong>PEIS</strong> <strong>Home</strong>. There exists a model for this in<br />
Gazebo called “StereoHead” and so it was used in the simulator world file.<br />
Figure 4.3 Stereo camera model as it appears in Gazebo.<br />
The camera is placed in the middle of the ceiling looking downwards into the home.<br />
Images from the stereo camera in the <strong>PEIS</strong> <strong>Home</strong> simulation:<br />
Figure 4.4 Disparity image and normal image from a simulated stereo camera.<br />
The left image is a disparity image generated by combining images from both lenses. The other is<br />
an image from only one of the camera lenses.<br />
27
Model declaration in the world file:<br />
<br />
stereoCam1<br />
3.000 2.210 2.455 <br />
0 90 90 <br />
0.100 <br />
10.000 <br />
0 <br />
1 <br />
87 <br />
0.200 <br />
320 240 <br />
<br />
All attributes except one is recognizable from the earlier camera model (see above). The attribute<br />
“baseline” sets how far the distance should be between the two camera lenses on the stereo camera.<br />
Player Interfaces<br />
The “stereo interface” in Player is supported.<br />
4.3 Problems<br />
Multiple Cameras<br />
During development it was discovered that adding several cameras greatly affected the performance<br />
of the simulation speed negatively. Having the five ceiling cameras all using moderately high<br />
resolution and update rate slowed the simulation speed to a crawl. To somewhat remedy this the<br />
update rate of the cameras are set very low and the image resolution is also lower then the real<br />
world camera counterparts. Should one wish to have these closer to the real world camera<br />
specifications a more powerful computer (mainly in the graphics department) than the one currently<br />
used to run Gazebo and the <strong>PEIS</strong> <strong>Home</strong> simulator is needed unless having the simulation run slowly<br />
is acceptable.<br />
28
5 Robots<br />
Here are the models for the simulation that can be considered to be robotic systems.<br />
5.1 PeopleBot<br />
In the <strong>PEIS</strong> <strong>Home</strong> there is a ActiveMedia PeopleBot robot 8 . This robot has 2 wheels to move<br />
around, 2 sonar rings, one placed low going all the way around the robot and one facing forwards<br />
and mounted high. Besides this the PeopleBot used in the <strong>PEIS</strong> <strong>Home</strong> is equipped with a<br />
pan/tilt/zoom camera, a laser rangefinder, a gripper and also a top mounted camera with a 360 o fov.<br />
In Gazebo there is a PeopleBot model. This model had the lower sonar ring as the real PeopleBot<br />
but no other sensors, including the front facing upper sonar ring. The model however also turned<br />
out to be an older design then the one currently used in the real <strong>PEIS</strong> <strong>Home</strong> so instead a plugin<br />
model was created based on the source code for the existing PeopleBot model. The older model was<br />
a little higher then the PeopleBot in the <strong>PEIS</strong> home and the adjustments from the original Gazebo<br />
model consisted mainly of changing the physical dimensions of the model.<br />
The modified PeopleBot model, without any additional components mounted:<br />
Figure 5.1 The new PeopleBot model as it appears in Gazebo<br />
To add the front facing upper sonar ring to the PeopleBot in the simulation the code for the sonar on<br />
the robot was taken and adapted to make a plugin model. Since it was not necessary this plugin<br />
model was not given a physical body. It is attached to the PeopleBot in the simulation to give it the<br />
same sonar cover as the real robot. The sonar model was called “FrontSonars”.<br />
There are models in Gazebo for the specific pan/tilt/zoom camera, a Canon VCC4, and laser<br />
rangefinder, SickLMS200, but models for the gripper and 360 o fov camera does not exist in<br />
Gazebo. Adding the Canon camera and laser to the simulated robot was deemed to be sufficient for<br />
this project.<br />
The robot with laser and camera models added:<br />
Figure 5.2 The new PeopleBot model with sensors attached.<br />
8 http://www.activrobots.com/ROBOTS/peoplebot.html<br />
29
Model declaration in the world file, including all the extra sensors:<br />
<br />
plugins/PeopleBotP/PeopleBotP.so<br />
robot1<br />
1.5 2.7 0.241<br />
<br />
plugins/FrontSonars/FrontSonars.so<br />
sonar1<br />
-0.050 0.000 0.835 <br />
<br />
<br />
laser1<br />
0.005 0.000 0.000<br />
<br />
<br />
camera1<br />
0.044 0.000 0.695 <br />
0.010 <br />
<br />
<br />
Player Interfaces<br />
The robot model provides the following Player interfaces:<br />
position (for moving and reading position)<br />
power (for reading battery levels)<br />
sonar ( sonar information, the lower ring )<br />
The sonar model (upper, front facing sonar) provides a “sonar interface”.<br />
The Camera VCC4 model supports the “camera” and “ptz” (pan/tilt/zoom controls for the camera)<br />
interfaces.<br />
Player Interfaces<br />
The laser provides the Player laser and fiducial interfaces.<br />
30
5.2 Fridge<br />
There is a fridge in the real <strong>PEIS</strong> <strong>Home</strong> Ecology which has can opened remotely using the <strong>PEIS</strong><br />
kernel, a plugin model for this fridge was made. This makes no use of any Player interface but like<br />
with the ceiling cameras the plugin model was made to use a Player compatible interface for<br />
simplicity’s sake. There are also some sensors and other things in the real fridge but those did not<br />
need to be included in the simulation.<br />
Fridge with door closed:<br />
Figure 5.3 Fridge model, with door closed, as it appears in Gazebo.<br />
Fridge with door opened:<br />
Figure 5.4 Fridge model, with door opened, as it appears in Gazebo.<br />
There are two shelves inside the fridge model and two in the door. The real world fridge had one<br />
more shelf but it is currently not in the model to allow some room for a manipulator (see below).<br />
The fridge model uses an “actarray interface”, an interface intended for arrays of actuators. In the<br />
case of the fridge there is really only one moveable part so it is like controlling an array of only one<br />
actuator. The fridge is made to accept only position commands of numeric value 0 or 1 to the<br />
actarray, where 0 and 1 closes and opens the door respectively.<br />
Model declaration of the fridge in the world file:<br />
<br />
plugins/Fridge/Fridge.so<br />
fridge<br />
0.350 2.675 0.000 <br />
...<br />
<br />
31
Player Interfaces<br />
The fridge provides an actarray interface.<br />
5.3 Manipulator<br />
A plugin model of a robotic arm for mounting inside the fridge has been built. The arm is controlled<br />
using an actarray interface as that for the fridge.<br />
The is the robotic arm in its initial state:<br />
Figure 5.5 Manipulator model in its initial state in Gazebo.<br />
As seen in the picture the different parts of the arm have distinctly different colours. This was to<br />
ease the identification of different parts during development. Should a more realistic look be desired<br />
the model can easily be adjusted to have some other colours. The smaller parts in the lower part of<br />
the model make up a gripper, they are actually placed a bit out in the air.<br />
The arm is simply built only having two degrees of freedom. One part extends outwards from the<br />
main fitting:<br />
side<br />
top<br />
Figure 5.6 Manipulator model in Gazebo horizontally extended.<br />
On the extended part the vertical portion can slide out:<br />
Side<br />
Top<br />
Figure 5.7 Manipulator model horizontally extended and gripper section moved out.<br />
32
One part can move down vertically:<br />
Figure 5.8 Manipulator model horizontally and vertically extended with gripper moved out.<br />
In the image above when the arm is reaching downwards it is not connected all the way. Making a<br />
model able to actually extend in such a way that the actual size of a part changed would’ve been<br />
difficult. Such small departures from realism, as in the images above, were deemed to be<br />
acceptable.<br />
The gripper part at the end that can be closed/opened.<br />
Each of the movements above are possibly by commanding four different actuators in an actarray<br />
interface. You can either command them to move to a position or with a certain speed.<br />
Model declaration in the world file, with the manipulator attached to the fridge:<br />
<br />
plugins/Fridge/Fridge.so<br />
fridge<br />
0.350 2.675 0.000 <br />
<br />
plugins/Manipulator/Manipulator.so<br />
fridgeArm<br />
0.020 0.150 0.790 <br />
<br />
<br />
33
Player Interfaces<br />
The manipulator model provides an actarray interface.<br />
5.4 Problems<br />
Gripper Interface<br />
There is a gripper interface in Player and Gazebo. Initially this interface was intended to be used to<br />
control the fridge The idea was to use the commands for opening/closing a gripper to open/close the<br />
fridge door. However there seem to be some fault in how commands to a gripper on the Gazebo<br />
side are handled so currently a gripper cannot be controlled using Player. This was solved by using<br />
an actarray interface instead after using such an interface successfully with the manipulator model.<br />
Actarray Interface<br />
Initially when using an actarray interface for the manipulator model there was a problem were<br />
plugin models using it would not load and Gazebo would fail with an error. There was however no<br />
problem when compiling a model with an actarray interface so it was theorized that maybe the<br />
problem was somehow with plugin models using such an interface.<br />
The test if a static model might be able to handle an actarray interface one of the models included in<br />
the Gazebo source code was modified to have one. Gazebo was then recompiled and when testing<br />
the model it did indeed load without an error. The idea then was to make the manipulator a static<br />
model.<br />
Adding a static model entailed considerably more effort then making a plugin model. Instead of<br />
modifying makefiles directly they must be generated using a tool called “automake” which uses a<br />
configuration file. Once this was done however it turned out that reconfiguring the makefiles had<br />
enabled actarray interfaces to work with plugin models too. So at the end the manipulator model<br />
ended up being a plugin model.<br />
34
6 Overall View<br />
In this section some images from the real and the simulated home are shown.<br />
First, an image of the complete <strong>PEIS</strong> <strong>Home</strong> in the simulator, seen from above:<br />
Figure 6.1 The simulated <strong>PEIS</strong> <strong>Home</strong> seen from above.<br />
35
Some images showing comparison between the real <strong>Home</strong> and the simulated one:<br />
Figure 6.2 Outside the bedroom area, seen in the real home (left) and the simulated (right).<br />
Figure 6.3 Living room area, seen in the real home (left) and the simulated (right).<br />
Figure 6.4 The kitchen area, seen in the real home (left) and the simulated (right).<br />
36
7 Conclusions<br />
7.1 Achieved Objectives<br />
Looking back at the starting objectives the main objectives are achieved with some exceptions.<br />
1. Get familiar with the Gazebo development environment.<br />
At the start of the project, a few weeks were spent installing and playing around with Gazebo,<br />
various world examples were tried and some basic models built.<br />
2. Create basic <strong>PEIS</strong> <strong>Home</strong> environment for Gazebo simulation (walls and furniture).<br />
Models have been created for the Walls and furniture (also the kitchen). A world file using all<br />
the <strong>PEIS</strong> <strong>Home</strong> simulator models has been made.<br />
3. Add a PeopleBot to the simulation, configured in a way which is as close as possible to the<br />
real PeopleBot used in the <strong>PEIS</strong>-<strong>Home</strong>.<br />
A model for the PeopleBot in the <strong>PEIS</strong> <strong>Home</strong> was built and added to the simulation world<br />
together with some sensors. Some devices, such as a gripper and 360 o fov camera that exist on<br />
the real robot have not been added.<br />
4. Add ceiling cameras to the simulation, configured in a way which is as close as possible to<br />
the real ceiling cameras mounted in the <strong>PEIS</strong>-<strong>Home</strong>.<br />
A camera model has been created and added to the simulated world. Unlike the real camera, it<br />
is accessed using a Player interface. Because of some performance issues lesser image<br />
resolutions and lower update rates than the real cameras have are used. See the Problems<br />
subsection under Static Sensors in this report.<br />
5. Add the <strong>PEIS</strong>-fridge to the simulation. This will involve creating new devices and<br />
interfaces in Gazebo for the fridge.<br />
A model for the fridge has been created, accessible through Player.<br />
6. Write the documentation, in the form of: (a) comments in the code, and (b) final X-job<br />
report. The documentation should be such as to allow a next student to take over and<br />
develop the simulator further.<br />
This final report is part of the final objective and at the time of writing the code could use some<br />
more commenting. Given this the final objective is not yet fully achieved.<br />
Looking at the optional objectives, two have been achieved, these are:<br />
• Adding a stereo camera mounted on the ceiling to the simulation.<br />
Using a model that existed in Gazebo a stereo camera has been added to the simulation.<br />
• Adding a manipulator to procure drinks from the fridge.<br />
A simple gripper model has been created for use with the fridge.<br />
37
7.2 Limitations and Problems<br />
In this section some problems/limitations in the current version of Gazebo are described.<br />
7.2.1 Camera movement<br />
To move an observer camera in the graphical interface of Gazebo you click and drag with your<br />
mouse in the observation window. The movement is actually based on what surface the mouse<br />
pointer was over. The camera is dragged in relation to the surface touched. This can become<br />
problematic should there be an obstacle in the way of the camera. You cannot for example zoom<br />
past an object. This is especially inconvenient should the camera end up outside any of the walls or<br />
above the ceiling of the home.<br />
7.2.2 Modelling<br />
In the current version of Gazebo there is no modelling tool to assist in the creation of models. A<br />
physical model is built by specifying in code what geometric shapes it should consist of and where<br />
they should be placed. The shapes one can use are mainly cubes, cylinder and spheres. It is possible<br />
to make an advanced 3D model in a modelling tool of some sort and use as a skin for a simple<br />
model to give it a detailed appearance. Only the simple geometric shapes the model consists of will<br />
be used for the physical interactions though. This made the sink part particularly challenging to<br />
make, as the round sides had to be built using cube shapes.<br />
7.2.3 Resetting models<br />
Models consisting of several parts bound together with one or more joints cannot be returned to<br />
their initial state when resetting the simulation with the Gazebo interface. The main parts, the parts<br />
that cannot move relative to one another, of a model will return to its starting position but any part<br />
attached with a joint will maintain its position at the reset relative to the main part.<br />
7.2.4 Attaching devices to GroundPlane<br />
If a device providing one or more interfaces is attached to a “GroundPlane” the interfaces will not<br />
be shown in the “simulation controls” panel if running Gazebo with a GUI. The devices can<br />
however be accessed through player or some other client using the Gazebo library.<br />
7.2.5 Lighting model<br />
For the graphical parts of Gazebo mostly standard OpenGL is used. There are several limitations in<br />
how light affects surfaces in the simulation. Most notably, objects don’t cast shadows on other<br />
objects and they do not reflect light onto surrounding surfaces. How a surface appears depends<br />
entirely on how it is facing relative to light sources, regardless of intervening surfaces, and what<br />
colour properties those light sources and that surface has.<br />
38
7.3 Future extensions<br />
7.3.1 Improvements<br />
7.3.1.1 Non-player accessibility<br />
One possible improvement given more time could be to modify some of the models to work more<br />
like the ones in the real home. Neither the existing cameras nor the fridge in the <strong>PEIS</strong> home<br />
simulator make use of Player. If these were made to more accurately simulate how they are<br />
accessed in the real home less software used currently will have to be adapted for use with the<br />
simulator.<br />
7.3.2 Adding features<br />
7.3.2.1 Dynamically adding models<br />
In Gazebo there is a model called “Factory”. This model has no physical shape in the simulation,<br />
what it does is to take model declarations as text strings and then those models are added to the<br />
simulation as if they’d been in the world file. This model can be accessed using a “speech” interface<br />
in Player if not using the Gazebo library directly.<br />
Using this program could be written to interactively add objects to the simulated world during<br />
runtime. This could be a lot more user friendly then having to stop a simulation and editing world<br />
files whenever one wants to add an object. The current “Factory” model cannot be used to remove<br />
models from the world.<br />
7.3.2.2 Moving objects<br />
Gazebo has a model called “TruthWidget” without a physical body. The model provides an<br />
interface which can be used to get its pose (position and rotation) but also set its pose. Having no<br />
physical body itself it is meant to be attached to other models, thereby allowing them the<br />
functionalities of the “TruthWidget”.<br />
Using this, client programs can be written that allows moving objects around in the simulation even<br />
if they possess no means of locomotion by themselves. This could add some useful interactivity to<br />
anyone working with the <strong>PEIS</strong> <strong>Home</strong> simulator.<br />
39
8 References<br />
1) A. Saffiotti and M. Broxvall. <strong>PEIS</strong> Ecologies: Ambient Intelligence meets Autonomous<br />
Robotics. Proc. of the sOc-EUSAI conference on Smart Objects and Ambient Intelligence.<br />
Grenoble, France, October 2005.<br />
2) Information on the AmigoBot.<br />
http://www.activrobots.com/ROBOTS/amigobot.html<br />
3) The Player Project homepage.<br />
http://playerstage.sourceforge.net<br />
4) The Player project information page for Player.<br />
http://playerstage.sourceforge.net/wiki/Player<br />
5) Information about OpenGL.<br />
http://opengl.org<br />
6) Information about ODE.<br />
http://ode.org/<br />
7) Gazebo 0.7.0 manual, HOWTO: Creating a Plugin Model<br />
http://playerstage.sourceforge.net/doc/Gazebo-manual-0.7.0-html/plugin_models.html<br />
8) Information on the PeopleBot<br />
http://www.activrobots.com/ROBOTS/peoplebot.html<br />
Websites last checked 2007-06-11.<br />
40