P22 2004 Manual - Wood Pellet Stoves
P22 2004 Manual - Wood Pellet Stoves
P22 2004 Manual - Wood Pellet Stoves

Create successful ePaper yourself
Turn your PDF publications into a flip-book with our unique Google optimized e-Paper software.
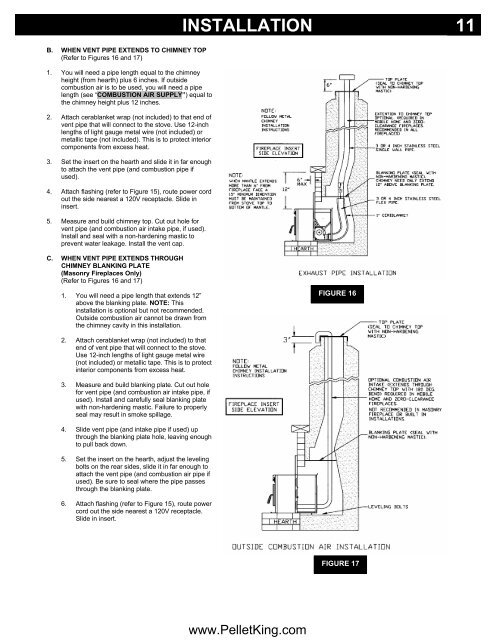
B. WHEN VENT PIPE EXTENDS TO CHIMNEY TOP<br />
(Refer to Figures 16 and 17)<br />
1. You will need a pipe length equal to the chimney<br />
height (from hearth) plus 6 inches. If outside<br />
combustion air is to be used, you will need a pipe<br />
length (see “COMBUSTION AIR SUPPLY”) equal to<br />
the chimney height plus 12 inches.<br />
2. Attach cerablanket wrap (not included) to that end of<br />
vent pipe that will connect to the stove. Use 12-inch<br />
lengths of light gauge metal wire (not included) or<br />
metallic tape (not included). This is to protect interior<br />
components from excess heat.<br />
3. Set the insert on the hearth and slide it in far enough<br />
to attach the vent pipe (and combustion pipe if<br />
used).<br />
4. Attach flashing (refer to Figure 15), route power cord<br />
out the side nearest a 120V receptacle. Slide in<br />
insert.<br />
5. Measure and build chimney top. Cut out hole for<br />
vent pipe (and combustion air intake pipe, if used).<br />
Install and seal with a non-hardening mastic to<br />
prevent water leakage. Install the vent cap.<br />
INSTALLATION 11<br />
C. WHEN VENT PIPE EXTENDS THROUGH<br />
CHIMNEY BLANKING PLATE<br />
(Masonry Fireplaces Only)<br />
(Refer to Figures 16 and 17)<br />
1. You will need a pipe length that extends 12”<br />
above the blanking plate. NOTE: This<br />
installation is optional but not recommended.<br />
Outside combustion air cannot be drawn from<br />
the chimney cavity in this installation.<br />
FIGURE 16<br />
2. Attach cerablanket wrap (not included) to that<br />
end of vent pipe that will connect to the stove.<br />
Use 12-inch lengths of light gauge metal wire<br />
(not included) or metallic tape. This is to protect<br />
interior components from excess heat.<br />
3. Measure and build blanking plate. Cut out hole<br />
for vent pipe (and combustion air intake pipe, if<br />
used). Install and carefully seal blanking plate<br />
with non-hardening mastic. Failure to properly<br />
seal may result in smoke spillage.<br />
4. Slide vent pipe (and intake pipe if used) up<br />
through the blanking plate hole, leaving enough<br />
to pull back down.<br />
5. Set the insert on the hearth, adjust the leveling<br />
bolts on the rear sides, slide it in far enough to<br />
attach the vent pipe (and combustion air pipe if<br />
used). Be sure to seal where the pipe passes<br />
through the blanking plate.<br />
6. Attach flashing (refer to Figure 15), route power<br />
cord out the side nearest a 120V receptacle.<br />
Slide in insert.<br />
FIGURE 17<br />
www.<strong>Pellet</strong>King.com