P22 2004 Manual - Wood Pellet Stoves
P22 2004 Manual - Wood Pellet Stoves
P22 2004 Manual - Wood Pellet Stoves

You also want an ePaper? Increase the reach of your titles
YUMPU automatically turns print PDFs into web optimized ePapers that Google loves.
FAILURE TO CLEAN AND MAINTAIN THIS UNIT AS INDICATED CAN<br />
RESULT IN POOR PERFORMANCE AND SAFETY HAZARDS. NEVER<br />
CLEAN WHEN HOT.<br />
NOTE: Inspect burn pot periodically to see that holes have not become<br />
plugged, if so, clean thoroughly.<br />
ASH REMOVAL<br />
Ashes should be placed in a metal container with a tight-fitting lid. The<br />
closed container or ashes should be placed on a noncombustible surface<br />
or on the ground, well away from all combustible materials pending final<br />
disposal. If ashes are disposed of by soil burial or otherwise locally<br />
dispersed, they should be retained in the closed container until all cinders<br />
have thoroughly cooled.<br />
ASH DISPOSAL<br />
Remove ashes periodically as they fill the firebox. To remove ashes:<br />
MAINTENANCE 19<br />
a. Make sure fire is out and firebox is cool.<br />
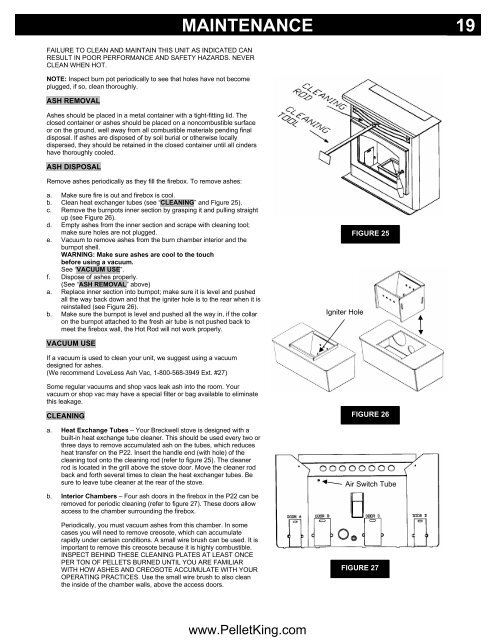
b. Clean heat exchanger tubes (see “CLEANING” and Figure 25).<br />
c. Remove the burnpots inner section by grasping it and pulling straight<br />
up (see Figure 26).<br />
d. Empty ashes from the inner section and scrape with cleaning tool;<br />
make sure holes are not plugged.<br />
e. Vacuum to remove ashes from the burn chamber interior and the<br />
burnpot shell.<br />
WARNING: Make sure ashes are cool to the touch<br />
before using a vacuum.<br />
See “VACUUM USE”.<br />
f. Dispose of ashes properly.<br />
(See “ASH REMOVAL” above)<br />
a. Replace inner section into burnpot; make sure it is level and pushed<br />
all the way back down and that the igniter hole is to the rear when it is<br />
reinstalled (see Figure 26).<br />
b. Make sure the burnpot is level and pushed all the way in, if the collar<br />
on the burnpot attached to the fresh air tube is not pushed back to<br />
meet the firebox wall, the Hot Rod will not work properly.<br />
Igniter Hole<br />
FIGURE 25<br />
VACUUM USE<br />
If a vacuum is used to clean your unit, we suggest using a vacuum<br />
designed for ashes.<br />
(We recommend LoveLess Ash Vac, 1-800-568-3949 Ext. #27)<br />
Some regular vacuums and shop vacs leak ash into the room. Your<br />
vacuum or shop vac may have a special filter or bag available to eliminate<br />
this leakage.<br />
CLEANING<br />
a. Heat Exchange Tubes – Your Breckwell stove is designed with a<br />
built-in heat exchange tube cleaner. This should be used every two or<br />
three days to remove accumulated ash on the tubes, which reduces<br />
heat transfer on the <strong>P22</strong>. Insert the handle end (with hole) of the<br />
cleaning tool onto the cleaning rod (refer to figure 25). The cleaner<br />
rod is located in the grill above the stove door. Move the cleaner rod<br />
back and forth several times to clean the heat exchanger tubes. Be<br />
sure to leave tube cleaner at the rear of the stove.<br />
b. Interior Chambers – Four ash doors in the firebox in the <strong>P22</strong> can be<br />
removed for periodic cleaning (refer to figure 27). These doors allow<br />
access to the chamber surrounding the firebox.<br />
Periodically, you must vacuum ashes from this chamber. In some<br />
cases you will need to remove creosote, which can accumulate<br />
rapidly under certain conditions. A small wire brush can be used. It is<br />
important to remove this creosote because it is highly combustible.<br />
INSPECT BEHIND THESE CLEANING PLATES AT LEAST ONCE<br />
PER TON OF PELLETS BURNED UNTIL YOU ARE FAMILIAR<br />
WITH HOW ASHES AND CREOSOTE ACCUMULATE WITH YOUR<br />
OPERATING PRACTICES. Use the small wire brush to also clean<br />
the inside of the chamber walls, above the access doors.<br />
FIGURE 26<br />
Air Switch Tube<br />
FIGURE 27<br />
www.<strong>Pellet</strong>King.com