P22 2004 Manual - Wood Pellet Stoves
P22 2004 Manual - Wood Pellet Stoves
P22 2004 Manual - Wood Pellet Stoves

Create successful ePaper yourself
Turn your PDF publications into a flip-book with our unique Google optimized e-Paper software.
INSTALLATION 7<br />
Equivalent Vent Length (EVL)<br />
The longer the run of pipe in your installation (both with inserts and<br />
freestandings), the more restriction there is in the system. Therefore,<br />
larger diameter pipe should be used.<br />
• Use 4” pipe if you have more than 15 feet of equivalent vent<br />
length.<br />
• Horizontal runs shall not exceed 10 feet of EVL.<br />
• It is recommended that vertical runs be a minimum of 8 feet.<br />
• To calculate EVL, use the following conversions:<br />
90º elbow or “T” = 5 equivalent feet<br />
45º elbow = 3 equivalent feet<br />
Horizontal Pipe Run<br />
Vertical Pipe Run<br />
= 1 equivalent foot per actual foot<br />
= 0.5 equivalent foot per actual foot<br />
NOTE: At altitudes above 3,000 feet, we suggest the use of 4”<br />
diameter vent at an EVL of 7 feet or more.<br />
FREESTANDING INSTALLATIONS<br />
A. ASSEMBLING PEDESTAL OR LEG SET<br />
If using a pedestal, follow the instructions inside the Breckwell <strong>P22</strong><br />
Pedestal Set Part # A-22-P (refer to figure 8).<br />
If using cast legs, follow the instructions inside the Breckwell <strong>P22</strong> Leg<br />
Set Part # A-CGL-22 or # A-CL-22.<br />
FIGURE 8<br />
Legs are installed by using the four bolts provided in the kit into the<br />
four holes under the stove at each corner, thread on nuts from the top<br />
and tighten. Make sure to save the hole plugs.<br />
NOTE: If converting from legs to pedestal the hole plugs must be<br />
installed in the unused holes.<br />
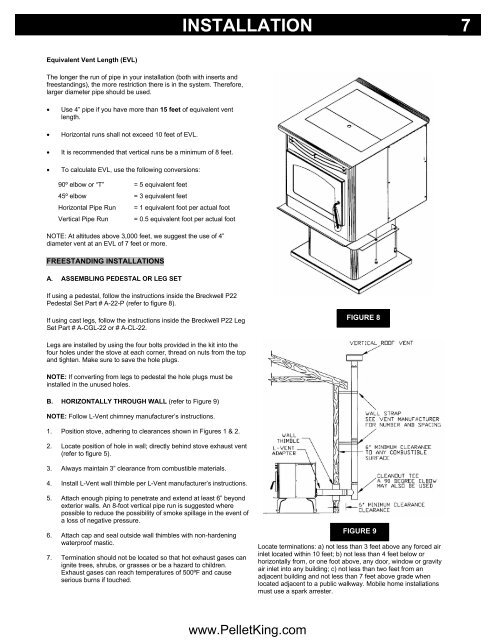
B. HORIZONTALLY THROUGH WALL (refer to Figure 9)<br />
NOTE: Follow L-Vent chimney manufacturer’s instructions.<br />
1. Position stove, adhering to clearances shown in Figures 1 & 2.<br />
2. Locate position of hole in wall; directly behind stove exhaust vent<br />
(refer to figure 5).<br />
3. Always maintain 3” clearance from combustible materials.<br />
4. Install L-Vent wall thimble per L-Vent manufacturer’s instructions.<br />
5. Attach enough piping to penetrate and extend at least 6” beyond<br />
exterior walls. An 8-foot vertical pipe run is suggested where<br />
possible to reduce the possibility of smoke spillage in the event of<br />
a loss of negative pressure.<br />
6. Attach cap and seal outside wall thimbles with non-hardening<br />
waterproof mastic.<br />
7. Termination should not be located so that hot exhaust gases can<br />
ignite trees, shrubs, or grasses or be a hazard to children.<br />
Exhaust gases can reach temperatures of 500ºF and cause<br />
serious burns if touched.<br />
FIGURE 9<br />
Locate terminations: a) not less than 3 feet above any forced air<br />
inlet located within 10 feet; b) not less than 4 feet below or<br />
horizontally from, or one foot above, any door, window or gravity<br />
air inlet into any building; c) not less than two feet from an<br />
adjacent building and not less than 7 feet above grade when<br />
located adjacent to a public walkway. Mobile home installations<br />
must use a spark arrester.<br />
www.<strong>Pellet</strong>King.com