

Slide Hammer and Bearing Puller Set - Harbor Freight Tools
Slide Hammer and Bearing Puller Set - Harbor Freight Tools
Slide Hammer and Bearing Puller Set - Harbor Freight Tools

Create successful ePaper yourself
Turn your PDF publications into a flip-book with our unique Google optimized e-Paper software.
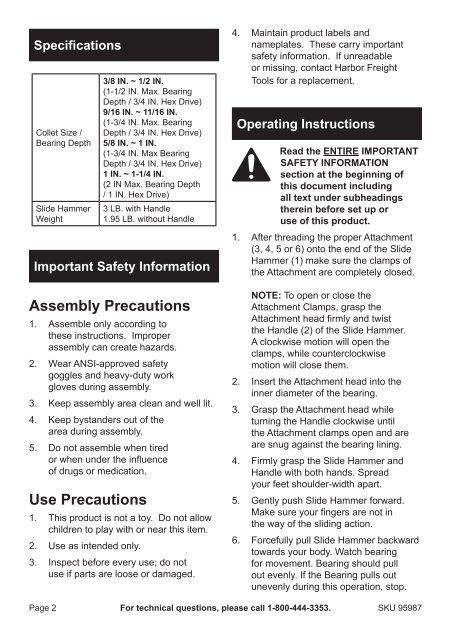
Specifications<br />
Collet Size /<br />
<strong>Bearing</strong> Depth<br />
<strong>Slide</strong> <strong>Hammer</strong><br />
Weight<br />
3/8 IN. ~ 1/2 IN.<br />
(1-1/2 IN. Max. <strong>Bearing</strong><br />
Depth / 3/4 IN. Hex Drive)<br />
9/16 IN. ~ 11/16 IN.<br />
(1-3/4 IN. Max. <strong>Bearing</strong><br />
Depth / 3/4 IN. Hex Drive)<br />
5/8 IN. ~ 1 IN.<br />
(1-3/4 IN. Max <strong>Bearing</strong><br />
Depth / 3/4 IN. Hex Drive)<br />
1 IN. ~ 1-1/4 IN.<br />
(2 IN Max. <strong>Bearing</strong> Depth<br />
/ 1 IN. Hex Drive)<br />
3 LB. with H<strong>and</strong>le<br />
1.95 LB. without H<strong>and</strong>le<br />
Important Safety Information<br />
Assembly Precautions<br />
1. Assemble only according to<br />
these instructions. Improper<br />
assembly can create hazards.<br />
2. Wear ANSI-approved safety<br />
goggles <strong>and</strong> heavy-duty work<br />
gloves during assembly.<br />
3. Keep assembly area clean <strong>and</strong> well lit.<br />
4. Keep byst<strong>and</strong>ers out of the<br />
area during assembly.<br />
5. Do not assemble when tired<br />
or when under the influence<br />
of drugs or medication.<br />
Use Precautions<br />
1. This product is not a toy. Do not allow<br />
children to play with or near this item.<br />
2. Use as intended only.<br />
3. Inspect before every use; do not<br />
use if parts are loose or damaged.<br />
4. Maintain product labels <strong>and</strong><br />
nameplates. These carry important<br />
safety information. If unreadable<br />
or missing, contact <strong>Harbor</strong> <strong>Freight</strong><br />
<strong>Tools</strong> for a replacement.<br />
Operating Instructions<br />
Read the ENTIRE IMPORTANT<br />
SAFETY INFORMATION<br />
section at the beginning of<br />
this document including<br />
all text under subheadings<br />
therein before set up or<br />
use of this product.<br />
1. After threading the proper Attachment<br />
(3, 4, 5 or 6) onto the end of the <strong>Slide</strong><br />
<strong>Hammer</strong> (1) make sure the clamps of<br />
the Attachment are completely closed.<br />
NOTE: To open or close the<br />
Attachment Clamps, grasp the<br />
Attachment head firmly <strong>and</strong> twist<br />
the H<strong>and</strong>le (2) of the <strong>Slide</strong> <strong>Hammer</strong>.<br />
A clockwise motion will open the<br />
clamps, while counterclockwise<br />
motion will close them.<br />
2. Insert the Attachment head into the<br />
inner diameter of the bearing.<br />
3. Grasp the Attachment head while<br />
turning the H<strong>and</strong>le clockwise until<br />
the Attachment clamps open <strong>and</strong> are<br />
are snug against the bearing lining.<br />
4. Firmly grasp the <strong>Slide</strong> <strong>Hammer</strong> <strong>and</strong><br />
H<strong>and</strong>le with both h<strong>and</strong>s. Spread<br />
your feet shoulder-width apart.<br />
5. Gently push <strong>Slide</strong> <strong>Hammer</strong> forward.<br />
Make sure your fingers are not in<br />
the way of the sliding action.<br />
6. Forcefully pull <strong>Slide</strong> <strong>Hammer</strong> backward<br />
towards your body. Watch bearing<br />
for movement. <strong>Bearing</strong> should pull<br />
out evenly. If the <strong>Bearing</strong> pulls out<br />
unevenly during this operation, stop.<br />
Page 2 For technical questions, please call 1-800-444-3353. SKU 95987


