o2 DSL Router Premium
o2 DSL Router Premium
o2 DSL Router Premium

You also want an ePaper? Increase the reach of your titles
YUMPU automatically turns print PDFs into web optimized ePapers that Google loves.
O 2 <strong>DSL</strong> <strong>Router</strong> <strong>Premium</strong><br />
Quick start guide<br />
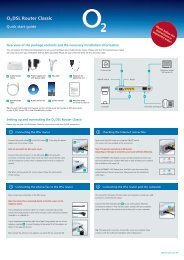
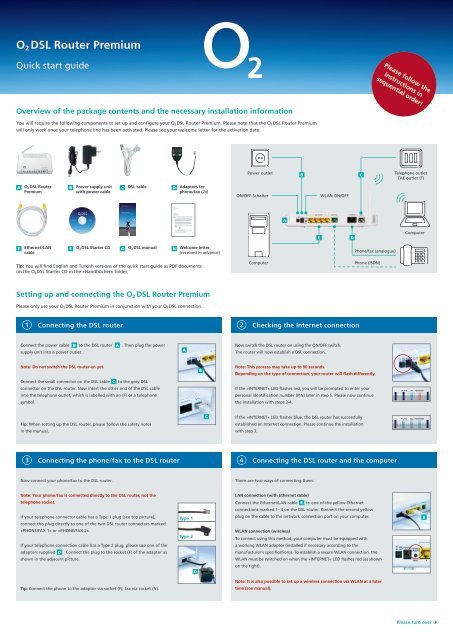
Overview of the package contents and the necessary installation information<br />
You will require the following components to set up and configure your O2 <strong>DSL</strong> <strong>Router</strong> <strong>Premium</strong>. Please note that the O2 <strong>DSL</strong> <strong>Router</strong> <strong>Premium</strong><br />
will only work once your telephone line has been activated. Please see your welcome letter for the activation date.<br />
A O2 <strong>DSL</strong> <strong>Router</strong> B Power supply unit C <strong>DSL</strong> cable D Adaptors for<br />
<strong>Premium</strong><br />
with power cable<br />
phone/fax (2x)<br />
Setting up and connecting the O 2 <strong>DSL</strong> <strong>Router</strong> <strong>Premium</strong><br />
Please only use your O2 <strong>DSL</strong> <strong>Router</strong> <strong>Premium</strong> in conjunction with your O2 <strong>DSL</strong> connection.<br />
Power outlet<br />
B<br />
C<br />
Telephone outlet<br />
TAE outlet (F)<br />
ON/OFF-Schalter<br />
Computer<br />
A<br />
E<br />
WLAN ON/OFF<br />
1 Connecting the <strong>DSL</strong> router 2 Checking the Internet connection<br />
Connect the power cable B to the <strong>DSL</strong> router A . Then plug the power<br />
supply unit into a power outlet.<br />
Note: Do not switch the <strong>DSL</strong> router on yet.<br />
Connect the small connector on the <strong>DSL</strong> cable C to the grey <strong>DSL</strong><br />
connector on the <strong>DSL</strong> router. Now insert the other end of the <strong>DSL</strong> cable<br />
into the telephone outlet, which is labelled with an (F) or a telephone<br />
symbol.<br />
Tip: When setting up the <strong>DSL</strong> router, please follow the safety notes<br />
in the manual.<br />
3<br />
Connecting the phone/fax to the <strong>DSL</strong> router<br />
Now connect your phone/fax to the <strong>DSL</strong> router.<br />
Note: Your phone/fax is connected directly to the <strong>DSL</strong> router, not the<br />
telephone socket.<br />
If your telephone connector cable has a Type 1 plug (see top picture),<br />
connect this plug directly to one of the two <strong>DSL</strong> router connectors marked<br />
»PHONE/FAX 1« or »PHONE/FAX 2«.<br />
If your telephone connection cable has a Type 2 plug, please use one of the<br />
adaptors supplied D . Connect the plug to the socket (F) of the adaptor as<br />
shown in the adjacent picture.<br />
Tip: Connect the phone to the adaptor via socket (F); fax via socket (N).<br />
27. Oktober 2006<br />
Herzlich willkommen bei O <strong>DSL</strong><br />
Guten Tag Herr Mustermann,<br />
vielen Dank für Ihren Auftrag. Wir freuen uns, dass Sie sich für O <strong>DSL</strong> entschieden haben. Eine gute Wahl<br />
– denn mit Ihrem O <strong>DSL</strong> Anschluss können Sie kostengünstig telefonieren und schnell im Internet surfen.<br />
Und so geht’s:<br />
1. Termin für die Freischaltung: 27. Oktober 2006 zwischen 08:00 Uhr und 14:00 Uhr<br />
An diesem Tag wird ein Techniker der T-Com zu Ihnen nach Hause kommen, um die Telefondose<br />
für O <strong>DSL</strong> freizuschalten. Bitte ermöglichen Sie den Zugang zu der Dose und gegebenenfalls zu<br />
den Telefonverteilerkästen im Haus. Es kommt auch vor, dass der Techniker den Anschluss<br />
freischaltet, ohne ins Haus kommen zu müssen. Für den Fall nehmen Sie bitte den <strong>Router</strong> in<br />
Betrieb und probieren, ob der Anschluss funktioniert.<br />
Bitte stellen Sie sicher, dass Sie oder eine von Ihnen beauftragte Person zum angekündigten<br />
Termin anwesend sind und der Techniker Zugang zu allen notwendigen Anschlüssen hat.<br />
Ist ein neuer Technikertermin nötig, da Sie zum vereinbarten Termin nicht angetroffen werden<br />
konnten, stellen wir Ihnen die Kosten für den Techniker in Höhe von 59 Euro in Rechnung.<br />
Natürlich ist eine vorzeitige Verschiebung des Termins für Sie kostenfrei.<br />
2. Folgende Rufnummern werden spätestens 48 Stunden nach erfolgreicher Freischaltung für<br />
Sie aktiviert:<br />
05241/ 9081064<br />
9081065<br />
9081066<br />
9081067<br />
3. Bitte gut aufbewahren: Ihr WLAN-Schlüssel & Ihre PIN.<br />
Um Ihr drahtloses Netzwerk vor Fremdzugriffen zu schützen, erhalten Sie hier Ihr Passwort für die<br />
Einrichtung des <strong>Router</strong>s. Achten Sie bitte auf Groß- und Kleinschreibung.<br />
Ihr persönlicher WLAN-Schlüssel lautet: nfElymEIOxXCn<br />
E Ethernet/LAN F O2 <strong>DSL</strong> Starter CD G O2 <strong>DSL</strong> manual H Welcome letter<br />
cable<br />
(received in advance)<br />
Tip: You will find English and Turkish versions of the quick start guide as PDF documents<br />
on the O 2 <strong>DSL</strong> Starter CD in the »Handbücher« folder.<br />
( N) ( F)<br />
Fax Telefon<br />
Herr<br />
Max Mustermann<br />
Georg-Brauchle-Ring 23-25<br />
80992 München<br />
A<br />
Type 1<br />
Type 2<br />
D<br />
B<br />
C<br />
Now switch the <strong>DSL</strong> router on using the ON/OFF switch.<br />
The router will now establish a <strong>DSL</strong> connection.<br />
Note: This process may take up to 90 seconds.<br />
D<br />
Phone/fax (analogue)<br />
Phone (ISDN)<br />
Depending on the type of connection, your router will flash differently.<br />
If the »INTERNET« LED flashes red, you will be prompted to enter your<br />
personal identification number (PIN) later in step 5. Please now continue<br />
the installation with steps 3-4.<br />
If the »INTERNET« LED flashes blue, the <strong>DSL</strong> router has successfully<br />
established an Internet connection. Please continue the installation<br />
with step 3.<br />
4<br />
Connecting the <strong>DSL</strong> router and the computer<br />
There are two ways of connecting them:<br />
LAN connection (with Ethernet cable)<br />
Connect the Ethernet/LAN cable E to one of the yellow Ethernet<br />
connections marked 1– 4 on the <strong>DSL</strong> router. Connect the second yellow<br />
plug on the cable to the network connection port on your computer.<br />
WLAN connection (wireless)<br />
To connect using this method, your computer must be equipped with<br />
a working WLAN adaptor (installed if necessary according to the<br />
manufacturer‘s specifications). To establish a secure WLAN connection, the<br />
WLAN must be switched on when the »INTERNET« LED flashes red (as shown<br />
on the right).<br />
Note: It is also possible to set up a wireless connection via WLAN at a later<br />
time (see manual).<br />
Please follow the<br />
instructions in<br />
sequential order!<br />
Computer<br />
E<br />
Please turn over
Software installation and configuration – only Microsoft Windows operating systems<br />
Users of other operating systems such as Mac OS or Linux can configure their network settings directly using the graphical user interface of the <strong>DSL</strong> router. This can be accessed via a browser at the<br />
following URL: http://192.168.1.1 (password: 1234). The <strong>DSL</strong> router works with the following browsers: Internet Explorer ® (5.5 or above), Firefox ® (1.4 or above), Netscape ® (7 or above), Opera ® (9.0<br />
or above), Safari ® (1.3.2 or above) or Konqueror ® (3.4.0 or above). Further tips can be found in the O 2 <strong>DSL</strong> <strong>Router</strong> user instructions on the O 2 <strong>DSL</strong> Starter CD.<br />
5<br />
If the »INTERNET« LED flashes red, you must now enter your personal identification number (PIN).<br />
To do so, launch your Internet browser.<br />
If you are not automatically prompted to enter your PIN, enter the address http://192.168.1.1 in<br />
your browser‘s address bar. On the page that is now displayed, enter the PIN that you received in<br />
your welcome letter.<br />
Note: Once you have entered the PIN, your router will be restarted.<br />
7<br />
8<br />
Entering your PIN (only if »INTERNET« LED flashes red)<br />
Quick configuration of the network and <strong>DSL</strong> router<br />
7.1 Start configuration wizard<br />
Please select the option »Schnelleinrichtung«<br />
and confirm by clicking on »Weiter«.<br />
Tip: The Windows XP and Vista integrated firewall<br />
is auto-ma tically deactivated and reactivated once<br />
the configuration is complete. If you use other<br />
firewall software, you must ensure that this is<br />
deactivated.<br />
Completion of quick configuration<br />
After successful configuration of your network and <strong>DSL</strong> router, the O 2 <strong>DSL</strong><br />
Connection Manager will start automatically.<br />
This program makes it easier for you to manage your <strong>DSL</strong> router and your<br />
<strong>DSL</strong> connection. You can directly view and amend the settings of the <strong>DSL</strong><br />
router using the O2 <strong>DSL</strong> Connection Manager, as well as implementing<br />
error diagnoses.<br />
You can find further information about this in the »<strong>DSL</strong> Connection<br />
Manager« manual on the O2 <strong>DSL</strong> Starter CD F .<br />
Customer support<br />
7.2 Entering your WLAN key<br />
(Only when using WLAN)<br />
If you are using WLAN, you will now be asked<br />
via a pop-up window to enter your WLAN key.<br />
You will find your WLAN key in your welcome<br />
letter H<br />
.<br />
Note: WLAN key input is case-sensitive.<br />
Our customer support hotline is available to assist you with the setup<br />
of your O2 <strong>DSL</strong> <strong>Router</strong> <strong>Premium</strong>, the WLAN configuration and for any other<br />
questions you may have regarding the full functionality of the <strong>DSL</strong> router.<br />
On the O 2 <strong>DSL</strong> Starter CD you will find the O 2 <strong>DSL</strong> Connection Manager, which<br />
will help you configure your network and <strong>DSL</strong> router.<br />
Switch your computer on and place the O2 <strong>DSL</strong> Starter CD F into the CD-ROM<br />
drive. Please close all open programs.<br />
Note: If installation does not start automatically, you can start it manually<br />
by double-clicking on the program cdrun.exe.<br />
Select the item »<strong>DSL</strong> Connection Manager installieren« on the welcome screen<br />
and follow the instructions. Your computer must be restarted after successful<br />
installation. After the restart, the O2 <strong>DSL</strong> Connection Manager Configuration<br />
Wizard will start automatically.<br />
Tip: Your network can also be configured without the O 2 <strong>DSL</strong> Connection<br />
Manager. To do so, all the necessary settings must be made manually via the<br />
user interface of the <strong>DSL</strong> router (see above – Users of other operating systems).<br />
9<br />
Installing the software<br />
Verifying the installation<br />
If the <strong>DSL</strong> router LEDs are illuminated as shown below, your O 2 <strong>DSL</strong> is ready for use.<br />
You can now surf with your O 2 <strong>DSL</strong>. Your phone/fax is also now operational.<br />
If there is more than one Ethernet/LAN connection, the corresponding LEDs also illuminate.<br />
Note: If the LEDs are not illuminated as shown, please verify each installation step or call our<br />
customer support hotline.<br />
2009.<br />
Contact our hotline:<br />
August<br />
• From a landline: dial +49(0)18 05. 62 43 57 (<strong>o2</strong>HELP) – for 14 cents per minute.<br />
• If you have an O2 Germany mobile phone contract, call from the O2 Germany<br />
Revised:<br />
mobile phone network on +49(0)179. 55222 – free of charge.<br />
excepted.<br />
If our hotline is unable to assist you, we will gladly send a service technician<br />
to your home at your request. Errors<br />
6<br />
7.3 Automatic configuration<br />
Your computer and <strong>DSL</strong> router will now be<br />
automatically configured according to the<br />
highest possible WLAN security standard.<br />
Confirm the configuration by clicking »Weiter«.<br />
7.4 Printing and saving the settings<br />
After the successful configuration, you can print<br />
the current settings. You will need these to make<br />
any subsequent changes to the configuration.<br />
Alternatively, you can also save the settings.<br />
Complete the configuration by clicking »Fertig<br />
stellen«.<br />
O 2 wishes you hours of happy surfing and <strong>DSL</strong> telephoning with O 2 <strong>DSL</strong>!<br />
F