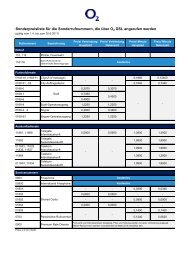
o2 DSL Router Classic
o2 DSL Router Classic
o2 DSL Router Classic

Create successful ePaper yourself
Turn your PDF publications into a flip-book with our unique Google optimized e-Paper software.
O 2 <strong>DSL</strong> <strong>Router</strong> <strong>Classic</strong><br />
Quick start guide<br />
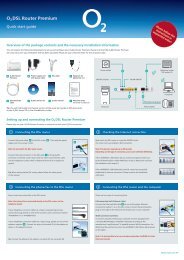
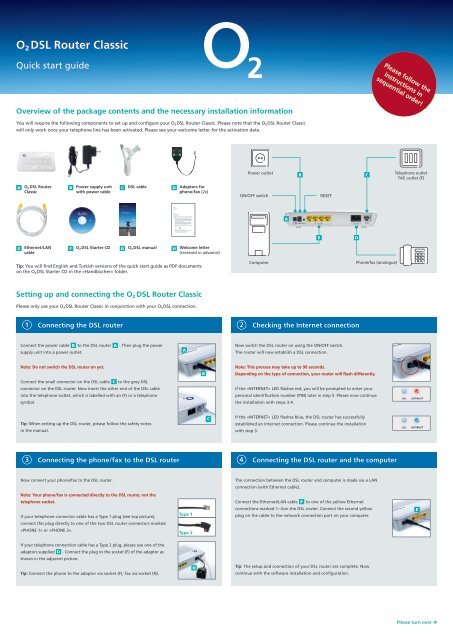
Overview of the package contents and the necessary installation information<br />
You will require the following components to set up and configure your O2 <strong>DSL</strong> <strong>Router</strong> <strong>Classic</strong>. Please note that the O2 <strong>DSL</strong> <strong>Router</strong> <strong>Classic</strong><br />
will only work once your telephone line has been activated. Please see your welcome letter for the activation date.<br />
A O2 <strong>DSL</strong> <strong>Router</strong> B Power supply unit C <strong>DSL</strong> cable D Adaptors for<br />
<strong>Classic</strong><br />
with power cable<br />
phone/fax (2x)<br />
E Ethernet/LAN<br />
cable<br />
F O2 <strong>DSL</strong> Starter CD G O2 <strong>DSL</strong> manual H Welcome letter<br />
Herr<br />
Max (received Mustermann in advance)<br />
Georg-Brauchle-Ring 23-25<br />
Setting up and connecting the O 2 <strong>DSL</strong> <strong>Router</strong> <strong>Classic</strong><br />
Please only use your O2 <strong>DSL</strong> <strong>Router</strong> <strong>Classic</strong> in conjunction with your O2 <strong>DSL</strong> connection.<br />
1 Connecting the <strong>DSL</strong> router<br />
Guten Tag Herr Mustermann, 2 Checking the Internet connection<br />
Connect the power cable B to the <strong>DSL</strong> router A . Then plug the power<br />
supply unit into a power outlet.<br />
Note: Do not switch the <strong>DSL</strong> router on yet.<br />
Connect the small connector on the <strong>DSL</strong> cable C to the grey <strong>DSL</strong><br />
connector on the <strong>DSL</strong> router. Now insert the other end of the <strong>DSL</strong> cable<br />
into the telephone outlet, which is labelled with an (F) or a telephone<br />
symbol.<br />
Tip: When setting up the <strong>DSL</strong> router, please follow the safety notes<br />
in the manual.<br />
3<br />
Connecting the phone/fax to the <strong>DSL</strong> router<br />
Now connect your phone/fax to the <strong>DSL</strong> router.<br />
Note: Your phone/fax is connected directly to the <strong>DSL</strong> router, not the<br />
telephone socket.<br />
If your telephone connector cable has a Type 1 plug (see top picture),<br />
connect this plug directly to one of the two <strong>DSL</strong> router connectors marked<br />
»PHONE 1« or »PHONE 2«.<br />
If your telephone connection cable has a Type 2 plug, please use one of the<br />
adaptors supplied D . Connect the plug to the socket (F) of the adaptor as<br />
shown in the adjacent picture.<br />
Tip: Connect the phone to the adaptor via socket (F); fax via socket (N).<br />
Herr<br />
Max Mustermann<br />
Georg-Brauchle-Ring 23-25<br />
80992 München<br />
27. Oktober 2006<br />
Herzlich willkommen bei O <strong>DSL</strong><br />
Guten Tag Herr Mustermann,<br />
vielen Dank für Ihren Auftrag. Wir freuen uns, dass Sie sich für O <strong>DSL</strong> entschieden haben. Eine gute Wahl<br />
– denn mit Ihrem O <strong>DSL</strong> Anschluss können Sie kostengünstig telefonieren und schnell im Internet surfen.<br />
Und so geht’s:<br />
1. Termin für die Freischaltung: 27. Oktober 2006 zwischen 08:00 Uhr und 14:00 Uhr<br />
An diesem Tag wird ein Techniker der T-Com zu Ihnen nach Hause kommen, um die Telefondose<br />
für O <strong>DSL</strong> freizuschalten. Bitte ermöglichen Sie den Zugang zu der Dose und gegebenenfalls zu<br />
den Telefonverteilerkästen im Haus. Es kommt auch vor, dass der Techniker den Anschluss<br />
freischaltet, ohne ins Haus kommen zu müssen. Für den Fall nehmen Sie bitte den <strong>Router</strong> in<br />
Betrieb und probieren, ob der Anschluss funktioniert.<br />
Bitte stellen Sie sicher, dass Sie oder eine von Ihnen beauftragte Person zum angekündigten<br />
Termin anwesend sind und der Techniker Zugang zu allen notwendigen Anschlüssen hat.<br />
Ist ein neuer Technikertermin nötig, da Sie zum vereinbarten Termin nicht angetroffen werden<br />
konnten, stellen wir Ihnen die Kosten für den Techniker in Höhe von 59 Euro in Rechnung.<br />
Natürlich ist eine vorzeitige Verschiebung des Termins für Sie kostenfrei.<br />
2. Folgende Rufnummern werden spätestens 48 Stunden nach erfolgreicher Freischaltung für<br />
Sie aktiviert:<br />
05241/ 9081064<br />
9081065<br />
9081066<br />
9081067<br />
3. Bitte gut aufbewahren: Ihr WLAN-Schlüssel & Ihre PIN.<br />
Um Ihr drahtloses Netzwerk vor Fremdzugriffen zu schützen, erhalten Sie hier Ihr Passwort für die<br />
Einrichtung des <strong>Router</strong>s. Achten Sie bitte auf Groß- und Kleinschreibung.<br />
Ihr persönlicher WLAN-Schlüssel lautet: nfElymEIOxXCn<br />
Tip: You will find English and Turkish versions of the quick start guide as PDF 80992 documents München<br />
on the O2 <strong>DSL</strong> Starter CD in the »Handbücher« folder.<br />
( N) ( F)<br />
Fax Telefon<br />
27. Oktober 2006<br />
Herzlich willkommen bei O2 <strong>DSL</strong><br />
vielen Dank für Ihren Auftrag. Wir freuen uns, dass Sie sich für O2 <strong>DSL</strong> entschieden haben. Eine gute Wahl<br />
– denn mit Ihrem O2 <strong>DSL</strong> Anschluss können Sie kostengünstig telefonieren und schnell im Internet surfen.<br />
Und so geht’s:<br />
Now switch the <strong>DSL</strong> router on using the ON/OFF switch.<br />
1. A Termin für die Freischaltung: 27. Oktober 2006 zwischen 08:00 Uhr und 14:00 Uhr<br />
The router will now establish a <strong>DSL</strong> connection.<br />
An diesem Tag wird ein Techniker der T-Com zu Ihnen nach Hause kommen, um die Telefondose<br />
für O2 <strong>DSL</strong> freizuschalten. Bitte ermöglichen Sie den Zugang zu der Dose und gegebenenfalls zu<br />
den Telefonverteilerkästen im Note: Haus. This Es kommt process auch may vor, dass take der up Techniker to 90 seconds. den Anschluss<br />
freischaltet, ohne ins Haus kommen zu müssen. Für den Fall nehmen Sie bitte den <strong>Router</strong> in<br />
Betrieb und B probieren, ob der Depending Anschluss funktioniert. on the type of connection, your router will flash differently.<br />
Bitte stellen Sie sicher, dass Sie oder eine von Ihnen beauftragte Person zum angekündigten<br />
Termin anwesend sind und der If the Techniker »INTERNET« Zugang zu LED allen flashes notwendigen red, you Anschlüssen will be prompted hat. to enter your<br />
Ist ein neuer Technikertermin nötig, da Sie zum vereinbarten Termin nicht angetroffen werden<br />
konnten, stellen wir Ihnen die personal Kosten für identification den Techniker in number Höhe von (PIN) 59 Euro later in Rechnung. in step 5. Please now continue<br />
the installation with steps 3-4.<br />
Natürlich ist eine vorzeitige Verschiebung des Termins für Sie kostenfrei.<br />
2. Folgende Rufnummern werden spätestens 48 Stunden nach erfolgreicher Freischaltung für<br />
Sie aktiviert:<br />
If the »INTERNET« LED flashes blue, the <strong>DSL</strong> router has successfully<br />
C<br />
established an Internet connection. Please continue the installation<br />
05241/ 9081064<br />
9081065 with step 3.<br />
9081066<br />
9081067<br />
Type 1<br />
Type 2<br />
D<br />
Power outlet<br />
ON/OFF switch<br />
Telefónica O 2 Germany GmbH & Co. OHG · Kundenbetreuung/<strong>DSL</strong>-WB · 90345 Nürnberg<br />
Computer<br />
A<br />
B<br />
RESET<br />
3. Bitte gut aufbewahren: Ihr WLAN-Schlüssel & Ihre PIN.<br />
Um Ihr drahtloses Netzwerk vor 4Fremdzugriffen<br />
zu schützen, erhalten Sie hier Ihr Passwort für die<br />
Einrichtung des <strong>Router</strong>s. Achten Sie bitte auf Groß- und Kleinschreibung.<br />
Ihr persönlicher WLAN-Schlüssel lautet: nfElymEIOxXCn<br />
Connecting the <strong>DSL</strong> router and the computer<br />
The connection between the <strong>DSL</strong> router and computer is made via a LAN<br />
connection (with Ethernet cable).<br />
Telefónica O2 Germany GmbH & Co. OHG • Georg-Brauchle-Ring 23-25 • 80992 München • Deutschland •<br />
www.<strong>o2</strong>.com/de<br />
Ust.-Id.-Nr. DE 811 889 638. Amtsgericht München HRA 70343. Gesellschafter: Telefónica O 2 Germany Management GmbH, Amtsgericht München HRB 109061<br />
und Telefónica O 2 Germany Verwaltungs GmbH, Amtsgericht München HRB 121389, beide ebenda. Geschäftsführer beider Gesellschafter: Jaime Smith Basterra,<br />
Vorsitzender. Antonio Botas Banuelos. Andrea Folgueiras. André Krause. Lutz Schüler. Carsten Wreth.<br />
Connect the Ethernet/LAN cable E to one of the yellow Ethernet<br />
connections marked 1– 4 on the <strong>DSL</strong> router. Connect the second yellow<br />
plug on the cable to the network connection port on your computer.<br />
Tip: The setup and connection of your <strong>DSL</strong> router are complete. Now<br />
continue with the software installation and configuration.<br />
E<br />
Kundenbetreuung<br />
m 49 (0)179 55 222<br />
(kostenfrei über das O2 Mobilfunknetz)<br />
t 01805 55 56 10**<br />
f 0800 10 90 060 (kostenfrei)<br />
www.<strong>o2</strong>online.de<br />
Kundennummer: S -13474245<br />
D<br />
C<br />
Please follow the<br />
instructions in<br />
sequential order!<br />
Phone/fax (analogue)<br />
Telephone outlet<br />
TAE outlet (F)<br />
E<br />
Please turn over
Software installation and configuration – only Microsoft Windows operating systems<br />
Users of other operating systems such as Mac OS or Linux can configure their network settings directly using the graphical user interface of the <strong>DSL</strong> router. This can be accessed via a browser at the<br />
following URL: http://192.168.1.1 (password: 1234). The <strong>DSL</strong> router works with the following browsers: Internet Explorer ® (5.5 or above), Firefox ® (1.4 or above), Netscape ® (7 or above), Opera ® (9.0<br />
or above), Safari ® (1.3.2 or above) or Konqueror ® (3.4.0 or above). Further tips can be found in the O 2 <strong>DSL</strong> <strong>Router</strong> user instructions on the O 2 <strong>DSL</strong> Starter CD.<br />
5 Entering your PIN (only if »INTERNET« LED flashes red)<br />
If the »INTERNET« LED flashes red, you must now enter your personal identification number (PIN).<br />
To do so, launch your Internet browser.<br />
If you are not automatically prompted to enter your PIN, enter the address http://192.168.1.1 in<br />
your browser‘s address bar. On the page that is now displayed, enter the PIN that you received in<br />
your welcome letter.<br />
Note: Once you have entered the PIN, your router will be restarted.<br />
7<br />
Completion of quick configuration<br />
After successful configuration of your network and <strong>DSL</strong> router, the O 2 <strong>DSL</strong><br />
Connection Manager will start automatically.<br />
This program makes it easier for you to manage your <strong>DSL</strong> router and your<br />
<strong>DSL</strong> connection. You can directly view and amend the settings of the <strong>DSL</strong><br />
router using the O2 <strong>DSL</strong> Connection Manager, as well as implementing<br />
error diagnoses.<br />
You can find further information about this in the »<strong>DSL</strong> Connection<br />
Manager« manual on the O2 <strong>DSL</strong> Starter CD F .<br />
Customer support<br />
Our customer support hotline is available to assist you with the setup<br />
of your O2 <strong>DSL</strong> <strong>Router</strong> <strong>Classic</strong> and for any other questions you may have<br />
regarding the full functionality of the <strong>DSL</strong> router.<br />
Contact our hotline:<br />
• From a landline: dial +49 (0)18 05. 62 43 57 (<strong>o2</strong>HELP) – for 14 cents per minute.<br />
• If you have an O2 Germany mobile phone contract, call from the O2 Germany<br />
mobile phone network on +49(0)179. 55222 – free of charge.<br />
If our hotline is unable to assist you, we will gladly send a service technician<br />
to your home at your request.<br />
6<br />
Installing the software<br />
On the O2 <strong>DSL</strong> Starter CD you will find the O2 <strong>DSL</strong> Connection Manager, which<br />
will help you configure your network and <strong>DSL</strong> router.<br />
Switch your computer on and place the O2 <strong>DSL</strong> Starter CD F into the<br />
CD-ROM drive. Please close all open programs.<br />
Note: If installation does not start automatically, you can start it manually<br />
by double-clicking on the program cdrun.exe.<br />
Select the item »<strong>DSL</strong> Connection Manager installieren« on the welcome screen<br />
and follow the instructions. Your computer must be restarted after successful<br />
installation. After the restart, the O2 <strong>DSL</strong> Connection Manager Configuration<br />
Wizard will start automatically.<br />
Tip: Your network can also be configured without the O 2 <strong>DSL</strong> Connection<br />
Manager. To do so, all the necessary settings must be made manually via the<br />
user interface of the <strong>DSL</strong> router (see above – Users of other operating systems).<br />
8<br />
Verifying the installation<br />
If the <strong>DSL</strong> router LEDs are illuminated as shown below, your O2 <strong>DSL</strong> is ready for use.<br />
You can now surf with your O2 <strong>DSL</strong>. Your phone/fax is also now operational.<br />
If there is more than one Ethernet/LAN connection, the corresponding LEDs also illuminate.<br />
Note: If the LEDs are not illuminated as shown, please verify each installation step or call our<br />
customer support hotline.<br />
O 2 wishes you hours of happy surfing and <strong>DSL</strong> telephoning with O 2 <strong>DSL</strong>!<br />
F<br />
Errors excepted. Revised: August 2009.